length VOLVO V90 CROSS COUNTRY 2018 Owner´s Manual
[x] Cancel search | Manufacturer: VOLVO, Model Year: 2018, Model line: V90 CROSS COUNTRY, Model: VOLVO V90 CROSS COUNTRY 2018Pages: 662, PDF Size: 11.93 MB
Page 196 of 662
SEATS AND STEERING WHEEL
* Option/accessory.
194
Adjusting front seat side bolster
settings *
The settings can be adjusted using either the multifunction control * on the seat or the center
display. The adjustment settings are shown in the center display.
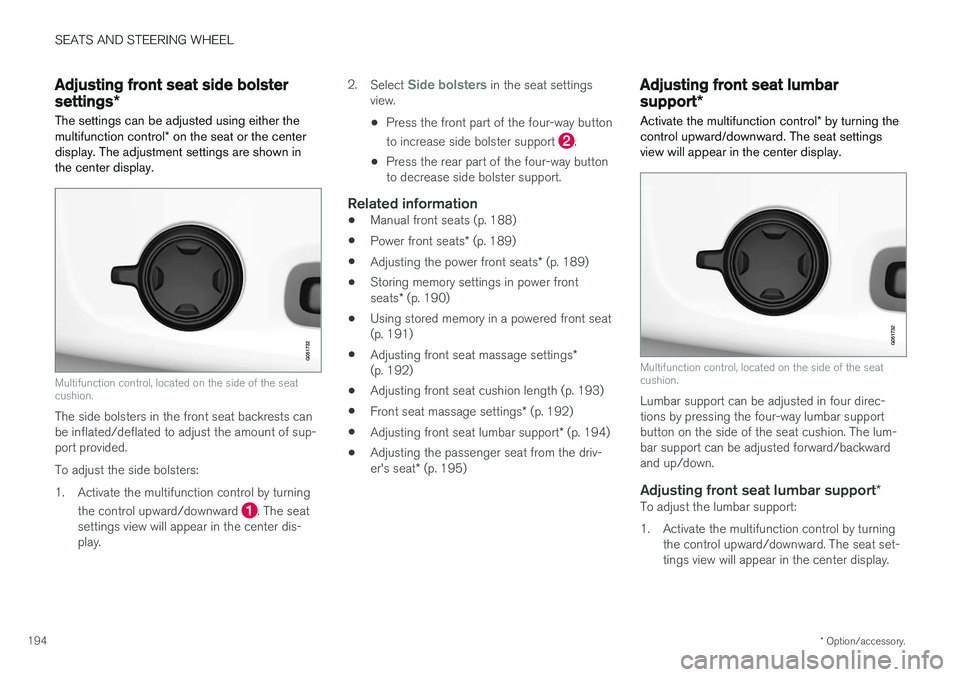
Multifunction control, located on the side of the seat cushion.
The side bolsters in the front seat backrests can be inflated/deflated to adjust the amount of sup-port provided. To adjust the side bolsters:
1. Activate the multifunction control by turning
the control upward/downward
. The seat
settings view will appear in the center dis- play. 2.
Select
Side bolsters in the seat settings
view.
• Press the front part of the four-way button to increase side bolster support
.
• Press the rear part of the four-way button to decrease side bolster support.
Related information
• Manual front seats (p. 188)
• Power front seats
* (p. 189)
• Adjusting the power front seats
* (p. 189)
• Storing memory settings in power front seats
* (p. 190)
• Using stored memory in a powered front seat (p. 191)
• Adjusting front seat massage settings
*
(p. 192)
• Adjusting front seat cushion length (p. 193)
• Front seat massage settings
* (p. 192)
• Adjusting front seat lumbar support
* (p. 194)
• Adjusting the passenger seat from the driv- er's seat
* (p. 195)
Adjusting front seat lumbar
support *
Activate the multifunction control * by turning the
control upward/downward. The seat settings view will appear in the center display.
Multifunction control, located on the side of the seat cushion.
Lumbar support can be adjusted in four direc- tions by pressing the four-way lumbar supportbutton on the side of the seat cushion. The lum-bar support can be adjusted forward/backwardand up/down.
Adjusting front seat lumbar support *To adjust the lumbar support:
1. Activate the multifunction control by turning
the control upward/downward. The seat set- tings view will appear in the center display.
Page 197 of 662
SEATS AND STEERING WHEEL
}}
* Option/accessory.195
2.
Select
Lumbar in the seat settings view.
• Press the four-way button (the round but- ton) up/down to move the lumbar supportupward/downward.
• Press the front part of the four-way buttonto increase lumbar support.
• Press the rear part of the four-way buttonto decrease lumbar support.
Related information
•
Manual front seats (p. 188)
• Power front seats
* (p. 189)
• Adjusting the power front seats
* (p. 189)
• Storing memory settings in power front seats
* (p. 190)
• Using stored memory in a powered front seat (p. 191)
• Adjusting front seat massage settings
*
(p. 192)
• Adjusting front seat cushion length (p. 193)
• Front seat massage settings
* (p. 192)
• Adjusting front seat side bolster settings
*
(p. 194)
• Adjusting the passenger seat from the driv- er's seat
* (p. 195)
Adjusting the passenger seat from
the driver's seat *
The front passenger seat can be adjusted from the driver's seat.
Activating the functionThe function is activated via the function view in the center display:
Tap the
Adjust Passenger
Seat button to activate.
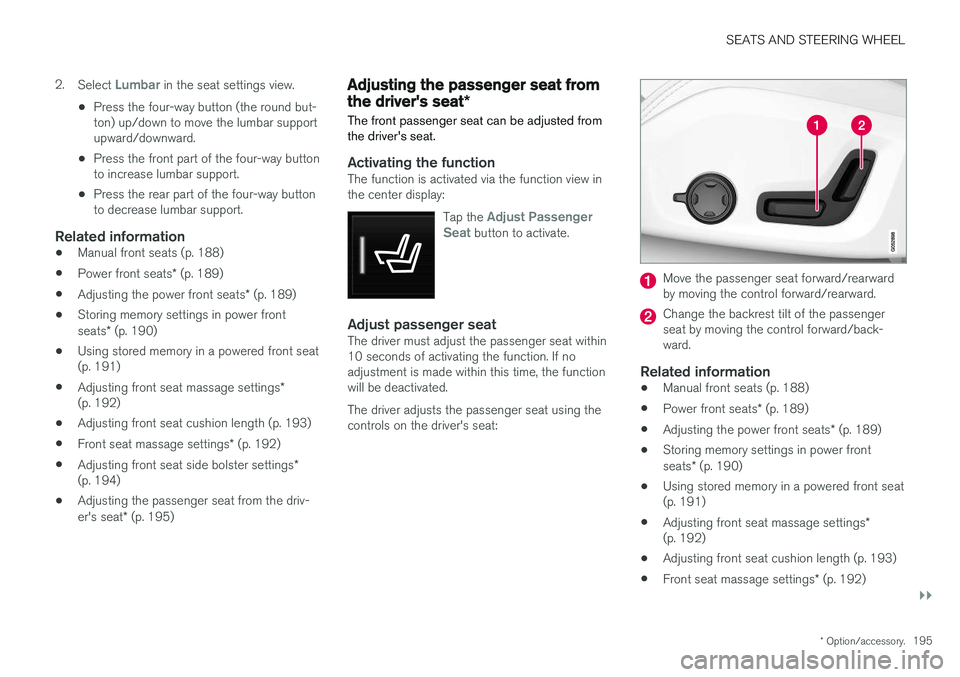
Adjust passenger seatThe driver must adjust the passenger seat within 10 seconds of activating the function. If noadjustment is made within this time, the functionwill be deactivated. The driver adjusts the passenger seat using the controls on the driver's seat:
Move the passenger seat forward/rearward by moving the control forward/rearward.
Change the backrest tilt of the passenger seat by moving the control forward/back-ward.
Related information
• Manual front seats (p. 188)
• Power front seats
* (p. 189)
• Adjusting the power front seats
* (p. 189)
• Storing memory settings in power front seats
* (p. 190)
• Using stored memory in a powered front seat (p. 191)
• Adjusting front seat massage settings
*
(p. 192)
• Adjusting front seat cushion length (p. 193)
• Front seat massage settings
* (p. 192)
Page 457 of 662
STARTING AND DRIVING
* Option/accessory.455
WARNING
•If you use HomeLink ®
to open a garage
door or gate, be sure no one is near the gate or door while it is in motion.
• Do not use HomeLink ®
with any garage
door opener that lacks safety stop andreverse features as required by US fed-eral safety standards (this includes anygarage door opener model manufacturedbefore April 1, 1982). A garage door thatcannot detect an object - signaling thedoor to stop and reverse - does not meetcurrent U.S. federal safety standards. Formore information, contact HomeLink at:www.homelink.com.
Related information
• HomeLink ®
* (p. 452)
• Programming HomeLink ®
* (p. 453)
• Type approval for HomeLink ®
* (p. 455)
Type approval for HomeLink®
*16
FCC (USA) and IC (Canada)This device complies with FCC rules part 15 and Industry Canada RSS-210. Operation is subjectto the following two conditions: (1) This devicemay not cause harmful interference, and (2) Thisdevice must accept any interference that may bereceived including interference that may causeundesired operation.
WARNING
The transmitter has been tested and complies with FCC and IC rules. Changes or modifica-tions not expressly approved by the partyresponsible for compliance could void the user's authority to operate the device. 17
Type approval for EUGentex Corporation hereby declares that HomeLink®
Model UAHL5 complies with the
Radio equipment directive 2014/53/EU. Wavelengths within which the radio equipment operates:
• 433.05MHz-434.79MHz <10mW E.R.P.
• 868.00MHz-868.60MHz <25mW E.R.P.
• 868.70MHz-868.20MHz <25mW E.R.P.
• 869.40MHz-869.65MHz <25mW E.R.P. •
869.70MHz-870.00MHz <25mW E.R.P.
Certificate holder address: Gentex Corporation,600 North Centennial Street, Zeeland MI 49464,USA For more information, see support.volvocars.com.
Related information
• HomeLink ®
* (p. 452)
16
Certain markets only.
17 The term "IC:" before the certification/registration number only signifies that Industry Canada technical specifications were met.
Page 472 of 662
AUDIO, MEDIA AND INTERNET
470
Activating and deactivating the HD
Radio™
HD Radio is deactivated when the car leaves the factory.
When listening to an HD Radio station and driv- ing through areas with weak HD signals (fringeareas), you may experience that the radio repeat-edly switches between analog/digital and digital/analog reception. If this happens, it may be desir-able to switch HD off. Carry out the following to activate or deactivate HD Radio:
1. Drag down the top view and tap on
Settings.
2. Press
Media and AM/FM Radio.
3. Press
HD Radio AM or HD Radio FM to
activate/deactivate the function.
If HD radio is deactivated, the radio will be unable to receive digital broadcasts but it will continue tofunction as a conventional radio (analog AM/FMreceiver). Please note that when HD is switchedoff, it will not be possible to tune in to sub-chan-nels. Note that if you activate or deactivate HD Radio only the selected wavelength band is affected.
Related information
• HD Radio
™ (p. 468)
• HD Radio
™ sub-channels (p. 470) •
HD Radio
™ limitations (p. 471)
• Opening contextual setting in the center dis-play (p. 135)
HD Radio™ sub-channels
In many cases, a main HD Radio station (FM wavebands only) will also have sub-channelsoffering additional types of programming ormusic.
Sub-channels
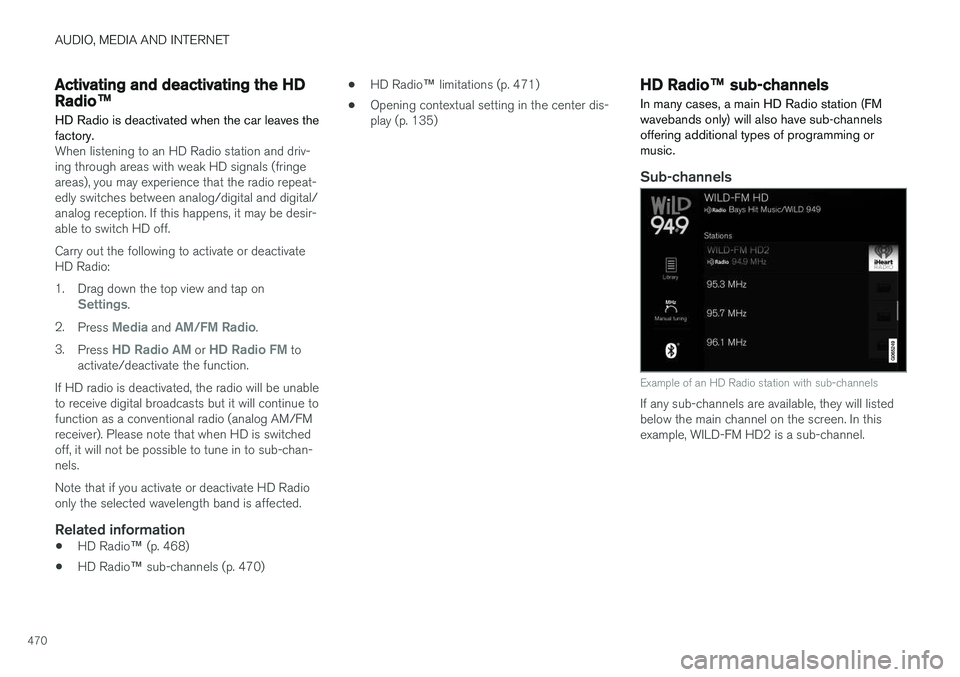
Example of an HD Radio station with sub-channels
If any sub-channels are available, they will listed below the main channel on the screen. In thisexample, WILD-FM HD2 is a sub-channel.
Page 629 of 662
MAINTENANCE AND SERVICE
}}
* Option/accessory.627
•
Heated windshield washer nozzles
* (p. 181)
• Using the rain sensor's memory function (p. 182)
• Using the rear window wiper/washer(p. 184)
• Filling washer fluid (p. 629)
• Windshield wipers in the service position(p. 628)
• Replacing windshield wiper blades (p. 627)
• Using the windshield wipers (p. 180)
Replacing windshield wiper blades
The wiper blades help remove water from the windshield and rear window. Along with thewasher fluid, they clean the glass and helpimprove visibility while driving. The windshieldand rear window wiper blades can be replaced.
Replacing wiper blades
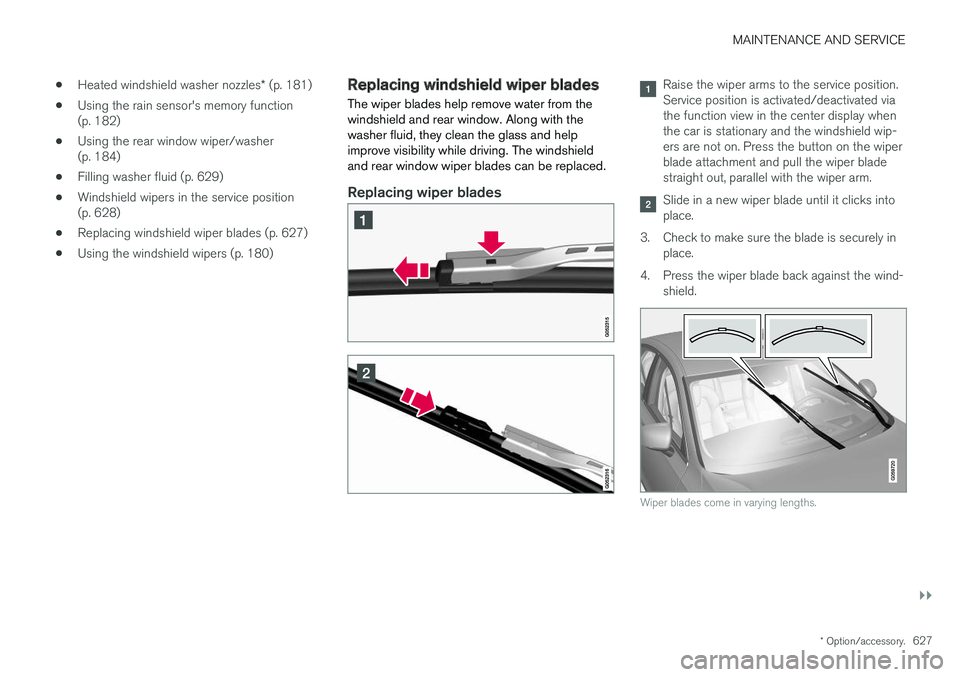
Raise the wiper arms to the service position. Service position is activated/deactivated viathe function view in the center display whenthe car is stationary and the windshield wip-ers are not on. Press the button on the wiperblade attachment and pull the wiper bladestraight out, parallel with the wiper arm.
Slide in a new wiper blade until it clicks into place.
3. Check to make sure the blade is securely in place.
4. Press the wiper blade back against the wind- shield.
Wiper blades come in varying lengths.
Page 630 of 662
||
MAINTENANCE AND SERVICE
* Option/accessory.
628
NOTE
The wiper blades are different lengths. The blade on the driver's side is longer than theone on the passenger side.
Related information
• Using the rain sensor (p. 181)
• Using the windshield and headlight washers (p. 183)
• Using automatic rear window wiping whenbacking up (p. 185)
• Heated windshield washer nozzles
* (p. 181)
• Using the rain sensor's memory function(p. 182)
• Using the rear window wiper/washer(p. 184)
• Filling washer fluid (p. 629)
• Windshield wipers in the service position(p. 628)
• Changing rear window wipers (p. 626)
• Using the windshield wipers (p. 180)
Windshield wipers in the serviceposition
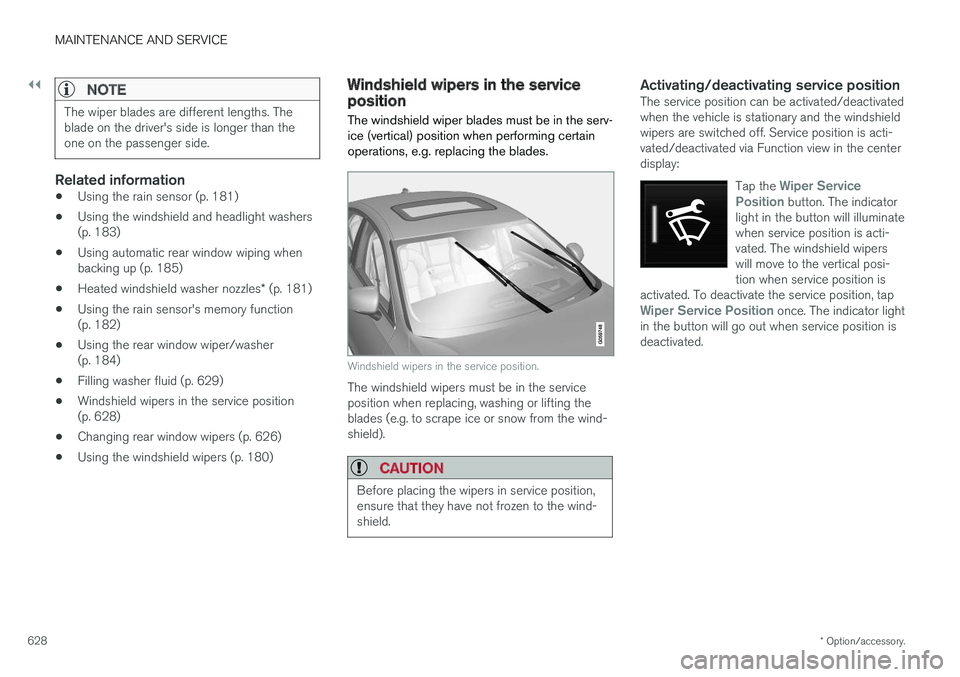
The windshield wiper blades must be in the serv- ice (vertical) position when performing certainoperations, e.g. replacing the blades.
Windshield wipers in the service position.
The windshield wipers must be in the service position when replacing, washing or lifting theblades (e.g. to scrape ice or snow from the wind-shield).
CAUTION
Before placing the wipers in service position, ensure that they have not frozen to the wind-shield.
Activating/deactivating service positionThe service position can be activated/deactivated when the vehicle is stationary and the windshieldwipers are switched off. Service position is acti-vated/deactivated via Function view in the centerdisplay:
Tap the
Wiper Service
Position button. The indicator
light in the button will illuminate when service position is acti-vated. The windshield wiperswill move to the vertical posi-tion when service position is
activated. To deactivate the service position, tap
Wiper Service Position once. The indicator light
in the button will go out when service position is deactivated.
Page 637 of 662
SPECIFICATIONS
}}
635
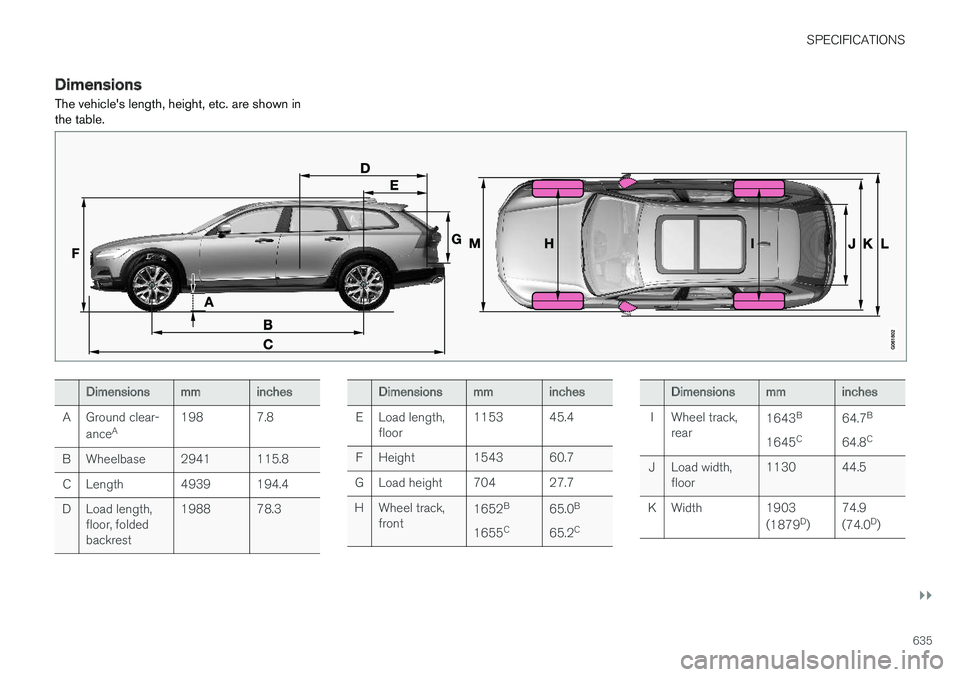
DimensionsThe vehicle's length, height, etc. are shown in the table.
Dimensionsmminches
A Ground clear- ance A 198 7.8
B Wheelbase 2941 115.8 C Length 4939 194.4
D Load length, floor, foldedbackrest 1988 78.3Dimensionsmminches
E Load length, floor 1153 45.4
F Height 1543 60.7
G Load height 704 27.7
H Wheel track, front 1652
B
1655 C 65.0
B
65.2 CDimensionsmminches
I Wheel track, rear 1643
B
1645 C 64.7
B
64.8 C
J Load width, floor 1130 44.5
K Width 1903 (1879D
) 74.9 (74.0
D
)