fog light bulb VOLVO V90 CROSS COUNTRY 2018 Owner´s Manual
[x] Cancel search | Manufacturer: VOLVO, Model Year: 2018, Model line: V90 CROSS COUNTRY, Model: VOLVO V90 CROSS COUNTRY 2018Pages: 662, PDF Size: 11.93 MB
Page 15 of 662
13
MAINTENANCE AND SERVICE
Volvo's service program572
Data transfer between vehicle and workshop over Wi-Fi 574
Download Center 575
Handling system updates via Down-load Center 575
Vehicle status 576
Scheduling service and repairs 576
Sending vehicle information to theworkshop 578
Hoisting the vehicle 579
Opening and closing the hood 581
Climate control system service 582
Replacing a windshield with head-up display * 582
Engine compartment overview 583
Engine oil 583
Checking and filling engine oil 584
Refilling coolant 586
Replacing bulbs 587
Removing the plastic cover to replace bulbs 588
Location of exterior lights 589
Replacing the low beam headlight bulbs 590
Replacing the high beam headlight bulbs 590
Replacing daytime running lights/ front parking light bulbs591
Replacing front turn signal bulbs 592
Replacing backup lights 593
Replacing the rear fog light bulb 593
Bulb specifications 594
Start battery 595
Support battery 598
Battery symbols 599
Fuses and fuseboxes 600
Replacing fuses 601
Fuses in the engine compartment 602
Fuses under the glove compartment 605
Fuses in the cargo compartment 608
Cleaning the interior 612
Cleaning the center display 612
Cleaning the head-up display *
613
Cleaning fabric upholstery and ceil-ing liner 614
Cleaning the seat belt 614
Cleaning floor mats and inlay mats 614
Cleaning leather upholstery 615
Cleaning the leather steering wheel 616
Cleaning interior plastic, metal andwood surfaces 617
Cleaning the exterior
617
Polishing and waxing 618
Hand washing 618
Automatic car washes 620
High-pressure washing 621
Cleaning the wiper blades 621
Cleaning exterior plastic, rubber and trim components 622
Cleaning rims 623
Corrosion protection 623
Paintwork 624
Touching up minor paint damage 624
Color codes 625
Changing rear window wipers 626
Replacing windshield wiper blades 627
Windshield wipers in the service position 628
Filling washer fluid 629
Page 159 of 662

LIGHTING
}}
* Option/accessory.157
With the steering wheel lever's lighting ring in the
position, the daytime running lights (DRL
1
)
will illuminate when the vehicle is driven in day- light conditions. The headlights will switch auto-matically from daytime running lights to lowbeams in weak daylight or dark conditions. Theheadlights will also switch to low beams if the front fog lights * and/or rear fog light are acti-
vated. US models : When
mode is selected, the
daytime running lights can be deactivated in the center display. The parking lights will also bedeactivated. In weak daylight or dark conditions,the parking lights and low beams will be illumi-nated. In the US: With the lighting ring in the
or
position, the daytime running lights will be
off .
In Canada : With the lighting ring in the
or
position, the daytime running lights will be
on.
NOTE
Volvo recommends use of Daytime Running Lights in the US. Its use is mandatory in Can-ada.
WARNING
The system is an energy saving aid – it cannot in all situations determine when the daylight istoo weak or not strong enough, e.g. whenthere is fog or rain. The driver is always responsible for driving the vehicle with lighting that is safe for the trafficconditions and as specified by applicable traf-fic regulations.
Related information
• Lighting panel and controls (p. 154)
• Ignition modes (p. 403)
• Low beams (p. 157)
• Replacing daytime running lights/front park- ing light bulbs (p. 591)
Low beams
When driving with the lighting ring in the
position, low beam will be automatically acti- vated in weak daylight or dark conditions, whenthe ignition is in II position or when the engine is
running.
Lighting ring in AUTO position.
With the lighting ring in the position, the
low beams will be automatically activated if:
• the front fog lights
* are activated
• the rear fog light is activated
• the rear and front fog lights are activated.
With the lighting ring in the
position, the
low beams will always be activated when the igni- tion is in mode II or when the engine is running.
1
Daytime Running Lights
Page 165 of 662
LIGHTING
* Option/accessory.163
Press the button for On/Off. The
symbol in
the instrument panel illuminates when the rear fog light is on. The rear fog light turns off automatically when:
• the start knob is turned clockwise to turn off the ignition or when the lighting ring is turned to the
position.
• the lighting ring is in the
position and
the front fog lights are turned off.
NOTE
Regulations concerning rear fog light use vary from country to country.
Related information
• Lighting panel and controls (p. 154)
• Front fog lights/cornering illumination
*
(p. 161)
• Ignition modes (p. 403)
• Replacing the rear fog light bulb (p. 593)
Brake lights The brake lights are automatically illuminated when braking.
The brake lights illuminate when the brake pedal is depressed. They also illuminate when thebrakes are automatically applied by one of thedriver support systems.
Related information
•
Emergency brake lights (p. 163)
• Brake functions (p. 404)
Emergency brake lights
The emergency brake lights are activated to warn following vehicles of hard braking. This function causes an additional taillight on each side of the vehicle to illuminate.
The emergency brake lights are activated in the event of hard braking or if the ABS system isactivated and the vehicle is traveling at a highspeed. After the driver decelerates to a low speed and then releases the brake, the brake lights resumetheir normal brightness.
Related information
• Brake lights (p. 163)
• Brakes (p. 405)
• Hazard warning flashers (p. 164)
Page 589 of 662
MAINTENANCE AND SERVICE
}}
587
Unscrew the cover in the plastic covering.
Unscrew the expansion tank cap and fill coolant as needed. The level should not exceed the yellow MAX mark inside the
expansion tank.
Put the components back in place in the reverse order.
CAUTION
• Mix the coolant with water of acceptable quality. If you are unsure of the quality ofthe water, use a Volvo-recommendedpremixed coolant.
• Make sure the coolant mixture is 50%water and 50% coolant.
• Only use coolants with corrosion protec-tion recommended by Volvo.
• To help ensure sufficient corrosion pro-tection in the system, only use new cool-ant when replacing larger components inthe cooling system.
• Never run the engine unless the coolingsystem is properly filled. An improperlyfilled cooling system could lead to hightemperatures and cracks in the cylinderheads.
• High levels of chlorine, chlorides andother salts may cause corrosion in thecooling system.
Related information
•Engine compartment overview (p. 583)
• Coolant specifications (p. 641)
Replacing bulbs
The bulbs in the halogen headlights, backup lights and rear fog light can be changed withoutthe help of a workshop. Halogen headlights are not available on all mod- els and markets. Contact a Volvo retailer formore information. LED 13
bulbs must be replaced by a workshop.
An authorized Volvo workshop is recommended.
NOTE
For information on lights not mentioned in this article, contact a Volvo dealer or a certi-fied Volvo service technician.
The headlight bulbs can be replaced without the assistance of a workshop, but before a bulb canbe replaced, the plastic cover over the headlightneeds to be removed. If you are experiencing problems with any lights other than light bulbs, contact a workshop 14
. If
there is a problem with an LED 13
light, the entire
lamp unit will normally need to be replaced.
WARNING
The vehicle electrical system must be in igni- tion mode 0 when bulbs are replaced.
Page 590 of 662
||
MAINTENANCE AND SERVICE
* Option/accessory.
588
CAUTION
Never touch the bulb glass with your bare fin- gers. Grease and oils from your fingers vapor-ize in the heat and will leave a deposit on thereflector, which may damage it.
NOTE
If the error message persists after the defec- tive bulb has been replaced, we recommend avisit to an authorized Volvo workshop.
NOTE
Exterior lighting such as headlights and tail- lights may develop temporary condensationon the inside of the lens. This is normal. Allexterior lighting is designed to resist this.Condensation is normally vented out of thelamp housing once the light has been lit forsome period of time.
NOTE
Bulbs for active curve lighting * contain traces
of mercury and should therefore always be submitted to a certified Volvo service techni-cian.
Related information
• Location of exterior lights (p. 589)
• Removing the plastic cover to replace bulbs (p. 588)
• Replacing the low beam headlight bulbs(p. 590)
• Replacing the high beam headlight bulbs(p. 590)
• Replacing daytime running lights/front park-ing light bulbs (p. 591)
• Replacing front turn signal bulbs (p. 592)
• Replacing backup lights (p. 593)
• Replacing the rear fog light bulb (p. 593)
• Bulb specifications (p. 594)
Removing the plastic cover toreplace bulbs
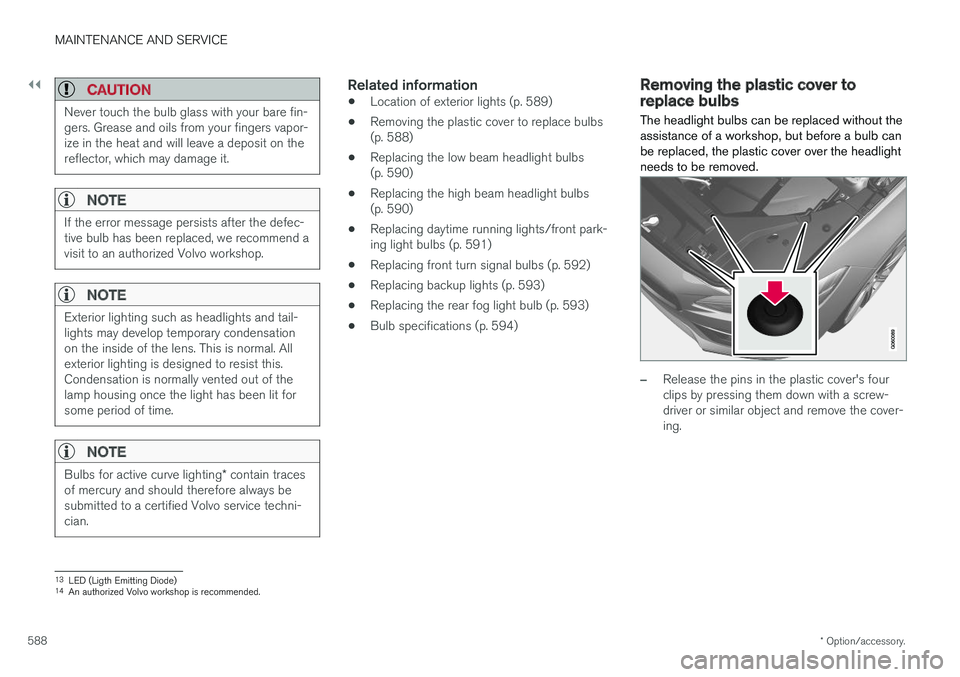
The headlight bulbs can be replaced without the assistance of a workshop, but before a bulb canbe replaced, the plastic cover over the headlightneeds to be removed.
–Release the pins in the plastic cover's four clips by pressing them down with a screw-driver or similar object and remove the cover-ing.
13 LED (Ligth Emitting Diode)
14 An authorized Volvo workshop is recommended.
Page 591 of 662
MAINTENANCE AND SERVICE
* Option/accessory.589
NOTE
To bear in mind when refitting the covering:
• The pin in the clip must be pressed back completely before the clip is reinstalled inthe covering.
• When the covering is reinstalled, the pinmust be pressed in until the end surfaceis level with the surface of the clip.
Related information
• Replacing bulbs (p. 587)
• Replacing the low beam headlight bulbs (p. 590)
• Replacing the high beam headlight bulbs(p. 590)
• Replacing daytime running lights/front park-ing light bulbs (p. 591)
• Replacing front turn signal bulbs (p. 592)
• Bulb specifications (p. 594)
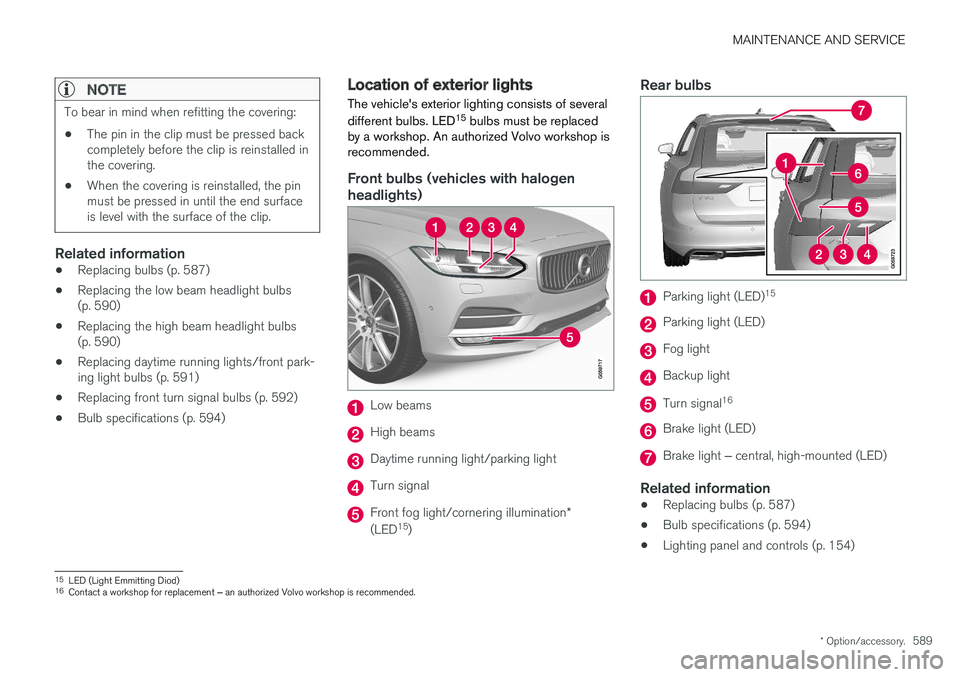
Location of exterior lights
The vehicle's exterior lighting consists of several different bulbs. LED 15
bulbs must be replaced
by a workshop. An authorized Volvo workshop is recommended.
Front bulbs (vehicles with halogen headlights)
Low beams
High beams
Daytime running light/parking light
Turn signal
Front fog light/cornering illumination *
(LED 15
)
Rear bulbs
Parking light (LED) 15
Parking light (LED)
Fog light
Backup light
Turn signal
16
Brake light (LED)
Brake light
‒ central, high-mounted (LED)
Related information
• Replacing bulbs (p. 587)
• Bulb specifications (p. 594)
• Lighting panel and controls (p. 154)
15
LED (Light Emmitting Diod)
16 Contact a workshop for replacement ‒ an authorized Volvo workshop is recommended.
Page 595 of 662
MAINTENANCE AND SERVICE
}}
593
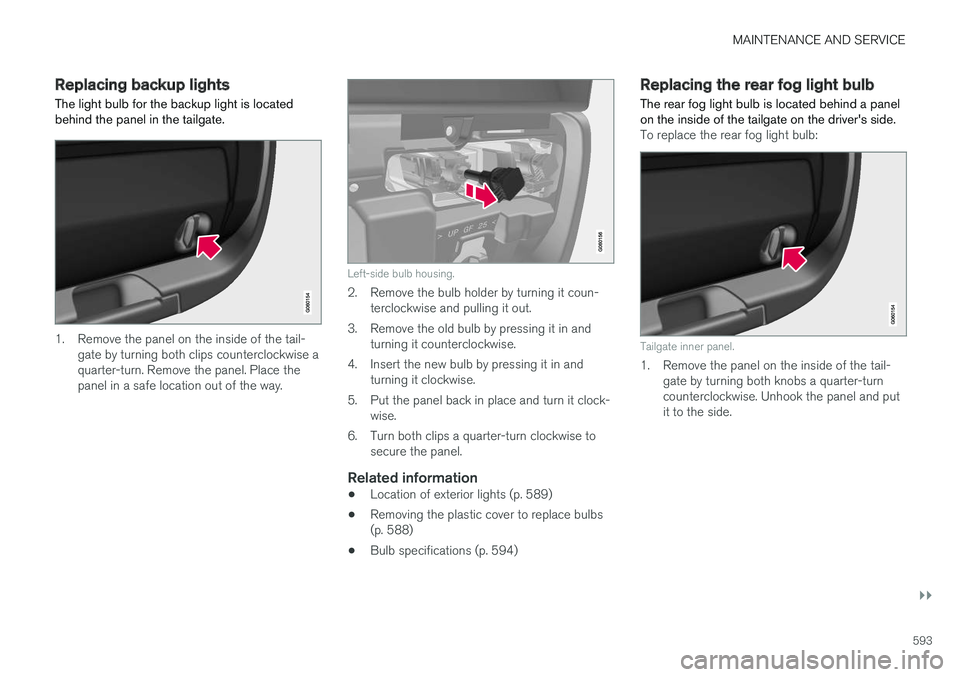
Replacing backup lights The light bulb for the backup light is located behind the panel in the tailgate.
1. Remove the panel on the inside of the tail-gate by turning both clips counterclockwise a quarter-turn. Remove the panel. Place thepanel in a safe location out of the way.
Left-side bulb housing.
2. Remove the bulb holder by turning it coun-terclockwise and pulling it out.
3. Remove the old bulb by pressing it in and turning it counterclockwise.
4. Insert the new bulb by pressing it in and turning it clockwise.
5. Put the panel back in place and turn it clock- wise.
6. Turn both clips a quarter-turn clockwise to secure the panel.
Related information
• Location of exterior lights (p. 589)
• Removing the plastic cover to replace bulbs (p. 588)
• Bulb specifications (p. 594)
Replacing the rear fog light bulb The rear fog light bulb is located behind a panel on the inside of the tailgate on the driver's side.
To replace the rear fog light bulb:
Tailgate inner panel.
1. Remove the panel on the inside of the tail-
gate by turning both knobs a quarter-turn counterclockwise. Unhook the panel and putit to the side.
Page 596 of 662
||
MAINTENANCE AND SERVICE
594
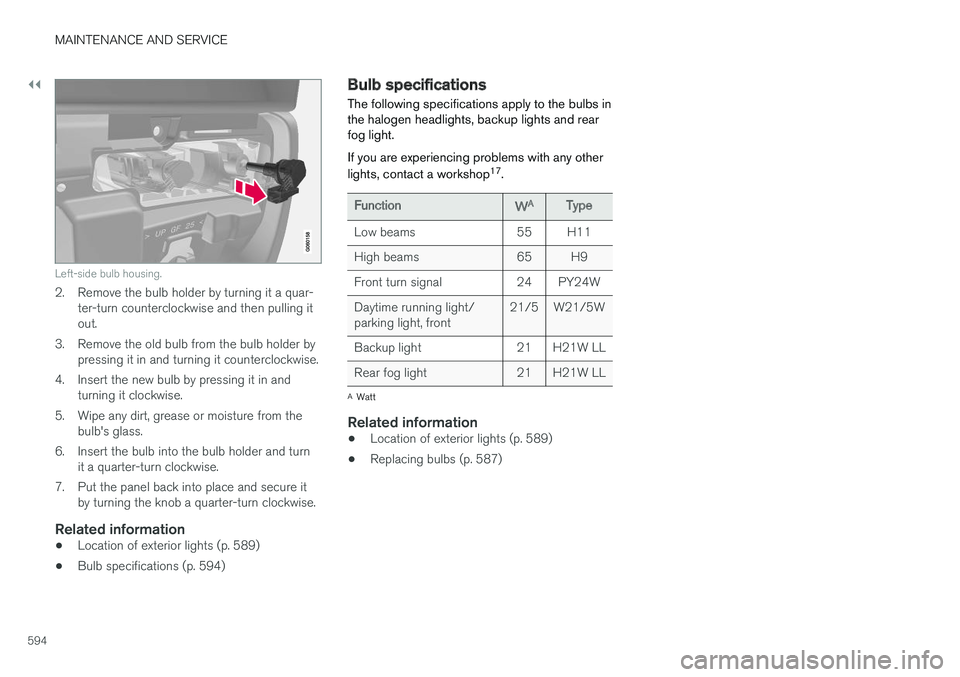
Left-side bulb housing.
2. Remove the bulb holder by turning it a quar-ter-turn counterclockwise and then pulling it out.
3. Remove the old bulb from the bulb holder by pressing it in and turning it counterclockwise.
4. Insert the new bulb by pressing it in and turning it clockwise.
5. Wipe any dirt, grease or moisture from the bulb's glass.
6. Insert the bulb into the bulb holder and turn it a quarter-turn clockwise.
7. Put the panel back into place and secure it by turning the knob a quarter-turn clockwise.
Related information
• Location of exterior lights (p. 589)
• Bulb specifications (p. 594)
Bulb specifications The following specifications apply to the bulbs in the halogen headlights, backup lights and rearfog light. If you are experiencing problems with any other lights, contact a workshop 17
.
FunctionWAType
Low beams 55 H11
High beams 65 H9
Front turn signal 24 PY24WDaytime running light/ parking light, front 21/5 W21/5W
Backup light 21 H21W LL
Rear fog light 21 H21W LL
A Watt
Related information
• Location of exterior lights (p. 589)
• Replacing bulbs (p. 587)
Page 653 of 662
INDEX
651
Internet, see Internet-connected vehicle 503
Internet-connected vehicle 503
book service and repair 576
No connection or poor connection 508
send car data 578
system updates 575
iPod ®, connecting 488
ISOFIX/LATCH anchors 74
J
Jack 539
Jump-start 442
K
Key 233
Keyboard 128, 131 change language 131
Keyless locking/unlocking 248
settings 250
touch-sensitive surfaces 247
Key tag 233
L
Labels location of 632
Laminated glass 170 Lamps changing 587
location 589
specifications 594
Trailer 448
Lane Keeping Aid operation 361
Lane Keeping Aid (LKA) 358, 360, 361, 363, 365
Language 134
Leather upholstery, cleaning instructions 615
Leveling control 428 settings 430
License agreement 98, 513
Lifting tools 539
Light bulbs, specifications 594
Light control 154, 167Lighting Active Bending Lights 161
approach lighting 164
automatic high beam 159
automatic lighting controls, passenger
compartment 165
brake lights 163
controls 154, 165, 167
cornering illumination 162
daytime running lights 156
display lighting 167
emergency brake lights 163
front fog lights 161
Hazard warning flashers 164
high beams 158, 159
home safe lighting 164
in passenger compartment 165, 167
instrument illumination 167
instrument lighting 167
light bulbs, specifications 594
light locations 589
low beams 157
position lights 156
rear fog light 162
settings 155
Turn signals 160
Lighting, replacing bulbs 587 backup lights 593daytime running lights/front parking
lights 591
front turn signals 592
high beams 590
low beams 590