wiper fluid VOLVO V90 CROSS COUNTRY 2018 Owner´s Manual
[x] Cancel search | Manufacturer: VOLVO, Model Year: 2018, Model line: V90 CROSS COUNTRY, Model: VOLVO V90 CROSS COUNTRY 2018Pages: 662, PDF Size: 11.93 MB
Page 15 of 662
13
MAINTENANCE AND SERVICE
Volvo's service program572
Data transfer between vehicle and workshop over Wi-Fi 574
Download Center 575
Handling system updates via Down-load Center 575
Vehicle status 576
Scheduling service and repairs 576
Sending vehicle information to theworkshop 578
Hoisting the vehicle 579
Opening and closing the hood 581
Climate control system service 582
Replacing a windshield with head-up display * 582
Engine compartment overview 583
Engine oil 583
Checking and filling engine oil 584
Refilling coolant 586
Replacing bulbs 587
Removing the plastic cover to replace bulbs 588
Location of exterior lights 589
Replacing the low beam headlight bulbs 590
Replacing the high beam headlight bulbs 590
Replacing daytime running lights/ front parking light bulbs591
Replacing front turn signal bulbs 592
Replacing backup lights 593
Replacing the rear fog light bulb 593
Bulb specifications 594
Start battery 595
Support battery 598
Battery symbols 599
Fuses and fuseboxes 600
Replacing fuses 601
Fuses in the engine compartment 602
Fuses under the glove compartment 605
Fuses in the cargo compartment 608
Cleaning the interior 612
Cleaning the center display 612
Cleaning the head-up display *
613
Cleaning fabric upholstery and ceil-ing liner 614
Cleaning the seat belt 614
Cleaning floor mats and inlay mats 614
Cleaning leather upholstery 615
Cleaning the leather steering wheel 616
Cleaning interior plastic, metal andwood surfaces 617
Cleaning the exterior
617
Polishing and waxing 618
Hand washing 618
Automatic car washes 620
High-pressure washing 621
Cleaning the wiper blades 621
Cleaning exterior plastic, rubber and trim components 622
Cleaning rims 623
Corrosion protection 623
Paintwork 624
Touching up minor paint damage 624
Color codes 625
Changing rear window wipers 626
Replacing windshield wiper blades 627
Windshield wipers in the service position 628
Filling washer fluid 629
Page 182 of 662
WINDOWS, GLASS AND MIRRORS
* Option/accessory.
180 •
Locking and unlocking using the remote key (p. 235)
• Locking and unlocking from inside the vehi-cle (p. 251)
Using the windshield wipers
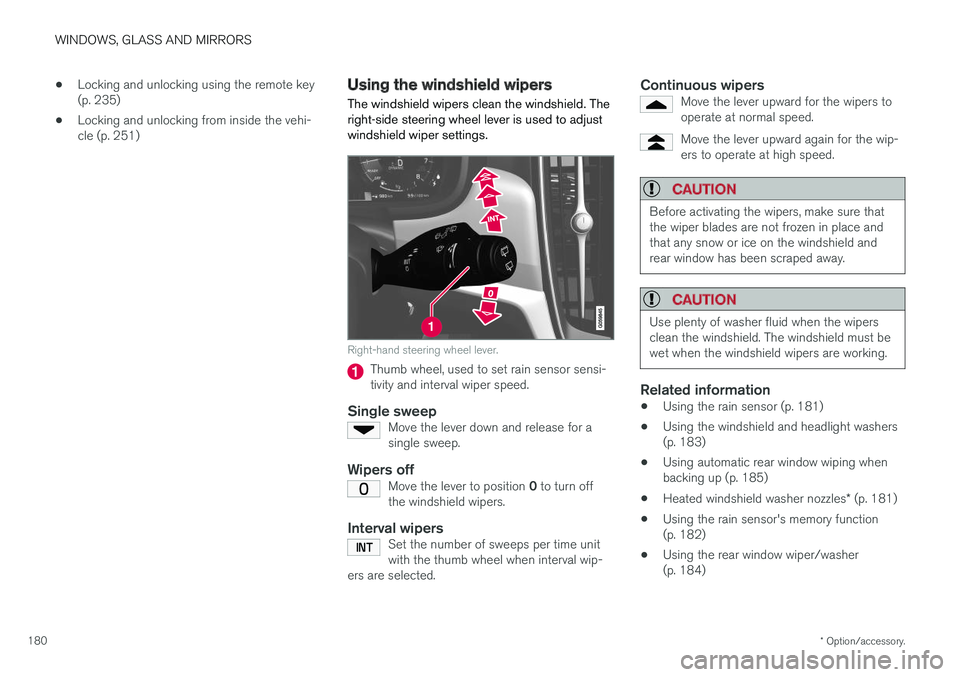
The windshield wipers clean the windshield. The right-side steering wheel lever is used to adjustwindshield wiper settings.
Right-hand steering wheel lever.
Thumb wheel, used to set rain sensor sensi- tivity and interval wiper speed.
Single sweepMove the lever down and release for asingle sweep.
Wipers offMove the lever to position 0 to turn off
the windshield wipers.
Interval wipersSet the number of sweeps per time unit with the thumb wheel when interval wip-
ers are selected.
Continuous wipersMove the lever upward for the wipers to operate at normal speed.
Move the lever upward again for the wip- ers to operate at high speed.
CAUTION
Before activating the wipers, make sure that the wiper blades are not frozen in place andthat any snow or ice on the windshield andrear window has been scraped away.
CAUTION
Use plenty of washer fluid when the wipers clean the windshield. The windshield must bewet when the windshield wipers are working.
Related information
• Using the rain sensor (p. 181)
• Using the windshield and headlight washers (p. 183)
• Using automatic rear window wiping whenbacking up (p. 185)
• Heated windshield washer nozzles
* (p. 181)
• Using the rain sensor's memory function(p. 182)
• Using the rear window wiper/washer(p. 184)
Page 183 of 662
WINDOWS, GLASS AND MIRRORS
}}
* Option/accessory.181
•
Filling washer fluid (p. 629)
• Windshield wipers in the service position (p. 628)
• Replacing windshield wiper blades (p. 627)
• Changing rear window wipers (p. 626)
Heated windshield washer nozzles
*
The washer nozzles are heated automatically in cold weather to prevent the washer fluid fromfreezing.
Related information
• Using the rain sensor (p. 181)
• Using the windshield and headlight washers (p. 183)
• Using automatic rear window wiping whenbacking up (p. 185)
• Using the rain sensor's memory function(p. 182)
• Using the rear window wiper/washer(p. 184)
• Filling washer fluid (p. 629)
• Windshield wipers in the service position(p. 628)
• Replacing windshield wiper blades (p. 627)
• Changing rear window wipers (p. 626)
• Using the windshield wipers (p. 180)
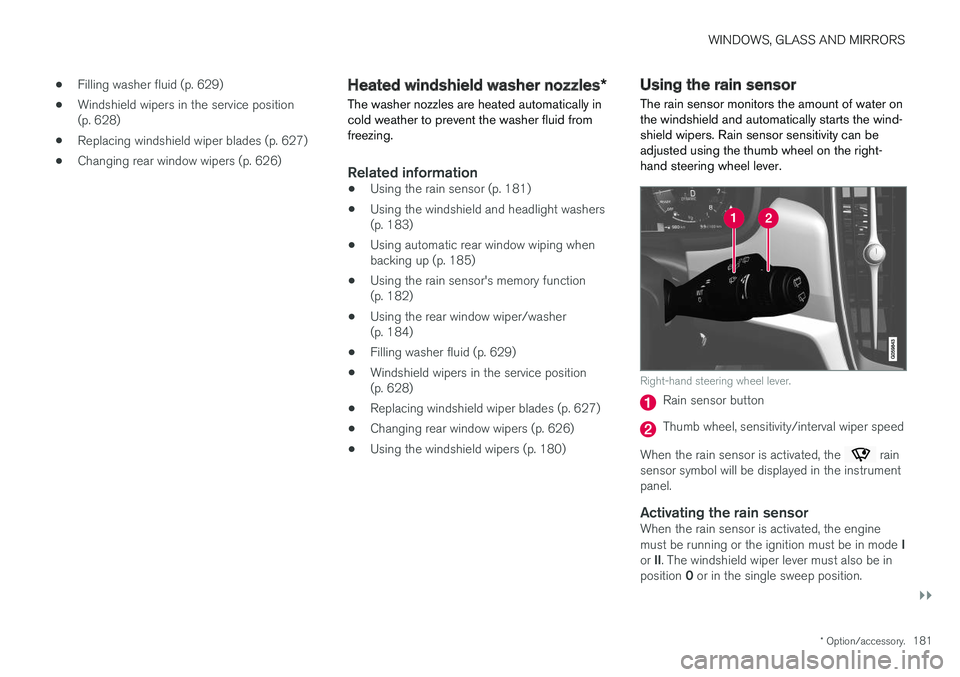
Using the rain sensor The rain sensor monitors the amount of water on the windshield and automatically starts the wind-shield wipers. Rain sensor sensitivity can beadjusted using the thumb wheel on the right-hand steering wheel lever.
Right-hand steering wheel lever.
Rain sensor button
Thumb wheel, sensitivity/interval wiper speed
When the rain sensor is activated, the
rain
sensor symbol will be displayed in the instrument panel.
Activating the rain sensorWhen the rain sensor is activated, the engine must be running or the ignition must be in mode I
or II. The windshield wiper lever must also be in
position 0 or in the single sweep position.
Page 184 of 662
||
WINDOWS, GLASS AND MIRRORS
* Option/accessory.
182 Activate the rain sensor by pressing the rain sen- sor button
.
If the lever is pressed down, the wipers will make additional sweeps across the windshield. Turn the thumb wheel upward for increased sen- sitivity and downward for decreased sensitivity.The wipers will make one extra sweep when thethumb wheel is turned upward.
Deactivate the rain sensor
Deactivate the rain sensor by pressing the rain sensor button or moving the lever upward to another wiper mode. The rain sensor is automatically deactivated in ignition mode 0 or when the engine is switched
off. The rain sensor is also automatically deactivated when the wiper blades are put in the serviceposition. The rain sensor will reactivate whenservice mode is switched off.
CAUTION
The windshield wipers may start inadvertently and be damaged in automatic car washes.Deactivate the rain sensor when the engine is running or when the ignition is in mode I or II.
The symbol in the instrument panel will go out.
Related information
• Using the windshield and headlight washers (p. 183)
• Using automatic rear window wiping whenbacking up (p. 185)
• Heated windshield washer nozzles
* (p. 181)
• Using the rain sensor's memory function(p. 182)
• Using the rear window wiper/washer (p. 184)
• Filling washer fluid (p. 629)
• Windshield wipers in the service position (p. 628)
• Replacing windshield wiper blades (p. 627)
• Changing rear window wipers (p. 626)
• Using the windshield wipers (p. 180)
Using the rain sensor's memoryfunction The rain sensor monitors the amount of water on the windshield and automatically starts the wind-shield wipers.
Activating/deactivating memory function
The rain sensor's memory function can be set to activate so that the rain sensor button does notneed to be pressed each time the engine isstarted: 1.
Tap
Settings in the Top view in the center
display.
2. Tap
My CarWipers.
3. Select
Rain Sensor Memory to activate/
deactivate the memory function.
Related information
• Using the rain sensor (p. 181)
• Using the windshield and headlight washers (p. 183)
• Using automatic rear window wiping whenbacking up (p. 185)
• Heated windshield washer nozzles
* (p. 181)
• Using the rear window wiper/washer(p. 184)
• Filling washer fluid (p. 629)
Page 185 of 662
WINDOWS, GLASS AND MIRRORS
}}
* Option/accessory.183
•
Windshield wipers in the service position (p. 628)
• Replacing windshield wiper blades (p. 627)
• Changing rear window wipers (p. 626)
• Using the windshield wipers (p. 180)
Using the windshield and headlightwashers
The windshield and headlight washers clean the windshield and headlights. Use the right-sidesteering wheel lever to start the windshield andheadlight washers.
Starting the windshield and headlight washers
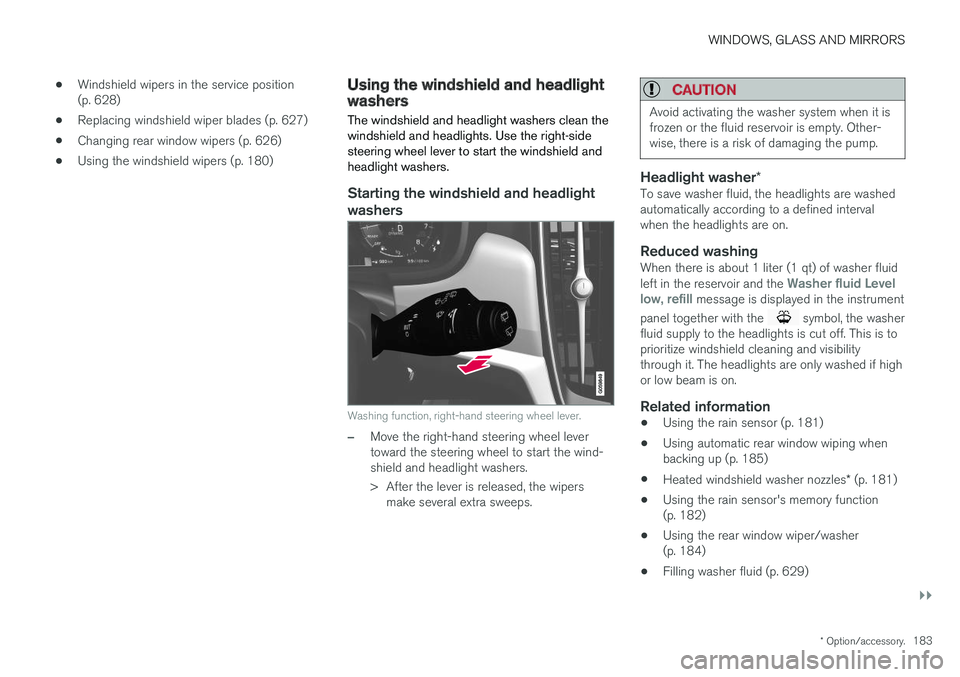
Washing function, right-hand steering wheel lever.
–Move the right-hand steering wheel lever toward the steering wheel to start the wind-shield and headlight washers.
> After the lever is released, the wipers make several extra sweeps.
CAUTION
Avoid activating the washer system when it is frozen or the fluid reservoir is empty. Other-wise, there is a risk of damaging the pump.
Headlight washer *To save washer fluid, the headlights are washed automatically according to a defined intervalwhen the headlights are on.
Reduced washingWhen there is about 1 liter (1 qt) of washer fluid left in the reservoir and the Washer fluid Level
low, refill message is displayed in the instrument
panel together with the
symbol, the washer
fluid supply to the headlights is cut off. This is to prioritize windshield cleaning and visibilitythrough it. The headlights are only washed if highor low beam is on.
Related information
• Using the rain sensor (p. 181)
• Using automatic rear window wiping whenbacking up (p. 185)
• Heated windshield washer nozzles
* (p. 181)
• Using the rain sensor's memory function(p. 182)
• Using the rear window wiper/washer(p. 184)
• Filling washer fluid (p. 629)
Page 186 of 662
WINDOWS, GLASS AND MIRRORS
* Option/accessory.
184 •
Windshield wipers in the service position (p. 628)
• Replacing windshield wiper blades (p. 627)
• Changing rear window wipers (p. 626)
• Using the windshield wipers (p. 180)
Using the rear window wiper/washer
The rear window wiper/washer cleans the rear window. Use the right-side steering wheel leverto start and control the wiper/washer.
Activating the rear window wiper/ washer
NOTE
The rear window wiper is equipped with over- heating protection that switches off the motorwiper if it becomes overheated. The rear win-dow wiper can be operated again after a cool-ing-down period.
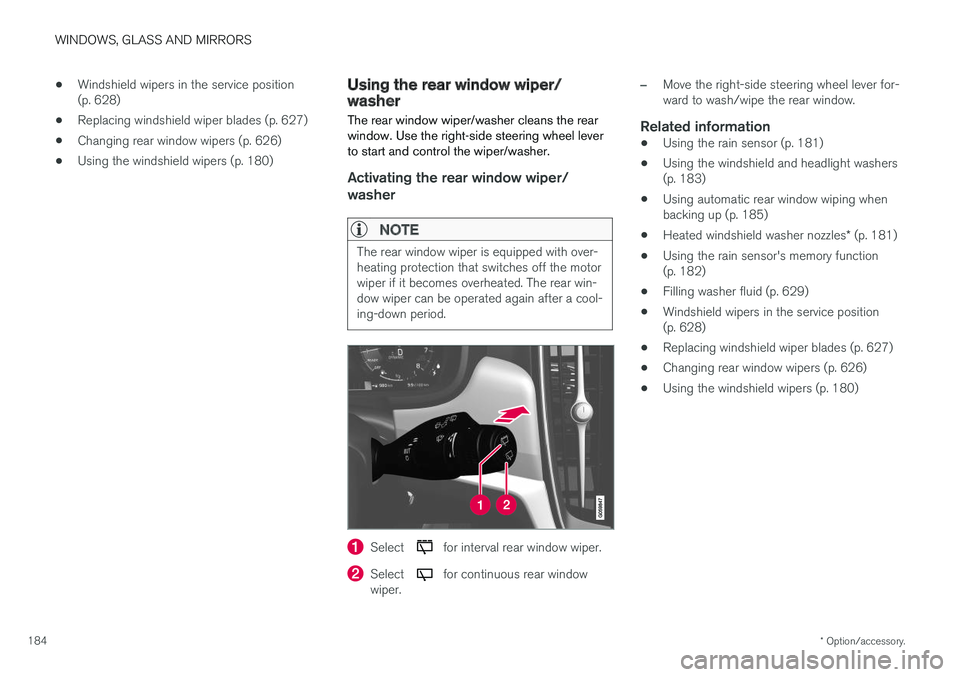
Select for interval rear window wiper.
Select for continuous rear window
wiper.
–Move the right-side steering wheel lever for- ward to wash/wipe the rear window.
Related information
• Using the rain sensor (p. 181)
• Using the windshield and headlight washers(p. 183)
• Using automatic rear window wiping whenbacking up (p. 185)
• Heated windshield washer nozzles
* (p. 181)
• Using the rain sensor's memory function(p. 182)
• Filling washer fluid (p. 629)
• Windshield wipers in the service position(p. 628)
• Replacing windshield wiper blades (p. 627)
• Changing rear window wipers (p. 626)
• Using the windshield wipers (p. 180)
Page 187 of 662
WINDOWS, GLASS AND MIRRORS
* Option/accessory.185
Using automatic rear window wipingwhen backing up
If reverse gear is engaged while the windshield wipers are on, the rear window wipers will start.This function is deactivated when a differentgear is selected.
1. Tap Settings in the Top view in the center
display.
2. Tap
My CarWipers.
3. Select
Auto Rear Wiper to activate/deacti-
vate automatic rear window wiping when backing up.
If the rear window wipers are already in continu-ous wiper mode, no change will be made.
Related information
• Using the rain sensor (p. 181)
• Using the windshield and headlight washers(p. 183)
• Heated windshield washer nozzles
* (p. 181)
• Using the rain sensor's memory function(p. 182)
• Using the rear window wiper/washer(p. 184)
• Filling washer fluid (p. 629)
• Windshield wipers in the service position(p. 628)
• Replacing windshield wiper blades (p. 627) •
Changing rear window wipers (p. 626)
• Using the windshield wipers (p. 180)
Page 436 of 662
||
STARTING AND DRIVING
434
Related information
•Drive-E
‒ purer driving pleasure (p. 27)
• ECO drive mode (p. 422)
• Checking tire pressure (p. 531)
Preparing for a long trip
It is important to have the vehicle's systems and equipment checked carefully before driving longdistances.
Check that:
• the engine is running properly and that fuel consumption is normal
• there are no leaks (fuel, oil or other fluid)
• the brake pedal is functioning optimally
• all lights are working
‒
adjust the headlight
height if the vehicle is carrying a heavy load
• tire tread depth and air pressure are at cor-rect levels. Change to snow tires when driv-ing in areas where there is a risk of snowy oricy roads.
• the start battery is sufficiently charged
• the wiper blades are in good condition
Related information
• Checking tire pressure (p. 531)
• Filling washer fluid (p. 629)
• Winter driving (p. 435)
• Economical driving (p. 433)
• Vehicle modem settings (p. 507)
• Loading recommendations (p. 561)
• Driving with a trailer (p. 445)
• Pilot Assist (p. 305)
• Speed limiter (p. 272) •
Tire sealing system (p. 546)
Page 437 of 662
STARTING AND DRIVING
}}
435
Winter driving
It is important to check the vehicle before driving in cold/snowy conditions to make sure it can bedriven safely.
Before the cold season arrives:
• Make sure the engine coolant contains 50% antifreeze. This mixture helps protect theengine from frost erosion down toapprox. -35 °C (-31 °F). Do not mix differenttypes of antifreeze as this could pose ahealth risk.
• Keep the fuel tank well filled to prevent con-densation from forming.
• Check the viscosity of the engine oil. Oil withlow viscosity (thinner oil) improves cold-weather starting and reduces fuel consump-tion when driving with a cold engine.
CAUTION
Low-viscosity oil should not be used with hard driving or in hot weather.
•
Check the condition and charge level of the start battery. Cold weather places greaterdemands on the start battery and reduces itscapacity.
• Use washer fluid containing antifreeze tohelp prevent ice from forming in the washerfluid reservoir.
Slippery driving conditionsFor optimal traction and roadholding, Volvo rec-ommends using snow tires on all wheels when-ever there is a risk of snow or ice on the road.
NOTE
Certain countries require use of winter tires by law. Not all countries permit the use ofstudded tires.
Practice driving on slippery surfaces under con- trolled conditions to learn how the vehicle reacts.
Related information
•Snow tires (p. 545)
• Snow chains (p. 545)
• Braking on salted roads (p. 407)
• Braking on wet roads (p. 406)
• Filling washer fluid (p. 629)
• Start battery (p. 595)
• Replacing windshield wiper blades (p. 627)
• Changing rear window wipers (p. 626)
• Refilling coolant (p. 586)
Driving through standing water
Driving the vehicle through a deep pool of stand- ing water on a water-covered roadway is calledfording. This must be done with great caution.
The vehicle can be driven through water up to a depth of 30 cm (11.8 in) at no more than walkingspeed. Be particularly careful when drivingthrough flowing water. When driving through standing water, drive slowly and do not stop the vehicle. When you havepassed the water, press lightly on the brake pedaland check that the brakes are functioning prop-erly. Water, mud, slush, etc. can make the brakelinings slippery, resulting in delayed brakingeffect.
• If the vehicle is equipped with contacts for anelectric heater or trailer coupling, clean theseafter driving in water or mud.
• Do not allow the vehicle to stand in water upto the sills any longer than absolutely neces-sary. This could result in electrical malfunc-tions.
Page 575 of 662
MAINTENANCE AND SERVICE
}}
573
Emission inspection readiness
How do states use OBD II for emission
inspections?
Many states connect a computer directly to a vehicle's OBD II system. The inspector can thenread "faults." In some states, this type of inspec-tion has replaced the tailpipe emission test.
How can my vehicle fail OBD II emission
inspection?
Your vehicle can fail OBD II emission inspection for any of the following reasons:
• If your Check Engine (MIL) light is lit, yourvehicle may fail inspection.
• If your vehicle's Check Engine light was lit,but went out without any action on your part,OBD II will still have a recorded fault. Yourvehicle may pass or fail, depending on theinspection practices in your area.
• If you had recent service that required dis-connecting the battery, OBD II diagnosticinformation may be incomplete and "notready" for inspection. A vehicle that is notready may fail inspection.
How can I prepare for my next OBD II
emission inspection?
• If your Check Engine (MIL) light is lit - or was lit but went out without service, have your vehicle diagnosed and, if necessary, servicedby a qualified Volvo technician.
• If you recently had service for a lit CheckEngine light, or if you had service thatrequired disconnecting the battery, a periodof driving is necessary to bring the OBD IIsystem to "ready" for inspection. Two half-hour trips of mixed stop-and-go/highwaydriving are typically needed to allow OBD II toreach readiness. Your Volvo retailer can pro-vide you with more information on planning atrip.
• Maintain your vehicle in accordance with yourvehicle's maintenance schedule.
Owner maintenancePeriodic maintenance requirements and intervalsare described in your vehicle's Warranty andService Records Information booklet. The following points can be carried out between the normally scheduled maintenance services.
Each time the car is refueled:
•Check the engine oil level.
• Clean the windshield, windshield wipers, headlights, and taillights.
Monthly:
• Check cold tire pressure in all tires. Inspect the tires for wear.
• Check that engine coolant and other fluidlevels are between the indicated "min" and"max" markings.
• Clean interior glass surfaces with a glasscleaner and soft paper towels.
• Wipe driver information displays with a softcloth.
• Visually inspect battery terminals for corro-sion. Corrosion may indicate a loose terminalconnector, or a battery near the end of itsuseful service life. Consult your Volvo retailerfor additional information.
As needed:
Wash the car, including the undercarriage, to reduce wear that can be caused by a buildup ofdirt, and corrosion that can be caused by salt res-idues. Clean leaves and twigs from air intake vents at the base of the windshield, and from other placeswhere they may collect.
NOTE
Complete service information for qualified technicians is available online for purchase orsubscription at www.volvotechinfo.com.