door lock VOLVO V90 CROSS COUNTRY 2021 Service Manual
[x] Cancel search | Manufacturer: VOLVO, Model Year: 2021, Model line: V90 CROSS COUNTRY, Model: VOLVO V90 CROSS COUNTRY 2021Pages: 683, PDF Size: 14.19 MB
Page 276 of 683
||
KEY, LOCKS AND ALARM
274
Related information
Private Locking (p. 272)
Alarm The alarm emits sound and light signals if anyone without a valid remote key attemptsto break into the vehicle or interferes with thestart battery or alarm siren.
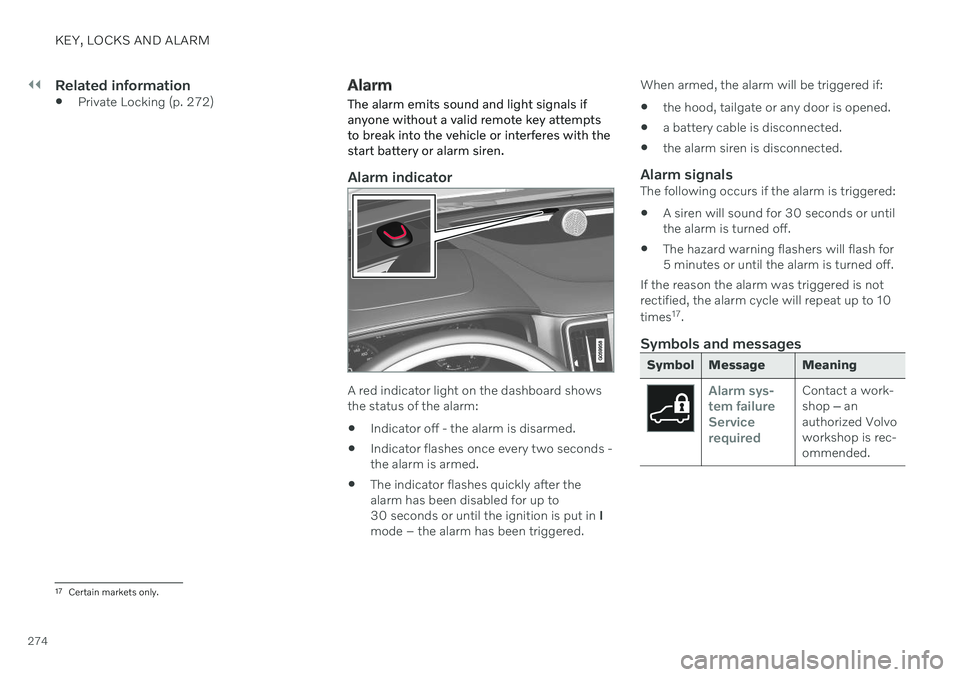
Alarm indicator
A red indicator light on the dashboard shows the status of the alarm:
Indicator off - the alarm is disarmed.
Indicator flashes once every two seconds -the alarm is armed.
The indicator flashes quickly after thealarm has been disabled for up to30 seconds or until the ignition is put in
I
mode – the alarm has been triggered. When armed, the alarm will be triggered if:
the hood, tailgate or any door is opened.
a battery cable is disconnected.
the alarm siren is disconnected.
Alarm signalsThe following occurs if the alarm is triggered:
A siren will sound for 30 seconds or untilthe alarm is turned off.
The hazard warning flashers will flash for5 minutes or until the alarm is turned off.
If the reason the alarm was triggered is notrectified, the alarm cycle will repeat up to 10 times 17
.
Symbols and messages
Symbol Message Meaning
Alarm sys- tem failureServicerequiredContact a work- shop ‒ an
authorized Volvoworkshop is rec-ommended.
17 Certain markets only.
Page 277 of 683
KEY, LOCKS AND ALARM
275
NOTE
Do not attempt to repair or alter any of the components in the alarm system yourself.Any such attempt could affect the termsand conditions of your insurance policy.
Related information
Arming and disarming the alarm (p. 275)
Arming and disarming the alarm
The alarm is armed when the vehicle is locked and disarmed when the vehicle isunlocked. The alarm can also be disarmedwithout a functioning key.
Arming and disarming the alarmThe alarm is armed when the vehicle is locked and disarmed when the vehicle is unlocked.
Disarming the alarm without a functioning remote key
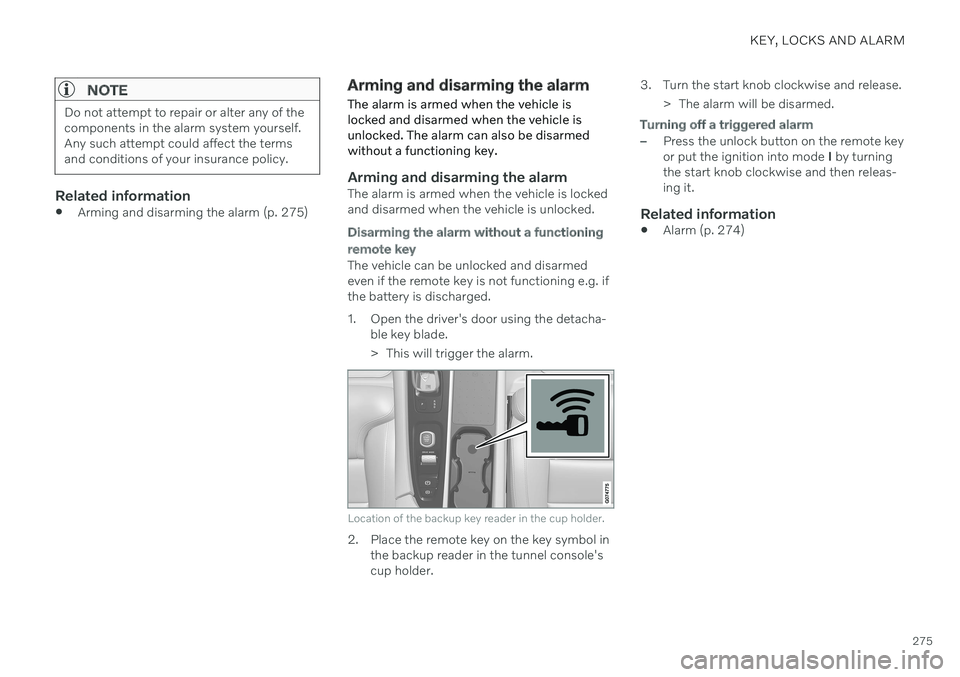
The vehicle can be unlocked and disarmed even if the remote key is not functioning e.g. ifthe battery is discharged.
1. Open the driver's door using the detacha- ble key blade.
> This will trigger the alarm.
Location of the backup key reader in the cup holder.
2. Place the remote key on the key symbol inthe backup reader in the tunnel console's cup holder. 3. Turn the start knob clockwise and release.
> The alarm will be disarmed.
Turning off a triggered alarm
–Press the unlock button on the remote key or put the ignition into mode I by turning
the start knob clockwise and then releas-ing it.
Related information
Alarm (p. 274)
Page 302 of 683
||
DRIVER SUPPORT
* Option/accessory.
300 such as Electronic Stability Control (ESC
45
).
The driver opens the door.
The driver unbuckles the seat belt.
The engine speed (rpm) is too low/high.
One or more of the wheels lose traction.
The brake temperature is high.
The parking brake is applied.
The camera and radar unit is covered by snow or heavy rain (the camera lens/radarwaves are blocked).
Your vehicle's speed goes below 5 km/h(3 mph) and ACC cannot determine if thevehicle ahead is stationary or if it isanother object, e.g. a speed bump.
Your vehicle's speed goes below 5 km/h(3 mph) and the vehicle ahead turns sothat ACC no longer has a vehicle to follow.
Related information
Adaptive Cruise Control
* (p. 294)
Selecting and activating Adaptive Cruise Control
* (p. 297)
Deactivating Adaptive Cruise Control
*
(p. 298)
Adaptive Cruise Control
* limitations
(p. 300)
Adaptive Cruise Control *46
limitations Adaptive Cruise Control (ACC 47
) may have
limited functionality in certain situations.
Steep roads and/or heavy loadsAdaptive Cruise Control is primarily intended to be driven on flat roads. The function maynot be able to maintain the correct time inter-val to the vehicle ahead when driving downsteep hills. The driver should be extra attentiveand prepared to apply the brakes. Do not use Adaptive Cruise Control if the vehi- cle is carrying a heavy load or towing a trailer.
Drive mode unavailableThe Off Road drive mode cannot be selected
if Adaptive Cruise Control is activated.
WARNING
This is not a collision avoidance sys- tem. The driver is always responsibleand must intervene if the system failsto detect a vehicle ahead.
The function does not brake for peopleor animals and does not brake for smallvehicles, such as bikes and motorcy-cles. Similarly, it does not brake for lowtrailers, oncoming, slow-moving or sta-tionary vehicles and objects.
Do not use the function in demandingsituations, such as in city traffic, atintersections, on slippery surfaces,with a lot of water or slush on the road,in heavy rain/snow, in poor visibility, onwinding roads, or on on/off ramps.
NOTE
The function uses the vehicle's camera and radar sensor, which has certain generallimitations.
Related information
Adaptive Cruise Control
* (p. 294)
Camera/radar sensor limitations (p. 390)
45
Electronic Stability Control
46 Depending on market, this function can be either standard or optional.
Page 312 of 683
||
DRIVER SUPPORT
* Option/accessory.
310 2. Press the
◀ (1) or ▶ (3) buttons on the
steering wheel to select another function.
> The Pilot Assist symbol and marking (4) in the instrument panel will go out and the stored maximum speed will beerased.
WARNING
With Pilot Assist in standby mode, the driver must intervene and steer andregulate both speed and distance tothe vehicle ahead.
If the vehicle comes too close to a vehi-cle ahead when Pilot Assist is instandby mode, the driver is insteadwarned of the short distance by the Distance Alert
* function.
Related information
Adaptive Cruise Control
* (p. 294)
Selecting and activating Adaptive CruiseControl
* (p. 297)
Switching between cruise control andAdaptive Cruise Control
* in the center dis-
play (p. 301)
Adaptive Cruise Control
* limitations
(p. 300)
Temporarily deactivating steering assis-tance with Pilot Assist
* (p. 311)
Pilot Assist *59
standby mode
Pilot Assist can be deactivated and put in standby mode. This may happen automati-cally or be due to driver intervention.
Standby mode means that the function is selected in the instrument panel but not acti-vated. In standby mode, Pilot Assist will notregulate the speed or distance to the vehicleahead or provide steering assistance.
Standby mode due to action by the
driver
Pilot Assist will be deactivated and put instandby mode if any of the following occurs:
The brakes are applied.
The gear selector is moved to
N.
A turn signal is used for more than1 minute.
The vehicle is driven faster than the setspeed for more than 1 minute.
Automatic standby mode
WARNING
With automatic standby mode, the driver is warned by an acoustic signal and a mes-sage on the instrument panel.
The driver must then regulate vehicle speed, apply the brakes if necessary,and maintain a safe distance to othervehicles.
The function may automatically go intostandby mode if one of the following occurs. One of the systems that Pilot Assist isdependent on stops working, such as Electronic Stability Control 60
.
The driver's hands are not on the steering wheel.
The driver opens the door.
The driver unbuckles the seat belt.
The engine speed (rpm) is too low/high.
One or more of the wheels lose traction.
The brake temperature is high.
The parking brake is applied.
The camera and radar unit is covered bysnow or heavy rain (the camera lens/radarwaves are blocked).
59
Depending on market, this function can be either standard or optional.
Page 403 of 683
STARTING AND DRIVING
}}
* Option/accessory.401
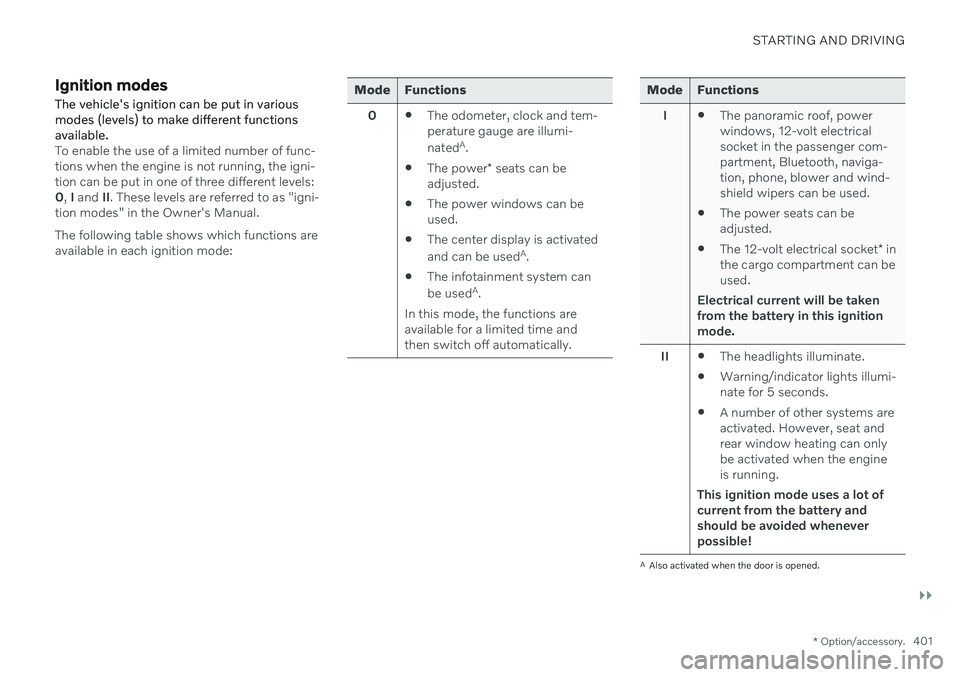
Ignition modes The vehicle's ignition can be put in various modes (levels) to make different functionsavailable.
To enable the use of a limited number of func- tions when the engine is not running, the igni-tion can be put in one of three different levels:0, I and II. These levels are referred to as "igni-
tion modes" in the Owner's Manual. The following table shows which functions are available in each ignition mode:
Mode Functions
0 The odometer, clock and tem- perature gauge are illumi- nated A
.
The power
* seats can be
adjusted.
The power windows can be used.
The center display is activated and can be used A
.
The infotainment system canbe used A
.
In this mode, the functions are available for a limited time andthen switch off automatically.Mode Functions
I The panoramic roof, power windows, 12-volt electricalsocket in the passenger com-partment, Bluetooth, naviga-tion, phone, blower and wind-shield wipers can be used.
The power seats can beadjusted.
The 12-volt electrical socket
* in
the cargo compartment can beused.
Electrical current will be taken
from the battery in this ignitionmode.
II The headlights illuminate.
Warning/indicator lights illumi-nate for 5 seconds.
A number of other systems areactivated. However, seat andrear window heating can onlybe activated when the engineis running.
This ignition mode uses a lot of
current from the battery andshould be avoided wheneverpossible!
A Also activated when the door is opened.
Page 440 of 683
STARTING AND DRIVING
* Option/accessory.
438
Opening/closing the fuel filler door
The vehicle must be unlocked before the fuel filler door can be opened 20
.
An arrow next to the fuel pump symbol in the instru-ment panel indicates the sideof the vehicle on which thefuel filler door is located.
1. Open the fuel filler door by pressing lightly
on its rear edge.
2. After refueling, press the fuel filler door lightly to close it.
Related information
Refueling (p. 438)
Refueling
The fuel tank is equipped with a fuel filling system without a cover.
Refueling the vehicle at a service station
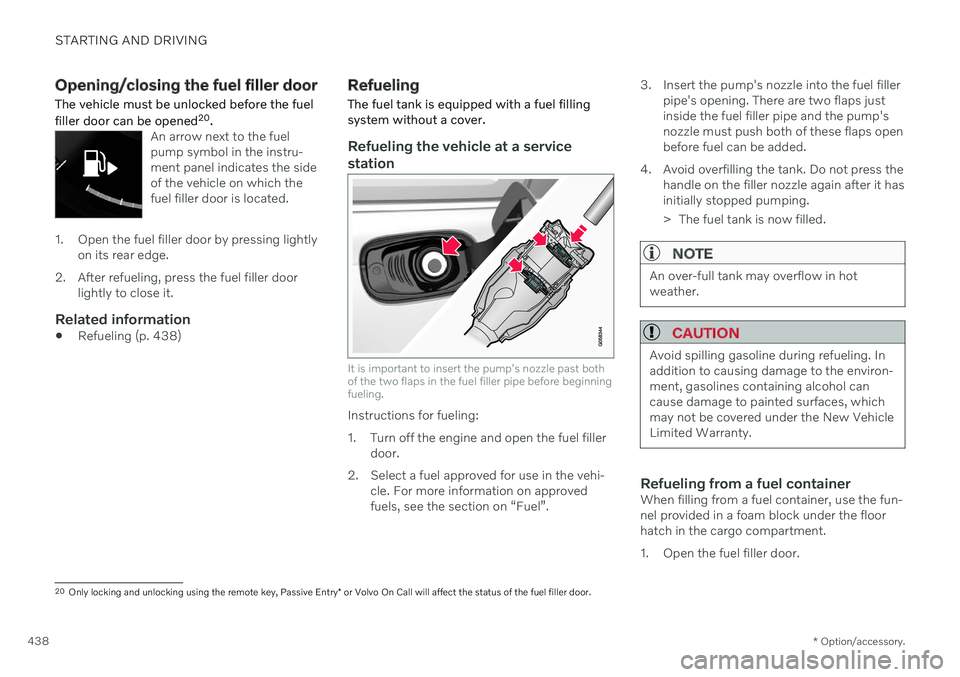
It is important to insert the pump's nozzle past both of the two flaps in the fuel filler pipe before beginningfueling.
Instructions for fueling:
1. Turn off the engine and open the fuel filler door.
2. Select a fuel approved for use in the vehi- cle. For more information on approved fuels, see the section on “Fuel”. 3. Insert the pump's nozzle into the fuel filler
pipe's opening. There are two flaps justinside the fuel filler pipe and the pump'snozzle must push both of these flaps openbefore fuel can be added.
4. Avoid overfilling the tank. Do not press the handle on the filler nozzle again after it hasinitially stopped pumping.
> The fuel tank is now filled.
NOTE
An over-full tank may overflow in hot weather.
CAUTION
Avoid spilling gasoline during refueling. In addition to causing damage to the environ-ment, gasolines containing alcohol cancause damage to painted surfaces, whichmay not be covered under the New VehicleLimited Warranty.
Refueling from a fuel containerWhen filling from a fuel container, use the fun- nel provided in a foam block under the floorhatch in the cargo compartment.
1. Open the fuel filler door.
20Only locking and unlocking using the remote key, Passive Entry * or Volvo On Call will affect the status of the fuel filler door.
Page 458 of 683
||
STARTING AND DRIVING
* Option/accessory.
456
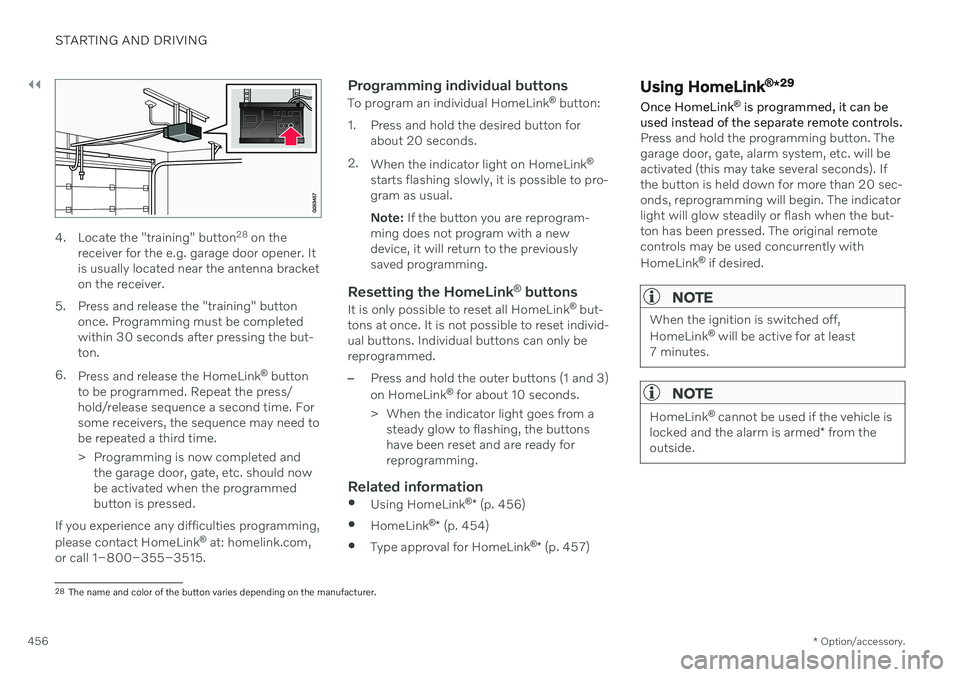
4. Locate the "training" button 28
on the
receiver for the e.g. garage door opener. It is usually located near the antenna bracketon the receiver.
5. Press and release the "training" button once. Programming must be completedwithin 30 seconds after pressing the but-ton.
6. Press and release the HomeLink ®
button
to be programmed. Repeat the press/hold/release sequence a second time. Forsome receivers, the sequence may need tobe repeated a third time.
> Programming is now completed and the garage door, gate, etc. should now be activated when the programmedbutton is pressed.
If you experience any difficulties programming, please contact HomeLink ®
at: homelink.com,
or call 1–800–355–3515.
Programming individual buttons
To program an individual HomeLink ®
button:
1. Press and hold the desired button for about 20 seconds.
2. When the indicator light on HomeLink ®
starts flashing slowly, it is possible to pro- gram as usual. Note: If the button you are reprogram-
ming does not program with a new device, it will return to the previouslysaved programming.
Resetting the HomeLink ®
buttons
It is only possible to reset all HomeLink ®
but-
tons at once. It is not possible to reset individ-ual buttons. Individual buttons can only bereprogrammed.
–Press and hold the outer buttons (1 and 3) on HomeLink ®
for about 10 seconds.
> When the indicator light goes from a steady glow to flashing, the buttons have been reset and are ready forreprogramming.
Related information
Using HomeLink ®
* (p. 456)
HomeLink ®
* (p. 454)
Type approval for HomeLink ®
* (p. 457)
Using HomeLink ®
*29
Once HomeLink ®
is programmed, it can be
used instead of the separate remote controls.
Press and hold the programming button. The garage door, gate, alarm system, etc. will beactivated (this may take several seconds). Ifthe button is held down for more than 20 sec-onds, reprogramming will begin. The indicatorlight will glow steadily or flash when the but-ton has been pressed. The original remotecontrols may be used concurrently with HomeLink ®
if desired.
NOTE
When the ignition is switched off, HomeLink ®
will be active for at least
7 minutes.
NOTE
HomeLink ®
cannot be used if the vehicle is
locked and the alarm is armed * from the
outside.
28 The name and color of the button varies depending on the manufacturer.
Page 521 of 683
AUDIO, MEDIA AND INTERNET
* Option/accessory.519
No or poor Internet connection Factors affecting the Internet connection.
The amount of data transmitted depends on the services or apps currently in use in thevehicle. Streaming music, for example,involves the transmission of a large amount ofdata, and this requires a good connection anda strong signal.
Phone to vehicleInternet connection speed may vary depend-ing on the location of the cellular phone in thevehicle. Move the phone closer to the centerdisplay to increase signal strength. Make surethat nothing is between the phone and centerdisplay that could be blocking the signal.
Phone to network operatorThe speed of the mobile network variesdepending on the coverage in the vehicle'scurrent location. Coverage may be poorer ine.g. tunnels, mountainous areas, deep valleysor indoors. Connection speed is also depend-ent on the subscription you have with yourservice provider.
NOTE
If you experience any problems with data traffic, contact your network service pro-vider.
Restarting the phoneIf you experience any Internet connection problems, it may help to restart your phone.
Related information
Internet-connected vehicle
* (p. 514)
Wi-Fi technology and security (p. 520)
Deleting Wi-Fi networks
Networks that are not needed can be deleted.
1. Tap Settings in the Top view.
2. Proceed to
CommunicationWi-FiSaved networks.
3. Tap
Forget to delete the network.
4. Confirm the selection. > The vehicle will no longer connect tothe deleted network.
Deleting all networksAll networks can be deleted at once by per- forming a factory reset. Please note that alluser data and system settings will be restoredto original default factory settings.
Related information
Internet-connected vehicle
* (p. 514)
No or poor Internet connection (p. 519)
Resetting center display settings (p. 138)
Connecting the vehicle to the Internet viaa phone (Wi-Fi) (p. 515)
Page 595 of 683

MAINTENANCE AND SERVICE
593
Turn the handle under the front edge of the hood counterclockwise to release thecatch and lift the hood.
Warning - hood not closedWhen the hood is released, a warn-ing symbol and graphic will be dis-played in the instrument panel andan audible signal will sound. If the
vehicle begins to roll, the audible signal will berepeated several times.
NOTE
If the warning symbol is illuminated or an audible warning signal sounds even thoughthe hood is securely closed, consult aworkshop - an authorized Volvo workshopis recommended.
Closing the hood1. Press down the hood until it begins to close under its own weight.
2. When the hood reaches the catch at the handle in the front edge of the vehicle, press down on the hood to close it com-pletely.
WARNING
Risk of injury! When closing, make sure that the hood is completely unobstructedand that no one can be injured.
WARNING
Make sure the hood locks securely after closing. It must audibly lock on both sides.
Hood not completely closed.
Hood completely closed.
WARNING
Never drive with the hood open! If this symbol appears, or anything else indicatesthat the hood is not com-pletely closed while driv-ing, stop immediately and
close it properly.
Related information
Engine compartment overview (p. 594)
Door and seat belt reminders (p. 54)
Page 639 of 683
MAINTENANCE AND SERVICE
}}
637
CAUTION
Remember to remove dirt from the drain holes in the doors and sills after washingthe vehicle.
Related information
Cleaning the exterior (p. 634)
Polishing and waxing (p. 635)
Automatic car washes (p. 637)
High-pressure washing (p. 638)
Cleaning the wiper blades (p. 639)
Cleaning exterior plastic, rubber and trim components (p. 639)
Cleaning rims (p. 640)
Corrosion protection (p. 641)
Settings for automatically activating theparking brake (p. 408)
Automatic car washes
The vehicle should be washed as soon as it becomes dirty. The longer the dirt remains,the more difficult it will be to keep the vehicleclean. It could also lead to paint damage.
Washing your vehicle in an automatic car wash is a fast and easy way to keep your vehi-cle clean, but it does not reach all areas of thevehicle. Volvo recommends washing yourvehicle by hand or supplementing automaticcar washes with a hand wash.
NOTE
Volvo recommends not washing the vehi- cle in an automatic car wash during thefirst few months; the paintwork on newvehicles takes some time to fully harden.
CAUTION
Before driving the vehicle into a car wash, deactivate the Automatic Braking whenStationary and Automatic Parking BrakeApplication functions. If the functions arenot deactivated, the brake system willseize when the vehicle is stationary and thevehicle will not be able to roll.
CAUTION
For automatic car washes in which the vehicle is pulled forward on rolling wheels:
1. Before washing the vehicle, make sure that the automatic rain sensor is deac- tivated. If it is not deactivated andinadvertently starts, the wiper armscould be damaged.
2. To help prevent damage from the auto- matic car wash machinery, make surethat the door mirrors are folded in,antennas retracted or removed, andany auxiliary lights secured.
3. Drive into the automatic car wash.
4. Turn off the "Automatic Braking when Stationary" function using the
but-
ton in the tunnel console.
5. Turn off the "Automatic Parking Brake Application" function in the center dis- play's Top view.
6. Turn off the engine by turning the start knob in the tunnel console clockwise.Hold the knob in position for at least2 seconds.
The vehicle is now ready for the automaticcar wash.