change wheel VOLVO V90 CROSS COUNTRY 2021 Owners Manual
[x] Cancel search | Manufacturer: VOLVO, Model Year: 2021, Model line: V90 CROSS COUNTRY, Model: VOLVO V90 CROSS COUNTRY 2021Pages: 683, PDF Size: 14.19 MB
Page 94 of 683
DISPLAYS AND VOICE CONTROL
* Option/accessory.
92
Instrument panel settings
Display settings for the instrument panel can be set in the instrument panel's App menuand in the center display's Settings menu.
Settings via instrument panel's app menu
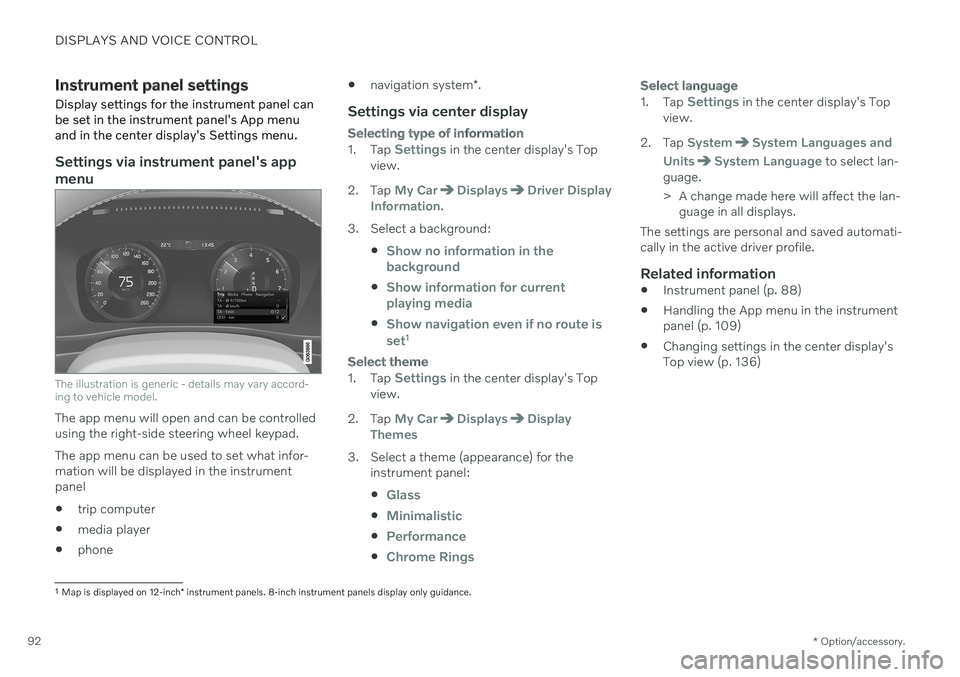
The illustration is generic - details may vary accord- ing to vehicle model.
The app menu will open and can be controlled using the right-side steering wheel keypad. The app menu can be used to set what infor- mation will be displayed in the instrumentpanel trip computer
media player
phone
navigation system
*.
Settings via center display
Selecting type of information
1.
Tap Settings in the center display's Top
view.
2. Tap
My CarDisplaysDriver Display
Information.
3. Select a background:
Show no information in the background
Show information for current playing media
Show navigation even if no route is set1
Select theme
1.Tap Settings in the center display's Top
view.
2. Tap
My CarDisplaysDisplay
Themes
3. Select a theme (appearance) for the instrument panel:
Glass
Minimalistic
Performance
Chrome Rings
Select language
1.Tap Settings in the center display's Top
view.
2. Tap
SystemSystem Languages and
Units
System Language to select lan-
guage.
> A change made here will affect the lan- guage in all displays.
The settings are personal and saved automati- cally in the active driver profile.
Related information
Instrument panel (p. 88)
Handling the App menu in the instrumentpanel (p. 109)
Changing settings in the center display'sTop view (p. 136)
1
Map is displayed on 12-inch * instrument panels. 8-inch instrument panels display only guidance.
Page 98 of 683
||
DISPLAYS AND VOICE CONTROL
963. Scroll down to the option buttons to
choose which information to show in the instrument panel: Odometer
Distance to empty tank
Tourist (alternative speedometer)
Mileage for trip odometer TM, TA or no display of mileage
Current fuel consumption, average fuelconsumption for TM or TA, or no dis-play of fuel consumption
Select or clear a selection using the O but-
ton (4). The change will apply immedi-ately.
Related information
Trip computer (p. 93)
Resetting the trip odometer (p. 96)
Resetting the trip odometer Resetting the trip odometer using the left- side steering wheel lever.
–Reset all information in trip odometer TM (i.e. mileage, average fuel consumption,average speed and driving time) by press-ing and holding the
RESET button on the
left-hand steering wheel lever. Pressing the RESET button only resets
the distance driven.
The TA trip odometer can not be manually reset. It resets automatically if the vehicle isnot used for four hours or more.
Related information
Trip computer (p. 93)
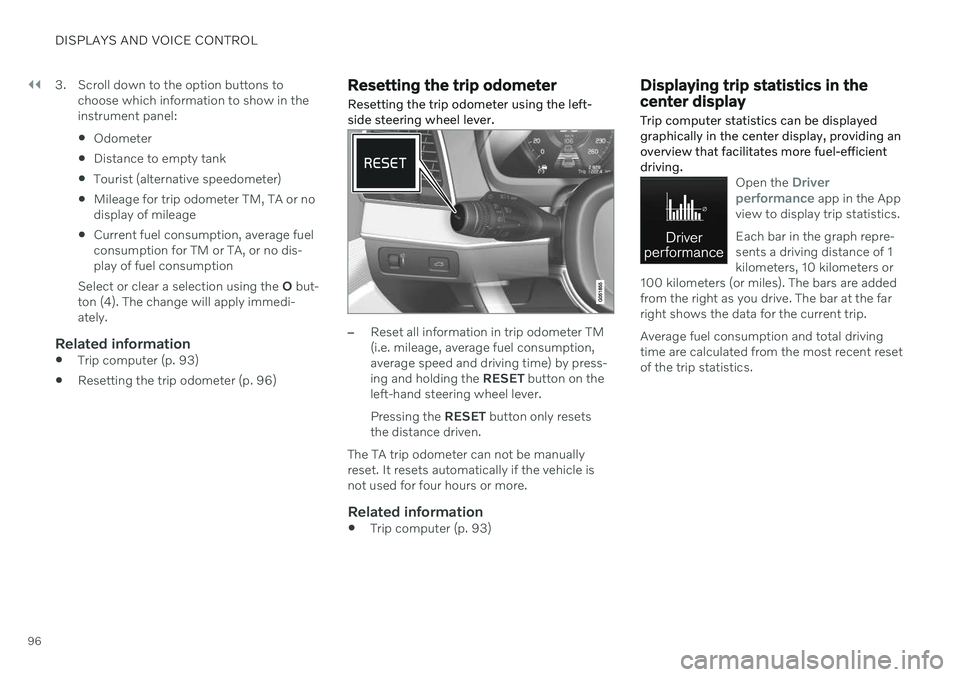
Displaying trip statistics in the center display Trip computer statistics can be displayed graphically in the center display, providing anoverview that facilitates more fuel-efficientdriving.
Open the Driver
performance app in the App
view to display trip statistics. Each bar in the graph repre- sents a driving distance of 1kilometers, 10 kilometers or
100 kilometers (or miles). The bars are addedfrom the right as you drive. The bar at the farright shows the data for the current trip. Average fuel consumption and total driving time are calculated from the most recent resetof the trip statistics.
Page 111 of 683
DISPLAYS AND VOICE CONTROL
}}
109
App Functions Trip com- puterSelect a trip odometer,change instrument panel dis-play settings, etc.
Mediaplayer Select active source formedia player.
Phone Call a contact from the call list.
Navigation Guide to destination, etc.
Related information
Instrument panel (p. 88)
Center display overview (p. 114)
Handling the App menu in the instrument panel (p. 109)
Handling the App menu in the instrument panel
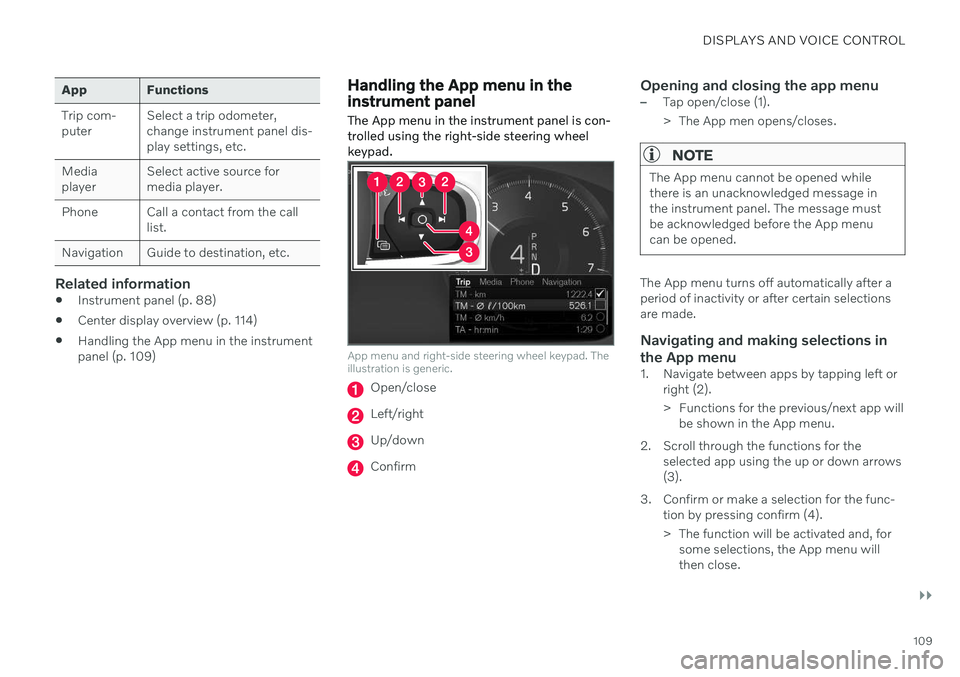
The App menu in the instrument panel is con- trolled using the right-side steering wheelkeypad.
App menu and right-side steering wheel keypad. The illustration is generic.
Open/close
Left/right
Up/down
Confirm
Opening and closing the app menu–Tap open/close (1).
> The App men opens/closes.
NOTE
The App menu cannot be opened while there is an unacknowledged message inthe instrument panel. The message mustbe acknowledged before the App menucan be opened.
The App menu turns off automatically after a period of inactivity or after certain selectionsare made.
Navigating and making selections in the App menu
1. Navigate between apps by tapping left or right (2).
> Functions for the previous/next app willbe shown in the App menu.
2. Scroll through the functions for the selected app using the up or down arrows (3).
3. Confirm or make a selection for the func- tion by pressing confirm (4).
> The function will be activated and, forsome selections, the App menu will then close.
Page 153 of 683
DISPLAYS AND VOICE CONTROL
}}
* Option/accessory.151
These may include:
Wait until after the tone, and then speak in your normal voice at a normal speed.
Do not speak while the system is respond-ing (the system is unable to process com-mands during this time).
Avoid background noises in the passengercompartment by keeping doors, windows and the panoramic roof
* closed.
NOTE
Not all system languages support voice control. If a language supports voice con- trol, it is marked with a
symbol in the
list of available system languages. Read more about where the information is foundin the section on voice control settings.
Generally, the system will listen for a basic command that is then followed by moredetailed commands specifying what you wantthe system to do. To change the audio volume of the system, turn the volume knob while the voice is speak-ing. It is possible to use other buttons whilevoice commands are being given. However,because other audio is silenced during dialogwith the system, it is not possible to perform any functions connected to audio using thebuttons.
Canceling voice controlTo cancel voice control, do one of the follow-ing:
Briefly press
and say "Cancel".
Press and hold the steering wheel key- pad's voice command button
until
two audible signals are given. This cancels voice control even when the system isspeaking.
Voice control will also be canceled if you donot respond during a dialog. The system willfirst ask three times for a response and if theresponse is still not given, voice control will beautomatically canceled. To speed up communication and skip prompts from the system, press the voice control but- ton
on the steering wheel keypad. This
will interrupt the system's response and you can say the next command.
Voice command examples
1. Tap . 2.
Say "
Call [First name] [Last name]
[number category]", e.g. "Call Robyn
Smith cellular".
> The system will call the selected con- tact from the phone book. If the contact has several phone numbers (e.g. home,cell, work), the right category must alsobe given.
Commands/phrasesThe following commands can usually be usedin any situation:
"
Repeat" - repeats the most recent voice
command in the current dialog.
"
Cancel" - cancels the dialog. 19
"
Help" - initiates a help dialog. The sys-
tem responds with commands that can be used in the current situation, an instruc-tion or an example.
Commands for specific functions, such as phone and audio, are described in the sections related to that function.
19 Note that this only cancels the dialog when the system is not speaking. To do this, press and hold until you hear two beeps.
Page 192 of 683

SEATS AND STEERING WHEEL
* Option/accessory.
190
Manual front seats
The front seats can be adjusted in a number of different ways to help enhance your seat-ing comfort.
Raise/lower the front edge of the seat cushion * by moving the control up/down. 1
Change the length of the seat cushion
* by
pulling up the lever and moving the cush- ion forward/backward.
Move the seat forward/backing by lifting the handle and moving the seat to a suita-ble distance from the steering wheel andpedals. Check to make sure the seat issecurely locked into place after its settinghas been changed.
Adjust lumbar support * by pressing the
button up/down/forward/rearward. 2
Raise/lower the seat by moving the con- trol up/down.
Change the backrest tilt by turning the knob on the backrest.
WARNING
Do not adjust the seat while driving. The seat should be adjusted so that thebrake pedal can be depressed fully. Inaddition, position the seat as far rear-ward as comfort and control allow.
Check that the seat is securely lockedinto position after adjusting.
Related information
Power
* front seats (p. 191)
Adjusting the power
* front seats (p. 191)
Storing positions for seats, mirrors and head-up display
* (p. 192)
Using stored positions for seats, mirrorsand head-up display
* (p. 193)
Adjusting front seat massage settings
*
(p. 195)
Adjusting
* front seat cushion length
(p. 196)
Front seat massage
* settings (p. 194)
Adjusting front seat side bolster settings
*
(p. 197)
Adjusting front seat lumbar support
*
(p. 197)
Adjusting the passenger seat from thedriver's seat
* (p. 199)
1
Only applies to the driver's seat.
2 Applies for four-way lumbar support *. Two-way lumbar support * is adjusted forward/rearward.
Page 194 of 683

||
SEATS AND STEERING WHEEL
* Option/accessory.
192
Raise/lower the seat by moving the con- trol up/down.
Move the seat forward/rearward by mov- ing the control forward/rearward.
Change the backrest tilt by moving the control forward/backward.
Only one movement (forward/rearward/up/down) can be performed at a time. The front seat backrests cannot be folded down completely.
Related information
Manual front seats (p. 190)
Power
* front seats (p. 191)
Storing positions for seats, mirrors and head-up display
* (p. 192)
Using stored positions for seats, mirrorsand head-up display
* (p. 193)
Adjusting front seat massage settings
*
(p. 195)
Adjusting
* front seat cushion length
(p. 196)
Front seat massage
* settings (p. 194)
Adjusting front seat side bolster settings
*
(p. 197)
Adjusting front seat lumbar support
*
(p. 197)
Adjusting the passenger seat from thedriver's seat
* (p. 199)
Storing positions for seats, mirrors and head-up display *
Adjustment settings for the power * seat, door
mirrors and head-up display * can be stored in
the memory buttons.
Two different positions for the power * seat,
door mirrors and head-up display * can be
stored using the memory buttons. The buttons are located on the inside of either one or both *
front doors.
Button M for storing a setting.
Memory button.
Memory button.
4
Not available in vehicles with two-way lumbar support *.
Page 197 of 683

SEATS AND STEERING WHEEL
* Option/accessory.195
Restarting the massage function
The massage function turns off automatically after 20 minutes. The function is reactivatedmanually.
–Tap Restart, which is displayed in the
center display, to restart the selected mas- sage program.
> The massage program will restart. If no selection is made, the message will be stored in Top view.
Related information
Manual front seats (p. 190)
Power
* front seats (p. 191)
Adjusting the power
* front seats (p. 191)
Storing positions for seats, mirrors and head-up display
* (p. 192)
Using stored positions for seats, mirrorsand head-up display
* (p. 193)
Adjusting front seat massage settings
*
(p. 195)
Adjusting
* front seat cushion length
(p. 196)
Adjusting front seat side bolster settings
*
(p. 197)
Adjusting front seat lumbar support
*
(p. 197)
Adjusting the passenger seat from thedriver's seat
* (p. 199)
Adjusting front seat massage settings *
The settings for the multifunctional seats can be adjusted using either the mutifunctioncontrol on the seat or the center display. Theadjustment settings are shown in the centerdisplay.
Adjusting front seat massage settingsThe front seat backrests have a massage func- tion. Air-filled cushions provide the massagingaction and a number of settings are available. The massage function can only be activated when the engine is running.
1. Activate the multifunction control by turn-
ing the control
upward/downward. The
seat settings view will appear in the center display. 2.
Select
Massage in the seat settings view.
3. Select massage settings by tapping the center display or by moving the cursor up/ down using the multifunction control's upper
/lower buttons. Change a set-
ting in the selected function by tapping the arrows on the center display or by using the multifunction control's front
/
rear
buttons.
Related information
Manual front seats (p. 190)
Power
* front seats (p. 191)
Adjusting the power
* front seats (p. 191)
Storing positions for seats, mirrors and head-up display
* (p. 192)
Using stored positions for seats, mirrorsand head-up display
* (p. 193)
Adjusting
* front seat cushion length
(p. 196)
Front seat massage
* settings (p. 194)
Adjusting front seat side bolster settings
*
(p. 197)
Adjusting front seat lumbar support
*
(p. 197)
Adjusting the passenger seat from thedriver's seat
* (p. 199)
Page 201 of 683
SEATS AND STEERING WHEEL
* Option/accessory.199
Adjusting the passenger seat from the driver's seat *
The front passenger seat can be adjusted from the driver's seat.
Activating the functionThe function is activated via the function view in the center display:
Tap the
Adjust Passenger
Seat button to activate.
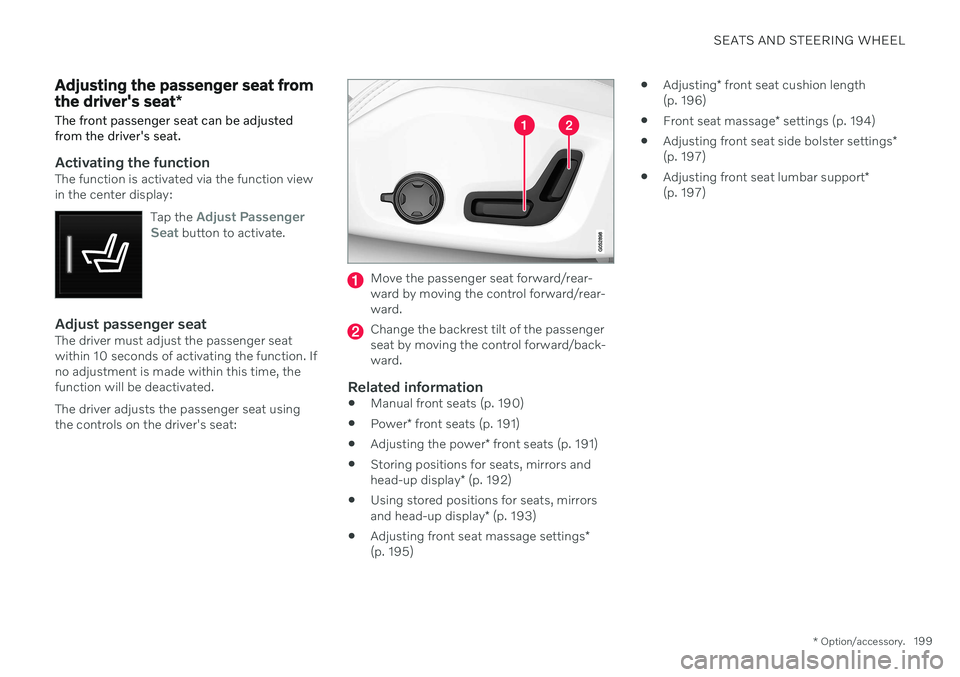
Adjust passenger seatThe driver must adjust the passenger seat within 10 seconds of activating the function. Ifno adjustment is made within this time, thefunction will be deactivated. The driver adjusts the passenger seat using the controls on the driver's seat:
Move the passenger seat forward/rear- ward by moving the control forward/rear-ward.
Change the backrest tilt of the passenger seat by moving the control forward/back-ward.
Related information
Manual front seats (p. 190)
Power
* front seats (p. 191)
Adjusting the power
* front seats (p. 191)
Storing positions for seats, mirrors and head-up display
* (p. 192)
Using stored positions for seats, mirrorsand head-up display
* (p. 193)
Adjusting front seat massage settings
*
(p. 195)
Adjusting
* front seat cushion length
(p. 196)
Front seat massage
* settings (p. 194)
Adjusting front seat side bolster settings
*
(p. 197)
Adjusting front seat lumbar support
*
(p. 197)
Page 210 of 683
CLIMATE CONTROL
* Option/accessory.
208
Perceived temperature
The climate control system regulates the cli- mate in the passenger compartment basedon perceived temperature, not actual tem-perature.
The selected passenger compartment tem- perature is based on the physical perception ofthe current ambient temperature, airflowspeed, humidity, sunlight in the passengercompartment, etc. The system has a sunlight sensor that detects which side of the vehicle the sunlight is shin-ing on and adjusts the temperature accord-ingly. This means that the temperature of theair coming out of the vents may be differentfor the left and right sides, even if the tem-perature setting is the same for both sides.
Related information
Climate (p. 206)
Climate control system voice commands 1
Voice commands can be used for the climate control system to e.g. change temperature, activate seat heating * or change blower
speed.
Tap and say one of the following com-
mands: "
Climate" - starts a command dialog for
climate controls and provides examples of commands that can be used.
"
Set temperature to X degrees" - sets
desired temperature.
"
Raise temperature"/"Lower
temperature" - raises/lowers the set tem-
perature.
"
Sync temperature" - synchronizes the
temperature for all climate zones in the vehicle with the temperature set for thedriver's side.
"
Air on feet"/"Air on body" - opens the
desired air vent.
"
Air on feet off"/"Air on body off" -
closes the desired air vent.
"
Set fan to max"/"Turn off fan" -
changes blower speed to Max/Off.
"
Raise fan speed"/"Lower fan speed" -
raises/lowers the set blower speed.
"
Turn on auto" - activates automatic cli-
mate control.
"
Air condition on"/"Air condition off" -
activates/deactivates air conditioning.
"
Recirculation on"/"Recirculation off" -
activates/deactivates air recirculation.
"
Turn on defroster "/"Turn off
defroster" - activates/deactivates win-
dow and door mirror defrosting.
"
Turn on max defroster"/"Turn off max
defroster" - activates/deactivates max
defroster.
"
Turn on rear defroster"/"Turn off rear
defroster" - Activates/deactivates heated
rear window and door mirrors.
"
Turn steering wheel heat on"/"Turn
steering wheel heat off" - activates/
deactivates heated steering wheel *.
"
Raise steering wheel heat"/"Lower
steering wheel heat" - raises/lowers the
level of steering wheel heating *.
"
Turn on seat heat"/"Turn off seat heat"
- activates/deactivates seat heating *.
"
Raise seat heat"/"Lower seat heat" -
raises/lowers the level of seat heating *.
1
Certain markets only.
Page 222 of 683
||
CLIMATE CONTROL
* Option/accessory.
220 only the controls for seat adjustment
* and the
unlock button will be displayed. After unlocking, blower speed and tempera- ture can also be changed from the climatepanel and all selected climate settings will bedisplayed. The screen locks automatically aftera period of inactivity.
Related information
Climate (p. 206)
Activating and deactivating power front seats
* (p. 220)
Activating and deactivating the heatedrear seats
* (p. 221)
Activating and deactivating front seat ven-tilation
* (p. 223)
Activating and deactivating the heatedsteering wheel
* (p. 223)
Activating auto climate control (p. 224)
Activating and deactivating recirculation (p. 225)
Activating and deactivating max defroster(p. 226)
Activating and deactivating the heatedrear window and door mirrors (p. 227)
Setting the blower speed for the frontseats (p. 228)
Setting the blower speed for the rear seats
* (p. 229)
Synchronize temperature (p. 232)
Activating and deactivating air condition- ing (p. 233)
Activating and deactivating power front seats
*
The seats can be heated for added comfort for the driver and passengers in cold weather.
1. Tap the left- or right-side steering wheel and seat button in the center display's cli- mate bar to open the controls for steeringwheel and seat heating. If the vehicle is not equipped with ventila- ted seats or heated steering wheel (for thedriver's side), the button for seat heating isdirectly accessible in the climate bar.
2. Tap the seat heating button repeatedly to
select one of the four levels: Off, High,Medium or Low.
> The level is changed and the set level is displayed in the button.