manual transmission VOLVO V90 CROSS COUNTRY 2021 Owners Manual
[x] Cancel search | Manufacturer: VOLVO, Model Year: 2021, Model line: V90 CROSS COUNTRY, Model: VOLVO V90 CROSS COUNTRY 2021Pages: 683, PDF Size: 14.19 MB
Page 89 of 683
DISPLAYS AND VOICE CONTROL
* Option/accessory.87
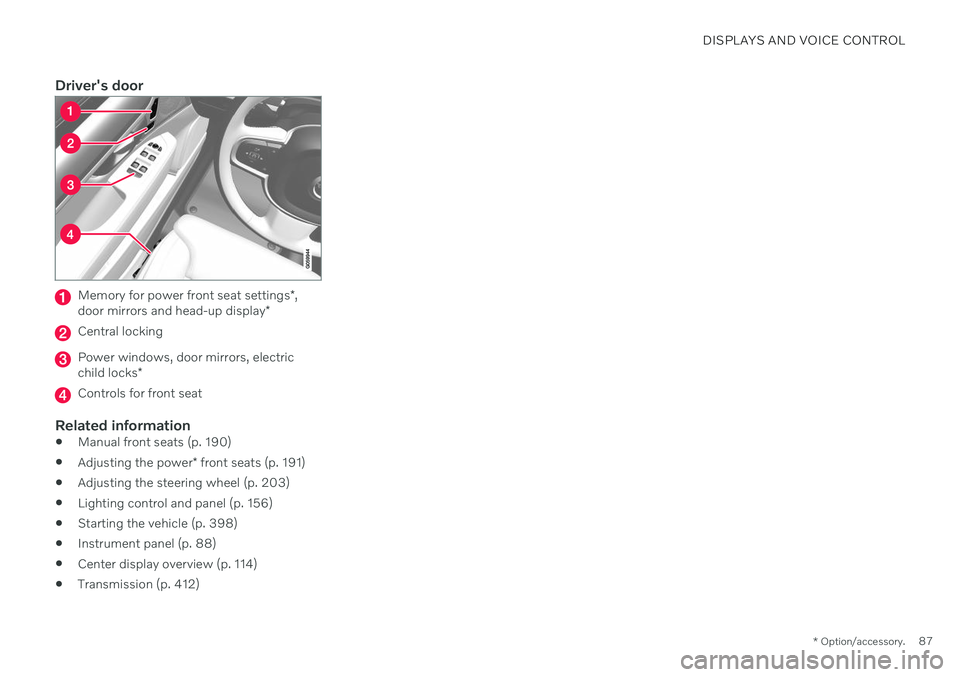
Driver's door
Memory for power front seat settings *,
door mirrors and head-up display *
Central locking
Power windows, door mirrors, electric child locks*
Controls for front seat
Related information
Manual front seats (p. 190)
Adjusting the power
* front seats (p. 191)
Adjusting the steering wheel (p. 203)
Lighting control and panel (p. 156)
Starting the vehicle (p. 398)
Instrument panel (p. 88)
Center display overview (p. 114)
Transmission (p. 412)
Page 204 of 683

||
SEATS AND STEERING WHEEL
* Option/accessory.
202
Tap the Headrest Fold but-
ton to activate/deactivate folding.
Manually push the head restraint until it clicks into position.
WARNING
Do not lower the head restraint if there are passengers in any of the rear seats.
WARNING
The head restraint must be locked in the upright position after it has been folded up.
Folding the rear seat outboard head restraints using the handle
For vehicles with the electric folding function *,
the outboard head restraints can be folded using the handle on the top of the seat (see illustration
.) Note that this method also
folds down the backrests. To fold down only the head restraints, e.g. to improve visibility, use the center display * instead. On models
without electrically folding backrests, the head restraints cannot be moved.
Related information
Folding down the rear seat backrests (p. 200)
Steering wheel controls and horn The steering wheel has a horn and controls for e.g. driver support systems and voice con-trol.
Steering wheel keypads and paddles
*.
Driver support system controls. 5
Paddle
* for manually shifting gears (auto-
matic transmission).
Controls for voice commands, accessing menus and messages, and handlingphone calls.
5 Cruise Control, Adaptive Cruise Control *, Distance Alert * and Pilot Assist.
Page 414 of 683
STARTING AND DRIVING
* Option/accessory.
412
Transmission
The transmission is part of the vehicle's drive- line (power transmission) between the engineand the drive wheels. The function of thetransmission is to change gears dependingon speed and power needs.
The vehicle has an 8-speed automatic trans- mission. The number of gears allows theengine's torque and power band to be effec-tively utilized. Two of the gears are overdrive gears that save fuel when driving at a constant engine speed.Both the gear selector and the steering wheelpaddles can be used to shift up or down man-ually. The selected gear selector position willbe displayed in the instrument panel.
Related information
Automatic transmission (p. 412)
Automatic transmission
Gear position is selected automatically to make driving as energy efficient as possible.The transmission also has a manual mode.
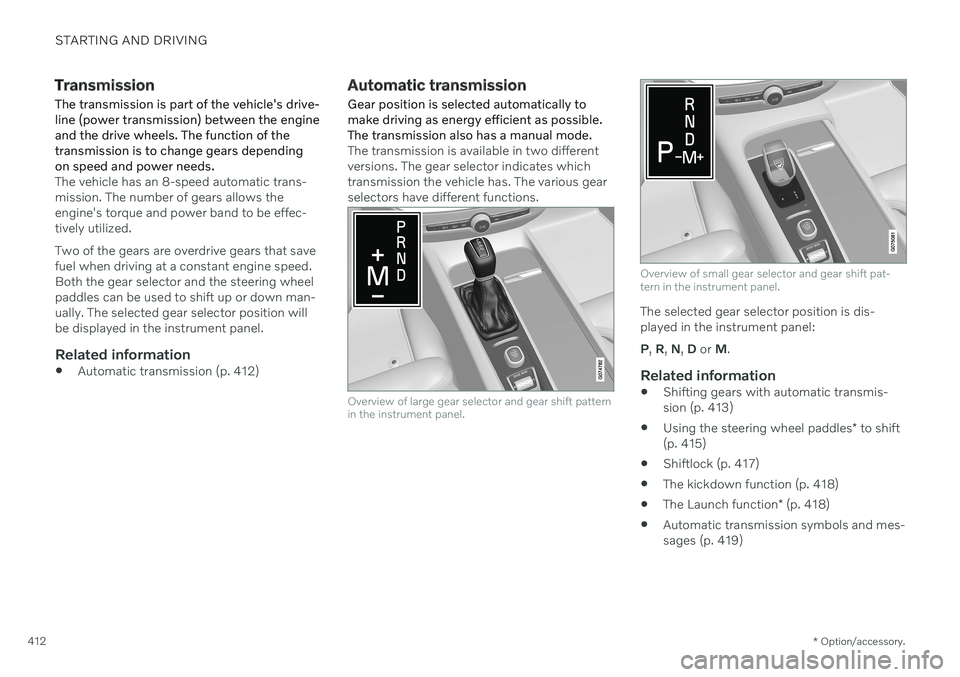
The transmission is available in two different versions. The gear selector indicates whichtransmission the vehicle has. The various gearselectors have different functions.
Overview of large gear selector and gear shift pattern in the instrument panel.
Overview of small gear selector and gear shift pat- tern in the instrument panel.
The selected gear selector position is dis- played in the instrument panel: P , R , N , D or M.
Related information
Shifting gears with automatic transmis- sion (p. 413)
Using the steering wheel paddles
* to shift
(p. 415)
Shiftlock (p. 417)
The kickdown function (p. 418)
The Launch function
* (p. 418)
Automatic transmission symbols and mes-sages (p. 419)
Page 415 of 683
STARTING AND DRIVING
}}
413
Shifting gears with automatic transmission
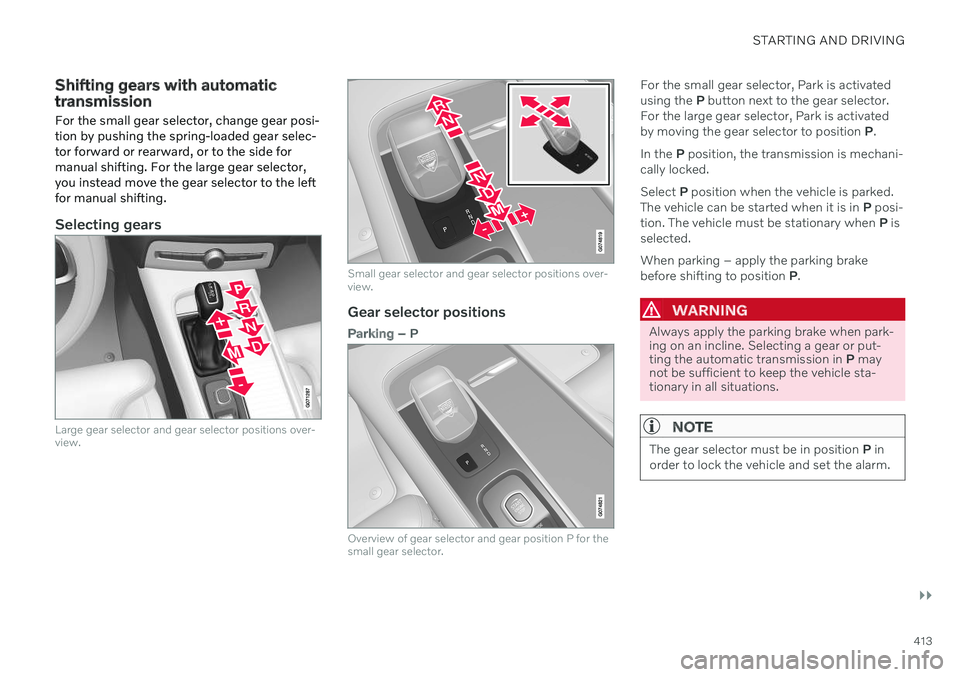
For the small gear selector, change gear posi- tion by pushing the spring-loaded gear selec-tor forward or rearward, or to the side formanual shifting. For the large gear selector,you instead move the gear selector to the leftfor manual shifting.
Selecting gears
Large gear selector and gear selector positions over- view.
Small gear selector and gear selector positions over- view.
Gear selector positions
Parking – P
Overview of gear selector and gear position P for the small gear selector.
For the small gear selector, Park is activated using the P button next to the gear selector.
For the large gear selector, Park is activatedby moving the gear selector to position P.
In the P position, the transmission is mechani-
cally locked. Select P position when the vehicle is parked.
The vehicle can be started when it is in P posi-
tion. The vehicle must be stationary when P is
selected. When parking – apply the parking brake before shifting to position P.
WARNING
Always apply the parking brake when park- ing on an incline. Selecting a gear or put-ting the automatic transmission in P may
not be sufficient to keep the vehicle sta-tionary in all situations.
NOTE
The gear selector must be in position P in
order to lock the vehicle and set the alarm.
Page 416 of 683
||
STARTING AND DRIVING
414Help functions
6
The system will switch to the P position auto-
matically:
if the ignition is switched off while
D or R
is selected.
if the driver unbuckles the seat belt and opens the driver's door while the vehicle isrunning with a gear other than
P selected.
To park a vehicle with an unbuckled seat beltand open door – end P mode by shifting to R
or D again.
If the vehicle is switched off in gear positionN , it will not automatically switch to the P
position. This makes it possible to wash thevehicle in an automatic car wash.
Reverse – R
Select R when backing up. The vehicle must
be stationary when R is selected.
Neutral – N
In N position, the vehicle can roll freely. The
vehicle can be started when it is in N position.
Apply the parking brake if the vehicle is sta- tionary with the gear selector in the N posi-
tion. To move to another gear position when N is
selected, the brake pedal must be depressed and the ignition in mode II. For vehicles with the small gear selector, the engine must berunning.
D
drive mode
D is the normal driving gear position. The
transmission shifts up or down automatically depending on acceleration and speed. The vehicle must be stationary when the gear selector is moved from R to D.
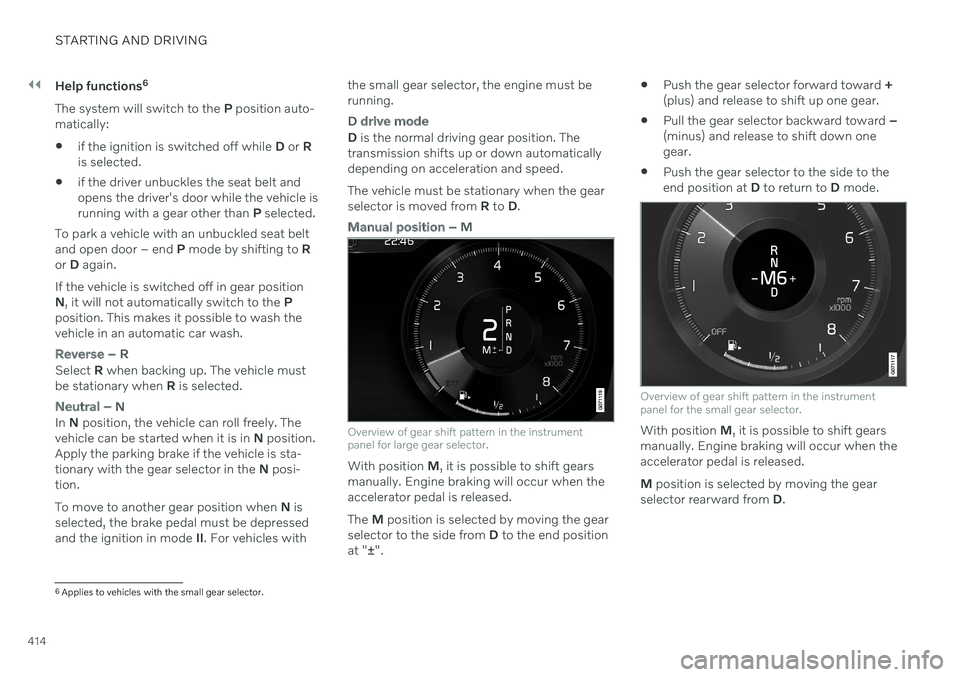
Manual position – M
Overview of gear shift pattern in the instrument panel for large gear selector.
With position M, it is possible to shift gears
manually. Engine braking will occur when the accelerator pedal is released. The M position is selected by moving the gear
selector to the side from D to the end position
at " ±".
Push the gear selector forward toward
+
(plus) and release to shift up one gear.
Pull the gear selector backward toward
–
(minus) and release to shift down one gear.
Push the gear selector to the side to theend position at
D to return to D mode.
Overview of gear shift pattern in the instrument panel for the small gear selector.
With position M, it is possible to shift gears
manually. Engine braking will occur when the accelerator pedal is released. M position is selected by moving the gear
selector rearward from D.
6
Applies to vehicles with the small gear selector.
Page 417 of 683
STARTING AND DRIVING
}}
* Option/accessory.415
Push the gear selector to the right toward "
+ " (plus) and release to shift up one gear.
Push the gear selector to the left toward"
– " (minus) and release to shift down one
gear.
Push the gear selector rearward to returnto
D mode.
For smooth shifting and engine performance,the transmission will shift down automaticallyif the vehicle's speed becomes too low for theselected gear.
Related information
Automatic transmission (p. 412)
Shiftlock (p. 417)
Using the steering wheel paddles
* to shift
(p. 415)
The kickdown function (p. 418)
Using the steering wheel paddles
*
to shift
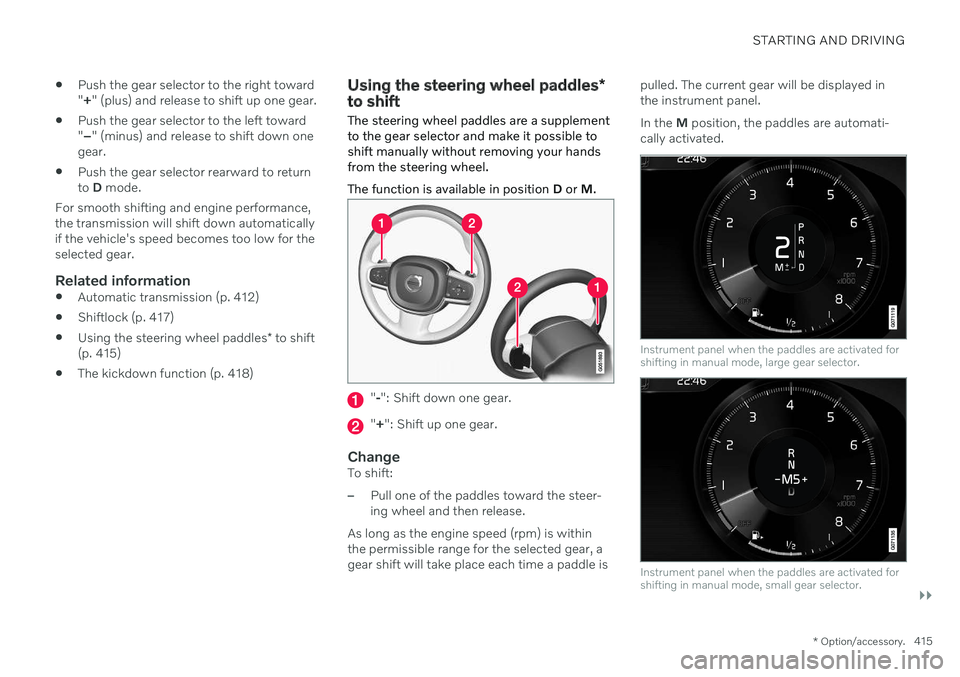
The steering wheel paddles are a supplement to the gear selector and make it possible toshift manually without removing your handsfrom the steering wheel. The function is available in position D or M.
"-": Shift down one gear.
" + ": Shift up one gear.
ChangeTo shift:
–Pull one of the paddles toward the steer- ing wheel and then release.
As long as the engine speed (rpm) is withinthe permissible range for the selected gear, agear shift will take place each time a paddle is pulled. The current gear will be displayed inthe instrument panel. In the
M position, the paddles are automati-
cally activated.
Instrument panel when the paddles are activated for shifting in manual mode, large gear selector.
Instrument panel when the paddles are activated for shifting in manual mode, small gear selector.
Page 418 of 683
||
STARTING AND DRIVING
416
Activating the steering wheel paddles in the D position
To be able to shift gears using the paddles, they must be activated:
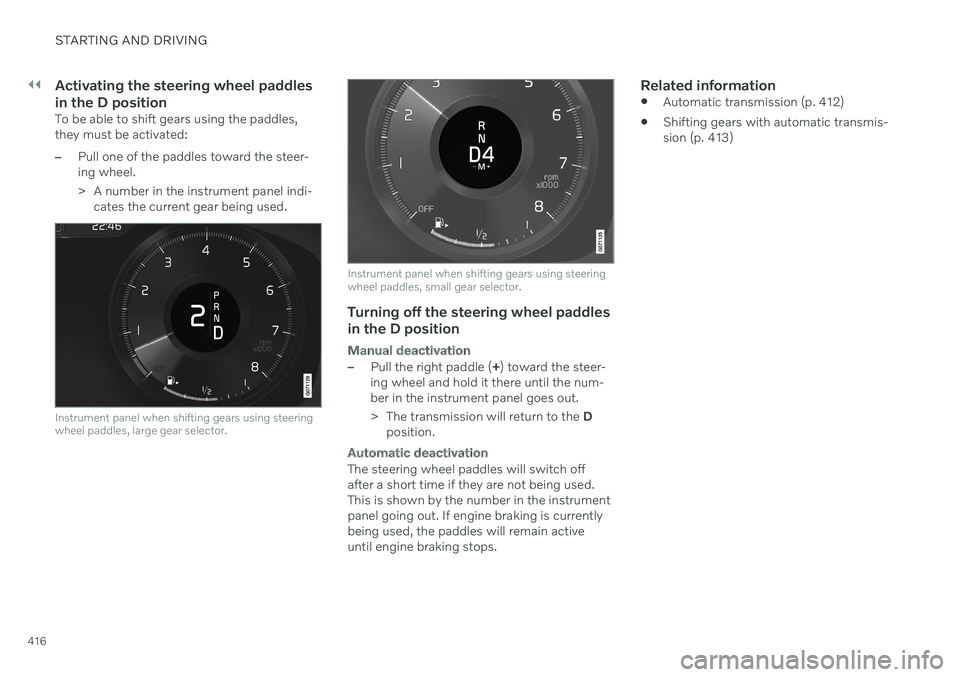
–Pull one of the paddles toward the steer- ing wheel.
> A number in the instrument panel indi-cates the current gear being used.
Instrument panel when shifting gears using steering wheel paddles, large gear selector.
Instrument panel when shifting gears using steering wheel paddles, small gear selector.
Turning off the steering wheel paddles
in the D position
Manual deactivation
–Pull the right paddle ( +) toward the steer-
ing wheel and hold it there until the num- ber in the instrument panel goes out.
> The transmission will return to the D
position.
Automatic deactivation
The steering wheel paddles will switch off after a short time if they are not being used.This is shown by the number in the instrumentpanel going out. If engine braking is currentlybeing used, the paddles will remain activeuntil engine braking stops.
Related information
Automatic transmission (p. 412)
Shifting gears with automatic transmis-sion (p. 413)
Page 425 of 683
STARTING AND DRIVING
}}
* Option/accessory.423
Limitations
Eco Coast is not available if
the engine and/or transmission are not at normal working temperatures
the gear selector is moved from
D to man-
ual shifting mode
the vehicle's speed is not within the65-140 km/h (40-87 mph) range
the gradient of the downgrade is morethan approximately 6%
the steering wheel paddles
* are being
used for manual shifting.
Deactivating and turning off Eco Coast
In certain situations, it may be advisable to deactivate or turn off Eco Coast so that enginebraking can be used. These situations mightinclude driving down steep hills or beforepassing another vehicle to help ensure thiscan be done as safely as possible. Deactivate Eco Coast by
pressing the accelerator or brake pedal
moving the gear selector to manual mode
using the steering wheel paddles
* to shift.
Turn off Eco Coast by
switching to another drive mode
*
deactivating
Eco drive mode in Function
view. It is possible to roll short distances even with- out Eco Coast in order to help conserve fuel.However, for the best fuel economy, EcoCoast should be activated and used to rolllonger distances.
Cruise control Eco CruiseWhen cruise control is activated in the Ecodrive mode, the vehicle's acceleration and deceleration will be slower than in other drivemodes to help further conserve fuel. Becauseof this, the vehicle's actual speed may beslightly above or below the set speed.
On a level road, the vehicle's actual speedmay differ from the set speed when cruisecontrol is active and the vehicle is coast-ing.
On a steep uphill gradient, the vehicle'sspeed is reduced until the transmissiondownshifts. Reduced acceleration is theninitiated in order to reach the set speed.
On a downhill gradient in which the vehi- cle is coasting, the vehicle's actual speed may be slightly above or below the setspeed. The function uses engine brakingto keep the set speed. If necessary, thenormal brakes are also applied.
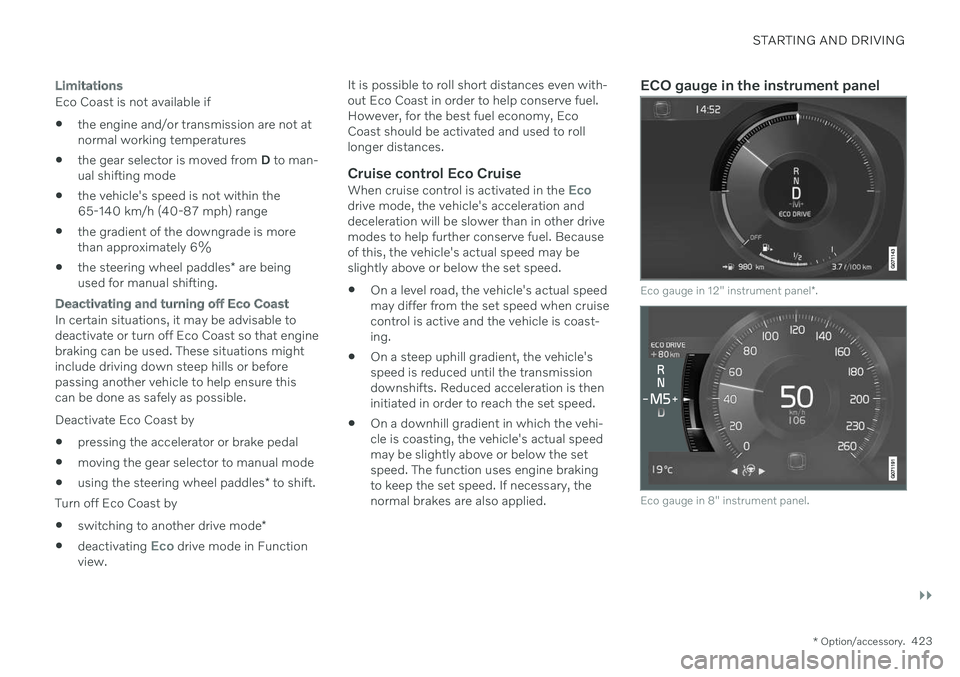
ECO gauge in the instrument panel
Eco gauge in 12" instrument panel
*.
Eco gauge in 8" instrument panel.
Page 452 of 683
||
STARTING AND DRIVING
* Option/accessory.
450
Checking trailer lights *
Automatic check
When the trailer has been connected to the vehicle's electrical system, its lights can bechecked by automatically activating them.This function helps the driver check that thetrailer's lights are functioning correctly beforestarting to drive. In order to perform this check, the vehicle must be switched off.
1. When a trailer is connected to the towbar,
the message
Automatic Trailer Lamp
Check will appear in the instrument panel.
2. Acknowledge the message by pressing the O button on the right-side steering
wheel keypad.
> The light check will begin.
3. Get out of the vehicle to perform the check.
> All of the lights on the trailer will beginflashing, and then illuminate separately one at a time.
4. Visually check that all of the trailer's lights are functioning correctly.
5. After a short time, all of the trailer's lights will start flashing again.
> The light check is completed.
Disabling the automatic check
The automatic light check can be disabled in the center display. 1.Tap
Settings in the Top view.
2. Tap
My CarLights and Lighting.
3. Deselect
Automatic Trailer Lamp
Check.
Manual check
If the automatic check has been disabled, the check can be started manually. 1. Tap
Settings in the Top view.
2. Tap
My CarLights and Lighting.
3. Select
Manual Trailer Lamp Check.
> The light check will begin. Get out of the vehicle to perform the check.
Related information
Driving with a trailer (p. 446)
Towing using a towline
This section refers to one vehicle being towed behind another using a towline.
Before towing another vehicle, check applica- ble speed limit regulations.
Preparations and towing
CAUTION
For some transmission variants, it is not possible to shift from P position if theengine is switched off. Contact an author-ized Volvo workshop for assistance towingor call a professional towing service.
CAUTION
Note that the vehicle must always be towed with the wheels rolling forward.
Do not tow a vehicle with automatictransmission at a speed greater than80 km/h (50 mph) or for a distancegreater than 80 km (50 miles).
Page 592 of 683

||
MAINTENANCE AND SERVICE
* Option/accessory.
590
WARNING
Apply the parking brake and put the gear selector in the Park (
P) position.
Block the wheels standing on theground, use rigid wooden blocks orlarge stones.
Check that the jack is not damaged,the threads are properly lubricated andit is free from dirt.
Be sure the jack is on a firm, level, non-slippery surface and that it is uprightand not leaning.
The jack must correctly engage in thejack attachment.
No objects should be placed betweenthe base of the jack and the ground, orbetween the jack and the attachmentbar on the vehicle.
Never let anyone remain in the vehiclewhen it is raised on a jack.
If a tire must be changed near passingtraffic, make sure all passengers moveto a safe location.
Use a jack intended for the vehiclewhen changing a tire. For any otherjob, use stands to support the vehicle.
Never crawl under or allow any part of your body to be extended under a vehi-cle supported by a jack.
WARNING
If the vehicle is lifted on a garage jack, the jack must be placed under one of the fourlifting points. Make sure that the vehicle iscorrectly positioned on the jack and that itcannot slide off. Make sure the jack platehas a rubber pad to help keep the vehiclestable and prevent damage. Always useaxle stands or similar.
When not in use, the jack * should be kept in
its storage compartment under the cargo compartment floor. Read through all instructions before starting. Before raising the vehicle using a jack or lift,take out all the tools you will need.
1. Turn on the vehicle's hazard warning flashers if e.g. a wheel change must be performed in an area with traffic.
2. Apply the parking brake and put the gear selector in P, or first gear if the vehicle has
a manual transmission. If the vehicle is equipped with
Leveling
Control* , this feature must be turned off
before the vehicle is lifted onto a tow truck. 3. Place chocks in front of and behind the
wheels that are still on the ground. Forexample, use heavy wooden blocks orlarge stones.
4. Position the jack or garage lift arms at the designated points under the vehicle. Thetriangle markings on the plastic cover indi-cate where the jack attachment points/lift-ing points are located. There are two jackattachment points on each side of thevehicle. There is a groove for the jack ateach attachment point.
5. Position the jack under the attachmentpoint being used, ensuring that the sur- face is firm, flat and not slippery.