sensor VOLVO XC40 2020 Quick Guide
[x] Cancel search | Manufacturer: VOLVO, Model Year: 2020, Model line: XC40, Model: VOLVO XC40 2020Pages: 43, PDF Size: 8.06 MB
Page 7 of 43
EXTERIOR OVERVIEW
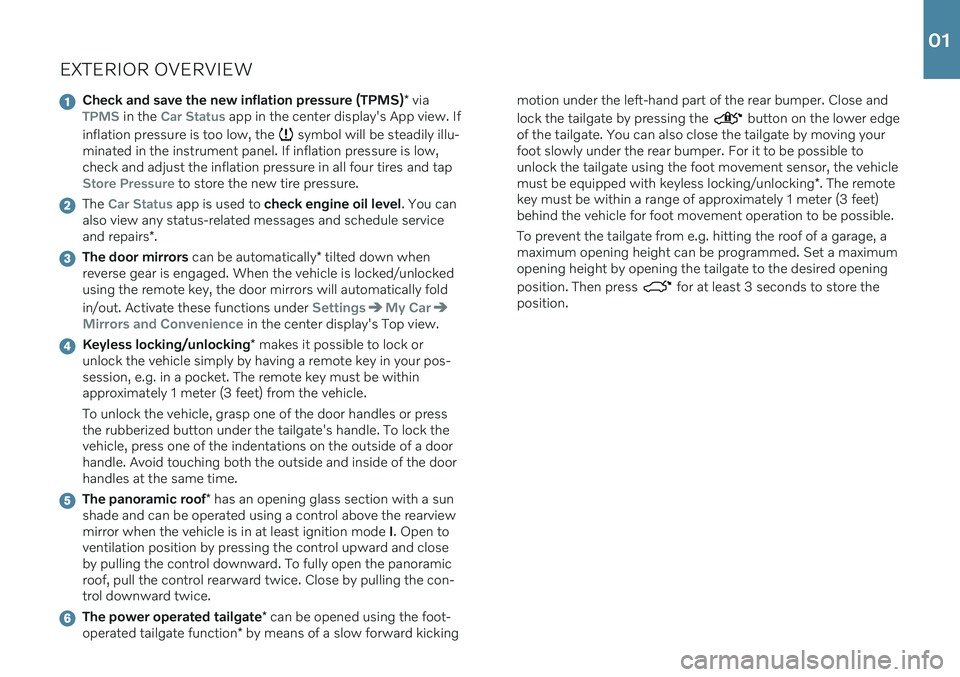
Check and save the new inflation pressure (TPMS)* viaTPMS in the Car Status app in the center display's App view. If
inflation pressure is too low, the
symbol will be steadily illu-
minated in the instrument panel. If inflation pressure is low, check and adjust the inflation pressure in all four tires and tap
Store Pressure to store the new tire pressure.
The Car Status app is used to check engine oil level . You can
also view any status-related messages and schedule service and repairs *.
The door mirrors can be automatically * tilted down when
reverse gear is engaged. When the vehicle is locked/unlocked using the remote key, the door mirrors will automatically fold in/out. Activate these functions under
SettingsMy Car
Mirrors and Convenience in the center display's Top view.
Keyless locking/unlocking * makes it possible to lock or
unlock the vehicle simply by having a remote key in your pos- session, e.g. in a pocket. The remote key must be withinapproximately 1 meter (3 feet) from the vehicle. To unlock the vehicle, grasp one of the door handles or press the rubberized button under the tailgate's handle. To lock thevehicle, press one of the indentations on the outside of a doorhandle. Avoid touching both the outside and inside of the doorhandles at the same time.
The panoramic roof * has an opening glass section with a sun
shade and can be operated using a control above the rearview mirror when the vehicle is in at least ignition mode I. Open to
ventilation position by pressing the control upward and closeby pulling the control downward. To fully open the panoramicroof, pull the control rearward twice. Close by pulling the con-trol downward twice.
The power operated tailgate * can be opened using the foot-
operated tailgate function * by means of a slow forward kicking motion under the left-hand part of the rear bumper. Close and lock the tailgate by pressing the
button on the lower edge
of the tailgate. You can also close the tailgate by moving your foot slowly under the rear bumper. For it to be possible tounlock the tailgate using the foot movement sensor, the vehicle must be equipped with keyless locking/unlocking *. The remote
key must be within a range of approximately 1 meter (3 feet) behind the vehicle for foot movement operation to be possible. To prevent the tailgate from e.g. hitting the roof of a garage, a maximum opening height can be programmed. Set a maximum opening height by opening the tailgate to the desired opening position. Then press
for at least 3 seconds to store the
position.
01
Page 11 of 43
INTERIOR OVERVIEW
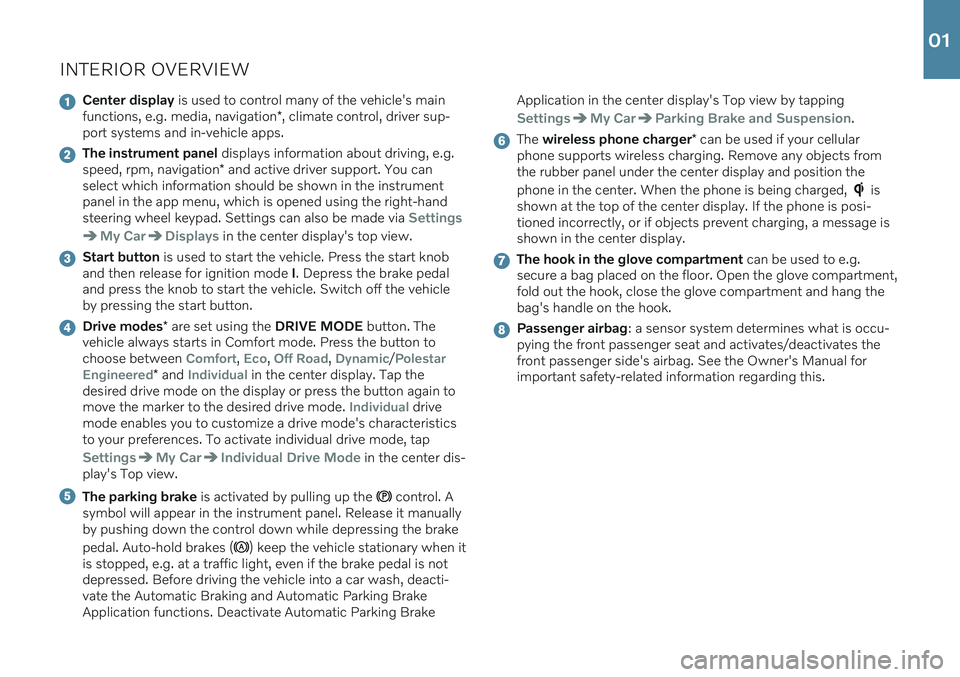
Center display is used to control many of the vehicle's main
functions, e.g. media, navigation *, climate control, driver sup-
port systems and in-vehicle apps.
The instrument panel displays information about driving, e.g.
speed, rpm, navigation * and active driver support. You can
select which information should be shown in the instrument panel in the app menu, which is opened using the right-handsteering wheel keypad. Settings can also be made via
Settings
My CarDisplays in the center display's top view.
Start button is used to start the vehicle. Press the start knob
and then release for ignition mode I. Depress the brake pedal
and press the knob to start the vehicle. Switch off the vehicle by pressing the start button.
Drive modes * are set using the DRIVE MODE button. The
vehicle always starts in Comfort mode. Press the button to choose between
Comfort, Eco, Off Road, Dynamic/Polestar
Engineered
* and Individual in the center display. Tap the
desired drive mode on the display or press the button again to move the marker to the desired drive mode.
Individual drive
mode enables you to customize a drive mode's characteristics to your preferences. To activate individual drive mode, tap
SettingsMy CarIndividual Drive Mode in the center dis-
play's Top view.
The parking brake is activated by pulling up the control. A
symbol will appear in the instrument panel. Release it manually by pushing down the control down while depressing the brake pedal. Auto-hold brakes (
) keep the vehicle stationary when it
is stopped, e.g. at a traffic light, even if the brake pedal is not depressed. Before driving the vehicle into a car wash, deacti-vate the Automatic Braking and Automatic Parking BrakeApplication functions. Deactivate Automatic Parking Brake Application in the center display's Top view by tapping
SettingsMy CarParking Brake and Suspension.
The
wireless phone charger * can be used if your cellular
phone supports wireless charging. Remove any objects from the rubber panel under the center display and position the phone in the center. When the phone is being charged,
is
shown at the top of the center display. If the phone is posi- tioned incorrectly, or if objects prevent charging, a message isshown in the center display.
The hook in the glove compartment can be used to e.g.
secure a bag placed on the floor. Open the glove compartment, fold out the hook, close the glove compartment and hang thebag's handle on the hook.
Passenger airbag : a sensor system determines what is occu-
pying the front passenger seat and activates/deactivates the front passenger side's airbag. See the Owner's Manual forimportant safety-related information regarding this.
01
Page 19 of 43
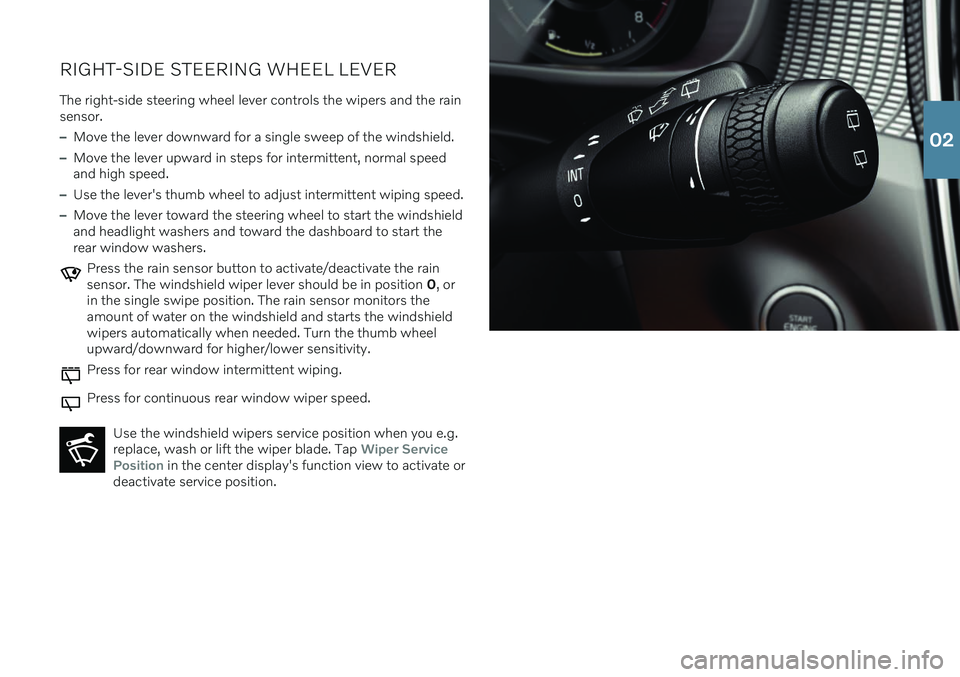
RIGHT-SIDE STEERING WHEEL LEVERThe right-side steering wheel lever controls the wipers and the rain sensor.
–Move the lever downward for a single sweep of the windshield.
–Move the lever upward in steps for intermittent, normal speed and high speed.
–Use the lever's thumb wheel to adjust intermittent wiping speed.
–Move the lever toward the steering wheel to start the windshield and headlight washers and toward the dashboard to start therear window washers.
Press the rain sensor button to activate/deactivate the rain sensor. The windshield wiper lever should be in position 0, or
in the single swipe position. The rain sensor monitors theamount of water on the windshield and starts the windshieldwipers automatically when needed. Turn the thumb wheelupward/downward for higher/lower sensitivity.
Press for rear window intermittent wiping.
Press for continuous rear window wiper speed.
Use the windshield wipers service position when you e.g. replace, wash or lift the wiper blade. Tap
Wiper Service
Position in the center display's function view to activate or
deactivate service position.
02
Page 21 of 43
PASSENGER COMPARTMENT CLIMATEClimate system functions for the front and rear sections of the pas- senger compartment are controlled from the center display andfrom the buttons on the center console and the rear side of the tun- nel console *. Some functions can also be controlled using voice
commands.
The icon for opening Climate view is located at the center of the climate bar at the bottom of the center display.When the
Clean Zone text is BLUE, this indicates that the
conditions for good air quality in the passenger compart- ment have been met.
–Tap AUTO3 in climate view for automatic control of several cli-
mate system functions. Tap for automatic control of air recircula- tion, air conditioning and air distribution. Press and hold for automatic control of air recirculation, air con- ditioning and air distribution and to change temperature andblower speed to standard settings: 22 °C (72 °F) and speed
3. It
is possible to change the temperature and blower speed without deactivating automatic climate control.
–Tap any of the icons in the climate bar at the bottom of the cen- ter display to set temperature, seat heating * and blower speed.
To synchronize 4
the temperature for all of the vehicle's zones with
the driver side's temperature, tap the driver side's temperature icon and then tap
Synchronize temperature .
Preconditioning *
Preconditioning can be set in the vehicle's center display and with the Volvo On Call app. Preconditioning ventilates the passenger compartment before driv- ing. Preconditioning can be started directly from the vehicle or setto start automatically using a timer.
Preconditioning direct start
1. Open Climate view in the center display. 2. Tap the
Parking climate tab and then tap Preconditioning.
Setting a preconditioning timer
1. Open Climate view in the center display.
2. Select the
Parking climateAdd timer tab and set a date/day/
time.
Interior Air Quality System IAQS *
IAQS is part of the Clean Zone Interior Package * and is a fully auto-
matic system that filters passenger compartment air to help remove air contaminants such as particulates, hydrocarbons, nitric oxides and ground-level ozone. Tap
SettingsClimateAir
Quality Sensor
in the center display's top view to activate the
function.
3 Not available with manual climate control.
4 Not available with 1-zone climate.
02
Page 41 of 43
contain abrasives. Never use abrasive cloths, paper towels or tissue paper, as these mayscratch the display. FOLDING THE BACKRESTS IN THE REAR SEAT When the backrest is folded down, make sure there are no objects in the rear seat, and the seatbelts are not buckled. The armrest* on the center seating position must
be in the stowed position. RIGHT-SIDE STEERING WHEEL LEVER Wiper blades in service position - Before plac-
ing the wipers in service position, ensure that they have not frozen to the windshield. If thewiper arms in service position are raised fromthe windshield, they must be folded backagainst the windshield before activating wiping,washing or rain sensor as well as before depar-ture. This is to prevent scratching the paint onthe hood. CONNECTIONS Electrical outlet – Each 12-volt socket can sup-
ply a maximum of 120 W (10 A).
NOTE
EXTERIOR OVERVIEW Foot-operated tailgate - There is a risk of
reduced or lost function if there are large amounts of snow, ice, dirt, etc. on the rearbumper. Make sure to keep the bumper clean. Please note that the system could be inadver- tently activated in a car wash or similar if theremote key is within range. Setting maximum opening height - If the sys-
tem has been working continuously for a pro- longed period of time, it will be switched off toavoid overload. It can be used again afterapproximately 2 minutes. Electromagnetic fields and obstructing objects may interfere with remote key functions . Avoid
storing the remote key near metal objects orelectronic devices, e.g. cell phones, tablets, lap-tops or chargers – preferably no closer than10-15 cm (4-6 in.). INTERIOR OVERVIEW OFF ROAD drive mode
is not designed to be
used for normal street driving. With a cold start , idling speed may be consider-
ably higher than normal for certain engine types. This is done to get the emissions system up tonormal operating temperature as quickly as pos-sible, which minimizes exhaust emissions andprotects the environment. STEERING WHEEL Trip computer - Calculation of driving range
may vary if your driving style changes. PASSENGER COMPARTMENT CLIMATE Heating/cooling cannot be accelerated by choosing a higher/lower temperature than thedesired temperature. Preconditioning - The vehicle's doors and win-
dows should be closed during preconditioning of the passenger compartment. CONNECTIONS Vehicle modem – Please note that the SIM
card used for Internet connection via P-SIM must have a different phone number than theSIM card used by the cellular phone. If the cardshave the same number, calls will not be con-nected correctly to the phone. Use a SIM cardwith a separate phone number for the Internetconnection or a data card that does not handlephone calls and therefore cannot interfere withphone function. Internet - Data (data traffic) is transfered when
using the Internet, which can incur additional costs. Activating data roaming and Wi-Fi hot-spots can incur additional charges. Contact yournetwork operator about data traffic costs. Whendownloading using a phone, pay extra attentionto the data traffic costs. Data downloading can affect other services that
transfer data, e.g. web radio. If the affect on other services is experienced as problematic, thedownload can be interrupted. Alternatively, itmay be appropriate to switch off or cancel otherservices. When downloading using a phone, payextra attention to the data traffic costs. Updating
– If the phone's operating system is
being updated, it is possible that the Bluetoothconnection will be interrupted. Delete the phonefrom the vehicle and reconnect. USING CONNECTED DEVICES Apple CarPlay and Android Auto – Volvo is not
responsible for the content of the CarPlay or Android Auto apps. For installation of Android Auto to be possible, the vehicle must be equipped with two USB ports (USB hub) *. If the car only has one USB
port then it is not possible to use Android Auto.
06