ECO mode VOLVO XC60 2013 Quick Guide
[x] Cancel search | Manufacturer: VOLVO, Model Year: 2013, Model line: XC60, Model: VOLVO XC60 2013Pages: 8, PDF Size: 2.78 MB
Page 3 of 8

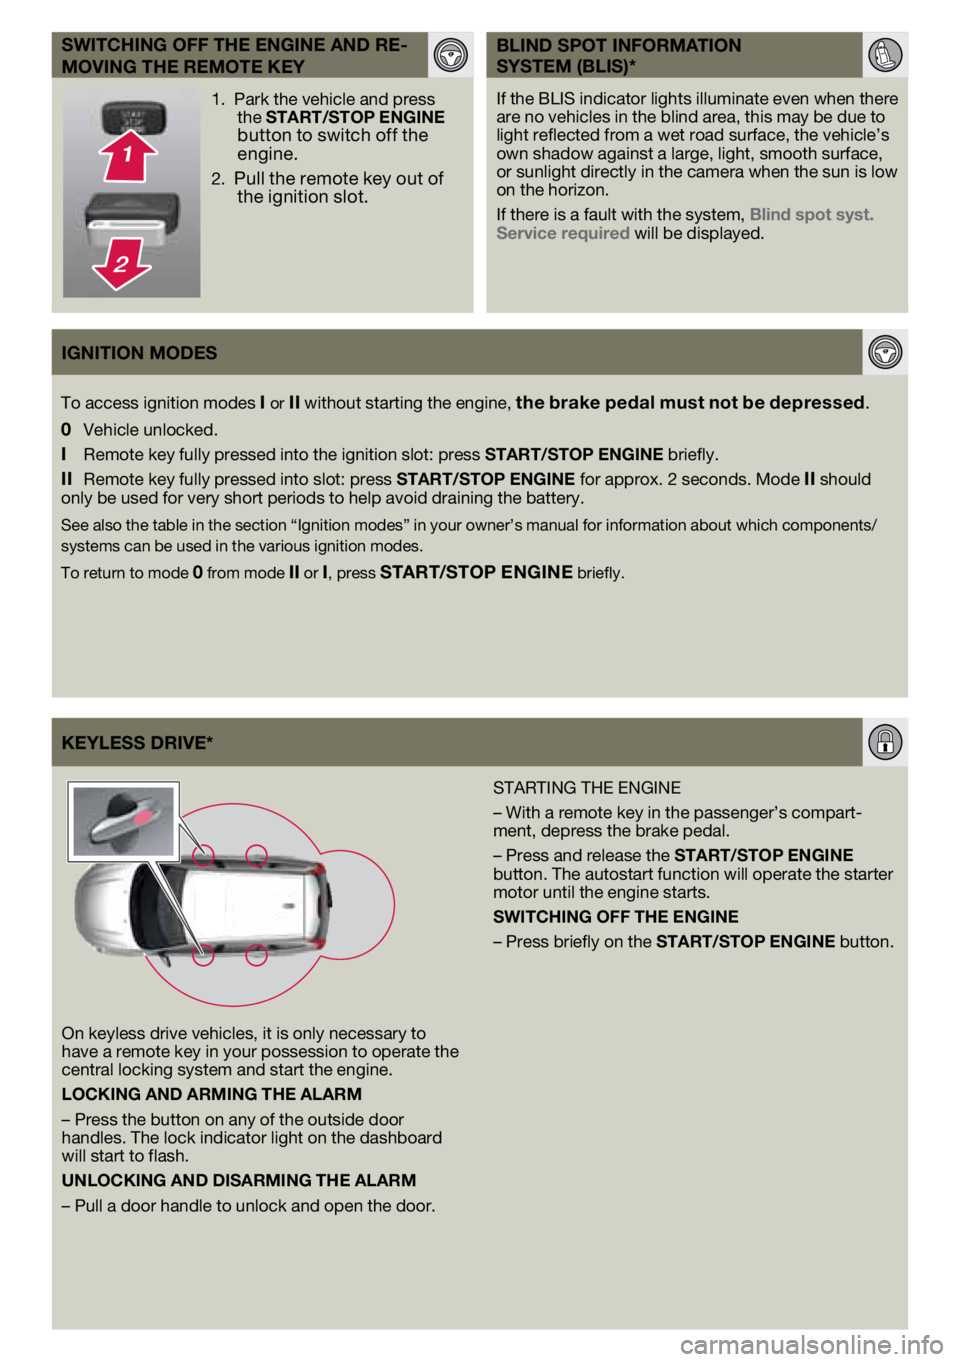
KEYlESS DRIvE*
On keyless drive vehicles, it is only necessary to
have a remote key in your possession to operate the
central locking system and start the engine.
lOCKING AND ARMING THE AlARM
– Press the button on any of the outside door
handles. The lock indicator light on the dashboard
will start to flash.
uNlOCKING AND DISARMING THE AlARM
– Pull a door handle to unlock and open the door.STARTING THE ENGINE
– With a remote key in the passenger’s compart-
ment, depress the brake pedal.
– Press and release the START/STOP ENGINE
button. The autostart function will operate the starter
motor until the engine starts.
SWITCHING OFF THE ENGINE
– Press briefly on the START/STOP ENGINE button.
1.
Park the vehicle and press
the START/STOP ENGINE
button to switch off the
engine.
2. Pull the remote key out of the ignition slot.
If the BLIS indicator lights illuminate even when there
are no vehicles in the blind area, this may be due to
light reflected from a wet road surface, the vehicle’s
own shadow against a large, light, smooth surface,
or sunlight directly in the camera when the sun is low
on the horizon.
If there is a fault with the system, Blind spot syst.
Service required will be displayed.
SWITCHING OFF THE ENGINE AND RE-
MOvING THE REMOTE KEY BlIND SPOT INFORMATION
SYSTEM (BlIS)*
IGNITION MODES
To access ignition modes I or II without starting the engine, the brake pedal must not be depressed.
0
Vehicle unlocked.
I Remote key fully pressed into the ignition slot: press START/STOP ENGINE briefly.
II Remote key fully pressed into slot: press START/STOP ENGINE for approx. 2 seconds. Mode II should
only be used for very short periods to help avoid draining the battery.
See also the table in the section “Ignition modes” in your owner’\
s manual for information about which components/
systems can be used in the various ignition modes.
To return to mode
0 from mode II or I, press START/STOP ENGINE briefly.
Page 4 of 8

on
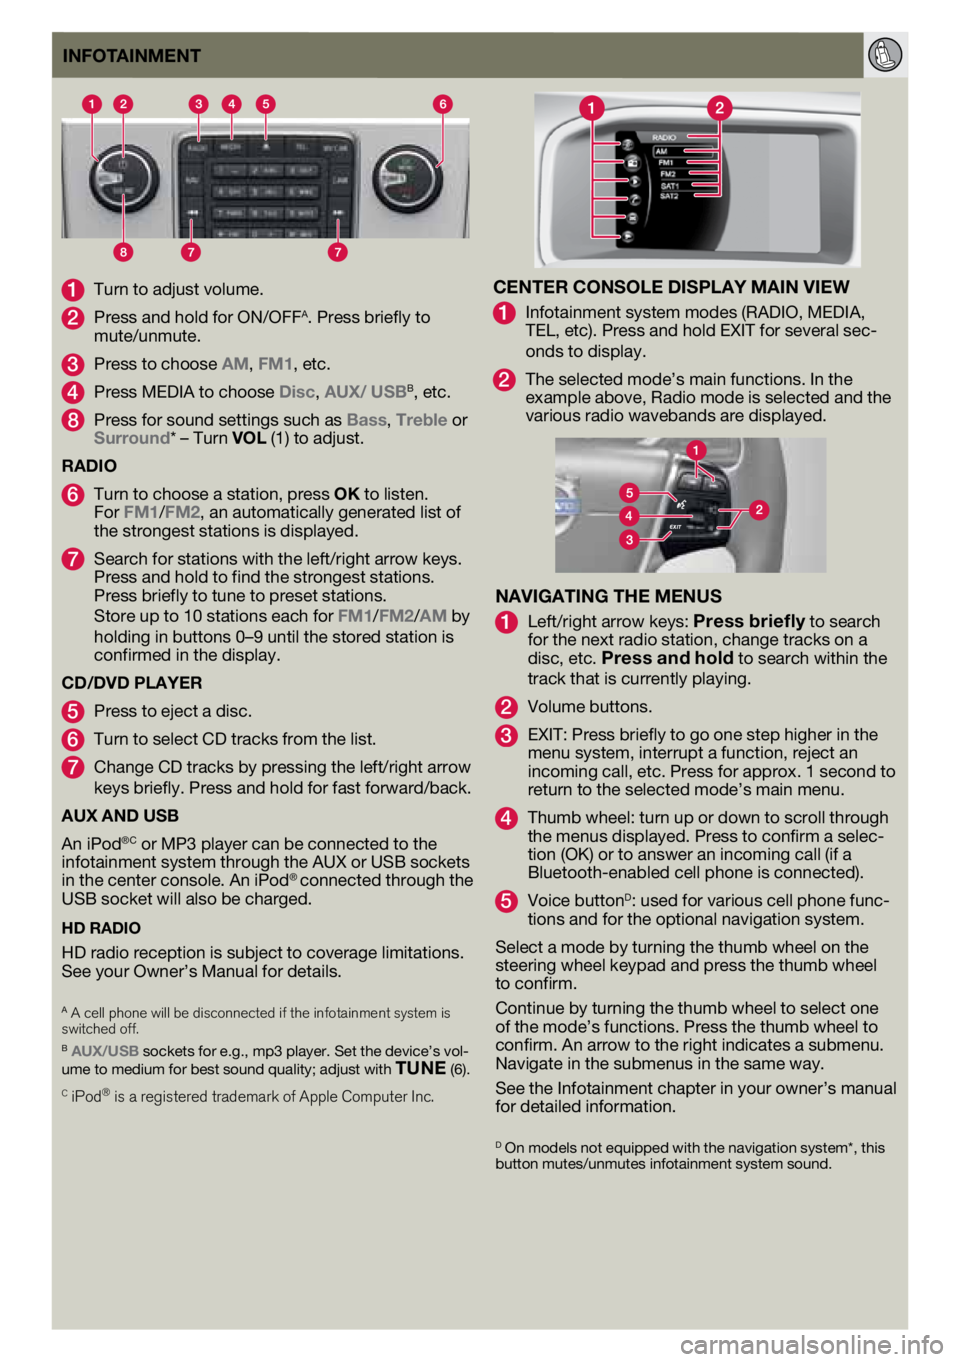
1 Turn to adjust volume.
2 Press and hold for ON/OFFA. Press briefly to
mute/unmute.
3 Press to choose AM, FM1, etc.
4 Press MEDIA to choose Disc, AuX/ uSBB, etc.
8 Press for sound settings such as Bass, Treble or
Surround* – Turn vOl (1) to adjust.
RADIO
6 Turn to choose a station, press OK to listen.
For FM1/FM2, an automatically generated list of
the strongest stations is displayed.
7 Search for stations with the left/right arrow keys.
Press and hold to find the strongest stations.
Press briefly to tune to preset stations.
Store up to 10 stations each for FM1/FM2/AM by
holding in buttons 0–9 until the stored station is
confirmed in the display.
CD/DvD PlAYER
5 Press to eject a disc.
6 Turn to select CD tracks from the list.
7 Change CD tracks by pressing the left/right arrow
keys briefly. Press and hold for fast forward/back.
AuX AND uSB
An iPod
®C or MP3 player can be connected to the
infotainment system through the AUX or USB sockets
in the center console. An iPod
® connected through the
USB socket will also be charged.
HD RADIO
HD radio reception is subject to coverage limitations.
See your Owner’s Manual for details.
A A cell phone will be disconnected if the infotainment system is
switched off\f
B AuX/uSB sockets for e.g., mp3 player. Set the device’s vol-
ume to medium for best sound quality; adjust with T uNE (6). C iPod® is a \begiste\bed t\badema\bk of Apple Compute\b Inc\f
INFOTAINMENT
CENTER CONSOlE DISPlAY MAIN vIEW
1 Infotainment system modes (RADIO, MEDIA,
TEL, etc). Press and hold EXIT for several sec-
onds to display.
2 The selected mode’s main functions. In the
example above, Radio mode is selected and the
various radio wavebands are displayed.
NAvIGATING THE MENuS
1 Left/right arrow keys: Press briefly to search
for the next radio station, change tracks on a
disc, etc.
Press and hold to search within the
track that is currently playing.
2 Volume buttons.
3 EXIT: Press briefly to go one step higher in the
menu system, interrupt a function, reject an
incoming call, etc. Press for approx. 1 second to
return to the selected mode’s main menu.
4 Thumb wheel: turn up or down to scroll through
the menus displayed. Press to confirm a selec-
tion (OK) or to answer an incoming call (if a
Bluetooth-enabled cell phone is connected).
5 Voice buttonD: used for various cell phone func-
tions and for the optional navigation system.
Select a mode by turning the thumb wheel on the
steering wheel keypad and press the thumb wheel
to confirm.
Continue by turning the thumb wheel to select one
of the mode’s functions. Press the thumb wheel to
confirm. An arrow to the right indicates a submenu.
Navigate in the submenus in the same way.
See the Infotainment chapter in your owner’s manual
for detailed information.
D On models not equipped with the navigation system*, this
button mutes/unmutes infotainment system sound.
Page 5 of 8

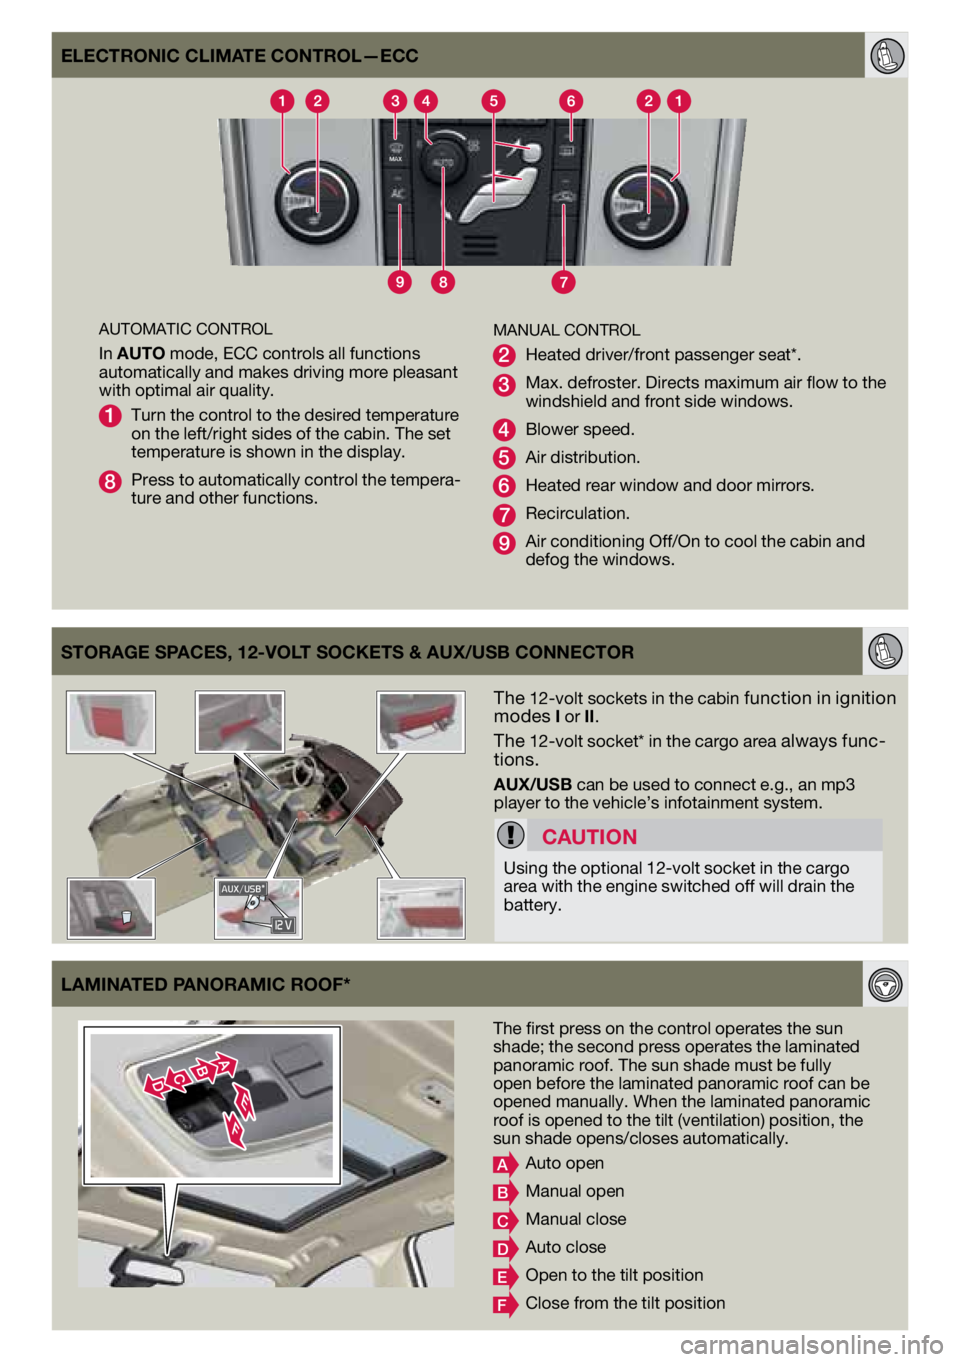
ElECTRONIC ClIMATE CONTROl—ECC
AUTOMATIC CONTROL
In AuTO mode, ECC controls all functions
automatically and makes driving more pleasant
with optimal air quality.
1 Turn the control to the desired temperature
on the left/right sides of the cabin. The set
temperature is shown in the display.
8 Press to automatically control the tempera-
ture and other functions.
The 12-volt sockets in the cabin function in ignition
modes I or II.
The 12-volt socket* in the cargo area always func -
tions.
AuX/uSB can be used to connect e.g., an mp3
player to the vehicle’s infotainment system.
STORAGE SPACES, 12-vOl T SOCKETS & AuX/uSB CONNECTOR
CA
uTIONUsing the optional 12-volt socket in the cargo
area with the engine switched off will drain the
battery.
MANUAL CONTROL
2 Heated driver/front passenger seat*.
3 Max. defroster. Directs maximum air flow to the
windshield and front side windows.
4 Blower speed.
5 Air distribution.
6 Heated rear window and door mirrors.
7 Recirculation.
9 Air conditioning Off/On to cool the cabin and
defog the windows.
The first press on the control operates the sun
shade; the second press operates the laminated
panoramic roof. The sun shade must be fully
open before the laminated panoramic roof can be
opened manually. When the laminated panoramic
roof is opened to the tilt (ventilation) position, the
sun shade opens/closes automatically.
A Auto open
B Manual open
C Manual close
D Auto close
E Open to the tilt position
F Close from the tilt position
lAMINATED PANORAMIC ROOF*