window VOLVO XC60 T8 2018 Quick Guide
[x] Cancel search | Manufacturer: VOLVO, Model Year: 2018, Model line: XC60 T8, Model: VOLVO XC60 T8 2018Pages: 46, PDF Size: 8.09 MB
Page 9 of 46
LOCKING/UNLOCKING
Remote key
Press briefly to lock doors, tailgate and fuel filler door and arm the alarm. A long press closes all side windows simultaneously.
One short press unlocks doors and tailgate and disarms the alarm. Press and hold to open all door windows at the same time.
Press briefly to unlock and disarm only the tailgate. Press and hold to open or close the power * tailgate.
The panic alarm activates the turn signals and horn to attract atten- tion in emergency situations. To activate, press and hold the buttonfor three seconds or press the button twice within three seconds.The function can be switched off using the same button after it hasbeen activated for at least five seconds. Otherwise, it will switch offautomatically after three minutes.
Charger door Make sure the vehicle is unlocked and the ignition is off before con- necting or disconnecting the charging cable.
1. Press the rear section of the door and release.
2. Open the charger door. The charging cable's coupler will lock into the charging socket when charging has started. Charging is interrupted if the vehicle is unlockedbut will restart after a short time if the cable is not disconnected. Private (valet) locking Private locking locks the tailgate, which can be practical when, for example, the vehicle is taken in for service or at a hotel. - In the center display's function view, tap
Private Locking to
activate/deactivate the function.
A pop-up window will appear showing whether the function is activated or deactivated. A four-digit code must be selected each time the func-tion is activated. The first time the function is used, an extra securitycode must be selected.
Locking * the glove compartment is performed manually using the
enclosed key which is located inside the glove compartment.
01
Page 18 of 46
POWER* FRONT SEATS
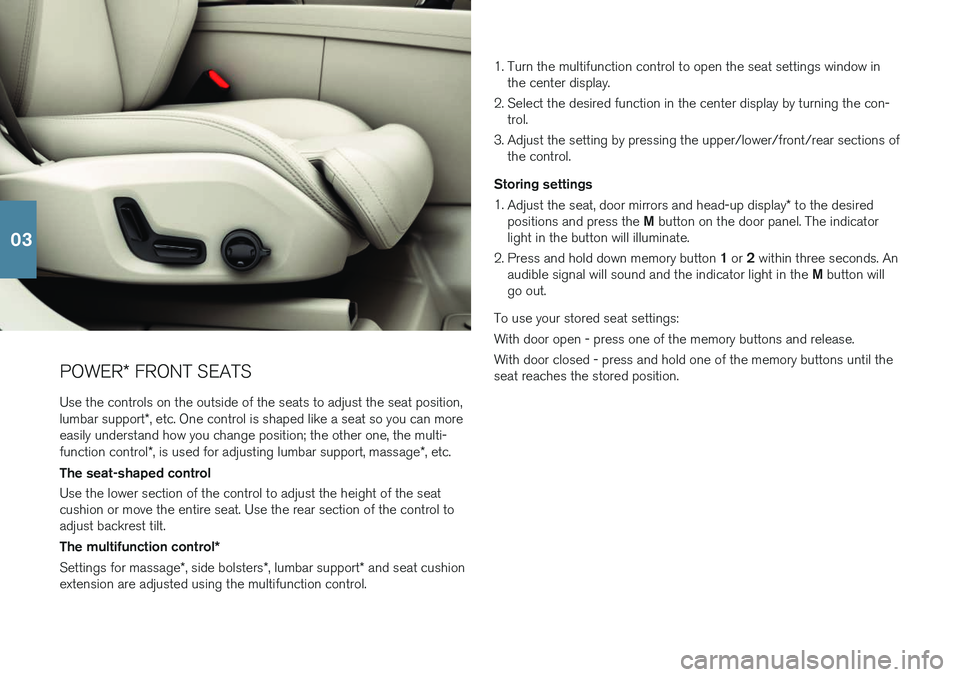
Use the controls on the outside of the seats to adjust the seat position, lumbar support *, etc. One control is shaped like a seat so you can more
easily understand how you change position; the other one, the multi-function control *, is used for adjusting lumbar support, massage *, etc.
The seat-shaped control Use the lower section of the control to adjust the height of the seat cushion or move the entire seat. Use the rear section of the control toadjust backrest tilt. The multifunction control *
Settings for massage *, side bolsters *, lumbar support * and seat cushion
extension are adjusted using the multifunction control. 1. Turn the multifunction control to open the seat settings window in
the center display.
2. Select the desired function in the center display by turning the con- trol.
3. Adjust the setting by pressing the upper/lower/front/rear sections of the control.
Storing settings 1. Adjust the seat, door mirrors and head-up display * to the desired
positions and press the M button on the door panel. The indicator
light in the button will illuminate.
2. Press and hold down memory button 1 or 2 within three seconds. An
audible signal will sound and the indicator light in the M button will
go out.
To use your stored seat settings: With door open - press one of the memory buttons and release. With door closed - press and hold one of the memory buttons until the seat reaches the stored position.
03
Page 23 of 46
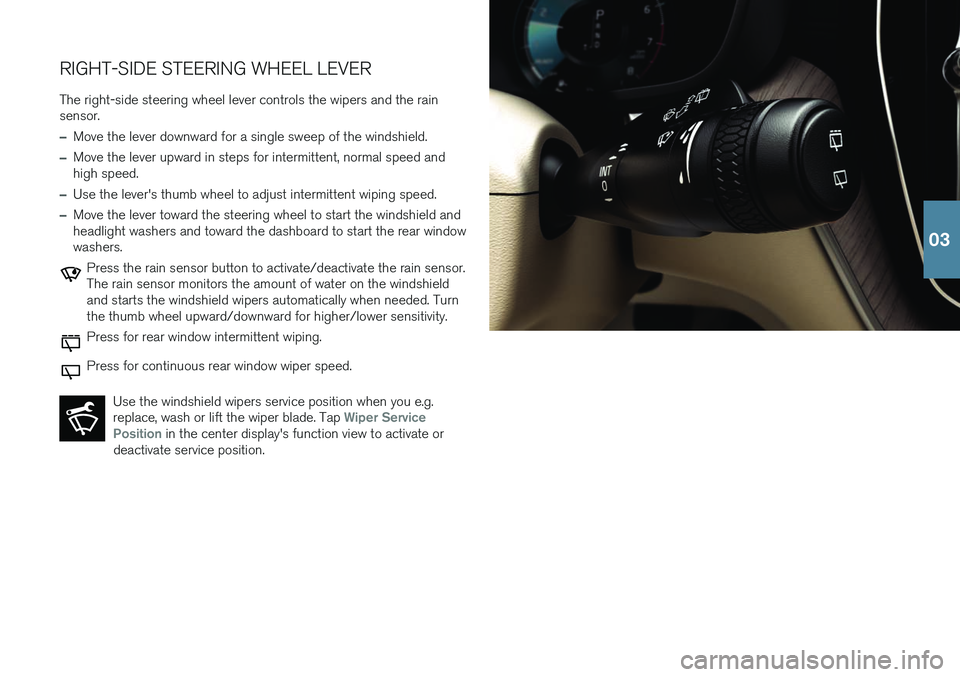
RIGHT-SIDE STEERING WHEEL LEVERThe right-side steering wheel lever controls the wipers and the rain sensor.
–Move the lever downward for a single sweep of the windshield.
–Move the lever upward in steps for intermittent, normal speed and high speed.
–Use the lever's thumb wheel to adjust intermittent wiping speed.
–Move the lever toward the steering wheel to start the windshield and headlight washers and toward the dashboard to start the rear windowwashers.
Press the rain sensor button to activate/deactivate the rain sensor. The rain sensor monitors the amount of water on the windshieldand starts the windshield wipers automatically when needed. Turnthe thumb wheel upward/downward for higher/lower sensitivity.
Press for rear window intermittent wiping.
Press for continuous rear window wiper speed.
Use the windshield wipers service position when you e.g. replace, wash or lift the wiper blade. Tap
Wiper Service
Position in the center display's function view to activate or
deactivate service position.
03
Page 33 of 46
FUNCTION VIEW AND APP VIEW Function view In home view, swipe the screen from left to right8
to access function
view. From here, you can activate/deactivate various vehicle functions, such as
Head-up Display* , Park Assist and Lane Keeping Aid. Acti-
vate/deactivate a function by tapping its symbol. Some functions open in their own windows. App view In home view, swipe from right to left 8
to access app view. This displays
the vehicle's factory-installed apps as well as any apps you have down- loaded and installed.
Managing and updating apps and systems
You can update many of the vehicle's systems in Download
Center in app view. The vehicle must be connected to the
Internet in order for this to be possible. Press Download
Center to open a download application. Here, you can:
Download apps - Tap New apps and select the desired app. SelectInstall to download the app.
Update apps - Tap
Install all to update all apps. Or tap Application
updates to display a list of available updates. Select the desired app
and tap Install.
Uninstall apps - Tap
Application updates and select the desired app.
Tap
Uninstall to delete the app.
Update system software - Tap
System updates to display a list of
updates that can be installed in the vehicle. Tap Install all at the bottom
of the list to update all software or Install to update specific software. If
you do not wish to display a list, select Install all near the System
updates button.
Moving icons The apps and buttons for vehicle functions in app view and function view can be moved to customize these views. 1. Press and hold an icon.
2. Drag the icon to the desired location in the view and release it.
8
Applies for left-hand drive vehicles. For right-hand drive vehicles, swipe the opposite way.
04
Page 39 of 46
PARKING ASSISTANCE SYSTEMS
Park Assist Pilot *
Park Assist Pilot can help detect if the vehicle will fit into a parking space and then helps guide the vehicle into the space. The driver's taskis to check the area around the vehicle, follow the instructions providedin the center display, select the appropriate gear, control the vehicle'sspeed and be prepared to apply the brakes to stop the vehicle.
Parking with Park Assist Pilot
1. The vehicle's speed may not exceed 30 km/h (20 mph) when parallel parking or 20 km/h (12 mph) when per- pendicular parking. The distance between the vehicleand the parking space should be about 1 meter (3 feet)when the function is looking for parking.
2. Tap
Park In in function view or camera view.
3. Stop the vehicle when notified by a graphic and a mes- sage in the center display that a suitable parking space has been found. A pop-up window will appear.
4. Follow the instructions provided in the center display. Be prepared to stop the vehicle when prompted by informa-tion in the center display.
Pulling out of a parking space with Park Assist Pilot
This function can only be used when the vehicle has been parallel parked.
1. Tap Park Out in function view or camera view.
2. Use the turn signals to indicate the direction in which the vehicle will pull out of the parking space.
3. Follow the instructions in the center display.
Park Assist Camera *
The Park Assist Camera can help the driver detect potential obstacles around the vehicle using a camera image and graphics in the centerdisplay. Camera views and guiding lines can be selected in the center display. The Park Assist Camera starts automatically when reverse gearis engaged. It can also be started manually from the center display.
–Tap the Camera button in function view to manually acti-
vate/deactivate the function.
05
Page 41 of 46
PURER DRIVING PLEASUREPlanning your trips and driving economically can help increase driving range using the electric motor while simultaneously reducing your envi-ronmental impact. The ability to maximize driving range varies depend-ing on the circumstances and conditions in which the vehicle is driven.Some factors you can influence and others you cannot. Greatest rangeis achieved during very favorable conditions when all factors have apositive impact. Plan your trips by always
•Charging the hybrid battery before driving.
•Preconditioning the vehicle.
Drive economically by
•Activating the Pure drive mode.
•Reducing the temperature in the passenger compartment and reduc- ing blower speed.
•Maintaining a consistent speed and planning ahead to help minimize braking.
•Selecting Hold in function view at higher speeds on trips that exceed
the hybrid battery's range.
•Maintaining the recommended tire inflation pressure and checking it regularly.
•Keeping the windows closed while driving.
Factors you cannot influence
•The traffic situation.
•Road condition and topography.
•Ambient temperature and headwinds.
See your Owner's Manual for more tips on increasing driving range and driving economically.
05
Page 45 of 46
Do not spray liquid or corrosive chemicals directly onto the center display. Do not use window clean-ers, cleaning agents, aerosol sprays, solvents, alco-hol, ammonia or detergents that contain abrasives.Never use abrasive cloths, paper towels or tissuepaper, as these may scratch the display. CHARGING THE HYBRID BATTERY Charging cable - Never connect the charging
cable if there is a risk of a thunderstorm or there is lightning. Never detach the charging cable from the120/240-volt outlet while charging is in progress –the 120/240-volt outlet could be damaged in suchcircumstances. Always interrupt charging first andthen disconnect the charging cable – first from thevehicle's charging socket and then from the120/240-volt outlet. Power strips, extension cords, surge protectors or similar devices must not be used together with thecharging cable since this may involve a risk of fire,electric shocks, etc. An adapter may not be usedbetween the 120/240-volt outlet and the chargingcable. Wipe the charging cable with a clean cloth lightly moistened with water or a mild detergent. Do notuse chemicals or solvents. Do not submerge thecharging cable. Only use the charging cable provided with your vehicle or a replacement cable purchased from aVolvo retailer. Charge module - Avoid exposing the charge mod-
ule and its plug to direct sunlight. In such cases, the overheating protection in the plug could reduce orcut off charging of the hybrid battery. Check that the 120/240-volt outlet has a power supply sufficient for charging electric vehicles – ifuncertain, you should have the outlet checked by aprofessional. FOLDING DOWN THE REAR SEAT BACKRESTS When the backrest is folded down, make sure there are no objects in the rear seat, and the seat beltsare not buckled. The armrest * on the center seating position must
be in the stowed position. RIGHT-SIDE STEERING WHEEL LEVER Wiper blades in service position
- Before placing
the wipers in service position, ensure that they have not frozen to the windshield. If the wiper arms inservice position are raised from the windshield, theymust be folded back against the windshield beforeactivating wiping, washing or rain sensor as well asbefore departure. This is to prevent scratching thepaint on the hood. CONNECTIONS Electrical outlet - Each 12-volt socket can supply
a maximum of 120 W (10 A). 120-volt sockets can supply a maximum of 150 W.
NOTE
EXTERIOR OVERVIEW Foot-operated tailgate - There is a risk of
reduced or lost function if there are large amounts of snow, ice, dirt, etc. on the rear bumper. Makesure to keep the bumper clean. Setting maximum opening height - If the system
has been working continuously for a prolonged period of time, it will be switched off to avoid over-load. It can be used again after approximately2 minutes Electromagnetic fields and obstructing objects may interfere with remote key functions . Avoid storing
the remote key near metal objects or electronic devices, e.g. cell phones, tablets, laptops or charg-ers – preferably no closer than 10-15 cm (4-6 in.). INTERIOR OVERVIEW OFF ROAD drive mode is not designed to be
used for normal street driving. With a cold start , idling speed may be considerably
higher than normal for certain engine types. This is done to get the emissions system up to normaloperating temperature as quickly as possible, whichminimizes exhaust emissions and helps protect theenvironment. Head-up display * - If City Safety is activated, the
information in the head-up display will be replaced by a City Safety graphic. This graphic will illuminateeven if the head-up display is turned off. The driver's ability to see information in the head-updisplay may be impeded by the use of e.g. polarizingsunglasses, a driving posture in which the driver isnot centered in the seat, objects on the displayunit's glass cover and/or unfavorable lighting condi-tions. People with certain types of vision problemsmay experience headaches or eye strain whenusing the head-up display. STEERING WHEEL Trip computer
- Calculation of driving range may
vary if your driving style changes. PASSENGER COMPARTMENT CLIMATE Heating/cooling cannot be accelerated by choos- ing a higher/lower temperature than the desiredtemperature. Preconditioning is only available when the vehicle
is connected to an electrical outlet. A charging post that is not always active, for example because of atimer, can cause loss of function for precondition-ing. If the vehicle is not connected to an electricalsocket it is still possible in a warm climate toachieve brief cooling of the passenger compart-ment by direct starting preconditioning. The vehicledoors and windows should be closed during pre-conditioning of the passenger compartment. CONNECTIONS Internet - Data (data traffic) is transfered when
using the Internet, which can incur additional costs. Activating data roaming and Wi-Fi hotspots canincur additional charges. Contact your networkoperator about data traffic costs. When download-ing using a phone, pay extra attention to the datatraffic costs. Data downloading can affect other services that
transfer data, e.g. web radio. If the affect on other services is experienced as problematic, the down-load can be interrupted. Alternatively, it may beappropriate to switch off or cancel other services. Updating - If the phone's operating system is
being updated, it is possible that the Bluetooth con- nection will be interrupted. Delete the phone fromthe vehicle and reconnect. USING CONNECTED DEVICES Apple CarPlay and Android Auto
- Volvo is not
responsible for the content of the CarPlay or Android Auto apps. PARKING ASSISTANCE SYSTEMS Keep the camera lens free of dirt, snow and ice to help ensure the best functionality. This is particu-larly important in poor light conditions.
07