steering wheel adjustment VOLVO XC60 TWIN ENGINE 2019 Owners Manual
[x] Cancel search | Manufacturer: VOLVO, Model Year: 2019, Model line: XC60 TWIN ENGINE, Model: VOLVO XC60 TWIN ENGINE 2019Pages: 695, PDF Size: 14.96 MB
Page 84 of 695
DISPLAYS AND VOICE CONTROL
* Option/accessory.82
Instruments and controls in left-hand drive vehicles
The overviews show the location of the vehicle'sdisplays and controls.
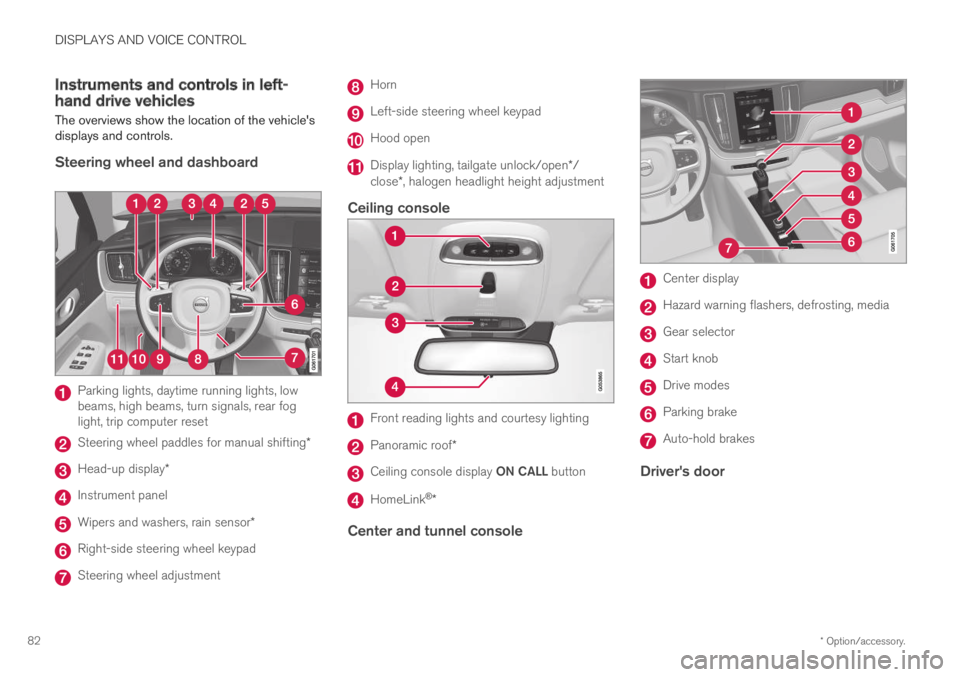
Steering wheel and dashboard
Parking lights, daytime running lights, lowbeams, high beams, turn signals, rear foglight, trip computer reset
Steering wheel paddles for manual shifting*
Head-up display*
Instrument panel
Wipers and washers, rain sensor*
Right-side steering wheel keypad
Steering wheel adjustment
Horn
Left-side steering wheel keypad
Hood open
Display lighting, tailgate unlock/open*/close*, halogen headlight height adjustment
Ceiling console
Front reading lights and courtesy lighting
Panoramic roof*
Ceiling console display ON CALL button
HomeLink®*
Center and tunnel console
Center display
Hazard warning flashers, defrosting, media
Gear selector
Start knob
Drive modes
Parking brake
Auto-hold brakes
Driver's door
Page 146 of 695
DISPLAYS AND VOICE CONTROL
* Option/accessory.144
Head-up display settings*
Adjusting settings for the head-up display.
Settings can be adjusted when the vehicle isstarted and a projected image is displayed on thewindshield.
Selecting display options
Select the functions to be shown in the head-updisplay.
1.Tap Settings in the center display's Topview.
2.Tap My CarDisplaysHead-UpDisplay Options.
3.Select one or more functions:
Show Navigation
Show Road Sign Information
Show Driver Support
Show Phone.
This setting is stored as a personal setting in thedriver profile.
Adjusting brightness and height
position
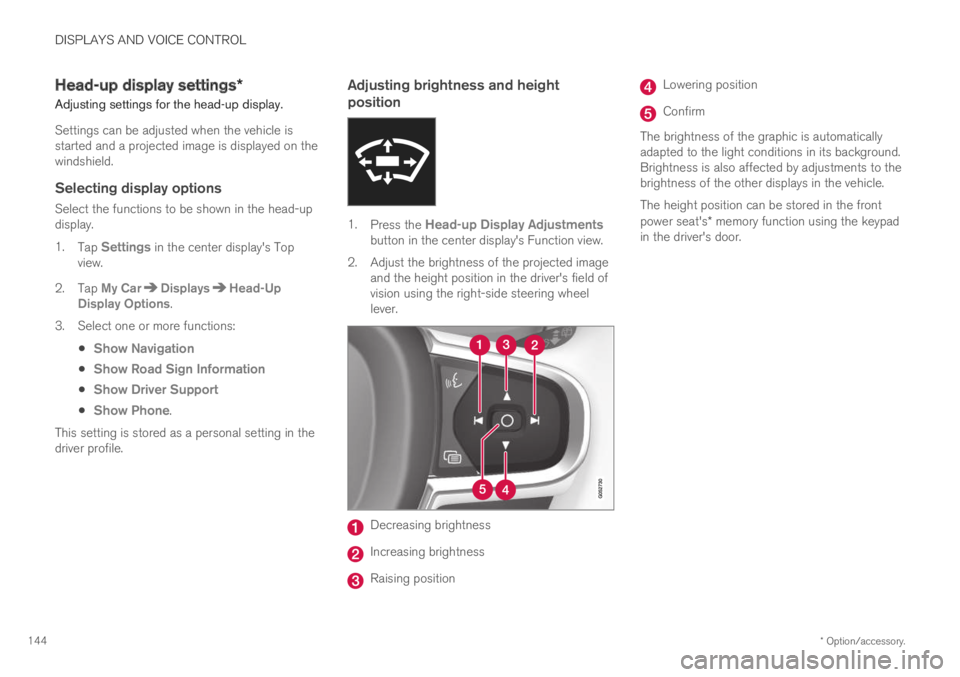
1.Press the Head-up Display Adjustmentsbutton in the center display's Function view.
2.Adjust the brightness of the projected imageand the height position in the driver's field ofvision using the right-side steering wheellever.
Decreasing brightness
Increasing brightness
Raising position
Lowering position
Confirm
The brightness of the graphic is automaticallyadapted to the light conditions in its background.Brightness is also affected by adjustments to thebrightness of the other displays in the vehicle.
The height position can be stored in the frontpower seat's* memory function using the keypadin the driver's door.
Page 188 of 695
||
SEATS AND STEERING WHEEL
* Option/accessory.186
Raise/lower the seat by moving the controlup/down.
Move the seat forward/rearward by movingthe control forward/rearward.
Change the backrest tilt by moving the con-trol forward/backward.
Only one movement (forward/rearward/up/down) can be performed at a time.
The front seat backrests cannot be folded downcompletely.
Related information
Manual front seats (p. 184)
Power* front seats (p. 185)
Storing positions for seats, mirrors and head-up display* (p. 186)
Using stored positions for seats, mirrors andhead-up display* (p. 187)
Adjusting front seat massage settings*(p. 189)
Adjusting* front seat cushion length (p. 189)
Front seat massage* settings (p. 188)
Adjusting front seat side bolster settings*(p. 190)
Adjusting front seat lumbar support* (p. 191)
Adjusting the passenger seat from the driv-er's seat* (p. 192)
Storing positions for seats, mirrors
and head-up display*
Adjustment settings for the power* seat, doormirrors and head-up display* can be stored inthe memory buttons.
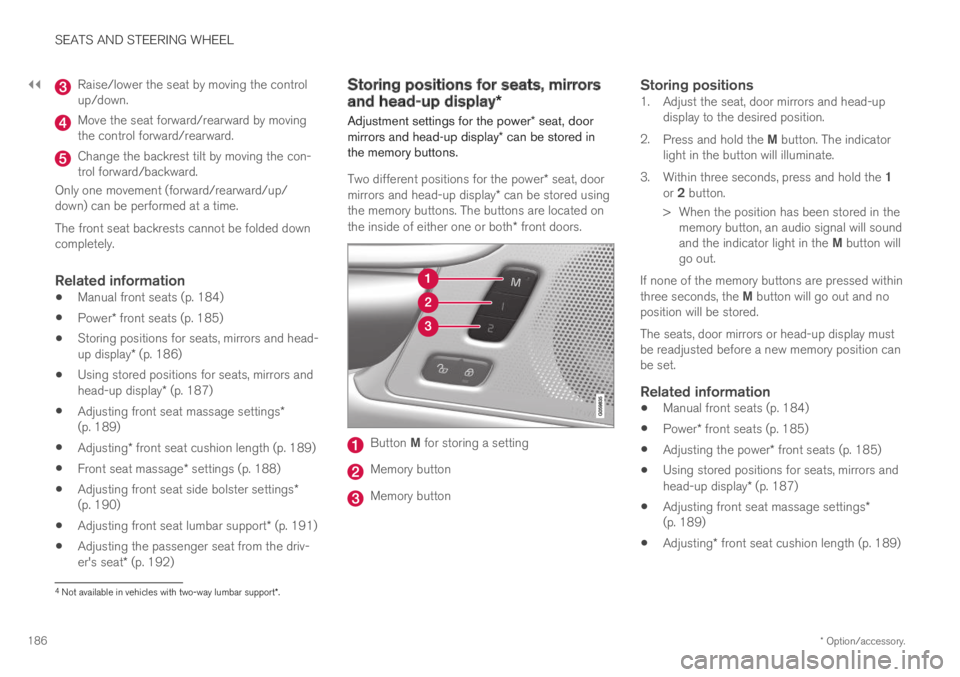
Two different positions for the power* seat, doormirrors and head-up display* can be stored usingthe memory buttons. The buttons are located onthe inside of either one or both* front doors.
Button M for storing a setting
Memory button
Memory button
Storing positions
1. Adjust the seat, door mirrors and head-updisplay to the desired position.
2.Press and hold the M button. The indicatorlight in the button will illuminate.
3.Within three seconds, press and hold the 1or 2 button.
> When the position has been stored in thememory button, an audio signal will soundand the indicator light in the M button willgo out.
If none of the memory buttons are pressed withinthree seconds, the M button will go out and noposition will be stored.
The seats, door mirrors or head-up display mustbe readjusted before a new memory position canbe set.
Related information
Manual front seats (p. 184)
Power* front seats (p. 185)
Adjusting the power* front seats (p. 185)
Using stored positions for seats, mirrors andhead-up display* (p. 187)
Adjusting front seat massage settings*(p. 189)
Adjusting* front seat cushion length (p. 189)
4Not available in vehicles with two-way lumbar support*.
Page 190 of 695
SEATS AND STEERING WHEEL
* Option/accessory.188
Adjusting the power* front seats (p. 185)
Storing positions for seats, mirrors and head-up display* (p. 186)
Adjusting front seat massage settings*(p. 189)
Adjusting* front seat cushion length (p. 189)
Front seat massage* settings (p. 188)
Adjusting front seat side bolster settings*(p. 190)
Adjusting front seat lumbar support* (p. 191)
Adjusting the passenger seat from the driv-er's seat* (p. 192)
Adjusting the door mirrors (p. 170)
Head-up display settings* (p. 144)
Front seat massage* settings
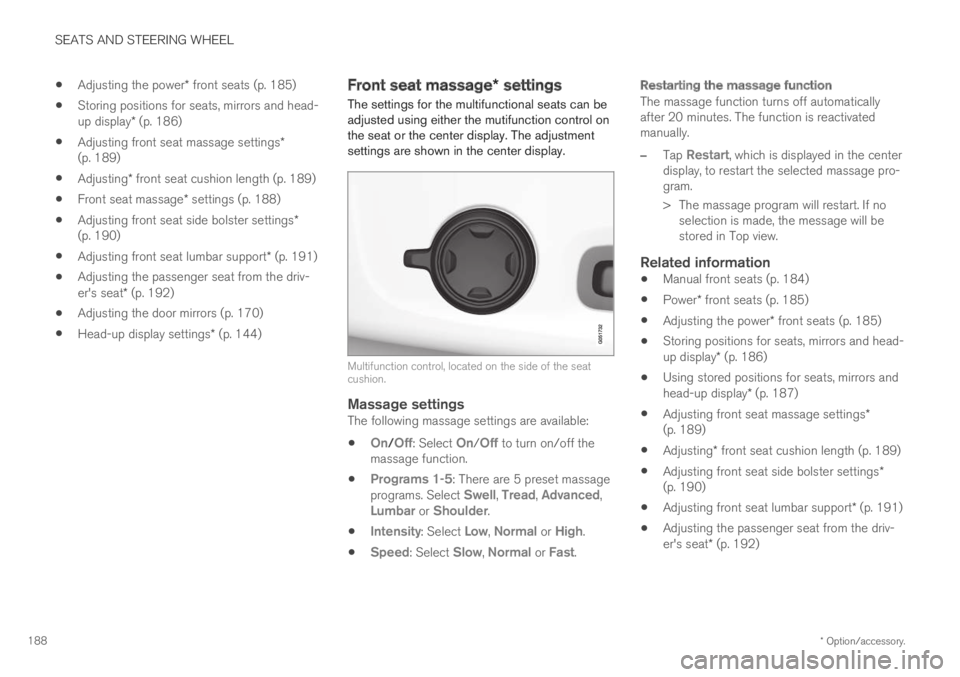
The settings for the multifunctional seats can beadjusted using either the mutifunction control onthe seat or the center display. The adjustmentsettings are shown in the center display.
Multifunction control, located on the side of the seatcushion.
Massage settings
The following massage settings are available:
On/Off: Select On/Off to turn on/off themassage function.
Programs 1-5: There are 5 preset massageprograms. Select Swell, Tread, Advanced,Lumbar or Shoulder.
Intensity: Select Low, Normal or High.
Speed: Select Slow, Normal or Fast.
Restarting the massage function
The massage function turns off automaticallyafter 20 minutes. The function is reactivatedmanually.
–Tap Restart, which is displayed in the centerdisplay, to restart the selected massage pro-gram.
>The massage program will restart. If noselection is made, the message will bestored in Top view.
Related information
Manual front seats (p. 184)
Power* front seats (p. 185)
Adjusting the power* front seats (p. 185)
Storing positions for seats, mirrors and head-up display* (p. 186)
Using stored positions for seats, mirrors andhead-up display* (p. 187)
Adjusting front seat massage settings*(p. 189)
Adjusting* front seat cushion length (p. 189)
Adjusting front seat side bolster settings*(p. 190)
Adjusting front seat lumbar support* (p. 191)
Adjusting the passenger seat from the driv-er's seat* (p. 192)
Page 191 of 695
SEATS AND STEERING WHEEL
}}
* Option/accessory.189
Adjusting front seat massage
settings*
The settings for the multifunctional seats can beadjusted using either the mutifunction control onthe seat or the center display. The adjustmentsettings are shown in the center display.
Adjusting front seat massage settings
The front seat backrests have a massage func-tion. Air-filled cushions provide the massagingaction and a number of settings are available.
The massage function can only be activatedwhen the engine is running.
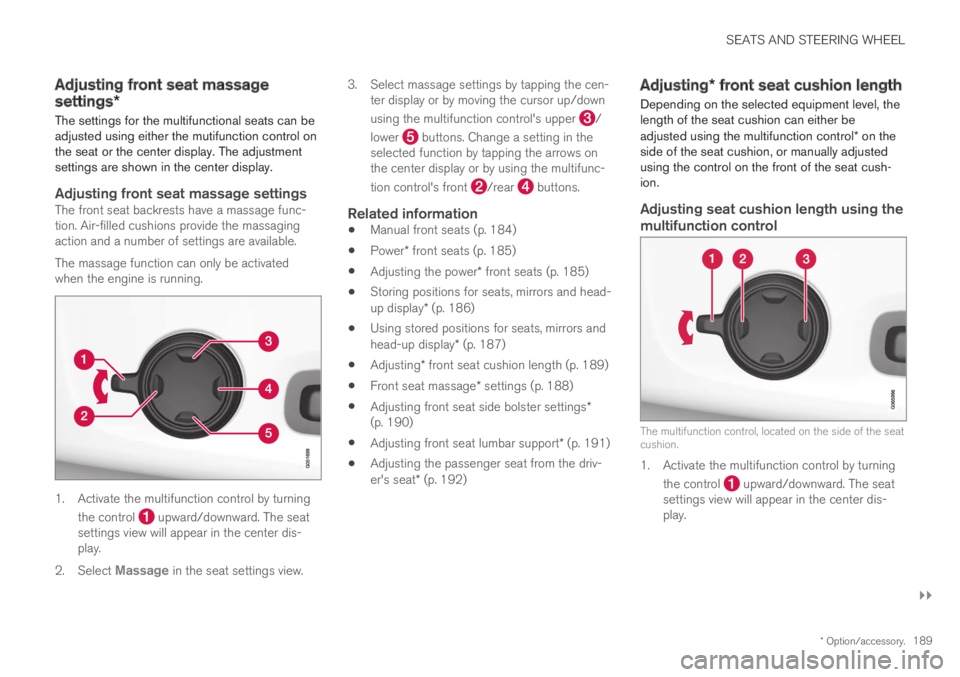
1. Activate the multifunction control by turning
the control upward/downward. The seatsettings view will appear in the center dis-play.
2.Select Massage in the seat settings view.
3.Select massage settings by tapping the cen-ter display or by moving the cursor up/down
using the multifunction control's upper /
lower buttons. Change a setting in theselected function by tapping the arrows onthe center display or by using the multifunc-
tion control's front /rear buttons.
Related information
Manual front seats (p. 184)
Power* front seats (p. 185)
Adjusting the power* front seats (p. 185)
Storing positions for seats, mirrors and head-up display* (p. 186)
Using stored positions for seats, mirrors andhead-up display* (p. 187)
Adjusting* front seat cushion length (p. 189)
Front seat massage* settings (p. 188)
Adjusting front seat side bolster settings*(p. 190)
Adjusting front seat lumbar support* (p. 191)
Adjusting the passenger seat from the driv-er's seat* (p. 192)
Adjusting* front seat cushion length
Depending on the selected equipment level, thelength of the seat cushion can either beadjusted using the multifunction control* on theside of the seat cushion, or manually adjustedusing the control on the front of the seat cush-ion.
Adjusting seat cushion length using the
multifunction control
The multifunction control, located on the side of the seatcushion.
1. Activate the multifunction control by turning
the control upward/downward. The seatsettings view will appear in the center dis-play.
Page 192 of 695
||
SEATS AND STEERING WHEEL
* Option/accessory.190
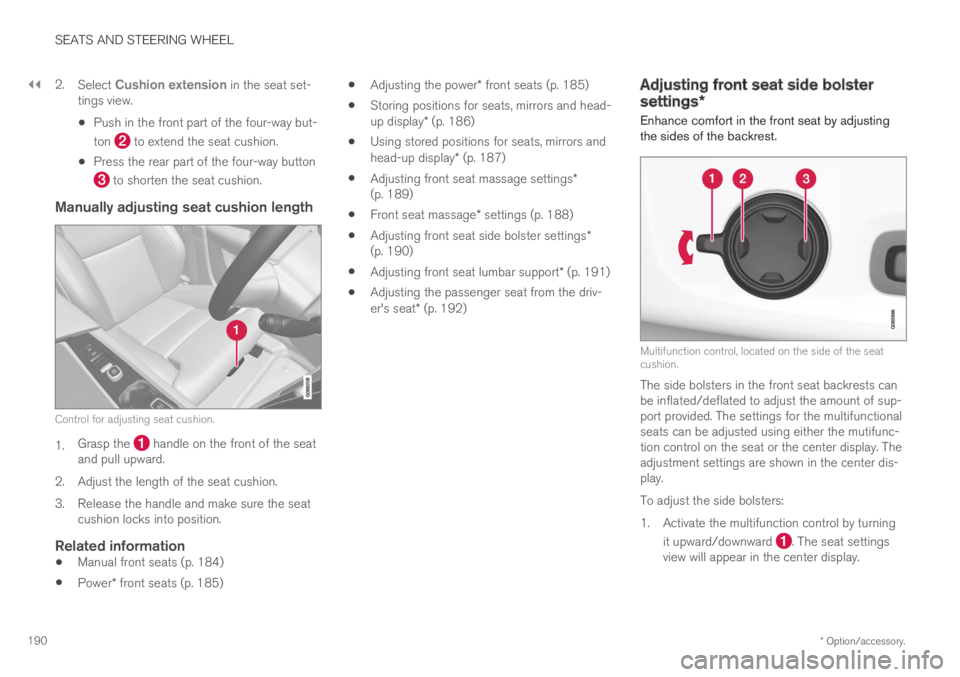
2.Select Cushion extension in the seat set-tings view.
Push in the front part of the four-way but-
ton to extend the seat cushion.
Press the rear part of the four-way button
to shorten the seat cushion.
Manually adjusting seat cushion length
Control for adjusting seat cushion.
1.Grasp the handle on the front of the seatand pull upward.
2.Adjust the length of the seat cushion.
3. Release the handle and make sure the seatcushion locks into position.
Related information
Manual front seats (p. 184)
Power* front seats (p. 185)
Adjusting the power* front seats (p. 185)
Storing positions for seats, mirrors and head-up display* (p. 186)
Using stored positions for seats, mirrors andhead-up display* (p. 187)
Adjusting front seat massage settings*(p. 189)
Front seat massage* settings (p. 188)
Adjusting front seat side bolster settings*(p. 190)
Adjusting front seat lumbar support* (p. 191)
Adjusting the passenger seat from the driv-er's seat* (p. 192)
Adjusting front seat side bolster
settings*
Enhance comfort in the front seat by adjustingthe sides of the backrest.
Multifunction control, located on the side of the seatcushion.
The side bolsters in the front seat backrests canbe inflated/deflated to adjust the amount of sup-port provided. The settings for the multifunctionalseats can be adjusted using either the mutifunc-tion control on the seat or the center display. Theadjustment settings are shown in the center dis-play.
To adjust the side bolsters:
1.Activate the multifunction control by turning
it upward/downward . The seat settingsview will appear in the center display.
Page 194 of 695
||
SEATS AND STEERING WHEEL
* Option/accessory.192
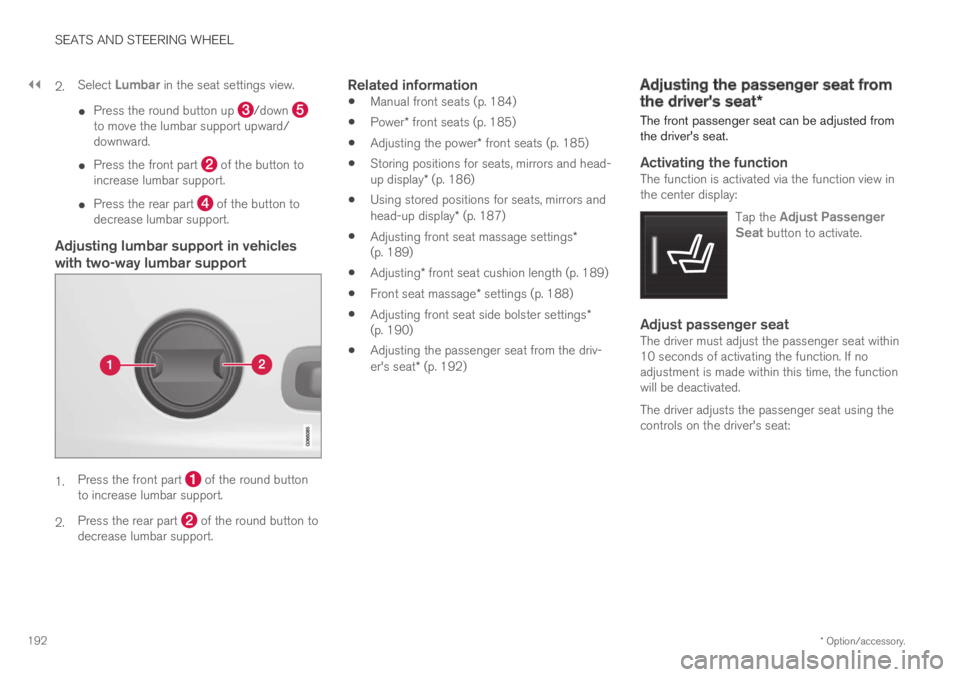
2.Select Lumbar in the seat settings view.
Press the round button up /down to move the lumbar support upward/downward.
Press the front part of the button toincrease lumbar support.
Press the rear part of the button todecrease lumbar support.
Adjusting lumbar support in vehicles
with two-way lumbar support
1.Press the front part of the round buttonto increase lumbar support.
2.Press the rear part of the round button todecrease lumbar support.
Related information
Manual front seats (p. 184)
Power* front seats (p. 185)
Adjusting the power* front seats (p. 185)
Storing positions for seats, mirrors and head-up display* (p. 186)
Using stored positions for seats, mirrors andhead-up display* (p. 187)
Adjusting front seat massage settings*(p. 189)
Adjusting* front seat cushion length (p. 189)
Front seat massage* settings (p. 188)
Adjusting front seat side bolster settings*(p. 190)
Adjusting the passenger seat from the driv-er's seat* (p. 192)
Adjusting the passenger seat from
the driver's seat*
The front passenger seat can be adjusted fromthe driver's seat.
Activating the function
The function is activated via the function view inthe center display:
Tap the Adjust PassengerSeat button to activate.
Adjust passenger seat
The driver must adjust the passenger seat within10 seconds of activating the function. If noadjustment is made within this time, the functionwill be deactivated.
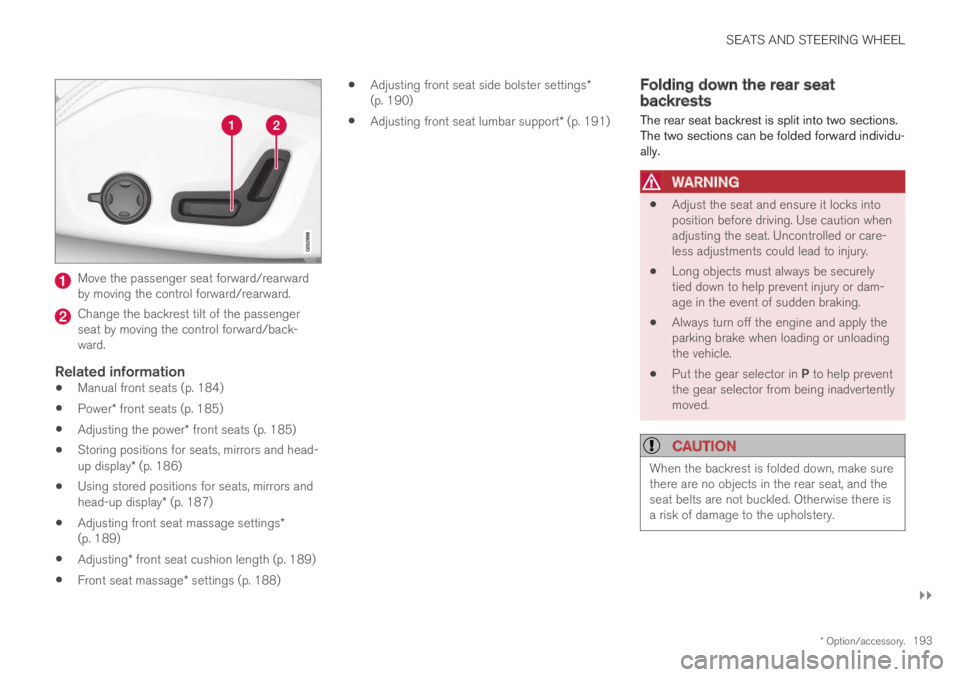
The driver adjusts the passenger seat using thecontrols on the driver's seat:
Page 195 of 695
SEATS AND STEERING WHEEL
}}
* Option/accessory.193
Move the passenger seat forward/rearwardby moving the control forward/rearward.
Change the backrest tilt of the passengerseat by moving the control forward/back-ward.
Related information
Manual front seats (p. 184)
Power* front seats (p. 185)
Adjusting the power* front seats (p. 185)
Storing positions for seats, mirrors and head-up display* (p. 186)
Using stored positions for seats, mirrors andhead-up display* (p. 187)
Adjusting front seat massage settings*(p. 189)
Adjusting* front seat cushion length (p. 189)
Front seat massage* settings (p. 188)
Adjusting front seat side bolster settings*(p. 190)
Adjusting front seat lumbar support* (p. 191)
Folding down the rear seatbackrests
The rear seat backrest is split into two sections.The two sections can be folded forward individu-ally.
WARNING
Adjust the seat and ensure it locks intoposition before driving. Use caution whenadjusting the seat. Uncontrolled or care-less adjustments could lead to injury.
Long objects must always be securelytied down to help prevent injury or dam-age in the event of sudden braking.
Always turn off the engine and apply theparking brake when loading or unloadingthe vehicle.
Put the gear selector in P to help preventthe gear selector from being inadvertentlymoved.
CAUTION
When the backrest is folded down, make surethere are no objects in the rear seat, and theseat belts are not buckled. Otherwise there isa risk of damage to the upholstery.
Page 407 of 695
DRIVER SUPPORT
}}
* Option/accessory.405
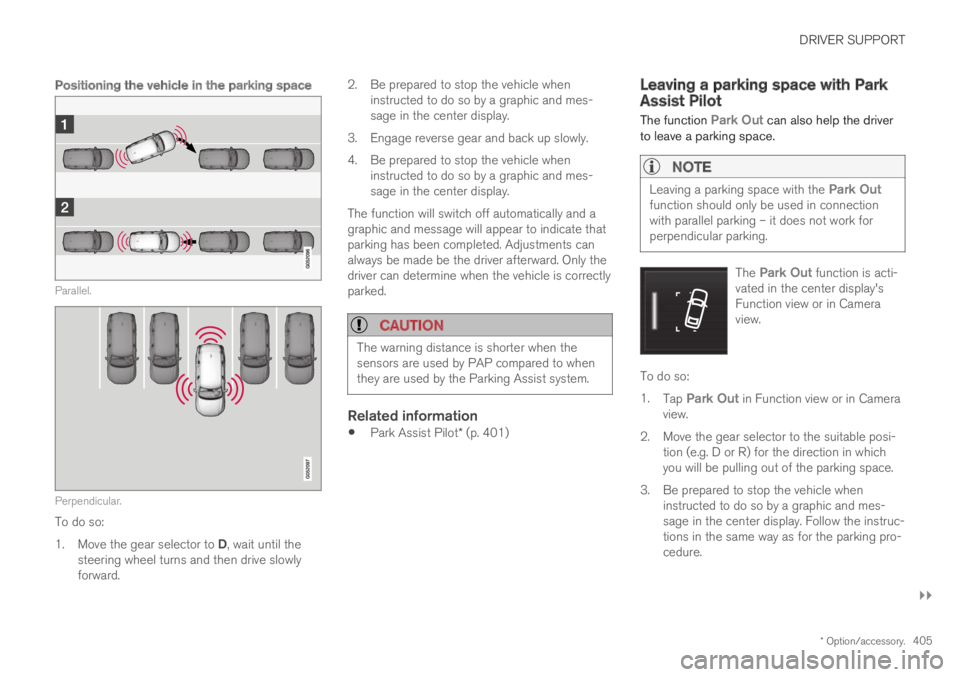
Positioning the vehicle in the parking space
Parallel.
Perpendicular.
To do so:
1.Move the gear selector to D, wait until thesteering wheel turns and then drive slowlyforward.
2.Be prepared to stop the vehicle wheninstructed to do so by a graphic and mes-sage in the center display.
3. Engage reverse gear and back up slowly.
4. Be prepared to stop the vehicle wheninstructed to do so by a graphic and mes-sage in the center display.
The function will switch off automatically and agraphic and message will appear to indicate thatparking has been completed. Adjustments canalways be made be the driver afterward. Only thedriver can determine when the vehicle is correctlyparked.
CAUTION
The warning distance is shorter when thesensors are used by PAP compared to whenthey are used by the Parking Assist system.
Related information
Park Assist Pilot* (p. 401)
Leaving a parking space with ParkAssist Pilot
The function Park Out can also help the driverto leave a parking space.
NOTE
Leaving a parking space with the Park Outfunction should only be used in connectionwith parallel parking – it does not work forperpendicular parking.
The Park Out function is acti-vated in the center display'sFunction view or in Cameraview.
To do so:
1.Tap Park Out in Function view or in Cameraview.
2.Move the gear selector to the suitable posi-tion (e.g. D or R) for the direction in whichyou will be pulling out of the parking space.
3. Be prepared to stop the vehicle wheninstructed to do so by a graphic and mes-sage in the center display. Follow the instruc-tions in the same way as for the parking pro-cedure.
Page 682 of 695
INDEX
680
G
Gasoline grade472
Gauge
fuel gauge87
Gear selector positions
automatic transmission445
Glass
laminated/reinforced166
Glove compartment593
Gracenote®517
Grocery bag holders 597
Gross vehicle weight667
Guide lines for Park Assist Camera 394
H
Handbrake438, 439
Hand wash649
Hard disk
space544
Hazard warning flashers161
HDC462
HD radio501
Head restraint196
Head-up display142
activate and deactivate143
cleaning644
replacing windshield619
settings144
store position144, 186, 187
Heated wiper blades176
Heater232
auxiliary heater232
parking heater232
Heating
Seats213, 214
steering wheel215, 216
windows219, 221
Height adjustment457, 460
high beams156, 157
High engine temperature475
Hill Descent Control461, 462, 463
activate with function button 463
Hill Start Assist443
Hill Start Assist (HSA)443
Hoisting the vehicle616
Hold
vehicle function467
HomeLink®485
programming486
use487
HomeLink® remote control
programmable 485
Home safe lighting161
Honk197
Hood, opening618
Horn197
Hybrid battery629
Charging413
Hybrid battery gauge88
Hybrid gauge87
Hybrid mode450, 456
I
IAQS (Interior Air Quality System) 204
IC (Inflatable Curtain)60
ID, Volvo26
Identification number38
Ignition mode433, 434
Immobilizer251
Electronic immobilizer251
Indicator symbols94
Individual drive mode450
Infant seats67
Inflatable curtain60