remote control VOLVO XC60 TWIN ENGINE 2020 Owner's Manual
[x] Cancel search | Manufacturer: VOLVO, Model Year: 2020, Model line: XC60 TWIN ENGINE, Model: VOLVO XC60 TWIN ENGINE 2020Pages: 687, PDF Size: 14.65 MB
Page 252 of 687

KEY, LOCKS AND ALARM
250
Locking and unlocking with detachable key blade
The detachable key blade can be used to unlock the vehicle from the outside, e.g. if thebattery in the remote key is discharged.
Unlocking
Pull the front left-hand door handle to its end position to access the lock cylinder.
Put the key in the lock cylinder.
Turn the key clockwise 45 degrees so that the key blade is pointing straight rear-ward.
Turn the key blade back 45 degrees to its original position. Remove the key from thelock cylinder and release the handle sothat it returns to its original positionagainst the vehicle.
5. Pull the door handle. > The door will open. Lock the door in the same way, but turn thekey 45 degrees counterclockwise in step (3).
Disarming the alarm and starting the vehicle
NOTE
When the door is unlocked using the detachable key blade and then opened, thealarm will be triggered.
Location of the backup key reader in the cup holder.
Turn off the alarm by:
1. Place the remote control key on the key
symbol in the backup reader in the bottom of the cup holder in the tunnel console.
2. Turn the start knob clockwise and release it.
> The alarm signal will stop and the alarmwill switch off.
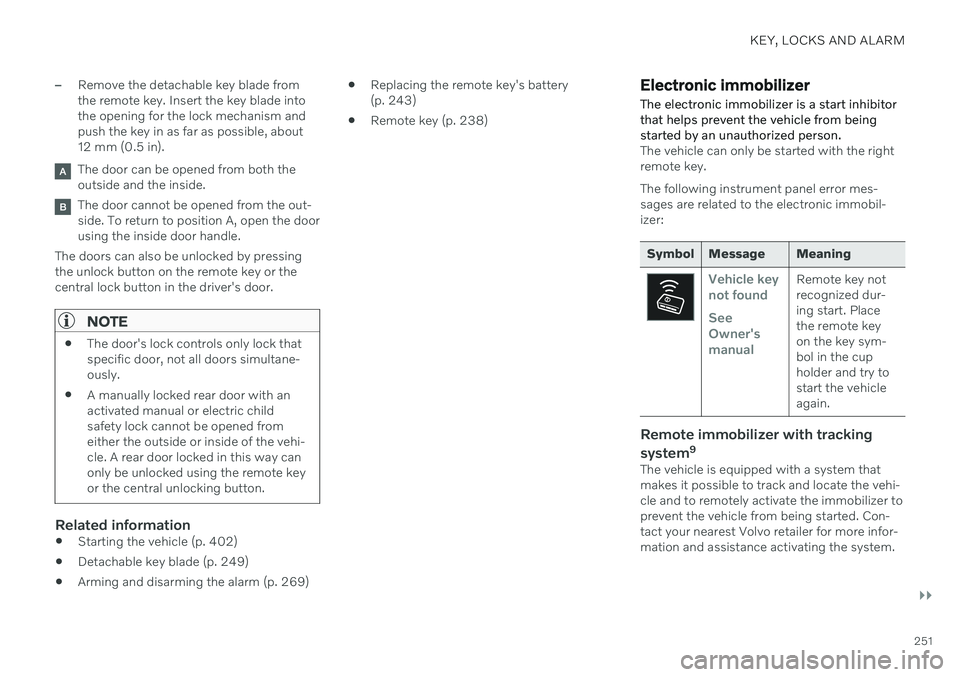
LockingThe vehicle can also be locked using the remote key's detachable key blade, e.g. ifeither the vehicle's or remote key's batteriesare discharged. The left-hand front door can be locked by inserting the detachable key into the door'slock cylinder. This is the only door with a lock cylinder. The other doors have lock mechanisms in the sideof the door that must be pushed in using thekey blade. The door will then be lockedmechanically and cannot be opened from theoutside. The doors can still be opened from inside.
Manual door lock. This is not the child lock.
Page 253 of 687
KEY, LOCKS AND ALARM
}}
251
–Remove the detachable key blade from the remote key. Insert the key blade intothe opening for the lock mechanism andpush the key in as far as possible, about12 mm (0.5 in).
The door can be opened from both the outside and the inside.
The door cannot be opened from the out- side. To return to position A, open the doorusing the inside door handle.
The doors can also be unlocked by pressingthe unlock button on the remote key or thecentral lock button in the driver's door.
NOTE
The door's lock controls only lock that specific door, not all doors simultane-ously.
A manually locked rear door with anactivated manual or electric childsafety lock cannot be opened fromeither the outside or inside of the vehi-cle. A rear door locked in this way canonly be unlocked using the remote keyor the central unlocking button.
Related information
Starting the vehicle (p. 402)
Detachable key blade (p. 249)
Arming and disarming the alarm (p. 269)
Replacing the remote key's battery (p. 243)
Remote key (p. 238)
Electronic immobilizer The electronic immobilizer is a start inhibitor that helps prevent the vehicle from beingstarted by an unauthorized person.
The vehicle can only be started with the right remote key. The following instrument panel error mes- sages are related to the electronic immobil-izer:
Symbol Message Meaning
Vehicle key not found See Owner'smanualRemote key not recognized dur-ing start. Placethe remote keyon the key sym-bol in the cupholder and try tostart the vehicleagain.
Remote immobilizer with tracking system 9
The vehicle is equipped with a system that makes it possible to track and locate the vehi-cle and to remotely activate the immobilizer toprevent the vehicle from being started. Con-tact your nearest Volvo retailer for more infor-mation and assistance activating the system.
Page 261 of 687
KEY, LOCKS AND ALARM
}}
* Option/accessory.259
Related information
Locking and unlocking from inside the vehicle (p. 257)
Opening and closing the power tailgate
*
(p. 261)
Activating and deactivating child safety locks The child safety locks help prevent the rear doors from being able to be opened from theinside.
The child safety locks can be either manual or electric *.
Activating and deactivating manual
child safety locks
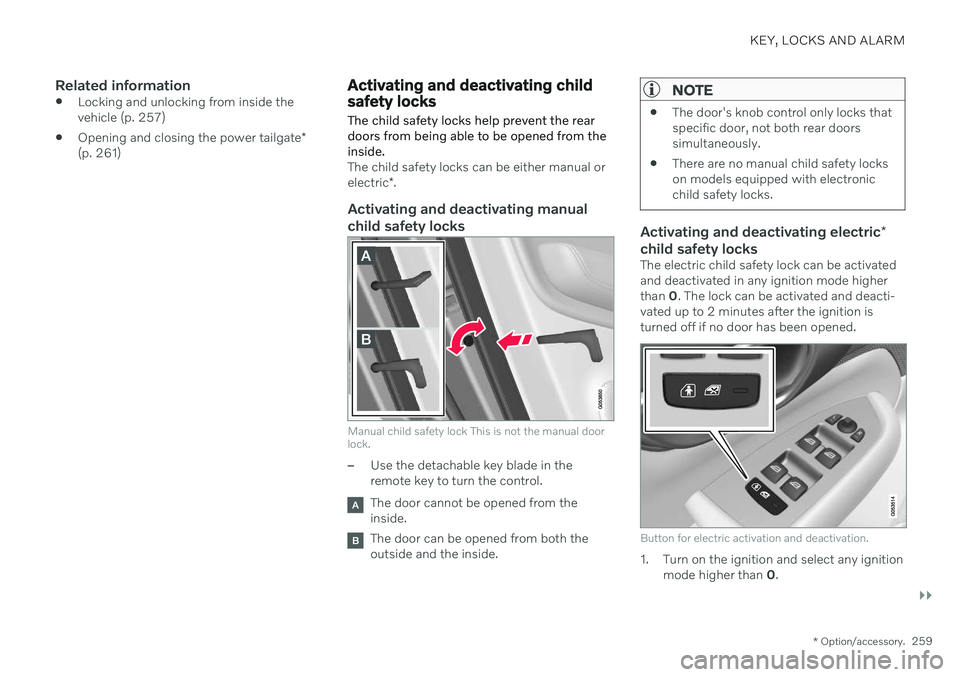
Manual child safety lock This is not the manual door lock.
–Use the detachable key blade in the remote key to turn the control.
The door cannot be opened from the inside.
The door can be opened from both the outside and the inside.
NOTE
The door's knob control only locks that specific door, not both rear doorssimultaneously.
There are no manual child safety lockson models equipped with electronicchild safety locks.
Activating and deactivating electric
*
child safety locks
The electric child safety lock can be activated and deactivated in any ignition mode higherthan 0. The lock can be activated and deacti-
vated up to 2 minutes after the ignition isturned off if no door has been opened.
Button for electric activation and deactivation.
1. Turn on the ignition and select any ignition mode higher than 0.
Page 404 of 687

STARTING AND DRIVING
* Option/accessory.
402
Starting the vehicle
The vehicle can be started using the start knob in the tunnel console when the remotekey is in the passenger compartment.
Start knob in the tunnel console.
WARNING
Before starting:
Buckle your seat belt.
Adjust the seat, steering wheel and mirrors.
Make sure you can fully depress thebrake pedal.
The remote key is not physically used to startthe ignition because the vehicle is equippedwith the keyless Passive Start system. To start the vehicle:
CAUTION
The vehicle cannot be started if the charg- ing cable is still plugged in. Make sure topull out the charging cable from the charg-ing socket before starting the vehicle.
1. The remote key must be inside the vehicle.
For vehicles with Passive Start, the key must be in the front section of the passen-ger compartment. With the optional key- less locking/unlocking function *, the key
can be anywhere in the vehicle.
2. Press and hold down the brake pedal 1
as
far as possible.
3. Turn the start knob clockwise and release. The control will automatically return to the original position.
WARNING
Never use more than one inlay mat at a time on the driver's floor. If any othertype of floor mat is used, remove theoriginal mat from the driver's seat floorbefore driving. All types of mats mustbe securely anchored in the attach-ment points in the floor. Make sure thefloor mat does not impede the move-ment of the brake pedal or acceleratorpedal in any way, as this could be aserious safety hazard.
Volvo's floor mats are specially manu-factured for your vehicle. They must beproperly secured in the attachmentpoints in the floor to help ensure theycannot slide and become trappedunder the pedals.
The starter motor will crank until the enginestarts or until overheating protection is trig-gered. During normal start conditions, the vehicle's electric motor will be prioritized and the gaso-line engine will remain off. This means thatonce the start knob is turned clockwise, theelectric motor has been "started" and the vehi-cle is ready to be driven. The warning andinformation symbols in the instrument panel
1 If the vehicle is moving, it is only necessary to turn the start knob clockwise to start the engine.
Page 405 of 687

STARTING AND DRIVING
}}
403
will go out and the selected theme will be dis- played to indicate that the electric motor isactivated. In some situations, such as in cold weather or if the hybrid battery's charge level is too low,the gasoline engine will start instead.
Error messagesIf the Vehicle key not found message is
shown in the instrument panel at start, place the remote key at the backup reader and thenmake a new start attempt.
Location of the backup reader in the tunnel console.
NOTE
When the remote key is placed in the backup reader, make sure that no othervehicle keys, metal objects or electronicdevices (e.g. cellular phones, tablets, lap-tops or chargers) are in the backup reader.Multiple vehicle keys close to each other inthe backup reader can disrupt their func-tionality.
If Vehicle start System check, wait is dis-
played in the instrument panel while attempt- ing to start the vehicle, wait until the messagedisappears and try again to start the vehicle.
CAUTION
If the engine has not responded after 3 attempts – wait for 3 minutes before star-ting a new attempt. Starting capabilityincreases if the starter battery is given timeto recover.
NOTE
The vehicle cannot be started if the hybrid battery is discharged.
WARNING
Never remove the remote control key from
the vehicle while driving.
WARNING
Always remove the remote key from the passenger compartment when youleave the vehicle and make sure theignition is in mode
0.
Always put the gear selector in
P and
apply the parking brake before leavingthe vehicle. Never leave the vehicleunsupervised while the engine is run-ning.
Always open the garage door fully andmake sure that ventilation is very goodbefore starting the engine in a garage.The exhaust fumes produced by thevehicle contain carbon monoxide,which is invisible and odorless but verytoxic.
Page 408 of 687
||
STARTING AND DRIVING
* Option/accessory.
406
Mode Functions
I The panoramic roof, power windows, 12-volt electricalsocket in the passenger com-partment, Bluetooth, naviga-tion, phone, blower and wind-shield wipers can be used.
The power seats can beadjusted.
The 12-volt electrical socket
* in
the cargo compartment can beused.
Electrical current will be taken
from the battery in this ignitionmode.
II The headlights illuminate.
Warning/indicator lights illumi-nate for 5 seconds.
A number of other systems areactivated. However, seat andrear window heating can onlybe activated when the engineis running.
This ignition mode uses a lot of
current from the battery andshould be avoided wheneverpossible!
A Also activated when the door is opened.
Related information
Starting the vehicle (p. 402)
Adjusting the steering wheel (p. 202)
Jump starting using another battery (p. 451)
Selecting ignition mode (p. 406)
Selecting ignition mode
The vehicle's ignition can be put in various modes (levels) to make different functionsavailable.
Selecting an ignition mode
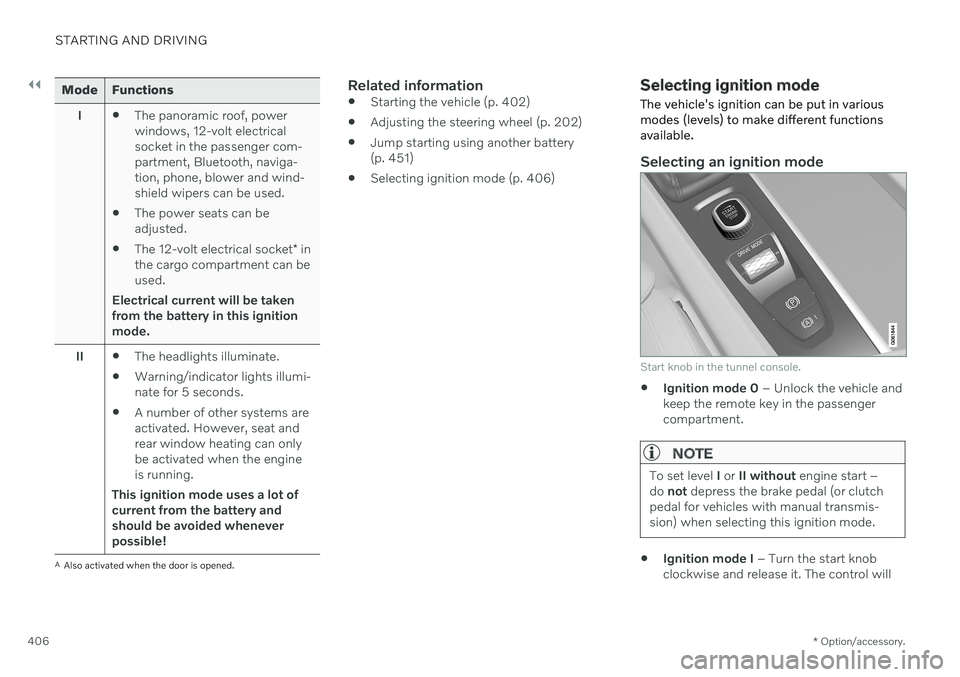
Start knob in the tunnel console.
Ignition mode 0
– Unlock the vehicle and
keep the remote key in the passenger compartment.
NOTE
To set level I or II without engine start –
do not depress the brake pedal (or clutch
pedal for vehicles with manual transmis- sion) when selecting this ignition mode.
Ignition mode I
– Turn the start knob
clockwise and release it. The control will
Page 465 of 687
STARTING AND DRIVING
* Option/accessory.463
only be lifted with the tow truck's lifting equip- ment.
WARNING
No person or object should be behind the tow truck when the vehicle is lifted ontothe bed of the truck.
Related information
Attaching and removing the towing eyelet (p. 461)
HomeLink ®
*18
HomeLink ®
19
is a programmable remote con-
trol, integrated in the vehicle electrical sys- tem, that can control up to three differentdevices (e.g. garage door opener, alarm sys-tem, outdoor and indoor lighting) and therebyreplace the remote controls for these.
General
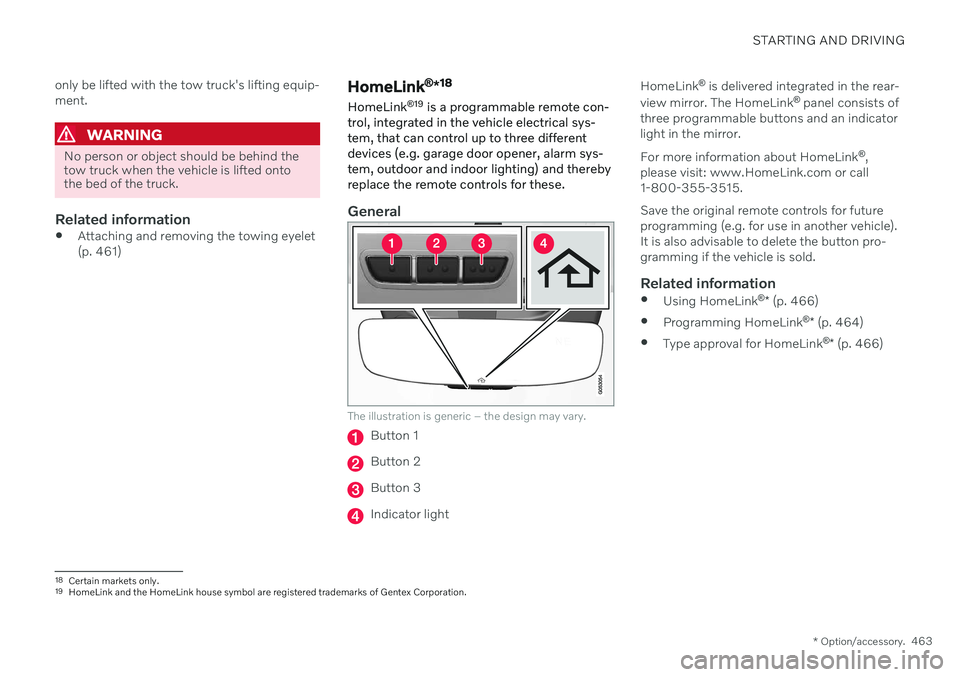
The illustration is generic – the design may vary.
Button 1
Button 2
Button 3
Indicator light HomeLink
®
is delivered integrated in the rear-
view mirror. The HomeLink ®
panel consists of
three programmable buttons and an indicator light in the mirror. For more information about HomeLink ®
,
please visit: www.HomeLink.com or call 1-800-355-3515. Save the original remote controls for future programming (e.g. for use in another vehicle).It is also advisable to delete the button pro-gramming if the vehicle is sold.
Related information
Using HomeLink ®
* (p. 466)
Programming HomeLink ®
* (p. 464)
Type approval for HomeLink ®
* (p. 466)
18
Certain markets only.
19 HomeLink and the HomeLink house symbol are registered trademarks of Gentex Corporation.
Page 466 of 687
STARTING AND DRIVING
* Option/accessory.
464
Programming HomeLink ®
*20
Follow these instructions to program HomeLink ®
, reset all programming, or pro-
gram individual buttons.
NOTE
In some vehicles, the ignition must be on or in the "accessory position" before HomeLink ®
can be programmed or used. It
can be a good idea to put new batteries in the remote control being replaced by HomeLink ®
for faster programming and
better radio signal transmission. TheHomeLink ®
buttons should be reset before
programming.
WARNING
While HomeLink ®
is being programmed,
the garage door or gate being programmed may be activated. Make sure that no one isnear the door or gate during programming.When programming a garage door opener,it is advised to park outside of the garage. 1. Point the remote control at the
HomeLink ®
button to be programmed and
hold it about 2-8 cm (1-3 inches) from the button. Do not obstruct the HomeLink ®
indicator light. Note: Some remote controls are more
effective at programming HomeLink ®
from
a distance of about 15-20 cm (6-12 inches). Keep this in mind if you experi-ence any programming difficulties.
2. Press and hold both the remote control button and the HomeLink ®
button to be
programmed. 3. Do not release the buttons until the indica-
tor light has stopped flashing slowly(about once a second) and either flashesquickly (about 10 times a second) orglows steadily. >If the indicator light glows steadily: Indication that programming is com-plete. Press the programmed buttontwice to activate. If the indicator light flashes quickly: The device being programmed with HomeLink ®
may have a security func-
tion that requires an extra step. Try pressing the programmed button twiceto see whether the programmingworks. Otherwise, continue with thefollowing steps.
20 Certain markets only.
Page 468 of 687
STARTING AND DRIVING
* Option/accessory.
466
Using HomeLink ®
*22
Once HomeLink ®
is programmed, it can be
used instead of the separate remote controls.
Press and hold the programming button. The garage door, gate, alarm system, etc. will beactivated (this may take several seconds). Ifthe button is held down for more than 20 sec-onds, reprogramming will begin. The indicatorlight will glow steadily or flash when the but-ton has been pressed. The original remotecontrols may be used concurrently with HomeLink ®
if desired.
NOTE
When the ignition is switched off, HomeLink ®
will be active for at least
7 minutes.
NOTE
HomeLink ®
cannot be used if the vehicle is
locked and the alarm is armed * from the
outside.
WARNING
If you use HomeLink ®
to open a garage
door or gate, be sure no one is near the gate or door while it is in motion.
Do not use HomeLink ®
with any
garage door opener that lacks safetystop and reverse features as requiredby US federal safety standards (thisincludes any garage door opener modelmanufactured before April 1, 1982). Agarage door that cannot detect anobject - signaling the door to stop andreverse - does not meet current U.S.federal safety standards. For moreinformation, contact HomeLink at:www.homelink.com.
Related information
HomeLink ®
* (p. 463)
Programming HomeLink ®
* (p. 464)
Type approval for HomeLink ®
* (p. 466)
Type approval for HomeLink ®
*23
FCC (USA) and IC (Canada)This device complies with FCC rules part 15 and Industry Canada RSS-210. Operation issubject to the following two conditions: (1)This device may not cause harmful interfer-ence, and (2) This device must accept anyinterference that may be received includinginterference that may cause undesired opera-tion.
WARNING
The transmitter has been tested and com- plies with FCC and IC rules. Changes ormodifications not expressly approved bythe party responsible for compliance couldvoid the user's authority to operate the device.
24
Type approval for EUGentex Corporation hereby declares that HomeLink
®
Model UAHL5 complies with the
Radio equipment directive 2014/53/EU. Wavelengths within which the radio equip- ment operates:
433.05MHz-434.79MHz <10mW E.R.P.
868.00MHz-868.60MHz <25mW E.R.P.
22
Certain markets only.
23 Certain markets only.
24 The term "IC:" before the certification/registration number only signifies that Industry Canada technical specifications were met.
Page 509 of 687

AUDIO, MEDIA AND INTERNET
}}
* Option/accessory.507
by tethering using the device's Wi-Fi hot- spot.
A maximum of 20 Android devices can bestored at the same time, which may beworth noting if many people share thevehicle, e.g. in a car pool. When the list isfull and a new device is connected, theoldest one will be deleted. A factory resetmust be performed to delete the list.
Related information
Android Auto
* (p. 504)
Connecting the vehicle to the Internet viaa phone (Wi-Fi) (p. 517)
Phone
A phone equipped with Bluetooth can be wirelessly connected to the vehicle's inte-grated hands-free system.
The audio and media system offers hands-free functionality for remotely controlling a numberof the phone's features. The phone's inte-grated controls can also be used, even when itis connected to the vehicle. When the phone has been paired and con- nected to the vehicle, it can be used as anInternet connection or to make or receivecalls, send or receive text messages or wire-lessly play music. The phone is controlled from the center dis- play, and the App menu (accessed using theright-side steering wheel keypad) and voicecommands can also be used to control certainfunctions.
Overview
Microphone.
Phone.
Phone handling in the center display.
Keypad for controlling phone functions shown in the center display and voicecommands.
Instrument panel.
Related information
Handling phone calls (p. 511)
Managing the phone book (p. 514)
Handling text messages (p. 512)
Connecting a phone to the car via Blue- tooth for the first time (p. 508)