display VOLVO XC60 TWIN ENGINE 2020 Owners Manual
[x] Cancel search | Manufacturer: VOLVO, Model Year: 2020, Model line: XC60 TWIN ENGINE, Model: VOLVO XC60 TWIN ENGINE 2020Pages: 687, PDF Size: 14.65 MB
Page 638 of 687
||
MAINTENANCE AND SERVICE
* Option/accessory.
636
WARNING
Never use more than one inlay mat at a time on the driver's floor. If any othertype of floor mat is used, remove theoriginal mat from the driver's seat floorbefore driving. All types of mats mustbe securely anchored in the attach-ment points in the floor. Make sure thefloor mat does not impede the move-ment of the brake pedal or acceleratorpedal in any way, as this could be aserious safety hazard.
Volvo's floor mats are specially manu-factured for your vehicle. They must beproperly secured in the attachmentpoints in the floor to help ensure theycannot slide and become trappedunder the pedals.
Related information
Cleaning the interior (p. 633)
Cleaning the center display (p. 633)
Cleaning fabric upholstery and ceiling liner(p. 635)
Cleaning the seat belt (p. 635)
Cleaning leather upholstery
* (p. 636)
Cleaning the leather steering wheel(p. 637)
Cleaning interior plastic, metal and woodsurfaces (p. 637)
Cleaning leather upholstery
*
Only use cleaning agents and car care prod- ucts recommended by Volvo. Clean regularlyand treat stains immediately. It is importantto vacuum before using a cleaning agent.
Volvo's leather upholstery * is treated to pro-
tect its original appearance. Over time, sun- light, grease, dirt, etc. could break down theprotective layer. This could result in scratchesand cracking. Leather upholstery * is a natural product that
changes and acquires a beautiful patina over time. Regular cleaning and treatments arerequired to preserve the qualities and color ofthe leather. Volvo offers a comprehensiveproduct, Volvo Leather Care KitWipes, forcleaning and treating leather upholstery.When used as directed, it helps preserve theleather's protective coating. For optimal results, Volvo recommends clean- ing and applying protective cream one to fourtimes a year (or more often as needed). VolvoLeather Care Kit 951 0251 and Volvo LeatherSoftener 943 7429 are available for purchaseat Volvo retailers.
Cleaning the leather upholstery1. Apply the leather cleaner to a damp sponge and squeeze it until the cleanerfoams. 2. Move the sponge in circular motions to
apply the foam to the stain.
3. Dampen the stain thoroughly with the sponge. Let the sponge absorb the stainand do not rub.
4. Dry the stain using a soft towel and let the leather dry completely.
Protecting the leather upholstery1. Apply a small amount of leather protectorto a cloth and then apply the protector tothe leather using light circular movements.
2. Let it dry for approximately 20 minutes. > Protecting the leather upholsterymakes it better able to withstand sun-light's harmful UV rays.
Related information
Cleaning the interior (p. 633)
Cleaning the center display (p. 633)
Cleaning fabric upholstery and ceiling liner(p. 635)
Cleaning the seat belt (p. 635)
Cleaning floor mats and inlay mats(p. 635)
Cleaning the leather steering wheel(p. 637)
Cleaning interior plastic, metal and wood surfaces (p. 637)
Page 639 of 687
MAINTENANCE AND SERVICE
}}
* Option/accessory.637
Cleaning the leather steering wheel
Only use cleaning agents and car care prod- ucts recommended by Volvo. Clean regularlyand treat stains immediately. It is importantto vacuum before using a cleaning agent.
Leather needs to breathe. Never cover the leather steering wheel with a plastic protector.Volvo Leather Care Kit 951 0251 and LeatherSoftener 943 7429 are recommended forcleaning the leather steering wheel. First,remove dirt, dust, etc. with a damp sponge orcloth.
CAUTION
Sharp objects such as rings could damage the leather on the steering wheel.
Treating stains on the steering wheel:Type 1 (ink, wine, coffee, milk, sweat or blood)
–Use a soft cloth or sponge. Wipe the steering wheel using a solution of 5%ammonia. For blood stains, mix approxi-mately 2 dl (1 cup) of water with 25 g(one ounce) of salt and wipe the stain.
Type 2 (grease, oil, sauces or chocolate)
1. Same procedure as for Type 1 stains.
2. Finish by wiping the wheel with an absorbent paper or towel. Type 3
(dry dirt or dust)
1. Remove the dirt/dust using a soft brush.
2. Same procedure as for Type 1 stains.
Related information
Cleaning the interior (p. 633)
Cleaning the center display (p. 633)
Cleaning fabric upholstery and ceiling liner (p. 635)
Cleaning the seat belt (p. 635)
Cleaning floor mats and inlay mats(p. 635)
Cleaning leather upholstery
* (p. 636)
Cleaning interior plastic, metal and woodsurfaces (p. 637)
Cleaning interior plastic, metal and wood surfaces
Only use cleaning agents and car care prod- ucts recommended by Volvo. Clean regularlyand treat stains immediately.
A lightly dampened microfiber cloth is recom- mended for cleaning interior details and surfa-ces. These cloths are available for purchase atVolvo retailers. Never scrape or rub a stain. Never use strong stain removers.
CAUTION
Do not use solvent containing alcohol to clean the instrument panel glass.
CAUTION
Keep in mind that glossy surfaces can be easily scratched. Wipe these surfaces witha clean and dry microfiber cloth usingsmall, circular motions. If necessary, mois-ten the cloth lightly with clean water.
Related information
Cleaning the interior (p. 633)
Cleaning the center display (p. 633)
Cleaning fabric upholstery and ceiling liner (p. 635)
Cleaning the seat belt (p. 635)
Page 650 of 687
||
MAINTENANCE AND SERVICE
6483. Press the new wiper blade until it clicks
into place. Check to make sure the blade is securely in place.
4. Fold the wiper arm back toward the win- dow.
CAUTION
Check the blades regularly. Neglected maintenance shortens the life of theblades.
Related information
Using the rain sensor (p. 181)
Using the windshield and headlight wash- ers (p. 183)
Using automatic rear window wipingwhen backing up (p. 185)
Using the rain sensor's memory function(p. 182)
Using the rear window wiper/washer(p. 184)
Filling washer fluid (p. 650)
Putting the wiper blades in service posi-tion (p. 649)
Replacing windshield wiper blades(p. 648)
Using the windshield wipers (p. 180)
Wiper blades and washer fluid (p. 180)
Replacing windshield wiper blades
The wiper blades help remove water from the windshield and rear window. Along with thewasher fluid, they are designed to clean theglass and help improve visibility while driving.The windshield and rear window wiperblades can be replaced.
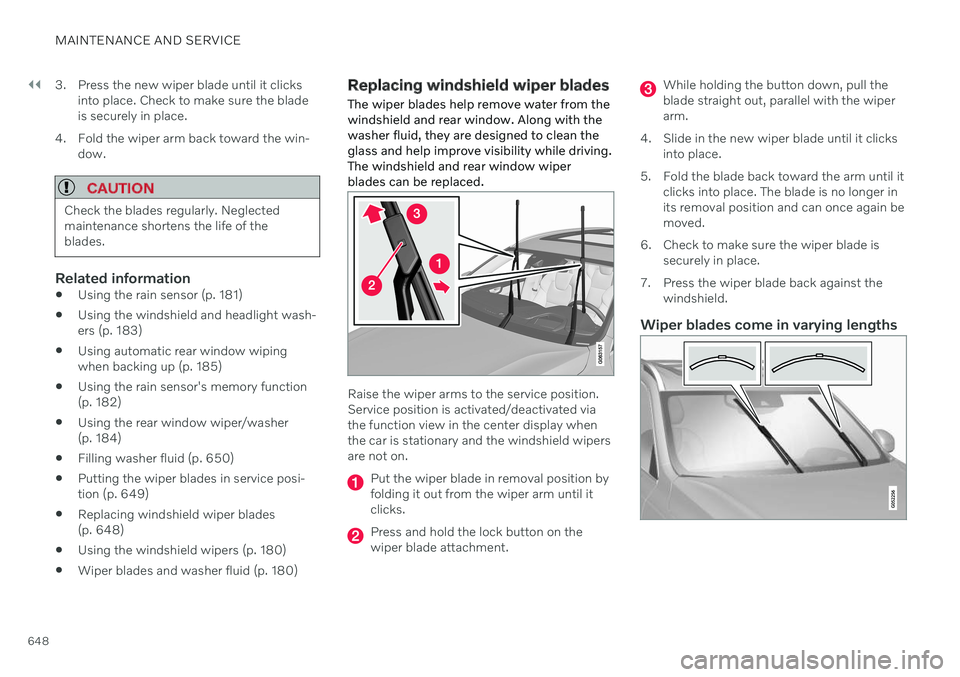
Raise the wiper arms to the service position. Service position is activated/deactivated viathe function view in the center display whenthe car is stationary and the windshield wipersare not on.
Put the wiper blade in removal position by folding it out from the wiper arm until itclicks.
Press and hold the lock button on the wiper blade attachment.
While holding the button down, pull the blade straight out, parallel with the wiperarm.
4. Slide in the new wiper blade until it clicks into place.
5. Fold the blade back toward the arm until it clicks into place. The blade is no longer inits removal position and can once again bemoved.
6. Check to make sure the wiper blade is securely in place.
7. Press the wiper blade back against the windshield.
Wiper blades come in varying lengths
Page 651 of 687
MAINTENANCE AND SERVICE
}}
649
NOTE
When changing wiper blades, make sure that the blades are of different lengths. Theblade on the driver's side is longer than theone on the passenger side.
Related information
Using the rain sensor (p. 181)
Using the windshield and headlight wash- ers (p. 183)
Using automatic rear window wipingwhen backing up (p. 185)
Using the rain sensor's memory function(p. 182)
Using the rear window wiper/washer(p. 184)
Filling washer fluid (p. 650)
Putting the wiper blades in service posi-tion (p. 649)
Changing rear window wipers (p. 647)
Using the windshield wipers (p. 180)
Wiper blades and washer fluid (p. 180)
Putting the wiper blades in service position The windshield wiper blades must be in the service (vertical) position for certain opera-tions, e.g. replacing the blades.
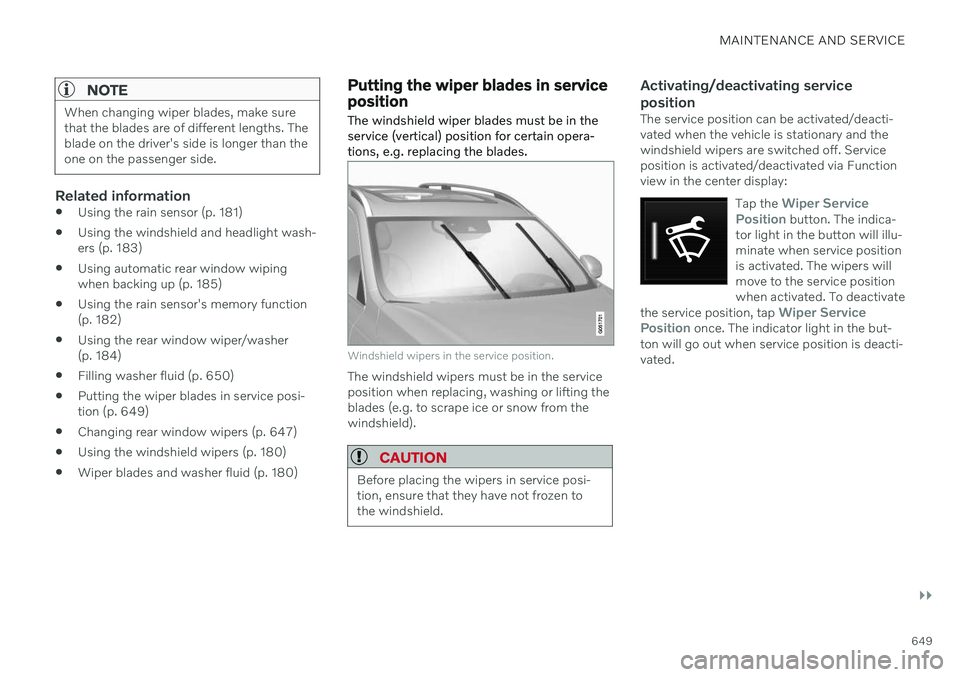
Windshield wipers in the service position.
The windshield wipers must be in the service position when replacing, washing or lifting theblades (e.g. to scrape ice or snow from thewindshield).
CAUTION
Before placing the wipers in service posi- tion, ensure that they have not frozen tothe windshield.
Activating/deactivating service position
The service position can be activated/deacti- vated when the vehicle is stationary and thewindshield wipers are switched off. Serviceposition is activated/deactivated via Functionview in the center display:
Tap the
Wiper Service
Position button. The indica-
tor light in the button will illu- minate when service positionis activated. The wipers willmove to the service positionwhen activated. To deactivate
the service position, tap
Wiper Service
Position once. The indicator light in the but-
ton will go out when service position is deacti- vated.
Page 652 of 687

||
MAINTENANCE AND SERVICE
* Option/accessory.
650 The wiper blades will also move out of the service position if:
The windshield wipers are turned on.
The windshield washers are turned on.
The rain sensor is activated.
The vehicle begins moving.
CAUTION
If the wiper arms in service position are raised from the windshield, they must befolded back against the windscreen beforeactivating wiping, washing or rain sensoras well as before departure. This is to pre-vent scratching the paint on the hood.
Related information
Using the rain sensor (p. 181)
Using the windshield and headlight wash- ers (p. 183)
Using automatic rear window wipingwhen backing up (p. 185)
Using the rain sensor's memory function(p. 182)
Using the rear window wiper/washer(p. 184)
Filling washer fluid (p. 650)
Replacing windshield wiper blades(p. 648)
Changing rear window wipers (p. 647)
Using the windshield wipers (p. 180)
Wiper blades and washer fluid (p. 180)
Filling washer fluid Washer fluid is used to keep the headlights, windshield and rear window clean. Washerfluid containing anti-freeze should be used invery cold weather (below-freezing tempera-tures).
Fill washer fluid into the reservoir with the blue cover. The reservoir is used for the wind-shield washer, tailgate window washer and headlight washer
*
NOTE
When there is approximately 1 liter (1 qt) of washer fluid remaining, the message
Washer fluid Level low, refill and the
symbol will be displayed in the
instrument panel.
Page 670 of 687
INDEX
668Automatic relocking 240, 254
Automatic transmission 417, 418
kickdown 421
oil 663
Trailer 457
Auxiliary heater 233
B
Backrest front seat, adjusting 188, 189, 192, 193 , 194, 195
rear seat, folding 198
Battery Hybrid 611
jump-start 451
Maintenance 607
recycling 612
start 607
symbols on the battery 612
BLIS 333 activating/deactivating 334
limitations 335
Symbols and messages 336
Blower adjusting 222
air distribution 210
air vents 211
Bluetooth
connect 497
connecting vehicle to Internet 517
phone 507
settings 515
Book service and repair 595
Booster cushions 74Brake assist after collision 416
Brake energy 408, 422Brake fluid grade 663
Brake functions 407
Brake position 418
Brakes 407 anti-lock brakes, ABS 407
automatic when stationary 414
Brake Assist System, BAS 409
brake lights 164
brake system 407
emergency brake lights 164
Maintenance 410
on salted roads 410
on wet roads 410
parking brake 411
brake system fluid 663C
Camera sensorsee Camera 312
Camera unit 312 limitations 313
maintenance and cleaning 317
Capacity weight 566, 659
Cargo compartment 577 attachment points 580
cargo net 586
electrical outlet 572, 574
Lighting 166
Cargo compartment cover 581, 583
cargo net 586
Cargo net 586
Car wash 638, 639, 641, 642, 643, 644
Catalytic converter 449 recovery 461
CD player 495
Cell phone, see Phone 508
Center console 571Center display change appearance 134
cleaning 633
climate controls 215
Function view 125
Page 671 of 687

INDEX
669
keyboard 129
messages 143, 144
operation 115, 118, 122, 127
overview 113
settings 135, 136
switch off and change volume 134
symbols in status bar 127
views 118
Central locking 257
Change of owner 137
Changing a wheel 552 Charge vehicle function 441
Charge level vehicle function 441
Charging hybrid battery 385 opening and closing the charging
door 390
start charging 390
Status 392, 393, 394
stop charging 396
Charging cable 387
Charging current 387
Checking engine oil level 603
Child restraints 65, 67 booster cushions 74
convertible seats 71
infant seats 69
integrated booster cushion 78
ISOFIX/LATCH anchors 77
lower attachment points 76
recalls and registration 67
top tether anchors 75
Child safety 65
Child safety locks 259
Circuit breaker 389
City Safety 318 braking for oncoming vehicles 327
crossing traffic 324
delayed evasive maneuver 327
detecting obstacles 322
evasive maneuver 326
limitations 328
limitations for evasive maneuvers 326
limitations in crossing traffic 325
setting warning distance 321
sub-functions 319
Symbols and messages 331
Cleaning 635, 637 automatic car wash 641
car wash 638, 639, 641, 642, 643, 644
center display 633
Seat belts 635
textile upholstery 633, 635, 636upholstery 633, 635, 636, 637
wheels 644
Cleaning wheels 644
Cleaning wiper blades 642
Clean Zone 207
Clean Zone Interior Package 208
Climate 204 auto-regulation 219
blower control 222
parking 225
perceived temperature 205
Sensors 204
temperature control 223, 224
voice control 205
zones 204
Climate controls 215 center display 215
rear seat 215
Climate system 204, 215 Refrigerant 664
repairs 599
Clock, setting 96
Collision 44, 49, 54, 63 Collision warner crossing traffic rear 337
see City Safety 318
Page 672 of 687
INDEX
670Collision warning
from the rear 332
Color code, paintwork 646
Color codes 646
Compass 467 calibration 468
Condensation in headlights 639, 641, 642, 643
Connecting vehicle to Internet No connection or poor connection 521
via a mobile device (WiFi) 517
via cellular phone (Bluetooth) 517
via vehicle's modem 518
Connect phone 508
Contact information 28
Convertible seats 71
coolant 663 filling 604
Cooling system overheating 450
Cornering assistance 306 activating/deactivating 307
limitations 307
Corner Traction Control 273
Corrosion protection 644 Covering cargo compartment 583
Crash, see Collision 44
Crash event data 35
Cross Traffic Alert 337
activating/deactivating 338
limitations 338
messages 340
Cruise control 279 activating 280
manage speed 302
standby mode 281
turn off 281
Curb weight 659
Customer Privacy Policy 37
CZIP (Clean Zone Interior Package) 208
D
Data recording 35 transferring between vehicle and
workshop 593
Data sharing 522, 523
Daytime running lights 158 Decals location 654
Defrosting 220
Detecting obstacles City Safety 322
Dimensions 657
Dipstick, electronic 603
Direction of rotation 540Display driver information 86
Display lighting 167
Distance Alert 277 activating/deactivating 278
limitations 278
Set time interval 303
DivX ®
496
Door mirrors 173 compass 467, 468
dimming 174
outer 173
power folding 174
resetting 174
store position 190, 191
Download Center 593 use 594
Driveline transmission 416
Drive mode 423 changing 428
driver support 305
Page 674 of 687

INDEX
672Front seats, power 189
adjusting passenger seat from driv-
er's seat 197
adjusting seat 189
Lumbar support 195
massage 192, 193, 194
multifunction control 192, 193, 194, 195
Side bolsters 195
store position 190, 191
FSC, environmental labeling 25
Fuel 446 Travel Link service 489
Fuel filling 445
Fuel gauge 89
Fuel requirements 446, 447 Fuel tank volume 664
Fuse box 613
Fuses 613 below the glove compartment 622
in engine compartment 615
in the cargo compartment 628
replacing 613
G
Gasoline grade 446 Gauge fuel gauge 89
hybrid battery 90
Gear selector positions automatic transmission 418
Glass, laminated/reinforced 170
Glove compartment 575Gracenote ® 495
Grocery bag holders 579
Gross vehicle weight 659
H
Handbrake 411
Hand wash 639 Hard disk space 524
Hazard warning flashers 164
HDC 436
HD radio 479
Head restraint 199
Head-up display 145 activating/deactivating 147
cleaning 634
Distance Alert 277
replacing windshield 599
settings 147
store position 147, 190, 191
Heated wiper blades 180
Heater 233 auxiliary heater 233
parking heater 233
Heating Seats 216, 217
steering wheel 218
windows 221
Height adjustment 430, 433
high beams 160, 161
High engine temperature 450
Hill Descent Control 436, 437 activate with function button 437
Hill Start Assist 416 Hill Start Assist (HSA) 416
Hoisting the vehicle 597Hold vehicle function 441
HomeLink ® 463
programming 464
type approval 466
use 466
Page 675 of 687
INDEX
673
HomeLink
® remote control
programmable 463
Home safe lighting, Homesafe Lighting, Follow me home lighting, follow-me-
home lighting 165
Honk 201
Hood, opening 599
Horn 201
Hybrid battery 611 Charging 385
Hybrid battery gauge 90
Hybrid gauge 89
Hybrid mode 423, 429
I
IAQS (Interior Air Quality System) 208
IC (Inflatable Curtain) 62
ID, Volvo 28
Identification number 40
Ignition mode 405, 406
Immobilizer 251 Electronic immobilizer 251
Indicator symbols 97
Individual drive mode 423
Infant seats 69
Inflatable curtain 62
Inflatable Curtain 62
Inflating tires 565Inflation pressure adjusting 546
Checking 545
decal with recommended pressure 547
Inflation pressure monitoring 547 action 551
save new inflation pressure 549
Status 550
Inflation pressure table 665
Information display 86, 88
Infotainment (Audio and media) 470
Instrument cluster 86 settings 88
Instrument illumination 167
Instrument lighting 167
Instrument panel 86 App menu 107, 108 hybrid-related symbols and mes-
sages 397
messages 109
settings 88
Instruments and controls 84Instruments overview left-hand drive vehicle 84
Integrated booster cushion 78 folding down 81
folding up 80
IntelliSafe driver support 31
Interior Air Quality System 208
Intermittent wiping 181 Internet, see Internet-connected vehi- cle 516
Internet-connected vehicle 516 book service and repair 595
No connection or poor connection 521
send car data 596
system updates 594
iPod ®, connecting 498
ISOFIX/LATCH anchors 77
J
Jack 553
Jump-start 451