service interval VOLVO XC60 TWIN ENGINE 2020 Owners Manual
[x] Cancel search | Manufacturer: VOLVO, Model Year: 2020, Model line: XC60 TWIN ENGINE, Model: VOLVO XC60 TWIN ENGINE 2020Pages: 687, PDF Size: 14.65 MB
Page 182 of 687

WINDOWS, GLASS AND MIRRORS
* Option/accessory.
180
Keyless locking and unlocking
* (p. 254)
Locking and unlocking using the remote key (p. 240)
Wiper blades and washer fluid The wipers and the washer fluid are designed to improve visibility and the headlight pat-tern.
Washer fluid direct from the wiper blades and heating
* of the wiper blades gives improved
vision. When there is approximately 1 liter (1 qt) of washer fluid remaining, a message to refill willappear in the instrument panel.
Related information
Using the rain sensor (p. 181)
Using the windshield and headlight wash-ers (p. 183)
Using automatic rear window wipingwhen backing up (p. 185)
Using the rain sensor's memory function(p. 182)
Using the rear window wiper/washer(p. 184)
Filling washer fluid (p. 650)
Putting the wiper blades in service posi-tion (p. 649)
Replacing windshield wiper blades(p. 648)
Changing rear window wipers (p. 647)
Using the windshield wipers (p. 180)
Using the windshield wipers
The windshield wipers are designed to clean the windshield. The right-side steering wheellever is used to adjust windshield wiper set-tings.
Right-hand steering wheel lever.
The thumb wheel is used to set rain sen- sor sensitivity and interval wiper speed.
Single sweepMove the lever down and release for asingle sweep.
Wipers offMove the lever to position 0 to turn off
the windshield wipers.
Page 183 of 687

WINDOWS, GLASS AND MIRRORS
}}
181
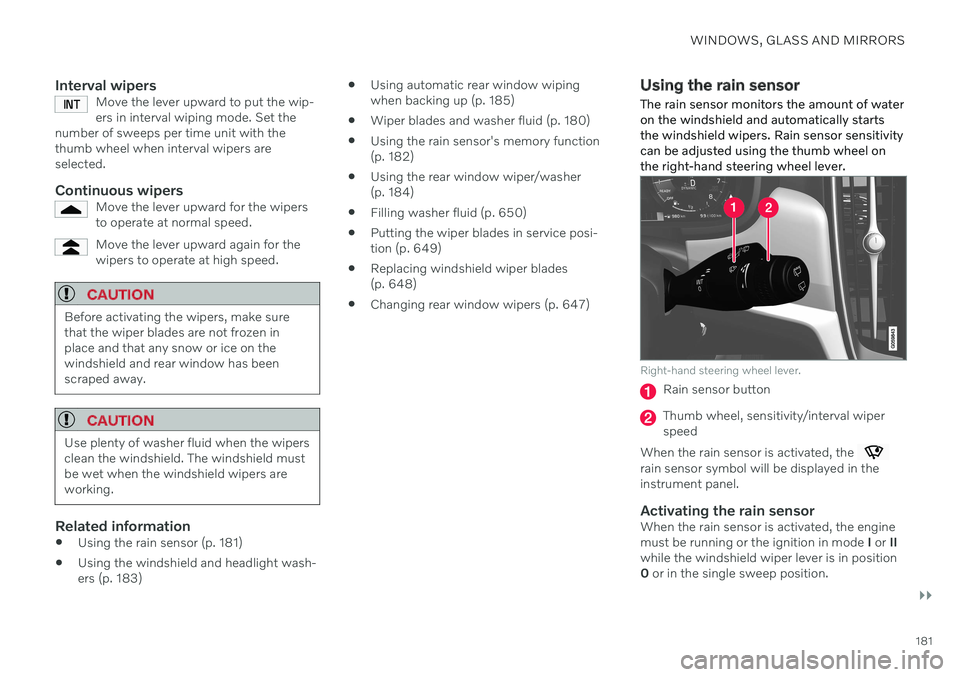
Interval wipersMove the lever upward to put the wip- ers in interval wiping mode. Set the
number of sweeps per time unit with thethumb wheel when interval wipers areselected.
Continuous wipersMove the lever upward for the wipers to operate at normal speed.
Move the lever upward again for the wipers to operate at high speed.
CAUTION
Before activating the wipers, make sure that the wiper blades are not frozen inplace and that any snow or ice on thewindshield and rear window has beenscraped away.
CAUTION
Use plenty of washer fluid when the wipers clean the windshield. The windshield mustbe wet when the windshield wipers areworking.
Related information
Using the rain sensor (p. 181)
Using the windshield and headlight wash- ers (p. 183)
Using automatic rear window wipingwhen backing up (p. 185)
Wiper blades and washer fluid (p. 180)
Using the rain sensor's memory function(p. 182)
Using the rear window wiper/washer(p. 184)
Filling washer fluid (p. 650)
Putting the wiper blades in service posi-tion (p. 649)
Replacing windshield wiper blades(p. 648)
Changing rear window wipers (p. 647)
Using the rain sensor
The rain sensor monitors the amount of water on the windshield and automatically startsthe windshield wipers. Rain sensor sensitivitycan be adjusted using the thumb wheel onthe right-hand steering wheel lever.
Right-hand steering wheel lever.
Rain sensor button
Thumb wheel, sensitivity/interval wiper speed
When the rain sensor is activated, the
rain sensor symbol will be displayed in the instrument panel.
Activating the rain sensorWhen the rain sensor is activated, the enginemust be running or the ignition in mode I or II
while the windshield wiper lever is in position0 or in the single sweep position.
Page 185 of 687

WINDOWS, GLASS AND MIRRORS
}}
* Option/accessory.183
Putting the wiper blades in service posi- tion (p. 649)
Replacing windshield wiper blades(p. 648)
Changing rear window wipers (p. 647)
Using the windshield wipers (p. 180)
Using the windshield and headlight washers The windshield and headlight washers are designed to clean the windshield and head-lights. Use the right-side steering wheel leverto start the windshield and headlight wash-ers.
Starting the windshield and headlight washers
Washing function, right-hand steering wheel lever.
–Move the right-hand steering wheel lever toward the steering wheel to start thewindshield and headlight washers.
> After the lever is released, the wipers
make several extra sweeps.
CAUTION
Avoid activating the washer system when it is frozen or the fluid reservoir is empty.Otherwise, there is a risk of damaging thepump.
Headlight washer *To save washer fluid, the headlights are washed automatically according to a definedinterval when the headlights are on.
Reduced washingWhen there is about 1 liter (1 qt) of washer fluid left in the reservoir and the Washer fluid
Level low, refill message is displayed in the
instrument panel together with the
sym-
bol, the washer fluid supply to the headlights is cut off. This is to prioritize windshield clean-ing and visibility through it. The headlights areonly washed if high or low beam is on.
Related information
Using the rain sensor (p. 181)
Using automatic rear window wipingwhen backing up (p. 185)
Wiper blades and washer fluid (p. 180)
Using the rain sensor's memory function(p. 182)
Using the rear window wiper/washer(p. 184)
Page 186 of 687

WINDOWS, GLASS AND MIRRORS
184
Filling washer fluid (p. 650)
Putting the wiper blades in service posi- tion (p. 649)
Replacing windshield wiper blades(p. 648)
Changing rear window wipers (p. 647)
Using the windshield wipers (p. 180)
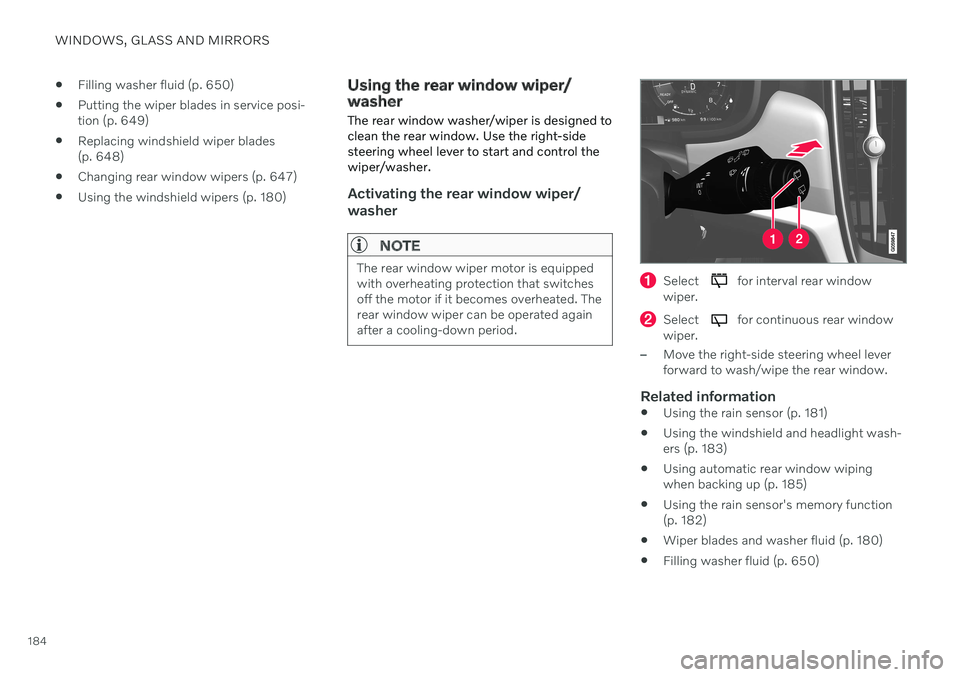
Using the rear window wiper/ washer The rear window washer/wiper is designed to clean the rear window. Use the right-sidesteering wheel lever to start and control thewiper/washer.
Activating the rear window wiper/ washer
NOTE
The rear window wiper motor is equipped with overheating protection that switchesoff the motor if it becomes overheated. Therear window wiper can be operated againafter a cooling-down period.Select for interval rear window
wiper.
Select for continuous rear window
wiper.
–Move the right-side steering wheel lever forward to wash/wipe the rear window.
Related information
Using the rain sensor (p. 181)
Using the windshield and headlight wash-ers (p. 183)
Using automatic rear window wipingwhen backing up (p. 185)
Using the rain sensor's memory function(p. 182)
Wiper blades and washer fluid (p. 180)
Filling washer fluid (p. 650)
Page 541 of 687

WHEELS AND TIRES
}}
539
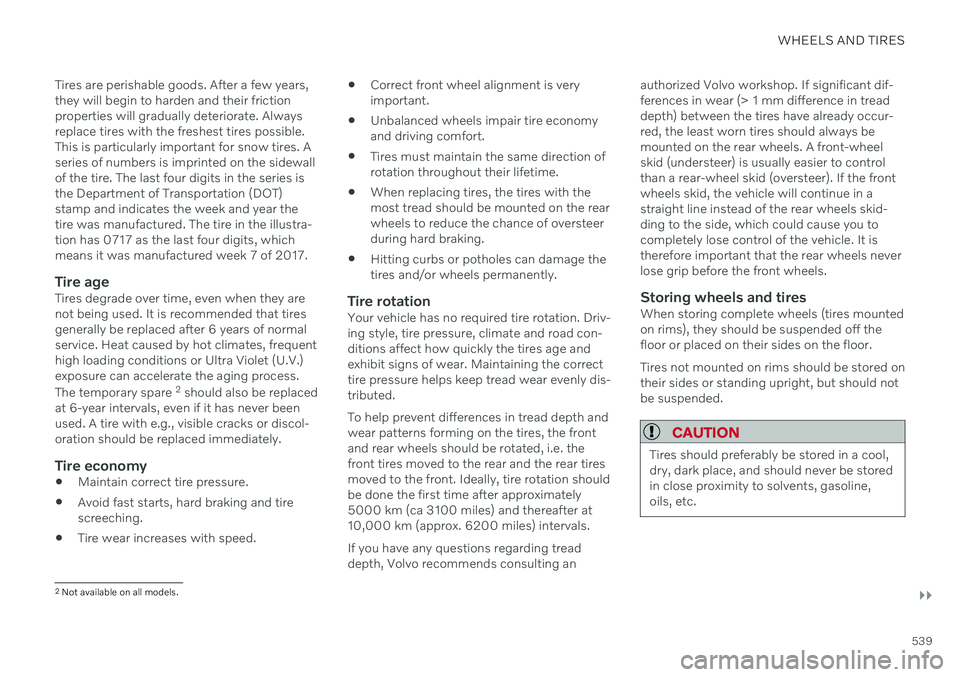
Tires are perishable goods. After a few years, they will begin to harden and their frictionproperties will gradually deteriorate. Alwaysreplace tires with the freshest tires possible.This is particularly important for snow tires. Aseries of numbers is imprinted on the sidewallof the tire. The last four digits in the series isthe Department of Transportation (DOT)stamp and indicates the week and year thetire was manufactured. The tire in the illustra-tion has 0717 as the last four digits, whichmeans it was manufactured week 7 of 2017.
Tire ageTires degrade over time, even when they arenot being used. It is recommended that tiresgenerally be replaced after 6 years of normalservice. Heat caused by hot climates, frequenthigh loading conditions or Ultra Violet (U.V.)exposure can accelerate the aging process. The temporary spare
2
should also be replaced
at 6-year intervals, even if it has never been used. A tire with e.g., visible cracks or discol-oration should be replaced immediately.
Tire economy
Maintain correct tire pressure.
Avoid fast starts, hard braking and tirescreeching.
Tire wear increases with speed.
Correct front wheel alignment is veryimportant.
Unbalanced wheels impair tire economyand driving comfort.
Tires must maintain the same direction ofrotation throughout their lifetime.
When replacing tires, the tires with themost tread should be mounted on the rearwheels to reduce the chance of oversteerduring hard braking.
Hitting curbs or potholes can damage thetires and/or wheels permanently.
Tire rotationYour vehicle has no required tire rotation. Driv-ing style, tire pressure, climate and road con-ditions affect how quickly the tires age andexhibit signs of wear. Maintaining the correcttire pressure helps keep tread wear evenly dis-tributed. To help prevent differences in tread depth and wear patterns forming on the tires, the frontand rear wheels should be rotated, i.e. thefront tires moved to the rear and the rear tiresmoved to the front. Ideally, tire rotation shouldbe done the first time after approximately5000 km (ca 3100 miles) and thereafter at10,000 km (approx. 6200 miles) intervals. If you have any questions regarding tread depth, Volvo recommends consulting an authorized Volvo workshop. If significant dif-ferences in wear (> 1 mm difference in treaddepth) between the tires have already occur-red, the least worn tires should always bemounted on the rear wheels. A front-wheelskid (understeer) is usually easier to controlthan a rear-wheel skid (oversteer). If the frontwheels skid, the vehicle will continue in astraight line instead of the rear wheels skid-ding to the side, which could cause you tocompletely lose control of the vehicle. It istherefore important that the rear wheels neverlose grip before the front wheels.
Storing wheels and tiresWhen storing complete wheels (tires mountedon rims), they should be suspended off thefloor or placed on their sides on the floor. Tires not mounted on rims should be stored on their sides or standing upright, but should notbe suspended.
CAUTION
Tires should preferably be stored in a cool, dry, dark place, and should never be storedin close proximity to solvents, gasoline,oils, etc.
2
Not available on all models.
Page 592 of 687

MAINTENANCE AND SERVICE
590
Volvo's service program To keep the vehicle as safe and reliable as possible, follow the Volvo service schedulespecified in the Warranty and MaintenanceRecords Information booklet.
WARNING
California Proposition 65 Operating, servicing and maintaining a pas- senger vehicle can expose you to chemi-cals including engine exhaust, carbon mon-oxide, phthalates, and lead, which areknown to the State of California to causecancer and birth defects or other reproduc-tive harm. To minimize exposure, avoidbreathing exhaust, do not idle the engineexcept as necessary, service your vehicle ina well ventilated area and wear gloves orwash your hands frequently when servicingyour vehicle. For more information go towww.P65Warnings.ca.gov/passenger-vehicle.
Volvo recommends having an authorized Volvo workshop perform service and mainte-nance. Volvo workshops have the staff, serviceliterature and special tools that can providethe highest quality of service.
CAUTION
To ensure the Volvo warranty is not invali- dated, check and follow the Warranty andService Records Information booklet.
Service and repairsService the vehicle regularly. Follow Volvo's recommended service intervals. Detailed inspection and repairs may only be performed by an authorized workshop.
WARNING
Do not make any repairs on this vehicle yourself. Electrical cables and/or compo-nents that have come loose may only becorrected by an authorized workshop – anauthorized Volvo workshop is recom-mended.
IntroductionThe maintenance services contain several checks that require special instruments andtools and therefore must be performed by aqualified technician. To keep your Volvo in topcondition, specify time-tested and provenGenuine Volvo Parts and Accessories.
The Federal Clean Air Act - U.S.
The Federal Clean Air Act requires vehicle manufacturers to furnish written instructionsto the ultimate purchaser to assure the properservicing and function of the components thatcontrol emissions. These services, which arelisted in the "Warranty and Service RecordsInformation" booklet, are not covered by thewarranty. You will be required to pay for laborand material used.
Maintenance
Your Volvo passed several major inspections before it was delivered to you, in accordancewith Volvo specifications. The maintenanceprocedures outlined in the Warranty and Serv-ice Records Information booklet, many ofwhich will positively affect your vehicle's emis-sions, should be performed as indicated. It isrecommended that receipts for vehicle emis-sion maintenance be retained in case ques-tions arise concerning maintenance. Inspec-tion and maintenance should also be per-formed anytime a malfunction is observed orsuspected.
Page 603 of 687

MAINTENANCE AND SERVICE
}}
601
Engine compartment overview
This overview shows some service-related components.
Some of the components included in the vehi- cle's electric drive system are located in theengine compartment. Exercise caution whenaccessing the engine compartment and onlytouch what is required for normal mainte-nance.
WARNING
Orange wiring may only be handled by qualified personnel.
WARNING
A number of electrical components in Twin Engine Plug-in Hybrid vehicles use high-voltage current and can be extremely dan-gerous if handled incorrectly.
Do not touch anything that is not clearly described in this Owner's Man-ual.
Be careful when checking/filling fluidsin the engine compartment.
The layout of the engine compartment may vary depending on model and engine variant.
Coolant expansion tank
Brake fluid reservoir (located on the driv- er's side)
Washer fluid filler pipe 12
Fusebox
Air filter
Engine oil filler pipe
WARNING
Bear in mind that the cooling fan (located at the front of the engine compartmentbehind the radiator) may start or continuerunning automatically up to about6 minutes after the engine is turned off. Always entrust engine washing to a work- shop – an authorized Volvo workshop isrecommended. If the engine is hot, there isa risk of fire.
WARNING
The ignition system works with extremely high and dangerous voltages. The vehicleelectrical system should always be in igni-tion mode
0 when work in being per-
formed in the engine compartment. Do not touch any spark plugs or ignition coils when the vehicle electrical system isin ignition mode II or when the engine is
warm.
Related information
Opening and closing the hood (p. 599)
Filling washer fluid (p. 650)
Refilling coolant (p. 604)
Fuses in the engine compartment (p. 615)
12
Fill the washer fluid at regular intervals, e.g. when refueling.
Page 604 of 687

MAINTENANCE AND SERVICE
602
Checking and filling engine oil (p. 603)
Ignition modes (p. 405)
Engine oil For the recommended service intervals and warranties to be applied, an approved engineoil must be used.
Volvo recommends:
If the engine oil is not checked regularly and the level becomes low, this could cause seri-ous engine damage.
CAUTION
To satisfy the requirements for the engine's service intervals, all engines are factory-filled with a specially adapted syntheticengine oil. Great care has been put into thechoice of oil, with consideration given toservice life, startability, fuel consumptionand environmental impact. For the recommended service intervals to apply, an approved engine oil must beused. Only use the prescribed oil grade totop off or change the oil. Otherwise, thereis a risk of the vehicle's service life, starta-bility, fuel consumption and environmentalimpact being affected. Failure to use engine oil of the prescribed grade and viscosity could cause damage toengine-related components. Volvo Car Cor-poration disclaims warranty liability forsuch type of damage. Volvo recommends entrusting oil changes to an authorized Volvo workshop.
Volvo uses different systems to warn if the oil level is too low/high or the oil pressure is low.On engine variants with an oil pressure sensor,
Page 664 of 687

SPECIFICATIONS
662
Engine oil specifications Fully synthetic engine oil of at least ACEA A5/B5 must be used. Lower oil gradesmay not offer the same fuel economy, engineperformance or engine protection.
Volvo recommends:
GeneralSee the Service and warranty booklet for infor- mation about oil change intervals.
NOTE
This vehicle is delivered from the factory with synthetic oil.
Do not use oil additives.
Oil viscosityThe wrong oil viscosity can shorten engine service life during normal use. SAE 5W-30provides good fuel economy and engine pro-tection. See the viscosity chart.
Viscosity chart
Extreme driving conditions
Volvo's VCC RBS0-2AE/SAE 0W20 oil is rec- ommended for extreme conditions.
Oil volume
The oil volume for the engine is:
Liter (approx) 5.6
US qts (approx) 5.9
Related information
Type designations (p. 654)
Checking and filling engine oil (p. 603)
Engine oil (p. 602)
Page 680 of 687

INDEX
678
S
Safety 44pregnancy 45
Safety belt, see Seat belt 49
Safety defects, reporting 46
Safety mode 63 starting/moving 64
Sealing compound 561
Seat, see Seats 188
Seat belt reminder 53
Seat belts 49 Automatic locking retractor/Emer-
gency locking retractor 67
buckling/unbuckling 50
pregnancy 45
seat belt reminder 53
seat belt tensioner 52
securing child restraint systems 69, 71, 74
Seat belt tensioner 52 resetting 53
Seats heating 216, 217
manual front seat 188
power front seats 189
store position 190, 191
ventilation 217
whiplash protection 48
Security code 266 Sensors air quality 209
Camera unit 312
climate 204
Radar unit 309
Sensus connection and entertainment 32
Sensus Navigation Road Sign Information 343
Service position 649
Service program 590
Set time interval for Distance Alert 303settings Categories 138
contextual 136
resetting 137
Shiftlock 420
Side airbag 62
Side Impact Protection System 62
SIM card 519
SIPS (Side Impact Protection System) 62 Sirius Satellite radio Travel link 486SiriusXM ® Satellite radio
traffic information 482, 483, 484
Ski hatch 580
Slippery conditions 442, 443
Slippery road conditions 443
Snow chains 560
Software updates 35
Sound experience 471
Sound settings 470, 513 phone 514
playing media 492, 493
text message 513
Spare tire 557 handling 558
Speed camera information 343 Speed Limiter change speed 302
Speed symbols, tires 542
Spin control 273
Stability and traction control system 273 sport mode 274, 275
Symbols and messages 276
Stains 633, 635, 636, 637 Start and lock system type designations 252