headlights VOLVO XC70 2013 Owner´s Manual
[x] Cancel search | Manufacturer: VOLVO, Model Year: 2013, Model line: XC70, Model: VOLVO XC70 2013Pages: 382, PDF Size: 6.78 MB
Page 103 of 382
03 Your driving environment
Wipers and washers
03
* Option/accessory, for more information, see Introduction.101
The rain sensor is automatically deactivated
when the key is removed from the ignition slot
or five minutes after the ignition has been
switched off.
CAUTION
The rain sensor should be deactivated when
washing the car in an automatic car wash,
etc. If the rain sensor function is left on, the
wipers will start inadvertently in the car
wash and could be damaged.
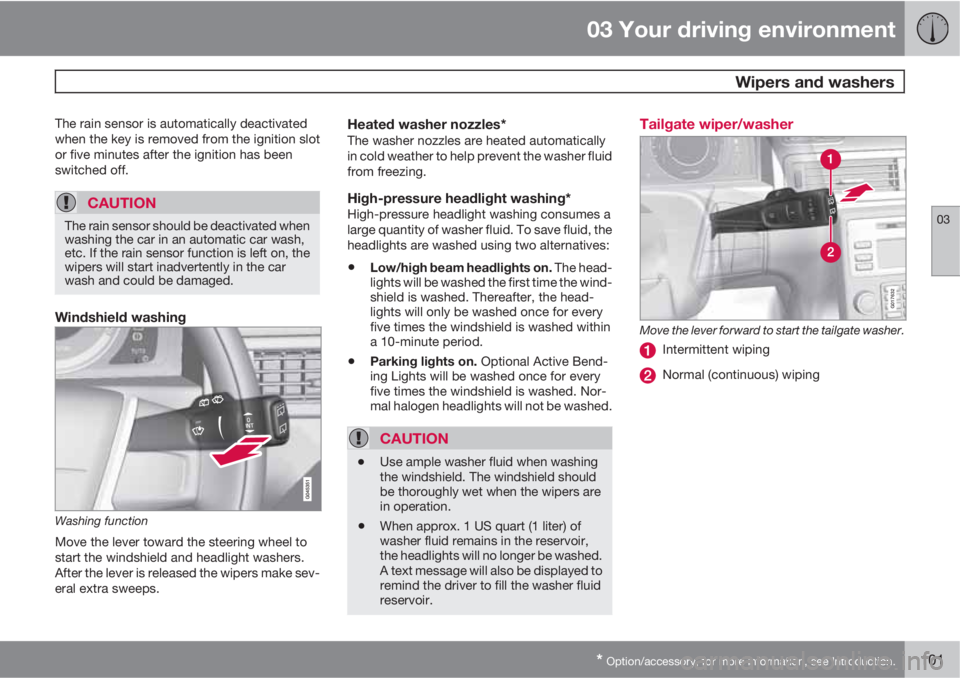
Windshield washing
Washing function
Move the lever toward the steering wheel to
start the windshield and headlight washers.
After the lever is released the wipers make sev-
eral extra sweeps.
Heated washer nozzles*The washer nozzles are heated automatically
in cold weather to help prevent the washer fluid
from freezing.
High-pressure headlight washing*High-pressure headlight washing consumes a
large quantity of washer fluid. To save fluid, the
headlights are washed using two alternatives:
•Low/high beam headlights on. The head-
lights will be washed the first time the wind-
shield is washed. Thereafter, the head-
lights will only be washed once for every
five times the windshield is washed within
a 10-minute period.
•Parking lights on. Optional Active Bend-
ing Lights will be washed once for every
five times the windshield is washed. Nor-
mal halogen headlights will not be washed.
CAUTION
•Use ample washer fluid when washing
the windshield. The windshield should
be thoroughly wet when the wipers are
in operation.
•When approx. 1 US quart (1 liter) of
washer fluid remains in the reservoir,
the headlights will no longer be washed.
A text message will also be displayed to
remind the driver to fill the washer fluid
reservoir.
Tailgate wiper/washer
G017632
Move the lever forward to start the tailgate washer.
Intermittent wiping
Normal (continuous) wiping
Page 108 of 382
03 Your driving environment
Mirrors
03
106
reverse, the mirrors will automatically return to
their original position.
This function can be activated/deactivated in
MY CAR under Settings
Car settings
Side mirror settingsIn reverse gear tilt
left mirror or
In reverse gear tilt right
mirror. See page 189 for information about
the MY CAR menu system.
Automatic retraction when lockingWhen the vehicle is locked/unlocked with the
remote key the door mirrors are automatically
retracted/extended.
The function can be activated/deactivated in
MY CAR under Settings
Car settings
Side mirror settingsRetract side mirrors
when locking. See page 189 for a description
of the menu system.
Resetting to neutralMirrors that have been moved out of position
by an external force must be electrically reset
to the neutral position for electric retracting/
extending to work.
•Retract the mirrors with the L and R but-
tons.
•Fold them out again with the L and R but-
tons.
The mirrors are now reset in neutral position.
Home safe and approach lightingThe light on the door mirrors comes on when
approach lighting or home safe lighting is
selected, see page 99.
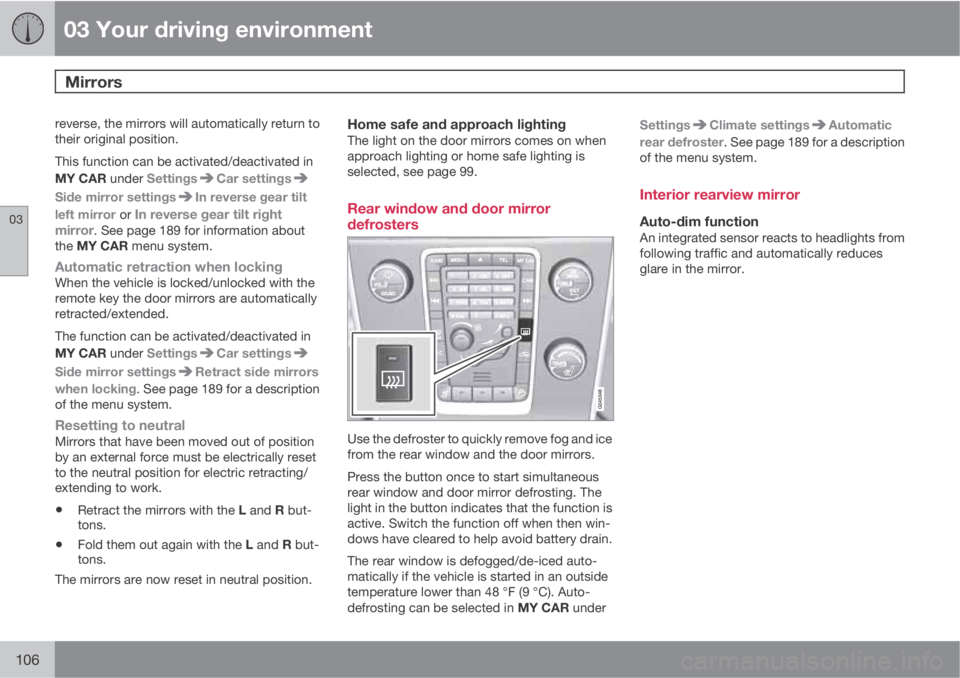
Rear window and door mirror
defrosters
Use the defroster to quickly remove fog and ice
from the rear window and the door mirrors.
Press the button once to start simultaneous
rear window and door mirror defrosting. The
light in the button indicates that the function is
active. Switch the function off when then win-
dows have cleared to help avoid battery drain.
The rear window is defogged/de-iced auto-
matically if the vehicle is started in an outside
temperature lower than 48 °F (9 °C). Auto-
defrosting can be selected in MY CAR underSettings
Climate settingsAutomatic
rear defroster. See page 189 for a description
of the menu system.
Interior rearview mirror
Auto-dim functionAn integrated sensor reacts to headlights from
following traffic and automatically reduces
glare in the mirror.
Page 118 of 382
03 Your driving environment
Starting the engine
03
116
Deactivated functionsWhen the engine is started with ERS, the fol-
lowing functions are deactivated:
•Headlights
•Parking lights
•License plate lights
•Windshield wipers
Switching off an engine started with ERSAny of the following will switch off the engine if
it has been started with ERS:
•Pressing the lock button (1) on the remote
key
•Unlocking the vehicle
•Opening a door
•Depressing the throttle or brake pedal
•Moving the gear selector from the P posi-
tion
•If there are less than approx. 2.5 gallons
(10 liters) of fuel in the tank
•More than 15 minutes have elapsed.
If the engine has been started with ERS and
switches off, the turn signals will illuminate for
3 seconds.
Message in the instrument panel displayIf ERS is interrupted, a text message will be
displayed in the instrument panel.
Switching off the engine
With the engine running, press the START/
STOP ENGINE button.
If the gear selector is not in the P position or if
the vehicle is moving, press the START/STOP
ENGINE button twice or press and hold it in
until the engine switches off.
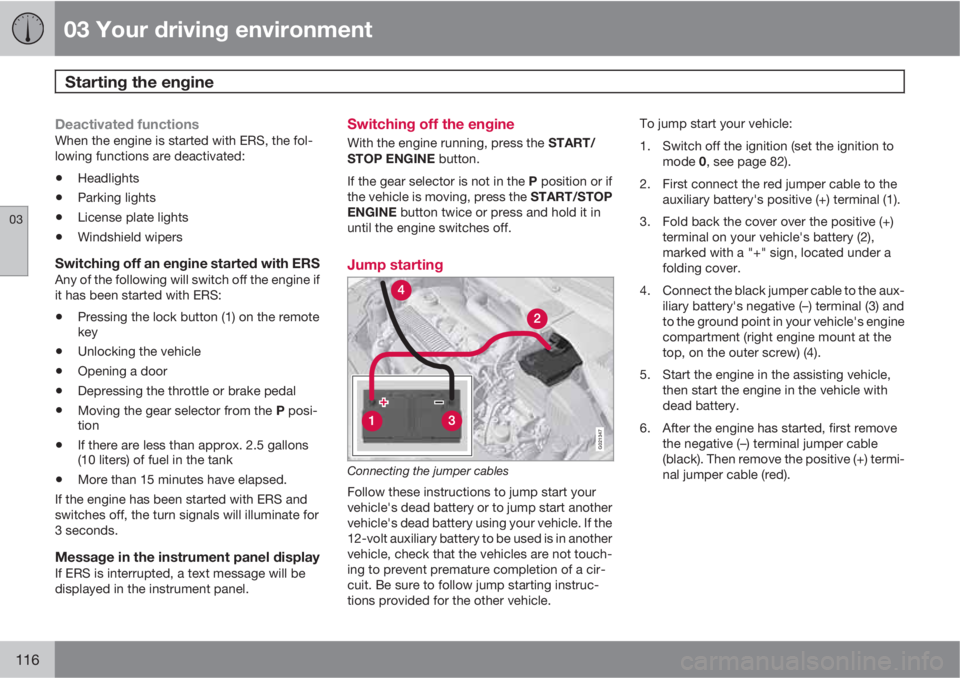
Jump starting
G021347
Connecting the jumper cables
Follow these instructions to jump start your
vehicle's dead battery or to jump start another
vehicle's dead battery using your vehicle. If the
12-volt auxiliary battery to be used is in another
vehicle, check that the vehicles are not touch-
ing to prevent premature completion of a cir-
cuit. Be sure to follow jump starting instruc-
tions provided for the other vehicle.To jump start your vehicle:
1. Switch off the ignition (set the ignition to
mode 0, see page 82).
2. First connect the red jumper cable to the
auxiliary battery's positive (+) terminal (1).
3. Fold back the cover over the positive (+)
terminal on your vehicle's battery (2),
marked with a "+" sign, located under a
folding cover.
4. Connect the black jumper cable to the aux-
iliary battery's negative (–) terminal (3) and
to the ground point in your vehicle's engine
compartment (right engine mount at the
top, on the outer screw) (4).
5. Start the engine in the assisting vehicle,
then start the engine in the vehicle with
dead battery.
6. After the engine has started, first remove
the negative (–) terminal jumper cable
(black). Then remove the positive (+) termi-
nal jumper cable (red).
Page 146 of 382
04 Driver support
Adaptive Cruise Control (ACC)*
04
144* Option/accessory, for more information, see Introduction.
•Your vehicle's speed goes below 10 mph
(15 km/h) and ACC cannot determine if the
target object is a stationary vehicle or some
other type of object such as e.g., a speed
bump.
•Your vehicle's speed goes below 10 mph
(15 km/h) and the vehicle ahead turns so
that ACC no longer has a target vehicle to
follow.
No automatic braking when at a
standstill
In certain situations, ACC will no longer apply
the brakes and go into standby mode while the
vehicle is not moving. This means that the
driver will have to apply the brakes.
This happens if:
•The driver presses the brake pedal
•The parking brake is activated
•The gear selected is moved to P,N or R
•The driver presses the button to put
ACC in standby mode
The parking brake is applied
automatically
In certain situations, ACC will apply the parking
brake in order to continue keeping the vehicle
at a standstill.
This happens if:
•The driver opens the door or takes off
his/her seat belt
•DSTC is put in Sport mode (see page 132)
•ACC has kept the vehicle at a standstill for
more than 2 minutes
•The engine has been switched off
•The brakes have overheated
Turning ACC off completely
•From standby mode, press once.
•From active mode, press twice.
The set speed and time interval are then
cleared from the system's memory and cannot
be resumed by pressing
.
The radar sensor and its limitations
In addition to being used by ACC, the radar
sensor is also used by Distance Alert (see
page 149) and Collision Warning with Full
Auto-brake and Pedestrian Detection (see
page 158). This sensor is designed to detect
cars or larger vehicles driving in the same
direction as your vehicle, in the same lane.
WARNING
Accessories or other objects, such as extra
headlights, must not be installed in front of
the grille.
Modification of the radar sensor could make
its use illegal.
The radar sensor's capacity to detect vehicles
ahead is impeded:
•if the radar sensor is obstructed and can-
not detect other vehicles, for example in
heavy rain, or if snow or other objects are
obscuring the radar sensor.
NOTE
Keep the area in front of the radar sensor
clean.
•if the speed of vehicles ahead is signifi-
cantly different from your own speed.
Page 176 of 382

04 Driver support
Park assist*
04
174* Option/accessory, for more information, see Introduction.
Front park assist
G021424
The distance monitored in front of the vehicle
is approximately 2.5 ft (0.8 m). The audible sig-
nal comes from the audio system's front
speakers.
It may not be possible to combine auxiliary
headlights and front park assist since these
lights could trigger the system's sensors.
NOTE
Front park assist is deactivated when the
parking brake is applied and or when the
gear selector is in the P position.
Faults in the system
If the information symbol illuminates and Park
assist syst Service required is shown on the
information display, this indicates that the sys-
tem is not functioning properly and has been
disengaged. Consult a trained and qualified
Volvo service technician.
CAUTION
In certain circumstances, the park assist
system may give unexpected warning sig-
nals that can be caused by external sound
sources that use the same ultrasound fre-
quencies as the system. This may include
such things as the horns of other vehicles,
wet tires on asphalt, pneumatic brakes,
motorcycle exhaust pipes, etc. This does
not indicate a fault in the system.
Cleaning the sensors
Location of the front sensors
Location of the rear sensors
The sensors must be cleaned regularly to
ensure that they work properly. Clean them
Page 183 of 382
04 Driver support
Blind Spot Information System*
04
* Option/accessory, for more information, see Introduction.181 When does BLIS function
The system functions when your vehicle is
moving at speeds above 6 mph (10 km/h).
When you pass another vehicle:The system reacts when you pass another
vehicle at a speed of up to 6 mph (10 km/h)
faster than that vehicle.
When you are passed by another vehicle:The system reacts if your vehicle is passed by
another vehicle at a speed of up to 43 mph
(70 km/h) faster than your vehicle.
WARNING
•BLIS does not function in sharp curves.
•BLIS does not function when your vehi-
cle is backing up.
•If you are towing a wide trailer, this may
prevent the BLIS cameras from detect-
ing other vehicles in adjacent lanes.
How BLIS functions in daylight and
darkness
Daylight
BLIS reacts to the shape of surrounding vehi-
cles. The system is designed to help detect
motor vehicles such as cars, trucks, buses,
motorcycles, etc.
DarknessBLIS reacts to the headlights of surrounding
vehicles. In order to be detected by BLIS, a
vehicle in the blind area must have its head-
lights on. This means, for example, that the
system will not detect a trailer without head-
lights that is being towed behind a car or truck.
WARNING
•BLIS does not react to cyclists or
mopeds.
•BLIS does not react to vehicles that are
standing still.
•The BLIS cameras have the same limi-
tation as the human eye. In other words,
their "vision is impaired" by adverse
weather conditions such as heavy
snowfall, intense light directly into the
camera, dense fog, etc.
LimitationsIn certain situations, the BLIS indicator light(s)
may illuminate even when there are no other
vehicles in the area monitored by the system.
NOTE
If the BLIS indicator lights illuminate occa-
sionally even when there are no other vehi-
cles in the blind area, this does not indicate
a fault in the system.
In the event of a fault,
Blind spot syst.
Service required will be displayed.
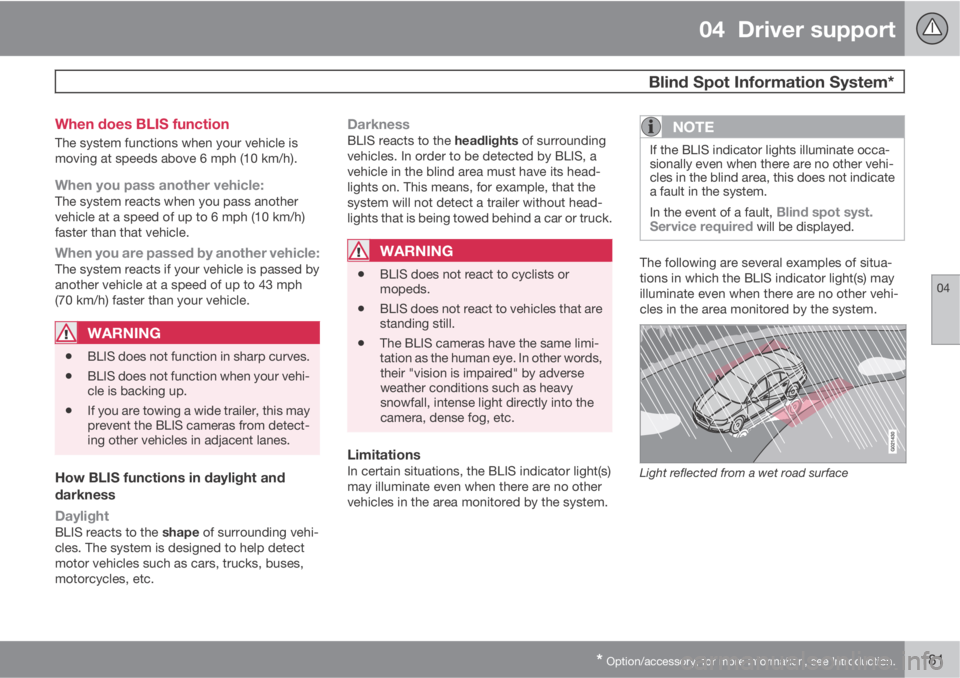
The following are several examples of situa-
tions in which the BLIS indicator light(s) may
illuminate even when there are no other vehi-
cles in the area monitored by the system.
Light reflected from a wet road surface
Page 325 of 382

09 Maintenance and specifications
Maintaining your car09
323 Owner maintenance
Periodic maintenance requirements and inter-
vals are described in your vehicle's Warranty
and Service Records Information booklet.
The following points can be carried out
between the normally scheduled maintenance
services.
Each time the car is refueled:
•Check the engine oil level.
•Clean the windshield, windshield wipers,
headlights, and taillights.
Monthly:
•Check cold tire pressure in all tires. Inspect
the tires for wear.
•Check that engine coolant and other fluid
levels are between the indicated "min" and
"max" markings.
•Clean interior glass surfaces with a glass
cleaner and soft paper towels.
•Wipe driver information displays with a soft
cloth.
•Visually inspect battery terminals for cor-
rosion. Corrosion may indicate a loose ter-
minal connector, or a battery near the end
of its useful service life. Consult your Volvo
retailer for additional information.
As needed:Wash the car, including the undercarriage, to
reduce wear that can be caused by a buildup
of dirt, and corrosion that can be caused by salt
residues.
Clean leaves and twigs from air intake vents at
the base of the windshield, and from other pla-
ces where they may collect.
NOTE
Complete service information for qualified
technicians is available online for purchase
or subscription at www.volvotechinfo.com.
Hoisting the vehicle
If a garage jack is used to lift the vehicle, the
two jack attachments points should be used.They are specially reinforced to bear the weight
of the vehicle. A garage jack can also be placed
under the front of the engine support frame.
Take care not to damage the splash guard
under the engine. Ensure that the jack is posi-
tioned so that the vehicle cannot slide off it.
Always use axle stands or similar structures.
If a two-post hoist is used to lift the vehicle, the
front and rear lift arm pads should be centered
under the reinforced lift plates on the inboard
edge of the sill rail (see illustration).
Emission inspection readiness
What is an Onboard Diagnostic System
(OBD II)?
OBD II is part of your vehicle's computerized
engine management system. It stores diagnos-
tic information about your vehicle's emission
controls. It can light the Check Engine light
(MIL) if it detects an emission control "fault." A
"fault" is a component or system that is not
performing within an expected range. A fault
may be permanent or temporary. OBD II will
store a message about any fault.
How do states use OBD II for emission
inspections?
Many states connect a computer directly to a
vehicle's OBD II system. The inspector can
then read "faults." In some states, this type of
Page 332 of 382
09 Maintenance and specifications
Replacing bulbs 09
330* Option/accessory, for more information, see Introduction.
Introduction
All bulb specifications are listed on page 336.
The following bulbs should only be replaced by
a trained and qualified Volvo service techni-
cian:
•Dome lighting, reading lights
•Glove compartment lighting
•Footwell lighting
•Turn signals in the door mirrors
•Approach lighting in the door mirrors
•Brake lights/rear fog light/taillights
•Rear parking lights
•Active Bending Lights
•LED bulbs
NOTE
For information regarding any other bulbs
not mentioned in this section, please con-
tact your Volvo retailer or a trained and
authorized Volvo service technician.
WARNING
•The engine should not be running when
changing bulbs.
•If the engine has been running just prior
to replacing bulbs in the headlight hous-
ing, please keep in mind that compo-
nents in the engine compartment will be
hot.
WARNING
•Active Bending Lights* – due to the high
voltage used by these headlights, these
bulbs should only be replaced by a
trained and qualified Volvo service tech-
nician.
•Turn off the lights and remove the
remote key from the ignition before
changing any bulbs.
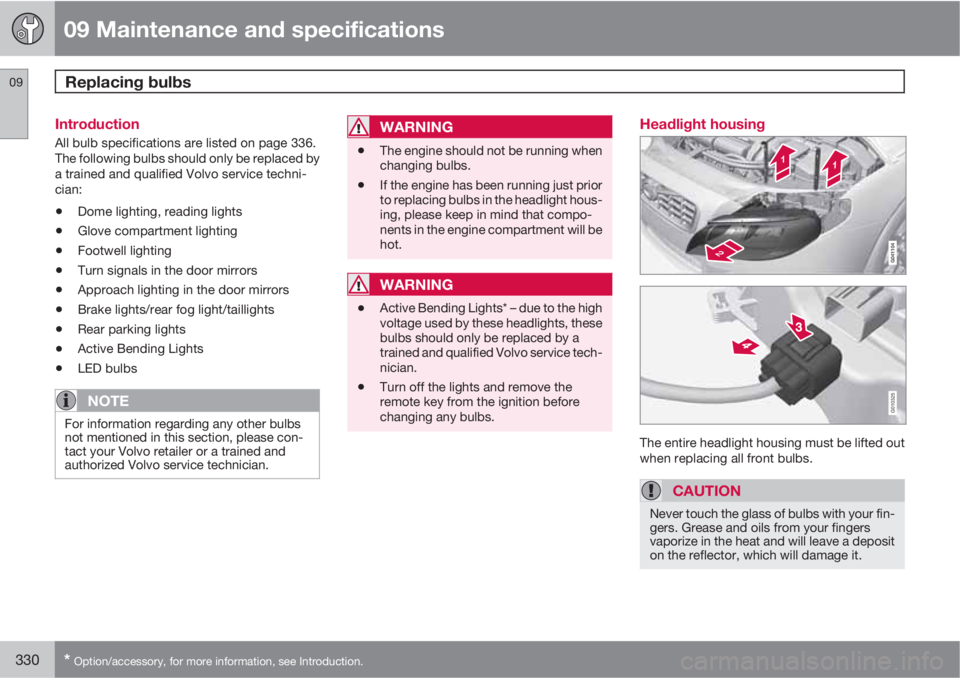
Headlight housing
G010325
The entire headlight housing must be lifted out
when replacing all front bulbs.
CAUTION
Never touch the glass of bulbs with your fin-
gers. Grease and oils from your fingers
vaporize in the heat and will leave a deposit
on the reflector, which will damage it.
Page 352 of 382
09 Maintenance and specifications
Vehicle care 09
350
Washing the car
The following points should be kept in mind
when washing and cleaning the car:
•The car should be washed at regular inter-
vals since dirt, dust, insects and tar spots
adhere to the paint and may cause dam-
age. To help prevent corrosion, it is partic-
ularly important to wash the car frequently
in the wintertime.
•Avoid washing your car in direct sunlight.
Doing so may cause detergents and wax
to dry out and become abrasive. To avoid
scratching, use lukewarm water to soften
the dirt before you wash with a soft
sponge, and plenty of sudsy water.
•Bird droppings: Remove from paintwork
as soon as possible. Otherwise the finish
may be permanently damaged.
•A detergent can be used to facilitate the
softening of dirt and oil.
•Dry the car with a clean chamois and
remember to clean the drain holes in the
doors and rocker panels.
•Tar spots can be removed with tar remover
after the car has been washed.
•A stiff-bristle brush and lukewarm soapy
water can be used to clean the wiper
blades. Frequent cleaning of the wind-
shield and wiper blades improves visibilityconsiderably and also helps prolong the
service life of the wiper blades.
•Wash off the dirt from the underside (wheel
housings, fenders, etc).
•In areas of high industrial fallout, more fre-
quent washing is recommended.
NOTE
When washing the car, remember to remove
dirt from the drain holes in the doors and
sills.
CAUTION
•During high pressure washing, the
spray mouthpiece must never be closer
to the vehicle than 13" (30 cm). Do not
spray into the locks.
•Dirt, snow, etc., on the headlights can
reduce lighting capacity considerably.
Clean the headlights regularly, for
example when refueling.
Special moonroof cautions:
•Always close the moonroof and sun
shade before washing your vehicle.
•Never use abrasive cleaning agents on
the moonroof.
•Never use wax on the rubber seals
around the moonroof.
Exterior componentsVolvo recommends the use of special cleaning
products, available at your Volvo retailer, for
cleaning colored plastic, rubber, or ornamental
components such as chromed strips on the
exterior of your vehicle. The instructions for
using these products should be followed care-
fully. Solvents or stain removers should not be
used.
CAUTION
•Avoid waxing or polishing plastic or rub-
ber components
•Polishing chromed strips can wear
away or damage the surface
•Polishes containing abrasive sub-
stances should not be used
Automatic car wash
•We do NOT recommend washing your car
in an automatic wash during the first few
months (because the paint will not have
hardened sufficiently).
•An automatic wash is a simple and quick
way to clean your car, but it is worth
remembering that it may not be as thor-
ough as when you yourself go over the car
with sponge and water. Keeping the under-
body clean is most important, especially in
the winter. Some automatic washers do
Page 353 of 382
09 Maintenance and specifications
Vehicle care09
351
not have facilities for washing the under-
body.
CAUTION
•Before driving into an automatic car
wash, turn off the optional rain sensor to
avoid damaging the windshield wipers.
•Make sure that side view mirrors, auxil-
iary lamps, etc, are secure, and that any
antenna(s) are retracted or removed.
Otherwise there is risk of the machine
dislodging them.
•Chromed wheels: Clean chrome-
plated wheels using the same deter-
gents used for the body of the vehicle.
Aggressive wheel-cleaning agents can
permanently stain chrome-plated
wheels.
WARNING
•When the vehicle is driven immediately
after being washed, apply the brakes,
including the parking brake, several
times in order to remove any moisture
from the brake linings.
•Engine cleaning agents should not be
used when the engine is warm. This
constitutes a fire risk.
Exterior lightingCondensation may form temporarily on the
inside of the lenses of exterior lights such as
headlights, fog lights, or taillights. This is nor-
mal and the lights are designed to withstand
moisture. Normally, condensation will dissi-
pate after the lights have been on for a short
time.
Polishing and waxing
•Normally, polishing is not required during
the first year after delivery, however, wax-
ing may be beneficial.
•Before applying polish or wax the vehicle
must be washed and dried. Tar spots can
be removed with kerosene or tar remover.
Difficult spots may require a fine rubbing
compound.
•After polishing use liquid or paste wax.
•Several commercially available products
contain both polish and wax.
•Waxing alone does not substitute for pol-
ishing a dull surface.
•A wide range of polymer-based waxes can
be purchased today. These waxes are easy
to use and produce a long-lasting, high-
gloss finish that protects the bodywork
against oxidation, road dirt and fading.
•Do not polish or wax your vehicle in direct
sunlight (the surface of the vehicle should
not be warmer than 113 °F (45 °C).
CAUTION
Volvo does not recommend the use of long-
life or durable paint protection coatings,
some of which may claim to prevent pitting,
fading, oxidation, etc. These coatings have
not been tested by Volvo for compatibility
with your vehicle's clear coat. Some of them
may cause the clear coat to soften, crack,
or cloud. Damage caused by application of
paint protection coatings may not be cov-
ered under your vehicle's paint warranty.
Cleaning the interior
Only use cleaning agents and car care prod-
ucts recommended by Volvo. Clean regularly
and follow the instructions included with the
car care product.
Upholstery care
Fabric
Clean with soapy water or a detergent. For
more difficult spots caused by oil, ice cream,
shoe polish, grease, etc., use a clothing/fabric
stain remover. Consult your Volvo retailer.
AlcanteraTM suede-like materialSuede-like upholstery can be cleaned with a
soft cloth and mild soap solution.