key battery VOLVO XC70 2013 Owner´s Manual
[x] Cancel search | Manufacturer: VOLVO, Model Year: 2013, Model line: XC70, Model: VOLVO XC70 2013Pages: 382, PDF Size: 6.78 MB
Page 122 of 382
03 Your driving environment
Transmission
03
120
3. Release the brake pedal and press gently
on the accelerator pedal.
Shiftlock override
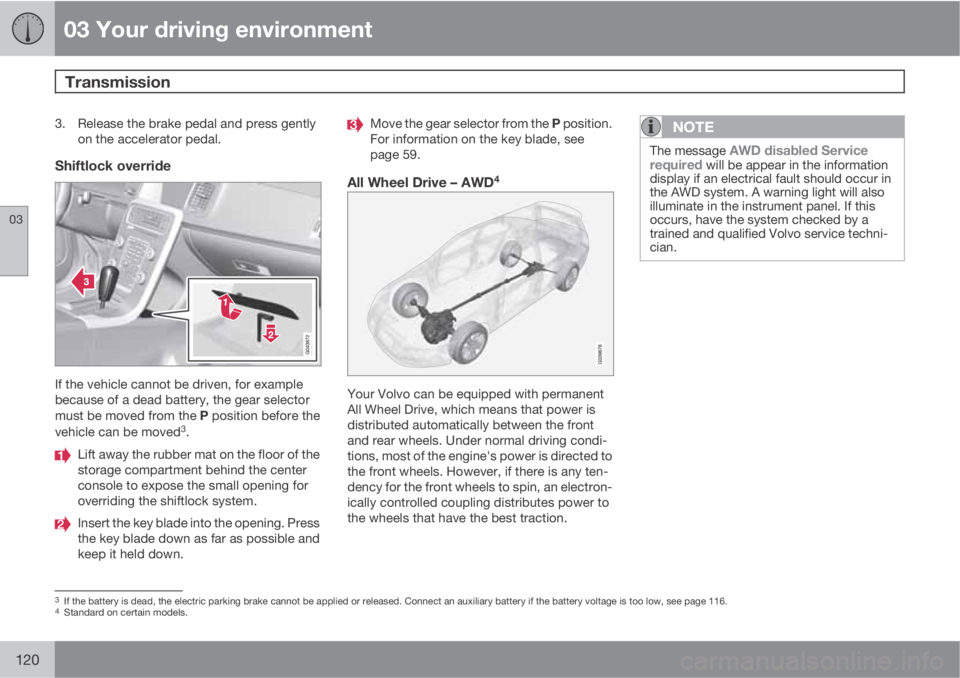
If the vehicle cannot be driven, for example
because of a dead battery, the gear selector
must be moved from the P position before the
vehicle can be moved
3.
Lift away the rubber mat on the floor of the
storage compartment behind the center
console to expose the small opening for
overriding the shiftlock system.
Insert the key blade into the opening. Press
the key blade down as far as possible and
keep it held down.
Move the gear selector from the P position.
For information on the key blade, see
page 59.
All Wheel Drive – AWD4
Your Volvo can be equipped with permanent
All Wheel Drive, which means that power is
distributed automatically between the front
and rear wheels. Under normal driving condi-
tions, most of the engine's power is directed to
the front wheels. However, if there is any ten-
dency for the front wheels to spin, an electron-
ically controlled coupling distributes power to
the wheels that have the best traction.
NOTE
The message AWD disabled Service
required will be appear in the information
display if an electrical fault should occur in
the AWD system. A warning light will also
illuminate in the instrument panel. If this
occurs, have the system checked by a
trained and qualified Volvo service techni-
cian.
3If the battery is dead, the electric parking brake cannot be applied or released. Connect an auxiliary battery if the battery voltage is too low, see page 116.4Standard on certain models.
Page 216 of 382
06 Infotainment
Introduction
06
214* Option/accessory, for more information, see Introduction.
General information
The infotainment system consists of radio and
media player features and also makes it pos-
sible to communicate via a cell phone. The
information is displayed on a 7" screen in the
center console. Infotainment functions can be
controlled from the center console or via the
buttons on the steering wheel keypad. On
models equipped with the optional navigation
system, voice commands can also be used to
e.g., set destinations, make calls from a
Bluetooth
�Ÿ-connected cell phone, etc.
If the infotainment system was on when the
ignition was switched off, the most recently
used source (
FM1, etc.) will restart the next
time the ignition is put in mode I or higher. The
driver's door must also be closed on vehicles
with keyless drive*.
The infotainment system can be operated for
15 minutes at a time while the engine is
switched off by pressing the On/Off button.
While the engine is being started, the infotain-
ment system will be temporarily interrupted
and will resume when the engine has started.
NOTE
To help avoid excessive battery drain,
remove the remote key from the ignition slot
if the infotainment system is used while the
engine is switched off.
Dolby Pro Logic
The system is manufactured under license
from Dolby Laboratories Licensing
Corporation.
Dolby Pro Logic II and the
symbol are
trademarks of Dolby Laboratories Licensing
Corporation.
Audyssey MultEQ1
The Audyssey MultEQ system has been used
to optimize sound quality to help ensure a
world-class listening experience.
1Applies only to models with Premium Sound Multimedia.
Page 279 of 382
07 During your trip
Loading
07
277
CAUTION
Be sure that there is adequate space above
and behind the vehicle before opening the
tailgate automatically.
The vehicle should not be driven or moved
with the tailgate in the open position. How-
ever, if the vehicle is moved with the tailgate
in the open position, the automatic closing
function will be inoperative until one of the
following occurs:
•The tailgate is closed manually
•The ignition is switched off and the key
is removed for approximately 10
minutes (the tailgate will function again
after restart).
NOTE
If the tailgate has been opened and closed
continuously too long, the automatic func-
tion will be deactivated to avoid overloading
the electrical system. The automatic func-
tion can be used again after approximately
2 minutes.
If the vehicle's battery has been discharged
or disconnected, the tailgate must be
opened and closed once manually to reset
the system.
Programming the tailgate opening angleThe tailgate's maximum opening angle can be
programmed, which can be useful, for exam-
ple, if the tailgate has to be opened in a garage
with a low ceiling.
To do so:
•Open the tailgate manually, hold it at the
desired maximum opening angle and
press the tailgate's closing button for at
least 3 seconds. When the tailgate is
released, programming is complete.
•To remove this programming, open the tail-
gate manually to a higher opening angle.
Automatic closingThe power tailgate can be closed by pressing
the
button on the tailgate (see the illus-
tration) or by pressing it down.
NOTE
If the tailgate is pressed down e.g., by the
weight of snow or strong wind, it will close
automatically.
WARNING
Be sure that no one is near the tailgate when
it is opened or closed automatically. The
tailgate should never be obstructed in any
way when it is operated.
Interrupting automatic opening/closingAutomatic opening or closing the tailgate can
be interrupted in four ways:
•By pressing the button on the
lighting panel.
•By pressing the button on the
remote key.
•By pressing the button on the lower edge
of the tailgate.
•By pressing the rubber-covered button
under the outer handle on the tailgate.
If one of these actions is taken, the tailgate will
stop moving.
Pinch protectionIf the tailgate is obstructed while it is being
operated, the pinch protection function is acti-
vated.
•If the tailgate is being opened, the electri-
cal function will be switched off and the
tailgate will be released from the electrical
system.
•If the tailgate is being closed, it will stop
and move slightly in the opposite direction.
Operating the tailgate manuallyThe power tailgate can be disconnected from
the vehicle’s electrical system by quickly pull-
Page 291 of 382
07 During your trip
Emergency towing
07
289
WARNING
•When the vehicle is being towed, the
ignition should be in mode II (in mode I,
all of the vehicle's airbags are deacti-
vated). See page 83 for more informa-
tion about ignition modes.
•Never remove the remote key from the
ignition slot when the vehicle is being
towed. For vehicles with keyless drive,
the remote key must remain inside the
vehicle.
•The power brakes and power steering
will not function when the engine is not
running. Approximately 5 times more
pressure will be required on the brake
pedal and the steering wheel will be
considerably harder to turn.
•The towing eyelets must not be used for
pulling the vehicle out of a ditch or for
any similar purpose involving severe
strain. Do not use the towing eyelets to
pull the vehicle up onto a flat bed tow
truck.
Towing the vehicle
1. With the remote key fully pressed into the
ignition slot1, press START/STOP
ENGINE for approximately 2 seconds to
activate ignition mode II.
2. The remote key must remain in the ignition
slot
2 for the entire time that the vehicle is
being towed.
3. Keep the tow rope taut when the towing
vehicle slows down by applying light pres-
sure on the brake pedal. This will help pre-
vent jarring movements of the vehicle
being towed.
4. Be prepared to apply the brakes to stop the
vehicle being towed.
CAUTION
General towing precautions:
•Please check with state and local
authorities before attempting this type
of towing, as vehicles being towed are
subject to regulations regarding maxi-
mum towing speed, length and type of
towing device, lighting, etc.
•If the vehicle's battery is dead, attach
jumper cables (see page 116) to provide
current for releasing the electric parking
brake and to move the gear selector
from the P position to N. If this is not
possible, see page 120 for information
about manually overriding the shiftlock
system to move the gear selector from
P to N.
•Maximum speed: 50 mph (80 km/h). Do
not exceed the maximum allowable
towing speed.
•Maximum distance with front wheels on
ground: 50 miles (80 km).
•The vehicle should only be towed in the
forward direction.
1Not necessary in vehicles with the optional keyless drive.2For vehicles with the the optional keyless dirive, the remote key must be in the vehicle.
Page 327 of 382
09 Maintenance and specifications
Hood and engine compartment09
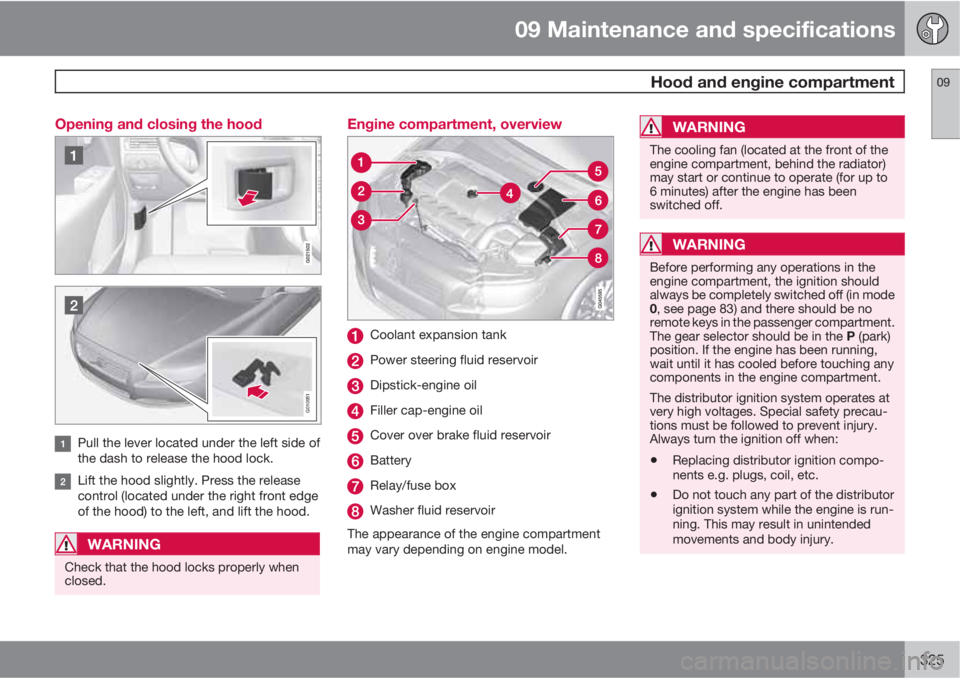
325 Opening and closing the hood
G010951
Pull the lever located under the left side of
the dash to release the hood lock.
Lift the hood slightly. Press the release
control (located under the right front edge
of the hood) to the left, and lift the hood.
WARNING
Check that the hood locks properly when
closed.
Engine compartment, overview
Coolant expansion tank
Power steering fluid reservoir
Dipstick-engine oil
Filler cap-engine oil
Cover over brake fluid reservoir
Battery
Relay/fuse box
Washer fluid reservoir
The appearance of the engine compartment
may vary depending on engine model.
WARNING
The cooling fan (located at the front of the
engine compartment, behind the radiator)
may start or continue to operate (for up to
6 minutes) after the engine has been
switched off.
WARNING
Before performing any operations in the
engine compartment, the ignition should
always be completely switched off (in mode
0, see page 83) and there should be no
remote keys in the passenger compartment.
The gear selector should be in the P (park)
position. If the engine has been running,
wait until it has cooled before touching any
components in the engine compartment.
The distributor ignition system operates at
very high voltages. Special safety precau-
tions must be followed to prevent injury.
Always turn the ignition off when:
•Replacing distributor ignition compo-
nents e.g. plugs, coil, etc.
•Do not touch any part of the distributor
ignition system while the engine is run-
ning. This may result in unintended
movements and body injury.
Page 342 of 382
09 Maintenance and specifications
Battery 09
340
WARNING
•Never expose the battery to open flame
or electric spark.
•Do not smoke near the battery.
•Battery fluid contains sulfuric acid. Do
not allow battery fluid to contact eyes,
skin, fabrics or painted surfaces. If con-
tact occurs, flush the affected area
immediately with water. Obtain medical
help immediately if eyes are affected.
NOTE
The life of the battery is shortened if it
becomes discharged repeatedly.
Maintenance
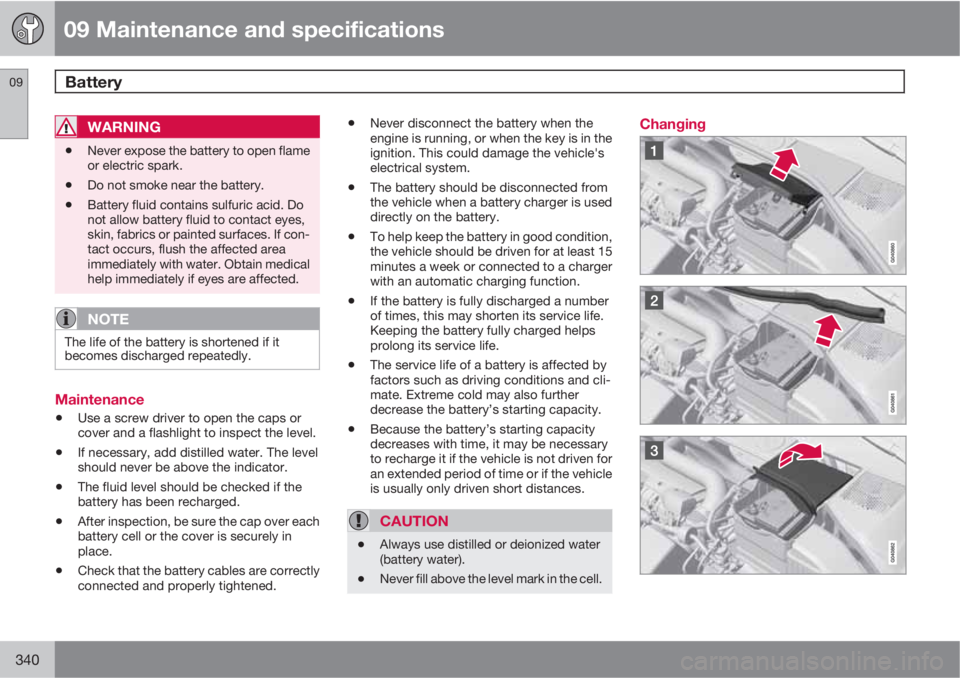
•Use a screw driver to open the caps or
cover and a flashlight to inspect the level.
•If necessary, add distilled water. The level
should never be above the indicator.
•The fluid level should be checked if the
battery has been recharged.
•After inspection, be sure the cap over each
battery cell or the cover is securely in
place.
•Check that the battery cables are correctly
connected and properly tightened.
•Never disconnect the battery when the
engine is running, or when the key is in the
ignition. This could damage the vehicle's
electrical system.
•The battery should be disconnected from
the vehicle when a battery charger is used
directly on the battery.
•To help keep the battery in good condition,
the vehicle should be driven for at least 15
minutes a week or connected to a charger
with an automatic charging function.
•If the battery is fully discharged a number
of times, this may shorten its service life.
Keeping the battery fully charged helps
prolong its service life.
•The service life of a battery is affected by
factors such as driving conditions and cli-
mate. Extreme cold may also further
decrease the battery’s starting capacity.
•Because the battery’s starting capacity
decreases with time, it may be necessary
to recharge it if the vehicle is not driven for
an extended period of time or if the vehicle
is usually only driven short distances.
CAUTION
•Always use distilled or deionized water
(battery water).
•Never fill above the level mark in the cell.
Changing
Page 343 of 382
09 Maintenance and specifications
Battery09
341
WARNING
Connect and disconnect the positive and
negative cables in the correct sequence.
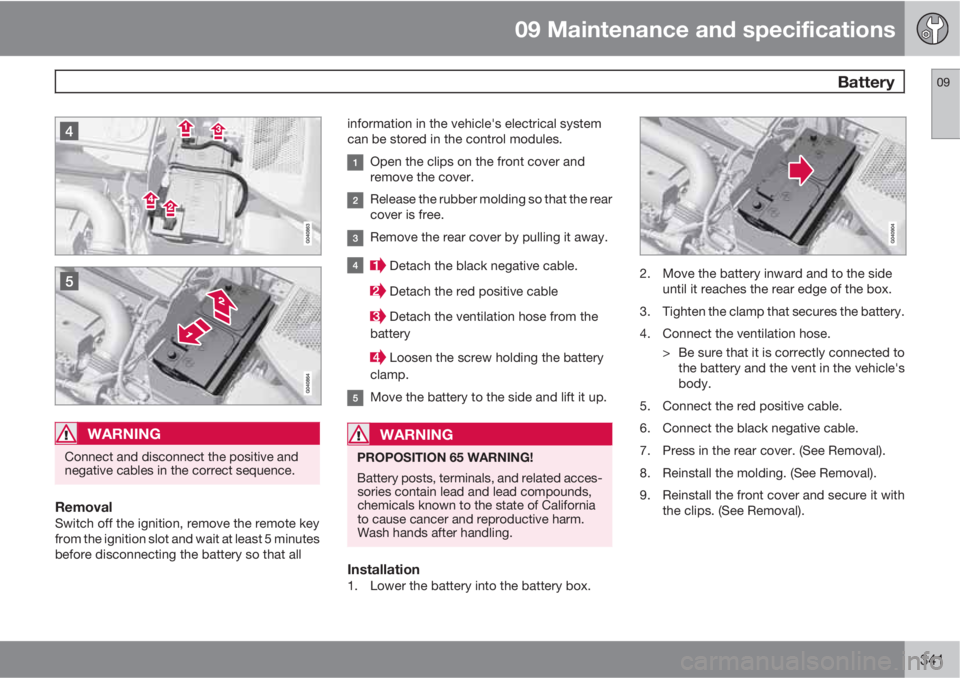
RemovalSwitch off the ignition, remove the remote key
from the ignition slot and wait at least 5 minutes
before disconnecting the battery so that allinformation in the vehicle's electrical system
can be stored in the control modules.
Open the clips on the front cover and
remove the cover.
Release the rubber molding so that the rear
cover is free.
Remove the rear cover by pulling it away.
Detach the black negative cable.
Detach the red positive cable
Detach the ventilation hose from the
battery
Loosen the screw holding the battery
clamp.
Move the battery to the side and lift it up.
WARNING
PROPOSITION 65 WARNING!
Battery posts, terminals, and related acces-
sories contain lead and lead compounds,
chemicals known to the state of California
to cause cancer and reproductive harm.
Wash hands after handling.
Installation1. Lower the battery into the battery box.
2. Move the battery inward and to the side
until it reaches the rear edge of the box.
3. Tighten the clamp that secures the battery.
4. Connect the ventilation hose.
> Be sure that it is correctly connected to
the battery and the vent in the vehicle's
body.
5. Connect the red positive cable.
6. Connect the black negative cable.
7. Press in the rear cover. (See Removal).
8. Reinstall the molding. (See Removal).
9. Reinstall the front cover and secure it with
the clips. (See Removal).
Page 372 of 382
11 Index
11
370
1, 2, 3 ...
12-volt sockets........................................ 209
A
ABS (anti-lock brake system).................. 122
Accessory installation warning.................. 13
Active chassis system.............................206
Active high beams..................................... 94
Active yaw control................................... 132
Adaptive brake lights............................... 121
Adaptive cruise control.................... 138, 140
Airbags
disconnecting the front passenger’s
side.................................................26, 27
front...................................................... 22
inflatable curtain................................... 32
side impact........................................... 30
Air conditioning........................................ 200
Air distribution.......................................... 196
Air distribution table................................. 202
Air vents................................................... 197
All Wheel Drive......................................... 120Anti-freeze.......................................270, 328
Anti-lock brake system
warning light......................................... 76
Anti-lock Brake System (ABS)................. 122
Approach lighting................................57, 99
Audio system
AUX/USB sockets............................... 238
Bluetooth�Ÿ devices............................. 241
Bluetooth�Ÿ hands-free system........... 243
Bluetooth streaming audio................. 241
getting started.................................... 215
HD digital radio................................... 227
introduction......................................... 214
media player....................................... 234
overview.............................................. 214
radio functions.................................... 225
Rear seat entertainment..................... 255
SiriusXM
E satellite radio.................... 229
sound settings.................................... 220
steering wheel keypad........................ 216
voice control....................................... 251
Auto-dim rearview mirror......................... 106
Automatic locking retractor....................... 37
Automatic transmission
Geartronic........................................... 119
general description.....................118, 119oil........................................................ 364
shiftlock override................................ 120
Axle weight.............................................. 303
B
Battery
changing..................................... 340, 341
maintenance....................................... 340
remote key, replacing........................... 60
specifications...................................... 365
warning symbols................................. 339
Blind Spot Information System
(BLIS)....................................... 180, 181, 182
Bluetooth cell phone connection............. 243
Booster cushion, integrated...................... 48
Booster cushions....................................... 45
Brake lights.............................................. 121
Brake system
ABS..................................................... 122
Brake pad inspection.......................... 121
checking fluid level............................. 328
emergency brake assistance.............. 122
fluid..................................................... 364
general information............................. 121
Page 378 of 382
11 Index
11
376
Refrigerant............................................... 364
Refueling..........................................271, 272
fuel filler cap....................................... 274
fuel filler door...................................... 273
fuel tank volume.................................364
Registering child restraints........................ 38
Remote control........................................ 264
private locking...................................... 62
replacing batteries.............................. 265
Remote key................................................ 54
approach lighting.................................. 57
immobilizer........................................... 56
key blade..................................54, 59, 62
locking the vehicle................................ 57
Personal Car Communicator..........57, 58
replacing the battery............................. 60
unlocking the vehicle............................ 57
Remote key/PCC
common functions................................ 57
Reporting safety defects............................ 17
Roadside Assistance............................... 369
Road sign information (RSI)..................... 134
Roof loads............................................... 280S
Safety, occupant........................................ 16
Safety defects, reporting........................... 17
Seat belt
reminder................................................ 19
Seat belts
Automatic locking retractor/Emergency
locking retractor.................................... 37
buckling................................................ 18
maintenance......................................... 18
pretensioners........................................ 18
reminder................................................ 18
reminder warning light.......................... 78
securing child restraint systems 41, 43, 45
unbuckling............................................ 18
use during pregnancy........................... 20
using.....................................................18
Seats, front.......................................... 84, 85
Sensus.....................................................186
Shiftlock....................................................... 9
override............................................... 120
Side door mirrors..................................... 105
Side impact airbags................................... 30
Side marker lights, changing bulbs......... 333
Sign information (RSI).............................. 134SiriusXM
E satellite radio......................... 229
Snow chains............................................ 306
Snow tires................................................ 306
Spare tire................................................. 307
Speed-dependent steering...................... 206
Spin control............................................. 132
SRS............................................................ 21
Stability system...............................132, 133
indicator light........................................ 77
Starting the engine..................................113
remote start........................................ 115
with keyless drive...............................113
Starting the vehicle
after a crash (crash mode)....................35
Start inhibitor (immobilizer)........................ 56
Steel grid in cargo area............................ 281
Steering wheel
adjusting............................................... 91
horn....................................................... 91
keypad.................................. 91, 189, 216
Stone chips, touching up......................... 353
Storage spaces........................................ 207
Studded tires........................................... 306
Sunroof (moonroof).................................. 108