stop start VOLVO XC70 2016 Owner´s Manual
[x] Cancel search | Manufacturer: VOLVO, Model Year: 2016, Model line: XC70, Model: VOLVO XC70 2016Pages: 396, PDF Size: 10.01 MB
Page 82 of 396
||
03 Instruments and controls
03
80* Option/accessory, for more information, see Introduction.
Ignition mode I–With the remote key fully pressed into the ignition slot 8
, press START/STOP
ENGINE briefly.
Ignition mode II–With the remote key fully pressed into the ignition slot 8
, press START/STOP
ENGINE for approximately 2 seconds.
Returning to mode 0To return to mode 0 from mode II or I, press
START/STOP ENGINE briefly.
Starting and stopping the engineSee Starting the engine (p. 246) and Switch- ing off the engine (p. 248) for information onstarting the engine and switching it off.
Emergency towingSee Towing the vehicle (p. 284) for importantinformation about the remote key when thevehicle is being towed.
Related information
•Inserting/removing remote key (p. 78)
Front seats
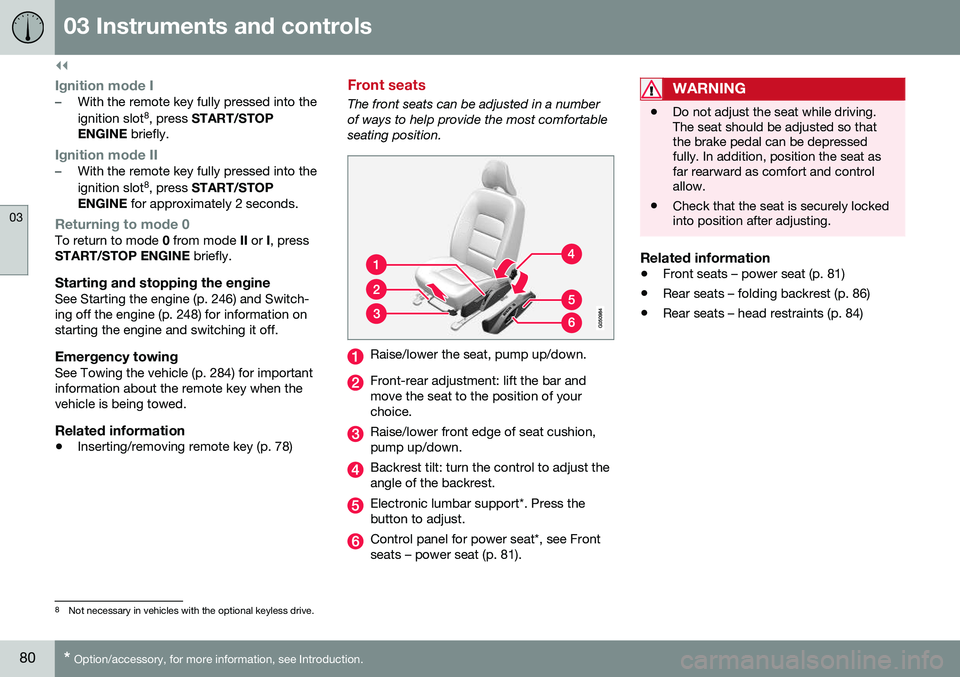
The front seats can be adjusted in a number of ways to help provide the most comfortableseating position.
Raise/lower the seat, pump up/down.
Front-rear adjustment: lift the bar and move the seat to the position of yourchoice.
Raise/lower front edge of seat cushion, pump up/down.
Backrest tilt: turn the control to adjust the angle of the backrest.
Electronic lumbar support*. Press the button to adjust.
Control panel for power seat*, see Front seats – power seat (p. 81).
WARNING
•Do not adjust the seat while driving. The seat should be adjusted so thatthe brake pedal can be depressedfully. In addition, position the seat asfar rearward as comfort and controlallow.
• Check that the seat is securely lockedinto position after adjusting.
Related information
•
Front seats – power seat (p. 81)
• Rear seats – folding backrest (p. 86)
• Rear seats – head restraints (p. 84)
8
Not necessary in vehicles with the optional keyless drive.
Page 107 of 396
03 Instruments and controls
03
}}
* Option/accessory, for more information, see Introduction.105
Digital compass*
The rear-view mirror has an integrated display that shows the compass direction in whichthe vehicle is traveling.
Operation
G029737
Rearview mirror with compass.
Eight different directions are shown with the abbreviations:
N (north), NE (north east), E(east), SE (southeast), S (south), SW (south-
west), W (west) and NW (northwest).
The compass is displayed automatically when the vehicle is started or in ignition mode II. To
switch the compass on/off use a pen, paper-clip or similar object and press in the buttonon the rear side of the mirror.
CalibrationNorth America is divided into 15 magneticzones and the compass will need to be cali-brated if the vehicle is driven into a new one (see the magnetic zones on the map in thefollowing section "Selecting a magneticzone"). To do so:
1. Stop the vehicle in a large open area,
safely out of traffic and away from steel structures and high-tension electricalwires.
2. Start the vehicle.
NOTE
• For best calibration results, switch off all electrical equipment in the vehicle(climate system, windshield wipers,audio system, etc.) and make sure thatall doors are closed.
• Calibration may not succeed or beincorrect if the vehicle's electricalequipment is not switched off.
3. Using a pen, paperclip or similar object,
press and hold the button on the rear side of mirror for approx. 6 seconds until
C is
displayed in the mirror.
4. Press and hold the button for 3 seconds until the number of the current magnetic zone is displayed.
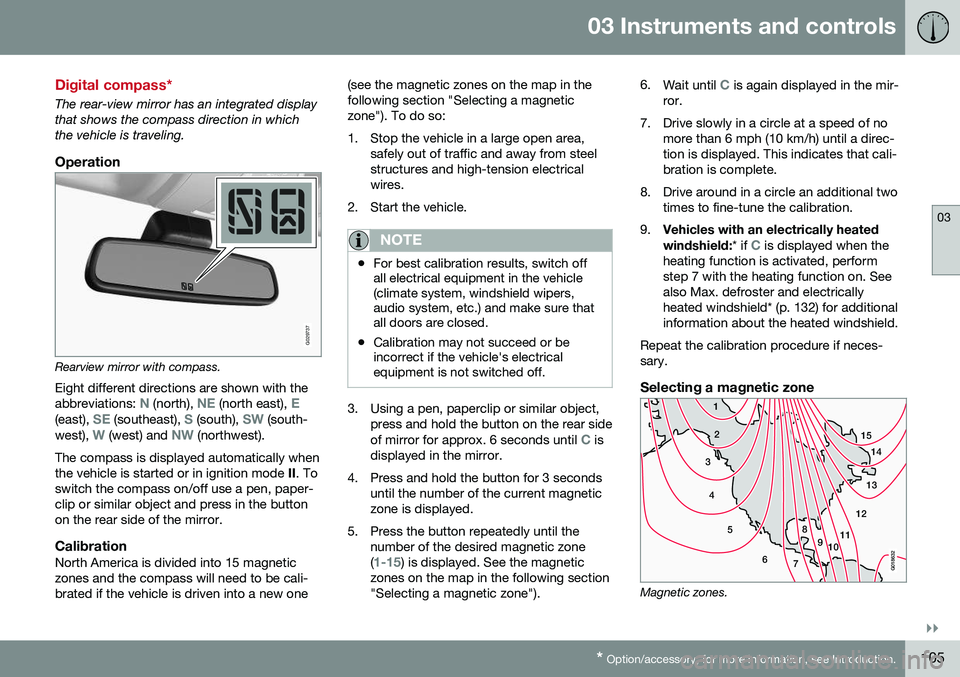
5. Press the button repeatedly until the number of the desired magnetic zone (
1-15) is displayed. See the magnetic
zones on the map in the following section "Selecting a magnetic zone"). 6.
Wait until
C is again displayed in the mir-
ror.
7. Drive slowly in a circle at a speed of no more than 6 mph (10 km/h) until a direc- tion is displayed. This indicates that cali-bration is complete.
8. Drive around in a circle an additional two times to fine-tune the calibration.
9. Vehicles with an electrically heated windshield:
* if
C is displayed when the
heating function is activated, perform step 7 with the heating function on. Seealso Max. defroster and electricallyheated windshield* (p. 132) for additionalinformation about the heated windshield.
Repeat the calibration procedure if neces-sary.
Selecting a magnetic zone
15 14
13
12
11
9
8
7
6
5
4
3
2
1
10
G018632
Magnetic zones.
Page 116 of 396
||
03 Instruments and controls
03
114
MessageDescription
Stop engineAStop and switch off the engine as soon as possi-ble. Serious risk of dam-age. Contact an author-ized Volvo workshop.
Stop safelyAStop and switch off the engine. Serious risk ofdamage. Contact anauthorized Volvo work-shop.
Service urgentAHave the vehicle checked by an authorized Volvoworkshop immediately.
Service requiredAHave the vehicle checked by an authorized Volvoworkshop as soon as pos-sible.
See man- ualARead the owner's manual.
Book time for mainte-nanceTime to book service at an authorized Volvo retailer.
MessageDescription
Time for regularmainte-nanceTime for regular service at an authorized Volvo work-shop. The timing is deter-mined by the number ofmiles driven, number ofmonths since the lastservice, engine runningtime.
Mainte- nance over-dueIf the service intervals are not followed, the warrantydoes not cover any dam-aged parts. Contact anauthorized Volvo work-shop for service.
Temporarily OFFAA function has been tem- porarily switched off andis reset automatically whiledriving or after startingagain.
Low battery Power savemodeThe audio system is switched off to save cur-rent. Charge the battery.
AThere will also be a system-specific part of this message
Related information
• Information displays – introduction (p. 68)
• Information display – menu overview (p. 113) •
Information display – menu controls(p. 112)
Page 145 of 396
05 Loading and storage
05
143
•
The vehicle's wind resistance and fuel consumption will increase with the size ofthe load.
• Drive smoothly. Avoid rapid starts, fastcornering and hard braking.
Related information
• Loading – general (p. 142)
• Load anchoring eyelets (p. 143)
Load anchoring eyelets
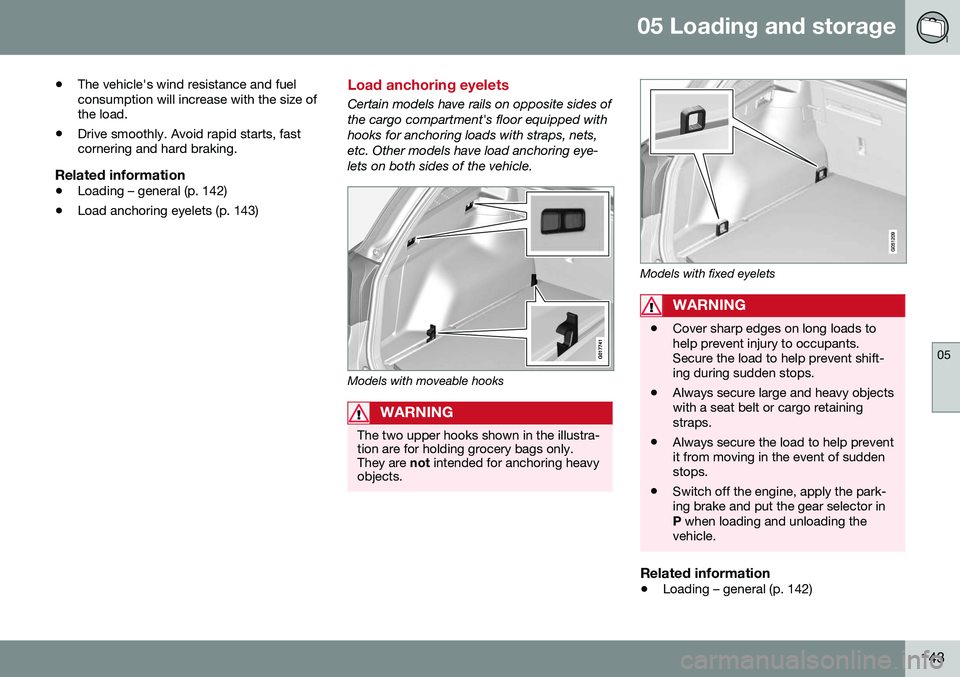
Certain models have rails on opposite sides of the cargo compartment's floor equipped withhooks for anchoring loads with straps, nets,etc. Other models have load anchoring eye-lets on both sides of the vehicle.
Models with moveable hooks
WARNING
The two upper hooks shown in the illustra- tion are for holding grocery bags only.They are
not intended for anchoring heavy
objects.
Models with fixed eyelets
WARNING
• Cover sharp edges on long loads to help prevent injury to occupants.Secure the load to help prevent shift-ing during sudden stops.
• Always secure large and heavy objectswith a seat belt or cargo retainingstraps.
• Always secure the load to help preventit from moving in the event of suddenstops.
• Switch off the engine, apply the park-ing brake and put the gear selector inP
when loading and unloading the
vehicle.
Related information
• Loading – general (p. 142)
Page 175 of 396
06 Locks and alarm
06
173
Alarm – turning off
The alarm system provides a warning if an attempt is made to break into the vehicle. If the alarm is sounding, it can be stopped by pressing the Unlock button on the remote keyor by inserting the remote key in the ignitionslot. Two short flashes from the car's turn sig-nals confirm that the alarm has been turnedoff.
Related information
•Alarm indicator (p. 171)
• Alarm – arming/disarming (p. 172)
• Remote key – replacing the battery (p. 159)
Alarm-related functions
The following is general information regarding the alarm system in your vehicle.
Automatic re-armingIf the doors are unlocked, the locks will auto-matically re-engage (re-lock) and the alarmwill re-arm after 2 minutes unless a door orthe tailgate has been opened.
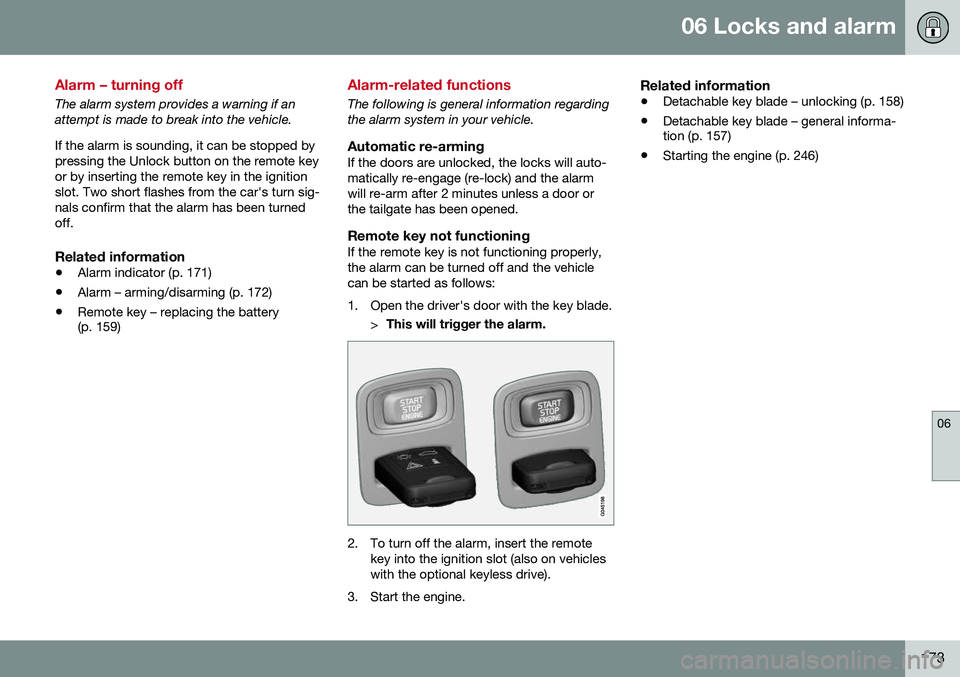
Remote key not functioningIf the remote key is not functioning properly,the alarm can be turned off and the vehiclecan be started as follows:
1. Open the driver's door with the key blade.
>This will trigger the alarm.
2. To turn off the alarm, insert the remote
key into the ignition slot (also on vehicles with the optional keyless drive).
3. Start the engine.
Related information
• Detachable key blade – unlocking (p. 158)
• Detachable key blade – general informa- tion (p. 157)
• Starting the engine (p. 246)
Page 179 of 396
07 Driver support
07
}}
177
Stability system – symbols and messages
Symbols and messages in the main
instrument panel
A text message can be erased by pressing briefly the OK button on the turn signal lever.
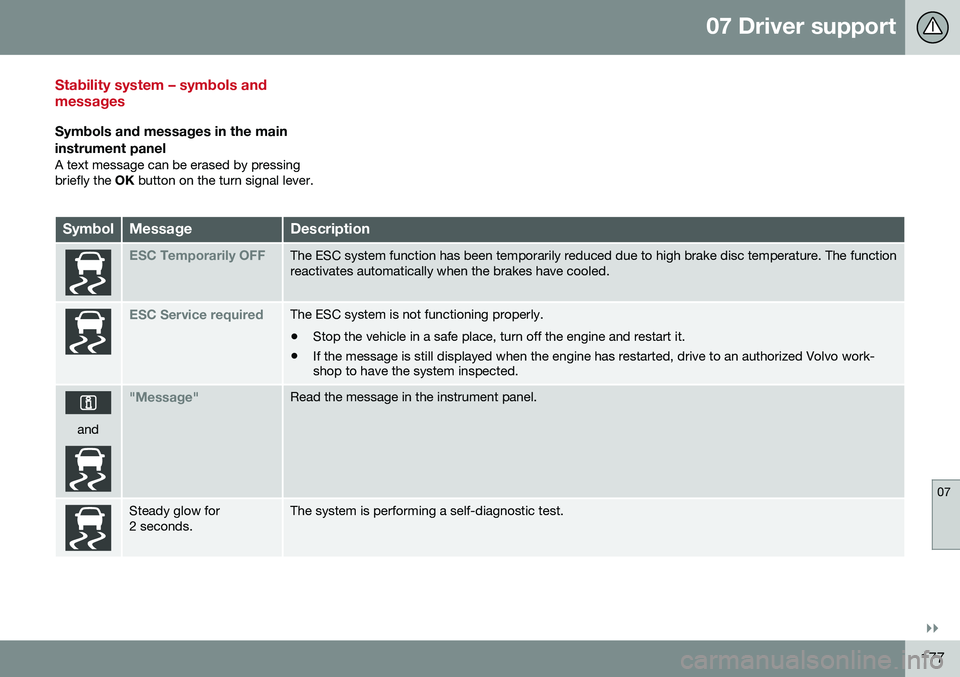
SymbolMessageDescription
ESC Temporarily OFFThe ESC system function has been temporarily reduced due to high brake disc temperature. The function reactivates automatically when the brakes have cooled.
ESC Service requiredThe ESC system is not functioning properly. • Stop the vehicle in a safe place, turn off the engine and restart it.
• If the message is still displayed when the engine has restarted, drive to an authorized Volvo work- shop to have the system inspected.
and
"Message"Read the message in the instrument panel.
Steady glow for 2 seconds.The system is performing a self-diagnostic test.
Page 219 of 396
07 Driver support
07
* Option/accessory, for more information, see Introduction.217
The camera’s limitations
The camera has the same limitations as the human eye. The camera is used by Pedestrian and Cyclist Detection with Full Auto Brake Collision warn-ing – introduction (p. 209), Active High Beams(Active high beams (AHB)* (p. 90)), Road SignInformation (Road Sign Information (RSI)* –introduction (p. 179)) and Driver Alert System(Driver Alert System (p. 222)) with LaneDeparture Warning.
NOTE
• To help protect the camera in very hot conditions, it may be temporarilyswitched off for approximately 15minutes after the engine has beenstarted.
• Keep the section of the windshield infront of the camera clean and free ofice, snow, or condensation.
WARNING
•
The camera has the same type of limi- tations as the human eye, i.e., it can-not see as well in heavy snowfall orrain, thick fog or in heavy blowing dustor snow. In such conditions, systemsdepending on the camera may experi-ence greatly reduced functionality ormay be temporarily deactivated.
• Never place any objects, decals, etc.,on the windshield in front of the cam-era. This could reduce or block thecamera’s function, and could causeone or more of the systems that utilizethe camera to stop functioning.
• Strong sunlight, reflections from theroad surface, ice or snow covering theroad, a dirty road surface, or unclearlane marker lines may drasticallyreduce the camera’s capacity todetect the side of a lane, a pedestrian,a cyclist or another vehicle.
Related information
•
Collision warning – introduction (p. 209)
• Collision warning* – function (p. 211)
• Collision warning* – operation (p. 212)
• Collision warning* – Pedestrian detection (p. 214)
• Collision warning* – Cyclist detection(p. 213)
• Collision warning* – limitations (p. 215) •
Collision warning – troubleshooting(p. 218)
• Collision warning – symbols and mes-sages (p. 220)
• Road Sign Information (RSI)* – introduc-tion (p. 179)
• Driver Alert System (p. 222)
• Active high beams (AHB)* (p. 90)
Page 248 of 396
08 Starting and driving
08
246* Option/accessory, for more information, see Introduction.
Starting the engine
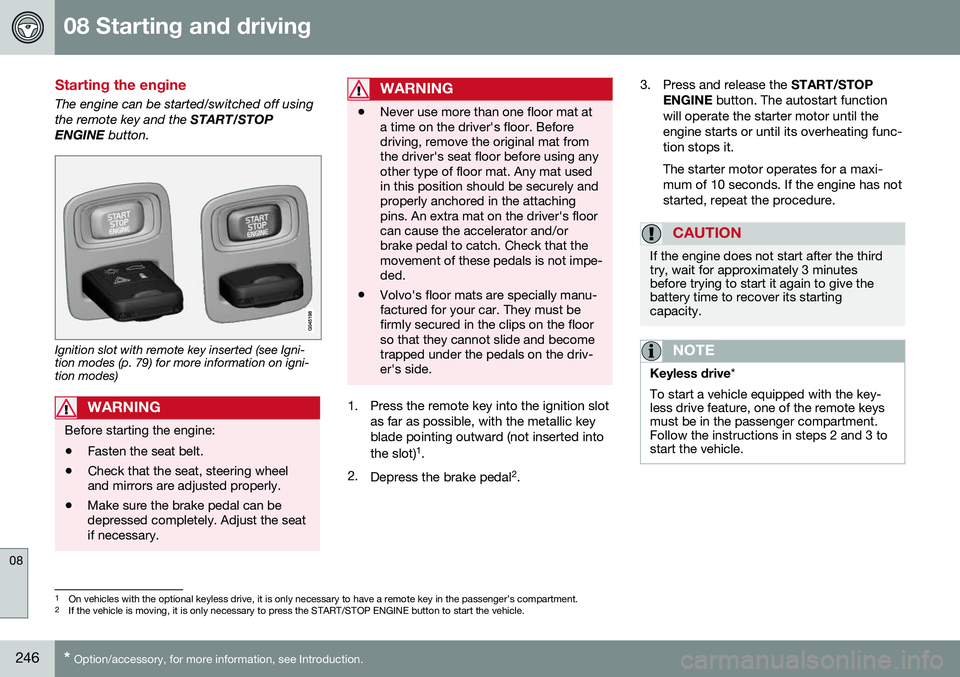
The engine can be started/switched off using the remote key and the START/STOP
ENGINE button.
Ignition slot with remote key inserted (see Igni- tion modes (p. 79) for more information on igni-tion modes)
WARNING
Before starting the engine:
• Fasten the seat belt.
• Check that the seat, steering wheel and mirrors are adjusted properly.
• Make sure the brake pedal can bedepressed completely. Adjust the seatif necessary.
WARNING
•Never use more than one floor mat at a time on the driver's floor. Beforedriving, remove the original mat fromthe driver's seat floor before using anyother type of floor mat. Any mat usedin this position should be securely andproperly anchored in the attachingpins. An extra mat on the driver's floorcan cause the accelerator and/orbrake pedal to catch. Check that themovement of these pedals is not impe-ded.
• Volvo's floor mats are specially manu-factured for your car. They must befirmly secured in the clips on the floorso that they cannot slide and becometrapped under the pedals on the driv-er's side.
1. Press the remote key into the ignition slot
as far as possible, with the metallic key blade pointing outward (not inserted into the slot) 1
.
2. Depress the brake pedal 2
. 3. Press and release the
START/STOP
ENGINE button. The autostart function
will operate the starter motor until the engine starts or until its overheating func-tion stops it. The starter motor operates for a maxi- mum of 10 seconds. If the engine has notstarted, repeat the procedure.
CAUTION
If the engine does not start after the third try, wait for approximately 3 minutesbefore trying to start it again to give thebattery time to recover its startingcapacity.
NOTE
Keyless drive *
To start a vehicle equipped with the key- less drive feature, one of the remote keysmust be in the passenger compartment.Follow the instructions in steps 2 and 3 tostart the vehicle.
1 On vehicles with the optional keyless drive, it is only necessary to have a remote key in the passenger’s compartment.
2 If the vehicle is moving, it is only necessary to press the START/STOP ENGINE button to start the vehicle.
Page 250 of 396
08 Starting and driving
08
248* Option/accessory, for more information, see Introduction.
Switching off the engine
Switch off the engine by pressing the START/
STOP ENGINE button.
If the gear selector is not in the P position or
if the vehicle is moving, press the START/
STOP ENGINE button twice or press and
hold it in until the engine switches off.
Related information
• Ignition modes (p. 79)
Engine Remote Start (ERS)* – introduction
ERS is a feature that makes it possible to remotely start the engine using the remotekey to cool or heat the passenger compart-ment before driving. The climate/ and infotainment systems will start using the same settings as when theengine was switched off. When the engine is started using ERS, it will run for a maximum of 15 minutes beforeautomatically switching off again. After 2 ERSstarts, the engine must be started in the nor-mal way before ERS can be used again.
NOTE
•Always adhere to applicable State, Province and/or Local laws regardingengine idling when using ERS.
• The service life of the remote key'sbattery is affected by ERS use. If thisfeature is used frequently, the batteryshould be replaced once a year, seeRemote key – replacing the battery(p. 159).
WARNING
Keep the following in mind before using ERS:
• The vehicle should be in view.
• The vehicle should be unoccupied.
• The vehicle must not be parked indoors or in an enclosed area.Exhaust fumes are harmful to thehealth.
Related information
•
Engine Remote Start (ERS)* – starting the engine (p. 249)
• Engine Remote Start (ERS)* – switchingoff the engine (p. 249)
Page 258 of 396
08 Starting and driving
08
256
Start/Stop – Hill Start Assist (HSA)
When starting on steep hills, HSA (see Trans- mission – general information (p. 251)) retainspressure on the brake pedal for several sec-onds after the pedal has been released inorder to keep the vehicle at a standstill. Thebrakes will be released after several secondsor when the driver presses the acceleratorpedal. The pedal will return to its normal posi-tion somewhat slower than normal.
Related information
•Start/Stop – introduction (p. 256)
• Start/Stop – function (p. 256)
• Start/Stop – settings (p. 259)
• Start/Stop – Auto-stop exceptions (p. 257)
• Start/Stop – Auto-start exceptions(p. 258)
• Start/Stop – symbols and messages(p. 260)
Start/Stop – introduction
Start/Stop is a function that temporarily switches off the engine when the vehicle isnot moving, for instance in heavy traffic or at atraffic light to help reduce fuel consumption. Start/Stop is available with certain engines/ transmissions.
Related information
•Start/Stop – function (p. 256)
• Start/Stop – settings (p. 259)
• Start/Stop – Auto-stop exceptions (p. 257)
• Start/Stop – Auto-start exceptions(p. 258)
• Start/Stop – Hill Start Assist (HSA)(p. 256)
• Start/Stop – symbols and messages(p. 260)
Start/Stop – function
Function and use
Start/Stop symbol in the instrument panel
Start/Stop button on the center console
Start/Stop is activated automatically each time the engine is started 9
. The symbol in the
instrument panel will be displayed for several seconds when the engine starts and the indi-cator light in the On/Off button will remainilluminated while the function is activated. All of the vehicle's systems will function while the engine is auto-stopped, although thefunction of certain systems may reduced atthis time. For example, blower speed andhigh infotainment system volume may bereduced to help conserve the battery'scapacity.
9 Not when the engine is started using the optional Engine Remote Start feature, Starting the engine (p. 246)