bulb VOLVO XC90 2004 Owners Manual
[x] Cancel search | Manufacturer: VOLVO, Model Year: 2004, Model line: XC90, Model: VOLVO XC90 2004Pages: 245, PDF Size: 7.14 MB
Page 49 of 245

Downloaded from www.Manualslib.com manuals search engine ProCarManuals.com
2004 VOLVO XC90
Headlight flasher (headlights off).
Move the lever towards the steering wheel. The headlight high beam will \
be on until the lever is
released.
4. Exterior courtesy lights.
Move the lever towards the steering wheel and release it.
NOTE: If the turn signal indicator flashes faster than normal, check for a bur\
ned-out turn signal bulb.
Home safe lighting
When you leave your vehicle at night, you can make use of the courtesy l\
ighting function:
l Remove the key from the ignition switch.
l Pull the turn signal lever towards the steering wheel (as when using th\
e headlight flasher function).
l Exit the vehicle and lock the doors.
The headlights, parking lights, license plate lights and the lights in t\
he sideview mirrors will now come
on and remain on for 30, 60 or 90 seconds (the time interval is at your\
discretion and can be changed by
an authorized Volvo retailer).
Approach lighting
When approaching the vehicle at night, press the yellow button in the ce\
ntral locking remote control (see
illustration on
page 73). This lights up the interior courtesy lights, parking lights, license\
plate lights and
the lights in the sideview mirrors.
Steering wheel adjustment
Steering wheel adjustment
Both the height and the reach of the steering wheel can be adjusted to a\
comfortable position for the
driver. Pull down the lever on the left of the steering column. Adjust t\
he steering wheel to a suitable
position and press the lever back into place to lock the steering wheel \
in the new position. Check that the
steering wheel is locked in the new position.
file:///K|/ownersdocs/2004/2004_XC90/04xc90_02a.htm (14 of 16)12/30/20\
06 4:35:14 PM
Page 137 of 245
Downloaded from www.Manualslib.com manuals search engine ProCarManuals.com
2004 VOLVO XC90
state of charge more frequently and spray an antirust oil on the battery\
posts.
l Volvo recommends the use of snow tires on all four wheels for winter driving - see section "Wheels
and tires."
l To prevent the washer fluid reservoir from freezing, add washer solvents containing antifreeze (see
page 126 for the location of the washer fluid reservoir).
This is important since dirt is often splashed on the windshield during \
winter driving, requiring the
frequent use of the washers and wipers. Volvo Washer Solvent should be d\
iluted as follows:
Down to 14° F (-10° C): 1 part washer solvent and 4 parts water \
Down to 5° F (-15° C): 1 part washer solvent and 3 parts water
Down to 0° F (-18° C): 1 part washer solvent and 2 parts water
Down to -18° F (-28° C): 1 part washer solvent and 1 part water \
l Use Volvo Teflon Lock Spray in the locks.
NOTE: Avoid the use of de-icing sprays as they can cause damage to the locks.
W Winter/Wet driving mode-enhanced vehicle traction
l Mode W will only function if the gear selector is in the (D)rive position.
l Press the button at the base of the gear selector to engage/disengage th\
is driving mode.
l An LED in the button will light up to indicate that W is engaged and thi\
s will also be displayed in the
instrument panel (see
page 24).
l This mode may be selected for starting/moving off on slippery roads.
* Synthetic oil is not used when the oil is changed at the normal mainte\
nance intervals except at owner
request and at additional charge. Please consult your Volvo retailer.
pg. 106 Starting and driving
Before a long distance trip
It is always worthwhile to have your vehicle checked at a Volvo retailer\
before driving long distances.
Your retailer will also be able to supply you with bulbs, fuses, spark p\
lugs and wiper blades for your use
in the event that problems occur.
As a minimum, the following items should be checked before any long trip\
:
l Check that engine runs smoothly and that fuel consumption is normal.
l Check for fuel, oil, and fluid leakage
l Check transmission oil level*.
l Check condition of drive belts.
l Check state of the battery's charge.
l Examine tires carefully (the spare tire as well), and replace those th\
at are worn. Check tire pressures.
l The brakes, front wheel alignment, and steering gear should be checked b\
y your Volvo retailer only.
file:///K|/ownersdocs/2004/2004_XC90/04xc90_06b.htm (16 of 17)12/30/20\
06 4:35:23 PM
Page 157 of 245
Downloaded from www.Manualslib.com manuals search engine ProCarManuals.com
2004 VOLVO XC90
2 0 0 4
VOLVO XC90
Maintenance
pg. 121 Maintenance
Volvo maintenance122
Working on your vehicle124
Engine compartment126
Oils and fluids127
Battery maintenance132
Bulbs135
Fuses143
pg. 122 Maintenance
Volvo Maintenance
Maintenance
Volvo advises you to follow the maintenance program outlined in the Warr\
anty and Service Records
Information booklet. This maintenance program contains inspections and s\
ervices necessary for the
proper function of your vehicle. The maintenance services contain severa\
l checks which require special
instruments and tools and therefore must be performed by a qualified tec\
hnician. To keep your Volvo in
top condition, specify time-tested and proven Genuine Volvo Parts and Ac\
cessories.
The Federal Clean Air Act - U.S.
The Federal Clean Air Act requires vehicle manufacturers to furnish writ\
ten instructions to the ultimate
purchaser to assure the proper servicing and function of the components \
that control emissions. These
services, which are listed in the "Warranty and Service Records Informat\
ion booklet," are not covered
file:///K|/ownersdocs/2004/2004_XC90/04xc90_09a.htm (1 of 14)12/30/200\
6 4:35:26 PM
Page 175 of 245
Downloaded from www.Manualslib.com manuals search engine ProCarManuals.com
2004 VOLVO XC90
locking system's remote control to reactivate such features as the power\
windows, moonroof, courtesy
lighting, etc.
WARNING!
PROPOSITION 65 WARNING!
Battery posts, terminals, and related accessories contain lead and lead \
compounds, chemicals known
to the state of California to cause cancer and reproductive harm. Wash h\
ands after handling.
pg. 135 Maintenance
Bulbs
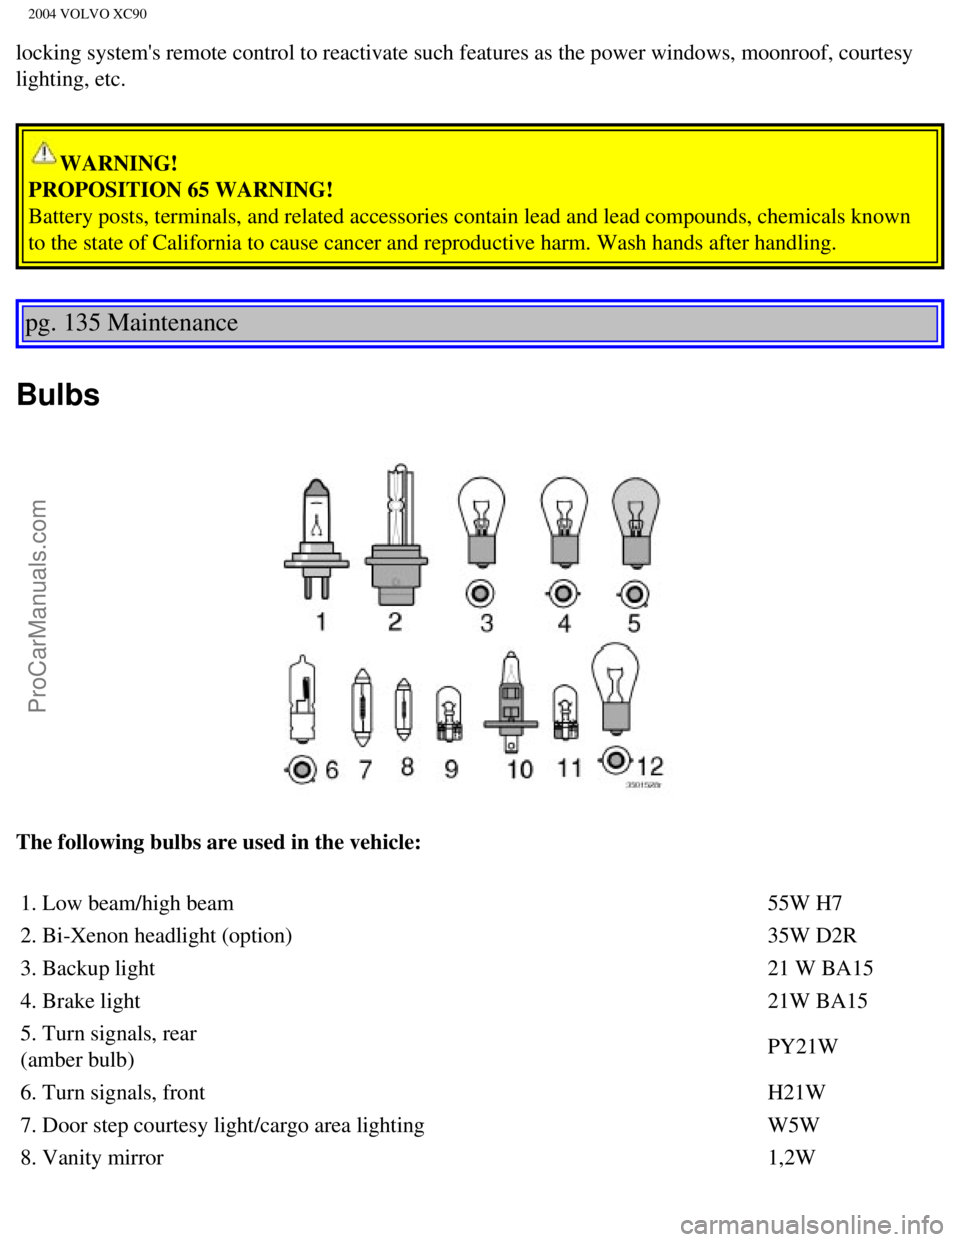
The following bulbs are used in the vehicle:
1. Low beam/high beam 55W H7
2. Bi-Xenon headlight (option) 35W D2R
3. Backup light 21 W BA15
4. Brake light 21W BA15
5. Turn signals, rear
(amber bulb) PY21W
6. Turn signals, front H21W
7. Door step courtesy light/cargo area lighting W5W
8. Vanity mirror 1,2W
file:///K|/ownersdocs/2004/2004_XC90/04xc90_09b.htm (5 of 23)12/30/200\
6 4:35:28 PM
Page 176 of 245
Downloaded from www.Manualslib.com manuals search engine ProCarManuals.com
2004 VOLVO XC90
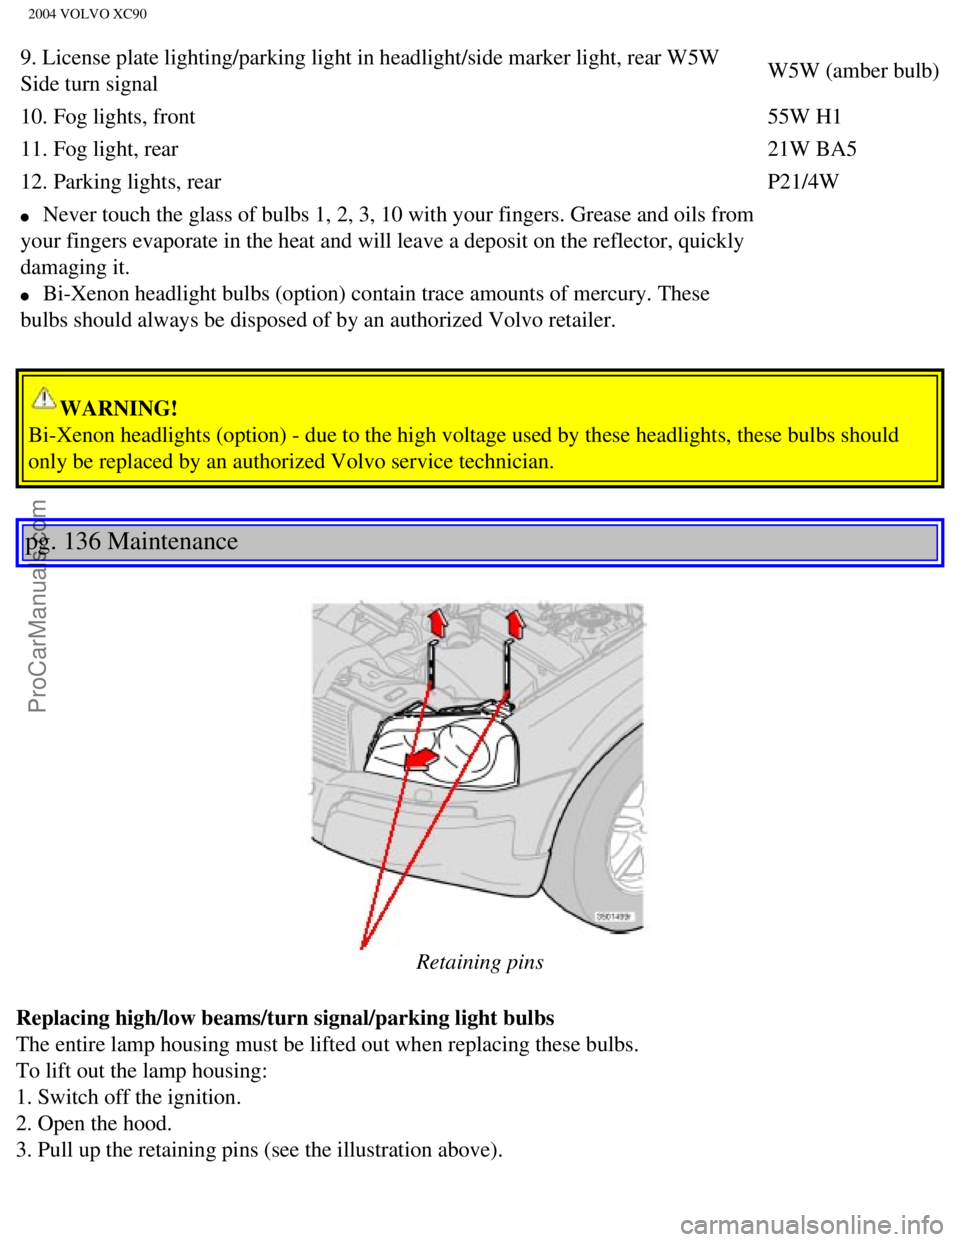
9. License plate lighting/parking light in headlight/side marker light, \
rear W5W
Side turn signal W5W (amber bulb)
10. Fog lights, front 55W H1
11. Fog light, rear 21W BA5
12. Parking lights, rear P21/4W
l Never touch the glass of bulbs 1, 2, 3, 10 with your fingers. Grease and\
oils from
your fingers evaporate in the heat and will leave a deposit on the refle\
ctor, quickly
damaging it.
l Bi-Xenon headlight bulbs (option) contain trace amounts of mercury. Th\
ese
bulbs should always be disposed of by an authorized Volvo retailer.
WARNING!
Bi-Xenon headlights (option) - due to the high voltage used by these h\
eadlights, these bulbs should
only be replaced by an authorized Volvo service technician.
pg. 136 Maintenance
Retaining pins
Replacing high/low beams/turn signal/parking light bulbs
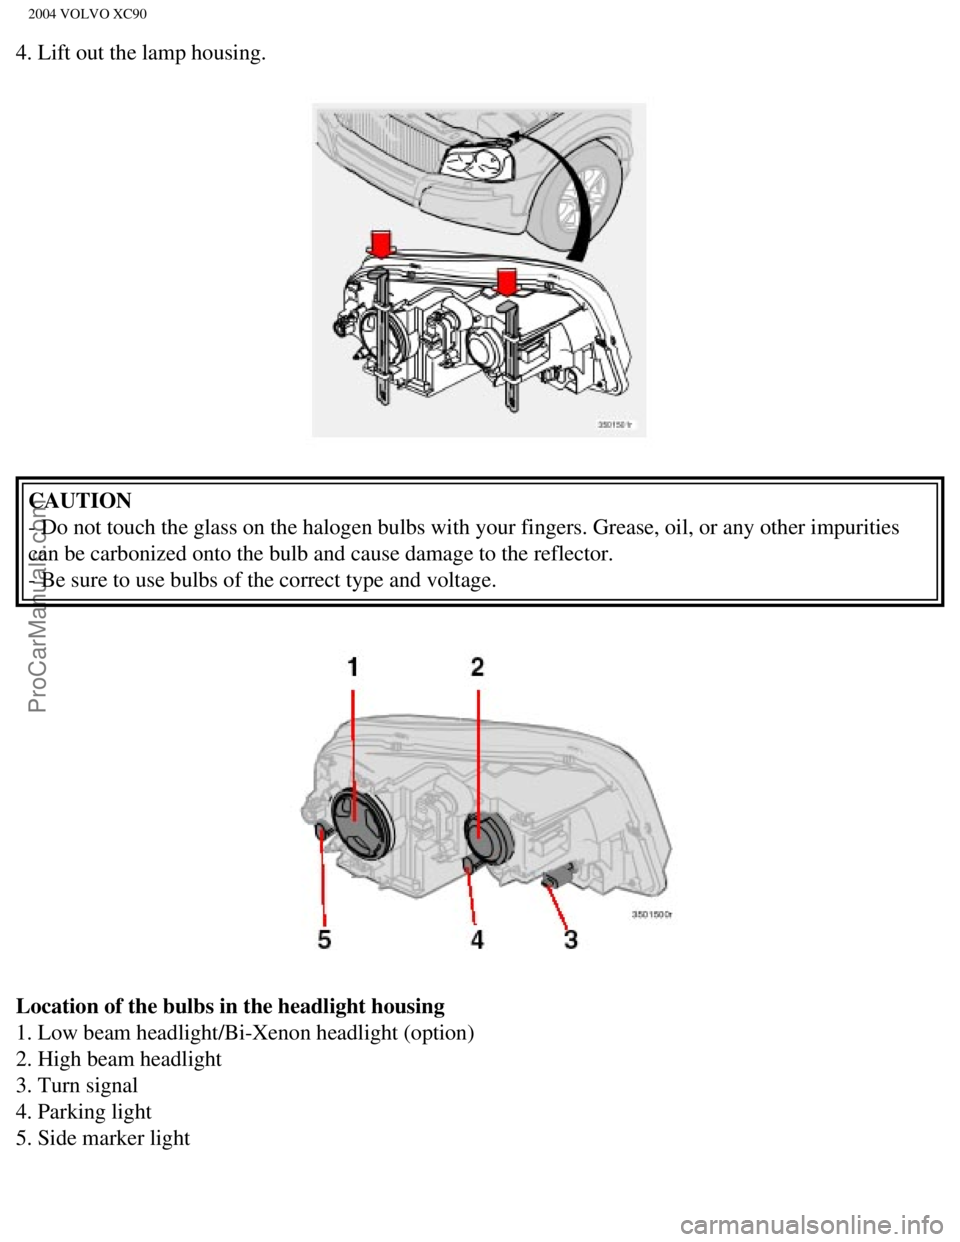
The entire lamp housing must be lifted out when replacing these bulbs.
To lift out the lamp housing:
1. Switch off the ignition.
2. Open the hood.
3. Pull up the retaining pins (see the illustration above).
file:///K|/ownersdocs/2004/2004_XC90/04xc90_09b.htm (6 of 23)12/30/200\
6 4:35:28 PM
Page 177 of 245
Downloaded from www.Manualslib.com manuals search engine ProCarManuals.com
2004 VOLVO XC90
4. Lift out the lamp housing.
CAUTION
- Do not touch the glass on the halogen bulbs with your fingers. Grease,\
oil, or any other impurities
can be carbonized onto the bulb and cause damage to the reflector.
- Be sure to use bulbs of the correct type and voltage.
Location of the bulbs in the headlight housing
1. Low beam headlight/Bi-Xenon headlight (option)
2. High beam headlight
3. Turn signal
4. Parking light
5. Side marker light
file:///K|/ownersdocs/2004/2004_XC90/04xc90_09b.htm (7 of 23)12/30/200\
6 4:35:28 PM
Page 178 of 245
Downloaded from www.Manualslib.com manuals search engine ProCarManuals.com
2004 VOLVO XC90
pg. 137 Maintenance
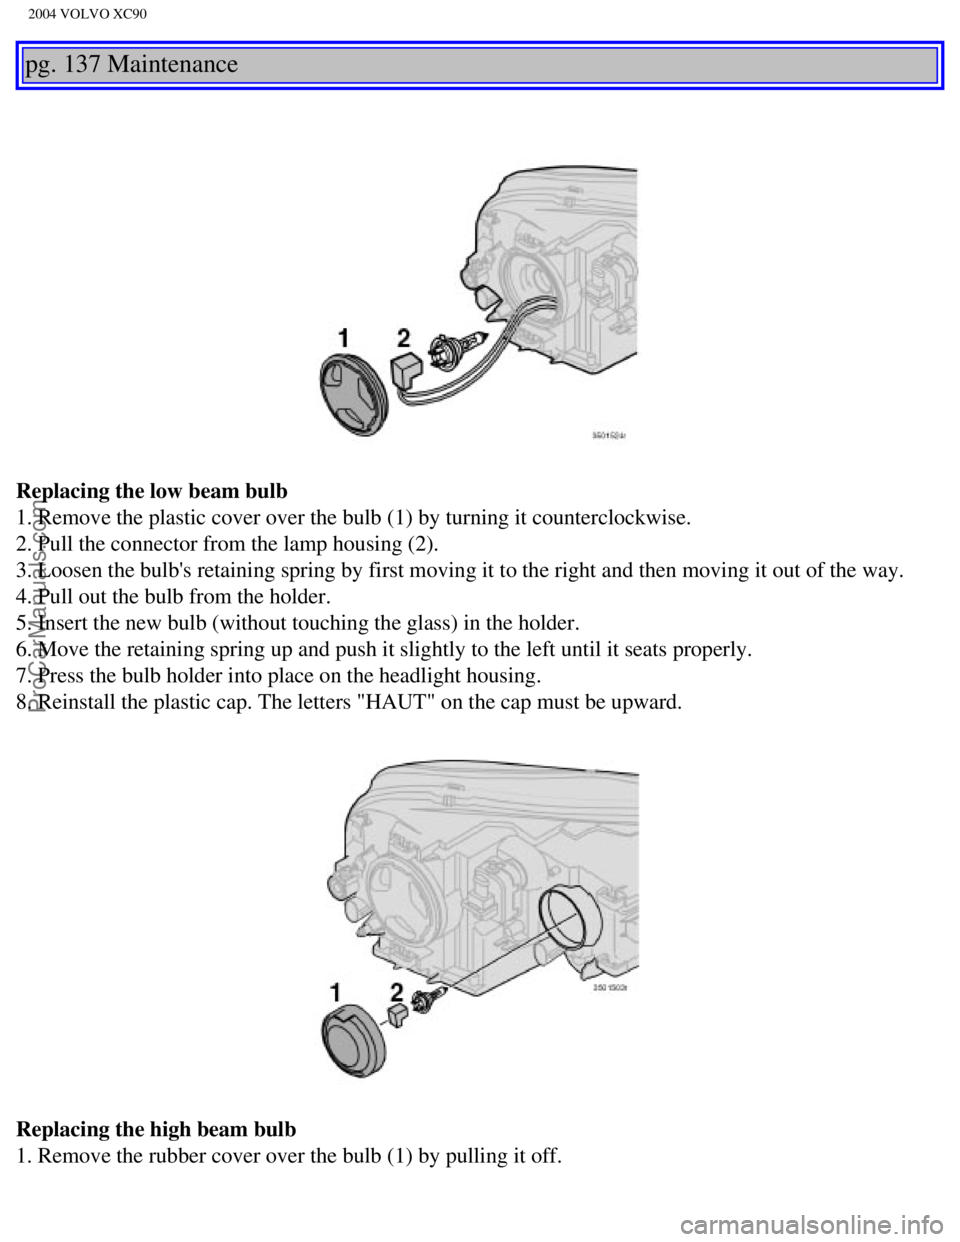
Replacing the low beam bulb
1. Remove the plastic cover over the bulb (1) by turning it counterclo\
ckwise.
2. Pull the connector from the lamp housing (2).
3. Loosen the bulb's retaining spring by first moving it to the right an\
d then moving it out of the way.
4. Pull out the bulb from the holder.
5. Insert the new bulb (without touching the glass) in the holder.
6. Move the retaining spring up and push it slightly to the left until i\
t seats properly.
7. Press the bulb holder into place on the headlight housing.
8. Reinstall the plastic cap. The letters "HAUT" on the cap must be upwa\
rd.
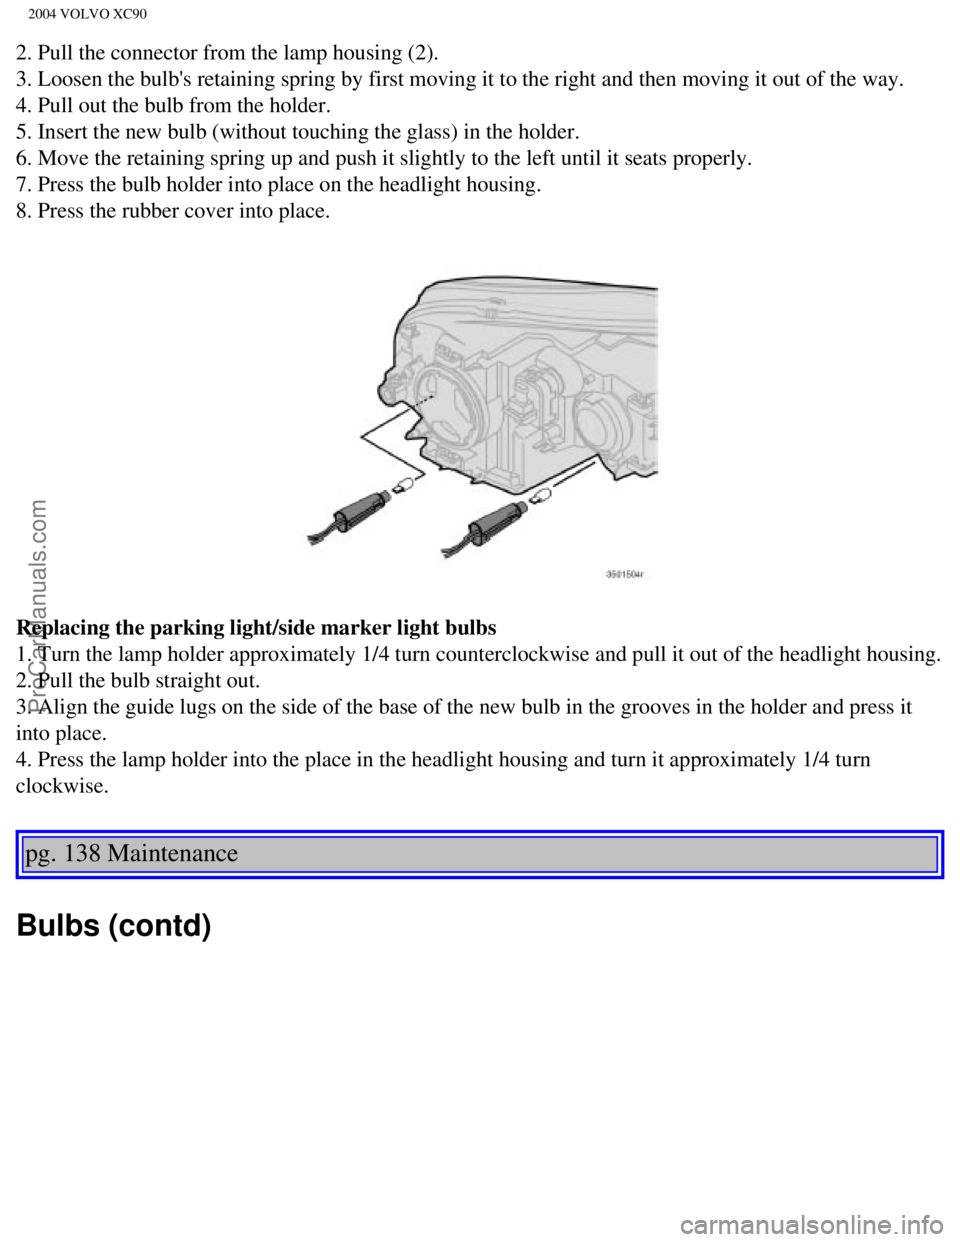
Replacing the high beam bulb
1. Remove the rubber cover over the bulb (1) by pulling it off.
file:///K|/ownersdocs/2004/2004_XC90/04xc90_09b.htm (8 of 23)12/30/200\
6 4:35:28 PM
Page 179 of 245
Downloaded from www.Manualslib.com manuals search engine ProCarManuals.com
2004 VOLVO XC90
2. Pull the connector from the lamp housing (2).
3. Loosen the bulb's retaining spring by first moving it to the right an\
d then moving it out of the way.
4. Pull out the bulb from the holder.
5. Insert the new bulb (without touching the glass) in the holder.
6. Move the retaining spring up and push it slightly to the left until i\
t seats properly.
7. Press the bulb holder into place on the headlight housing.
8. Press the rubber cover into place.
Replacing the parking light/side marker light bulbs
1. Turn the lamp holder approximately 1/4 turn counterclockwise and pull\
it out of the headlight housing.
2. Pull the bulb straight out.
3. Align the guide lugs on the side of the base of the new bulb in the g\
rooves in the holder and press it
into place.
4. Press the lamp holder into the place in the headlight housing and tur\
n it approximately 1/4 turn
clockwise.
pg. 138 Maintenance
Bulbs (contd)
file:///K|/ownersdocs/2004/2004_XC90/04xc90_09b.htm (9 of 23)12/30/200\
6 4:35:28 PM
Page 180 of 245
Downloaded from www.Manualslib.com manuals search engine ProCarManuals.com
2004 VOLVO XC90
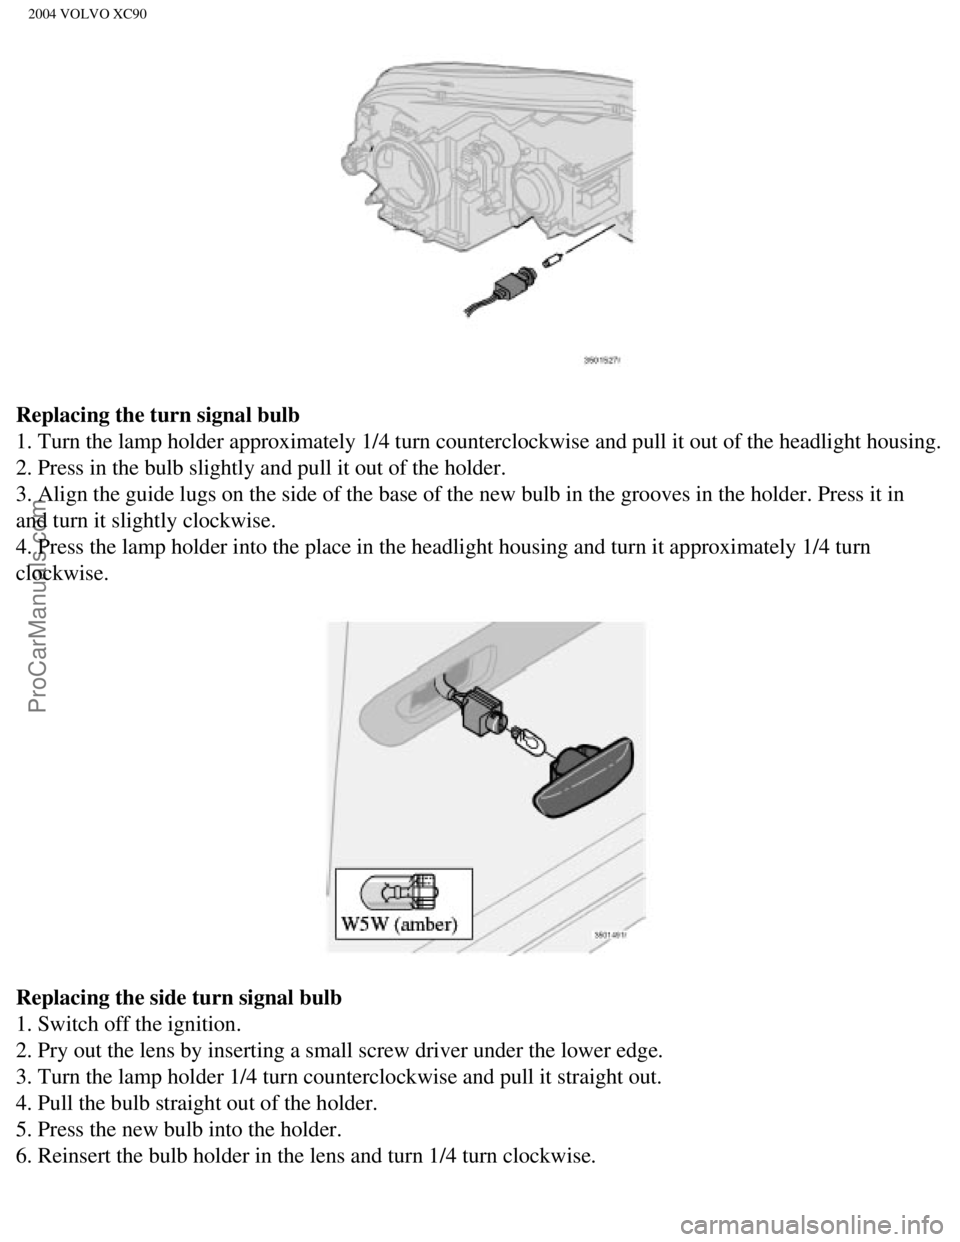
Replacing the turn signal bulb
1. Turn the lamp holder approximately 1/4 turn counterclockwise and pull\
it out of the headlight housing.
2. Press in the bulb slightly and pull it out of the holder.
3. Align the guide lugs on the side of the base of the new bulb in the g\
rooves in the holder. Press it in
and turn it slightly clockwise.
4. Press the lamp holder into the place in the headlight housing and tur\
n it approximately 1/4 turn
clockwise.
Replacing the side turn signal bulb
1. Switch off the ignition.
2. Pry out the lens by inserting a small screw driver under the lower ed\
ge.
3. Turn the lamp holder 1/4 turn counterclockwise and pull it straight o\
ut.
4. Pull the bulb straight out of the holder.
5. Press the new bulb into the holder.
6. Reinsert the bulb holder in the lens and turn 1/4 turn clockwise.
file:///K|/ownersdocs/2004/2004_XC90/04xc90_09b.htm (10 of 23)12/30/20\
06 4:35:28 PM
Page 181 of 245
Downloaded from www.Manualslib.com manuals search engine ProCarManuals.com
2004 VOLVO XC90
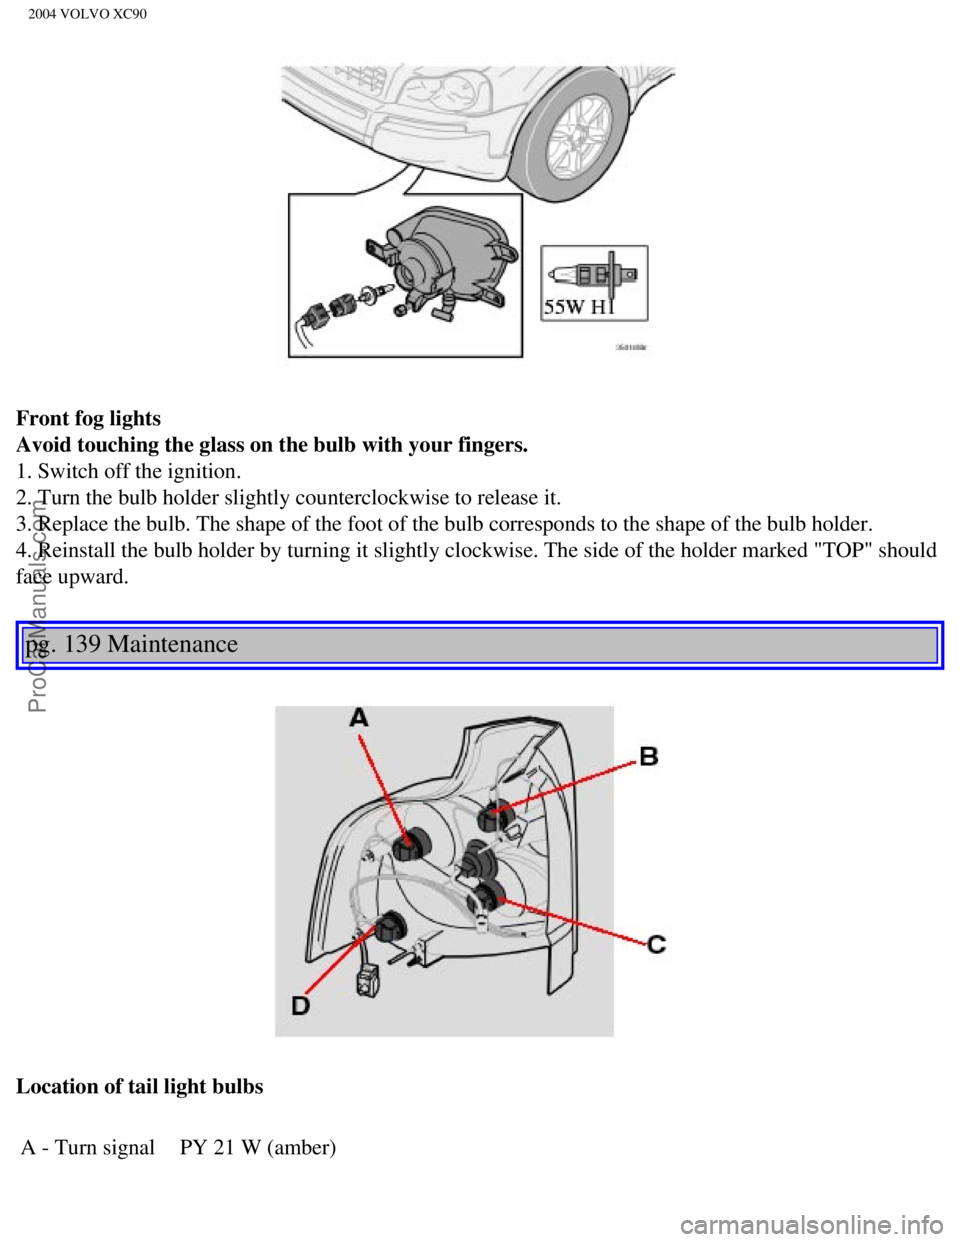
Front fog lights
Avoid touching the glass on the bulb with your fingers.
1. Switch off the ignition.
2. Turn the bulb holder slightly counterclockwise to release it.
3. Replace the bulb. The shape of the foot of the bulb corresponds to th\
e shape of the bulb holder.
4. Reinstall the bulb holder by turning it slightly clockwise. The side \
of the holder marked "TOP" should
face upward.
pg. 139 Maintenance
Location of tail light bulbs A - Turn signal PY 21 W (amber)
file:///K|/ownersdocs/2004/2004_XC90/04xc90_09b.htm (11 of 23)12/30/20\
06 4:35:28 PM