tow VOLVO XC90 2004 User Guide
[x] Cancel search | Manufacturer: VOLVO, Model Year: 2004, Model line: XC90, Model: VOLVO XC90 2004Pages: 245, PDF Size: 6.36 MB
Page 58 of 245
2004 VOLVO XC90
WARNING!
Always use the parking brake when parking. On hills, also turn the front\
wheels toward the curb.The
indicator light in the instrument panel will light up even if the parkin\
g brake is applied only slightly.
Be sure to press down on the pedal sufficiently.
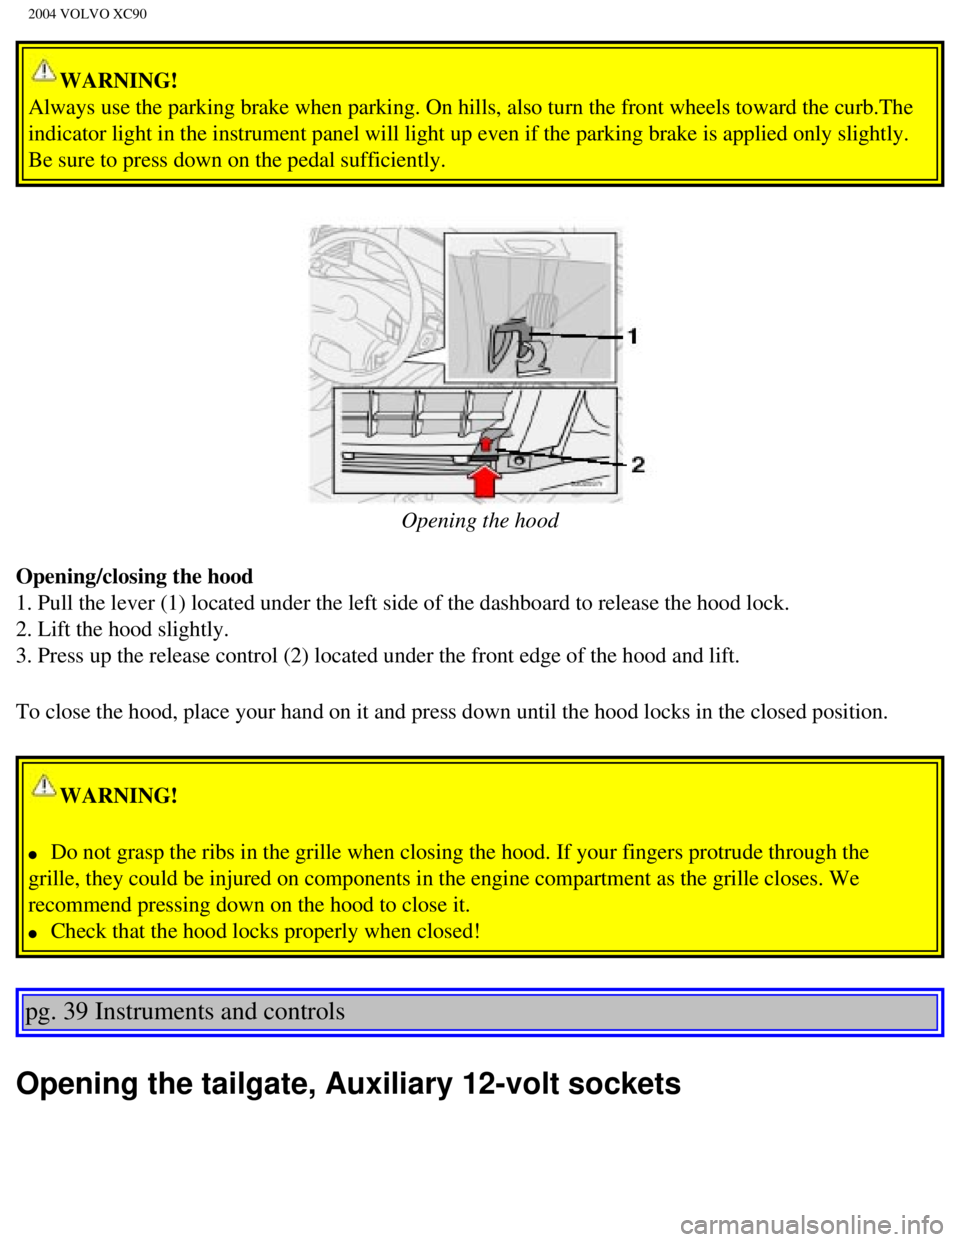
Opening the hood
Opening/closing the hood
1. Pull the lever (1) located under the left side of the dashboard to \
release the hood lock.
2. Lift the hood slightly.
3. Press up the release control (2) located under the front edge of th\
e hood and lift.
To close the hood, place your hand on it and press down until the hood l\
ocks in the closed position.
WARNING!
l Do not grasp the ribs in the grille when closing the hood. If your finge\
rs protrude through the
grille, they could be injured on components in the engine compartment as\
the grille closes. We
recommend pressing down on the hood to close it.
l Check that the hood locks properly when closed!
pg. 39 Instruments and controls
Opening the tailgate, Auxiliary 12-volt sockets
file:///K|/ownersdocs/2004/2004_XC90/04xc90_02b.htm (7 of 16)12/30/200\
6 4:35:15 PM
Page 70 of 245

2004 VOLVO XC90
Air vents in the dash
A Open
B Closed
C Horizontal air flow
D Vertical air flow
l Direct the outer air vents toward the side windows to defrost.
l In cold weather, close the air vents in the center of the dashboard to d\
irect as much air as possible toward the windows.
Air vents in the door pillars
A Open
B Closed
C Horizontal air flow
D Vertical air flow
l Direct the outer air vents toward the side windows to defrost.
pg. 48 Climate control
Electronic Climate Control (ECC)
file:///K|/ownersdocs/2004/2004_XC90/04xc90_03.htm (3 of 7)12/30/2006 \
4:35:16 PM
Page 96 of 245
2004 VOLVO XC90
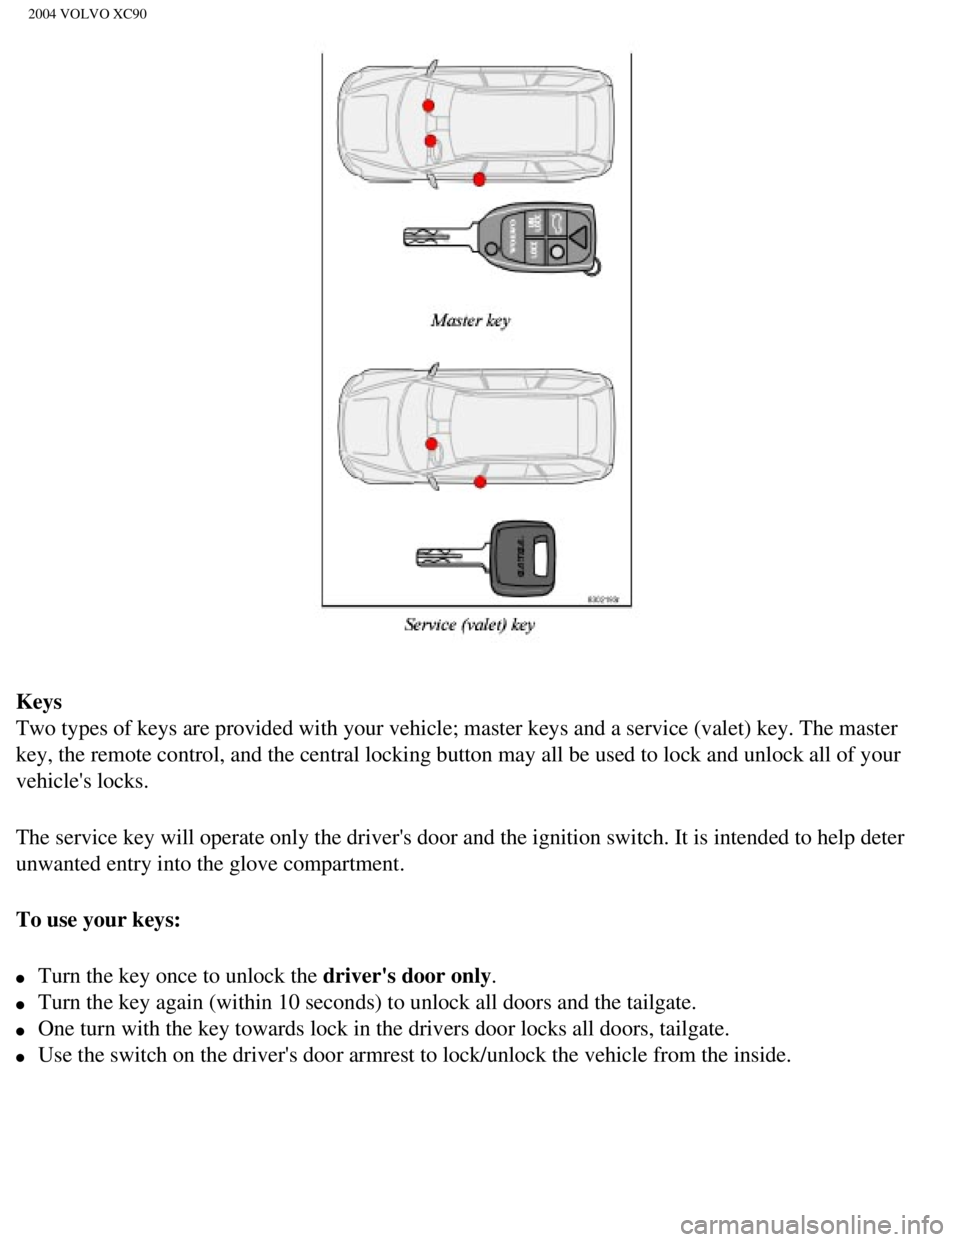
Keys
Two types of keys are provided with your vehicle; master keys and a serv\
ice (valet) key. The master
key, the remote control, and the central locking button may all be used \
to lock and unlock all of your
vehicle's locks.
The service key will operate only the driver's door and the ignition swi\
tch. It is intended to help deter
unwanted entry into the glove compartment.
To use your keys:
l Turn the key once to unlock the driver's door only.
l Turn the key again (within 10 seconds) to unlock all doors and the tai\
lgate.
l One turn with the key towards lock in the drivers door locks all doors, \
tailgate.
l Use the switch on the driver's door armrest to lock/unlock the vehicle f\
rom the inside.
file:///K|/ownersdocs/2004/2004_XC90/04xc90_05.htm (2 of 12)12/30/2006\
4:35:20 PM
Page 104 of 245

2004 VOLVO XC90
l A door is forced open.
l The ignition switch is tampered with.
l If there is movement in the passenger compartment (if the vehicle is eq\
uipped with the optional
movement sensor).
l The vehicle is lifted or towed (if the vehicle is equipped with the opt\
ional inclination sensor).
l The battery is disconnected (while the alarm is armed).
l The siren is disconnected when the alarm is disarmed.
Arming the alarm
Press the LOCK button on the remote control, lock the vehicle using the \
key in the driver's door or press
the central lock button on one of the front doors with the door open. On\
e long flash of the turn signals
will confirm that the alarm is armed.
Disarming the alarm
Press the UNLOCK button on the remote control or unlock the doors with t\
he key.
Turning off (stopping) the alarm
If the alarm is sounding, it can be stopped by pressing the UNLOCK butto\
n on the remote control or by
unlocking the driver's door with the key.
Audible/visual alarm signal
An audible alarm signal is given by a battery powered siren. The alarm c\
ycle lasts for 25 seconds.
The visual alarm signal is given by flashing all turn signals and turnin\
g on the interior lighting for
approximately 5 minutes.
"Panic" button
In an emergency situation, this feature can be used to attract attention\
.
Activate the "panic" button by pressing the red button on the remote con\
trol (see illustration on
page 73)
for at least 3 seconds or by pressing this button twice within 3 seconds\
. The turn signals will flash, the
interior lights will go on and the vehicle's horn will sound.
The function can be turned off by pressing any of the buttons on the rem\
ote control or will stop
automatically after 25 seconds. When a button is pressed, there is a 5 s\
econd delay before the panic
alarm is deactivated.
NOTE: This button will NOT unlock the vehicle.
pg. 79 Locks and Alarms
file:///K|/ownersdocs/2004/2004_XC90/04xc90_05.htm (10 of 12)12/30/200\
6 4:35:20 PM
Page 107 of 245
2004 VOLVO XC90
2 0 0 4
VOLVO XC90
Starting and driving
pg. 81 Starting and driving
Refueling82
Starting the vehicle85
General information87
Automatic transmission with Geartronic89
All Wheel Drive92
Brake system93
Dynamic Stability Traction Control (DSTC)95
Rear Parking Assistance97
Towing 98
Jump starting 100
Towing a trailer 101
Detachable trailer hitch - installing/
removing 103
Load carriers 104
Cold weather precautions 105
Before a long distance trip106
file:///K|/ownersdocs/2004/2004_XC90/04xc90_06a.htm (1 of 15)12/30/200\
6 4:35:22 PM
Page 119 of 245
2004 VOLVO XC90
l Models equipped with a 5-cylinder turbo engine have five forward speeds.\
Models equipped with a 6-
cylinder turbo engine have four forward speeds
l A "lock-up" feature on gears 3 and 4 (and 5, if equipped) reduces engi\
ne speed and help saves fuel.
The currently selected gear will be displayed in the instrument panel (\
see
page 24).
l To access the (MAN)ual shifting position from (D)rive, move the gear selector to the left to MAN.
l To return to the (D)rive position from MAN, move the gear selector to the right.
While driving
If you select the (MAN)ual position while driving, the gear that was being used in the (D)rive position
will also initially be selected in (MAN)ual position.
l Move the gear selector forward (toward "+") to shift to a higher gear \
or rearward (toward "-") to shift
to a lower gear.
l If you hold the gear selector toward "-", the transmission will downshif\
t one gear and will utilize the
braking power of the engine. If the current speed is too high for using \
a lower gear, the downshift will
not occur until the speed has decreased enough to allow the lower gear t\
o be used.
l If you slow down to a very low speed, the transmission will automaticall\
y shift down.
l When starting in the (MAN)ual position, 3rd gear is the highest gear that may be selected.
Kickdown
Automatic shift to a lower gear (kickdown) is achieved by depressing t\
he accelerator pedal fully and
briskly. An upshift will occur when approaching the top speed for a part\
icular gear or by releasing the
accelerator pedal slightly. Kickdown can be used for maximum acceleratio\
n or when passing at highway
speeds.
NOTE: The gear selector must be in the D (Drive) position for kickdown to fu\
nction.
Automatic transmission - adaptive system
The automatic transmission is controlled by an adaptive control system t\
hat constantly monitors the way
in which the transmission functions. It senses and adapts each gear shif\
t for optimal performance. The
system also monitors your particular driving style and adapts gear shift\
ing accordingly.
pg. 91 Starting and driving
file:///K|/ownersdocs/2004/2004_XC90/04xc90_06a.htm (13 of 15)12/30/20\
06 4:35:22 PM
Page 122 of 245
2004 VOLVO XC90
pg. 93 Starting and driving
Brake system
BRAKE Brake circuit malfunction
The brake system is a hydraulic system consisting of two master cylinder\
s and two separate brake
circuits. If a problem should occur in one of these circuits, it is stil\
l possible to stop the vehicle with the
other brake circuit.
If the brake pedal must be depressed farther than normal and requires gr\
eater foot pressure, the stopping
distance will be longer.
A warning light in the instrument panel will light up to warn the driver\
that a fault has occurred.
If this light comes on while driving or braking, stop immediately and ch\
eck the brake fluid level in the
reservoir.
NOTE: Press the brake pedal hard and maintain pressure on the pedal - do not p\
ump the brakes.
WARNING!
If the fluid level is below the MIN mark in the reservoir or if a "Brake\
failure - Service urgent"
message is displayed in the text window: DO NOT DRIVE. Have the vehicle \
towed to a Volvo
retailer and have the brake system inspected.
NOTE: When the vehicle is at a standstill and the engine is idling, e.g. at a \
traffic light and the brake
pedal is depressed, the pedal may go down slightly. This is a normal fun\
ction of the power-assisted
brake system.
Power brakes function only when the engine is running
The power brakes utilize vacuum pressure which is only created when the \
engine is running. Never let
the vehicle roll to a stop with the engine switched off.
If the power brakes are not working, the brake pedal must be pressed app\
roximately four times harder
than usual to make up for the lack of power assistance. This can happen \
for example when towing your
vehicle or if the engine is switched off when the vehicle is rolling. Th\
e brake pedal feels harder than
usual.
Water on brake discs and brake pads affects braking
file:///K|/ownersdocs/2004/2004_XC90/04xc90_06b.htm (1 of 17)12/30/200\
6 4:35:23 PM
Page 123 of 245
2004 VOLVO XC90
Driving in rain and slush or passing through an automatic car wash can c\
ause water to collect on the
brake discs and pads. This will cause a delay in braking effect when the\
pedal is depressed. To avoid
such a delay when the brakes are needed, depress the pedal occasionally \
when driving through rain,
slush, etc. This will remove the water from the brakes. Check that brake\
application feels normal. This
should also be done after washing or starting in very damp or cold weath\
er.
Severe strain on the brake system
The brakes will be subject to severe strain when driving in mountains or\
hilly areas, or when towing a
trailer. Vehicle speed is usually slower, which means that the cooling o\
f the brakes is less efficient than
when driving on level roads. To reduce the strain on the brakes, shift i\
nto a lower gear and let the engine
help with the braking. Do not forget that if you are towing a trailer, t\
he brakes will be subjected to a
greater than normal load.
pg. 94 Starting and driving
Brake system (contd)
Anti-lock brakes (ABS)
If the warning lamp lights up there is a malfunction of the ABS system (\
the standard braking system will
however function) and the vehicle should be driven cautiously to a Volv\
o retailer for inspection. The
Anti-lock Braking System (ABS) helps to improve vehicle control (stop\
ping and steering) during severe
braking conditions by limiting brake lockup. When the system "senses" im\
pending lockup, braking
pressure is automatically modulated in order to help prevent lockup, whi\
ch could lead to a skid.
This system performs a self-diagnostic test when the engine is started a\
nd when the vehicle first
reaches a speed of approximately 12 mph (20 km/h). The brake pedal will pulsate several times and a
sound may be audible from the ABS control module. This is normal.
To obtain optimal effect from the ABS system, constant pressure should b\
e kept on the brake pedal,
keep constant pressure on the brake pedal. Do not pump the brake pedal.
The switching of the ABS modulator will be audible and the brake pedal w\
ill pulsate during braking.
Please be aware that ABS does not increase the absolute braking potentia\
l of the vehicle. While control
will be enhanced, ABS will not shorten stopping distances on slippery su\
rfaces.
ABS with EBD (Electronic Brake Force Distribution)
EBD is an integrated part of the ABS system. EBD regulates the hydraulic\
pressure to the rear brakes to
help provide optimal braking capacity. The brake pedal will pulsate duri\
ng braking, which is normal.
file:///K|/ownersdocs/2004/2004_XC90/04xc90_06b.htm (2 of 17)12/30/200\
6 4:35:23 PM
Page 124 of 245
2004 VOLVO XC90
If the BRAKE and ABS warning lights come on at the same time, this could\
indicate a fault in the brake
system.
l Stop the vehicle in a suitable place and switch off the engine.
l Restart the engine.
l If both warning lights go off, no further action is required.
l If both lights are still on after the engine has been restarted, switch \
off the engine again and check the
brake fluid level (see
page 126 for the location of the brake fluid reservoir).
l If the brake fluid level is above the MIN mark, drive carefully to an au\
thorized Volvo retailer and
have the brake system inspected.
WARNING!
If the fluid level is below the MIN mark in the reservoir or if a "Brake\
failure - Service urgent"
message is displayed in the text window: DO NOT DRIVE. Have the vehicle \
towed to a Volvo
retailer and have the brake system inspected.
pg. 95 Starting and driving
Dynamic Stability Traction Control (DSTC)
The DSTC system on the Volvo XC90 consists of a number of functions:
1. Traction control (TC)
This function is designed to help reduce wheel spin by transferring powe\
r from a drive wheel that begins
to lose traction to the wheel on the opposite side of the vehicle (on t\
he same axle). TC monitors and
compares the rotational speed of the drive wheels. If one of the drive w\
heels shows a tendency to spin,
the difference in speed is immediately detected. This triggers the Anti-\
lock Brake System, which brakes
the spinning wheel until the difference in rotational speed is corrected\
.
TC is most active at low speeds, and a pulsating sound will be audible w\
hen the system is regulating
wheel spin. This is quite normal.
This is one of the DSTC system's permanent functions and is not affected\
when the DSTC button on the
center control panel is pressed.
2. Spin control (SC)
The spin control function is designed to help prevent the drive wheels f\
rom spinning while the vehicle is
accelerating. This is done by temporarily reducing engine torque to the \
drive wheels, which helps
file:///K|/ownersdocs/2004/2004_XC90/04xc90_06b.htm (3 of 17)12/30/200\
6 4:35:23 PM
Page 127 of 245
2004 VOLVO XC90
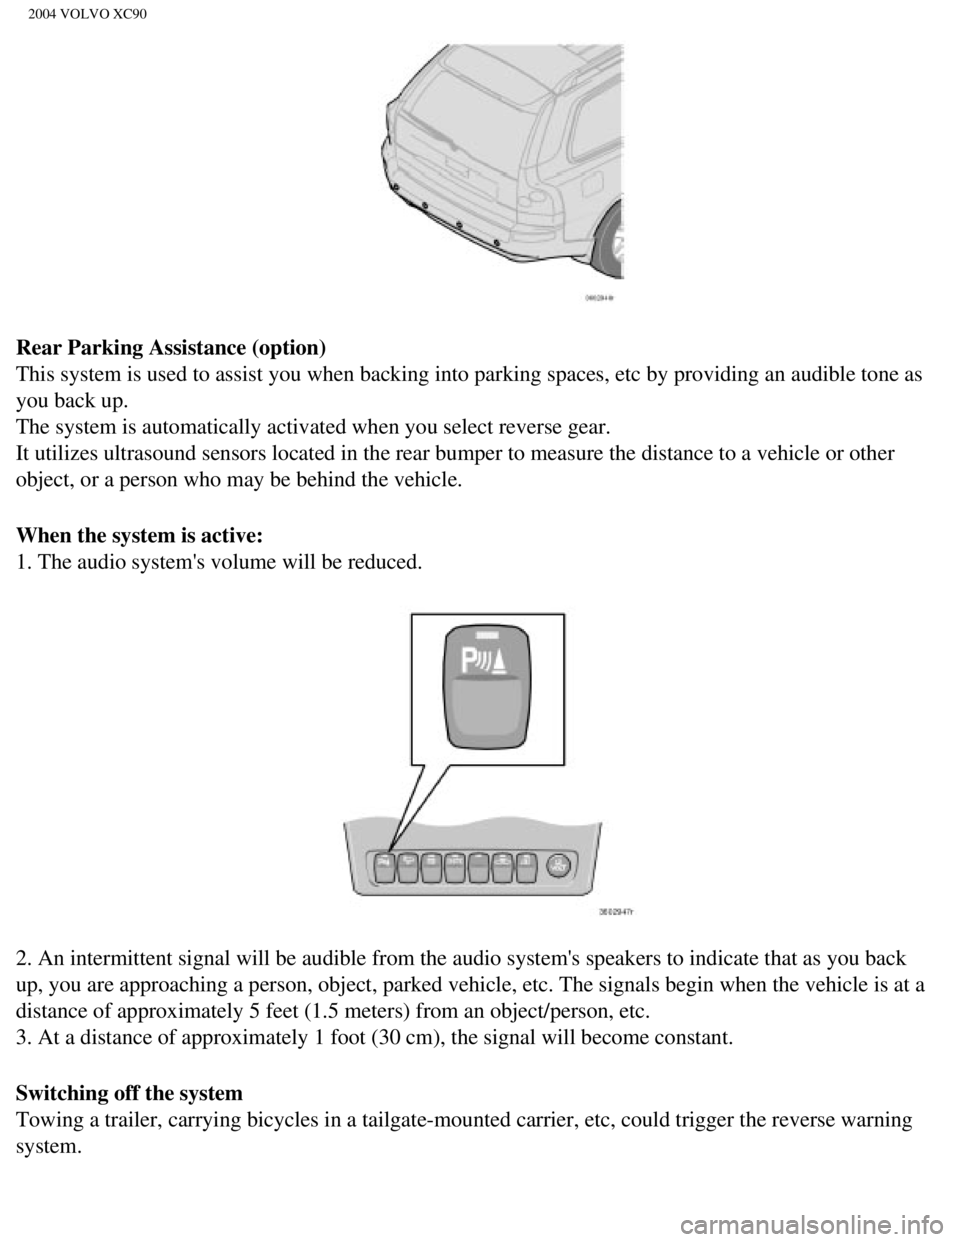
Rear Parking Assistance (option)
This system is used to assist you when backing into parking spaces, etc \
by providing an audible tone as
you back up.
The system is automatically activated when you select reverse gear.
It utilizes ultrasound sensors located in the rear bumper to measure the\
distance to a vehicle or other
object, or a person who may be behind the vehicle.
When the system is active:
1. The audio system's volume will be reduced.
2. An intermittent signal will be audible from the audio system's speake\
rs to indicate that as you back
up, you are approaching a person, object, parked vehicle, etc. The signa\
ls begin when the vehicle is at a
distance of approximately 5 feet (1.5 meters) from an object/person, e\
tc.
3. At a distance of approximately 1 foot (30 cm), the signal will beco\
me constant.
Switching off the system
Towing a trailer, carrying bicycles in a tailgate-mounted carrier, etc, \
could trigger the reverse warning
system.
file:///K|/ownersdocs/2004/2004_XC90/04xc90_06b.htm (6 of 17)12/30/200\
6 4:35:23 PM