engine VOLVO XC90 2004 Manual PDF
[x] Cancel search | Manufacturer: VOLVO, Model Year: 2004, Model line: XC90, Model: VOLVO XC90 2004Pages: 245, PDF Size: 6.36 MB
Page 203 of 245
2004 VOLVO XC90
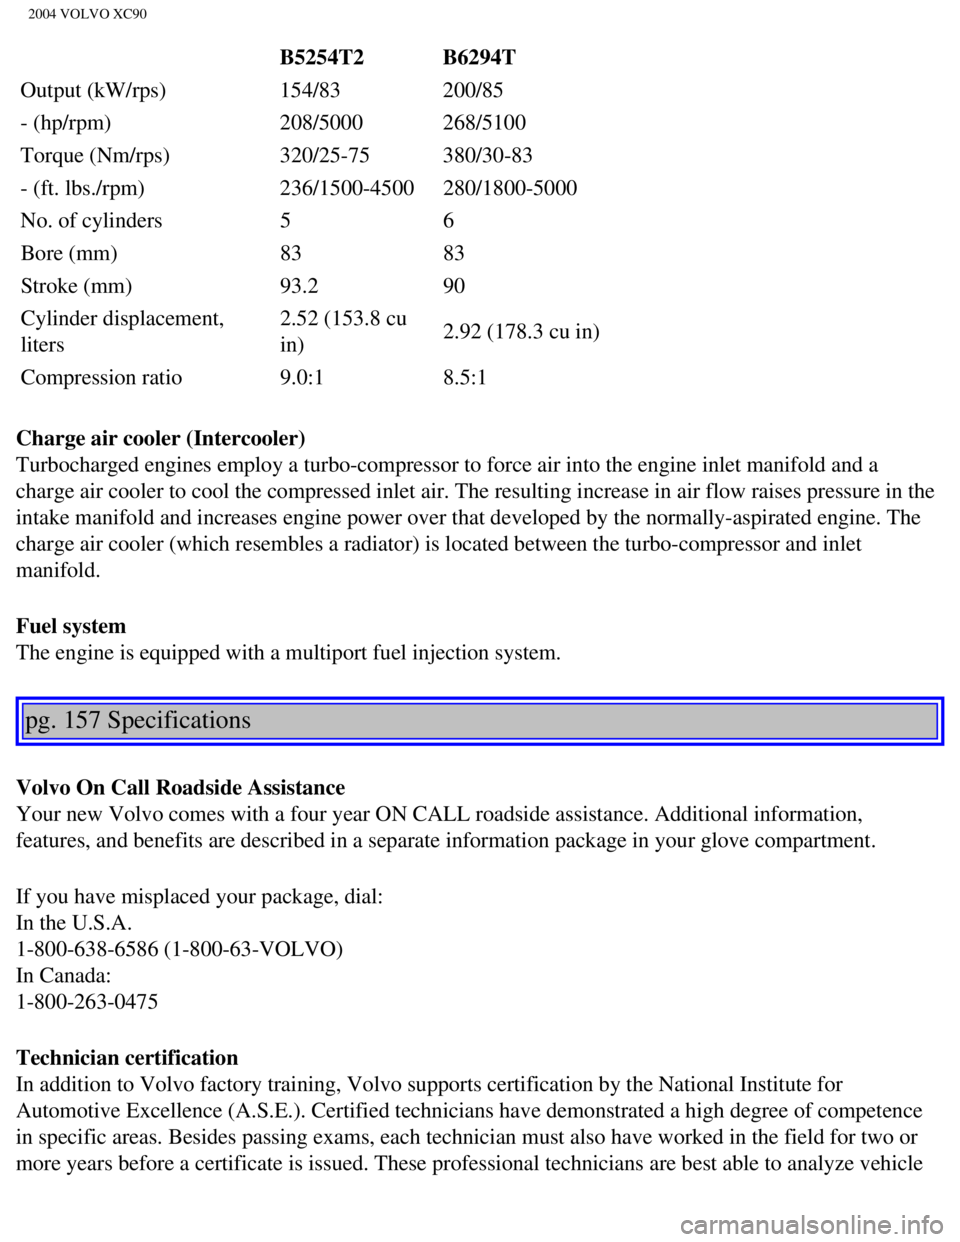
B5254T2 B6294T
Output (kW/rps) 154/83 200/85
- (hp/rpm) 208/5000 268/5100
Torque (Nm/rps) 320/25-75 380/30-83
- (ft. lbs./rpm) 236/1500-4500 280/1800-5000
No. of cylinders 5 6
Bore (mm) 83 83
Stroke (mm) 93.2 90
Cylinder displacement,
liters 2.52 (153.8 cu
in)
2.92 (178.3 cu in)
Compression ratio 9.0:1 8.5:1
Charge air cooler (Intercooler)
Turbocharged engines employ a turbo-compressor to force air into the eng\
ine inlet manifold and a
charge air cooler to cool the compressed inlet air. The resulting increa\
se in air flow raises pressure in the
intake manifold and increases engine power over that developed by the no\
rmally-aspirated engine. The
charge air cooler (which resembles a radiator) is located between the \
turbo-compressor and inlet
manifold.
Fuel system
The engine is equipped with a multiport fuel injection system.
pg. 157 Specifications
Volvo On Call Roadside Assistance
Your new Volvo comes with a four year ON CALL roadside assistance. Addit\
ional information,
features, and benefits are described in a separate information package i\
n your glove compartment.
If you have misplaced your package, dial:
In the U.S.A.
1-800-638-6586 (1-800-63-VOLVO)
In Canada:
1-800-263-0475
Technician certification
In addition to Volvo factory training, Volvo supports certification by t\
he National Institute for
Automotive Excellence (A.S.E.). Certified technicians have demonstrate\
d a high degree of competence
in specific areas. Besides passing exams, each technician must also have\
worked in the field for two or
more years before a certificate is issued. These professional technician\
s are best able to analyze vehicle
file:///K|/ownersdocs/2004/2004_XC90/04xc90_10.htm (10 of 11)12/30/200\
6 4:35:29 PM
Page 231 of 245
2004 VOLVO XC90
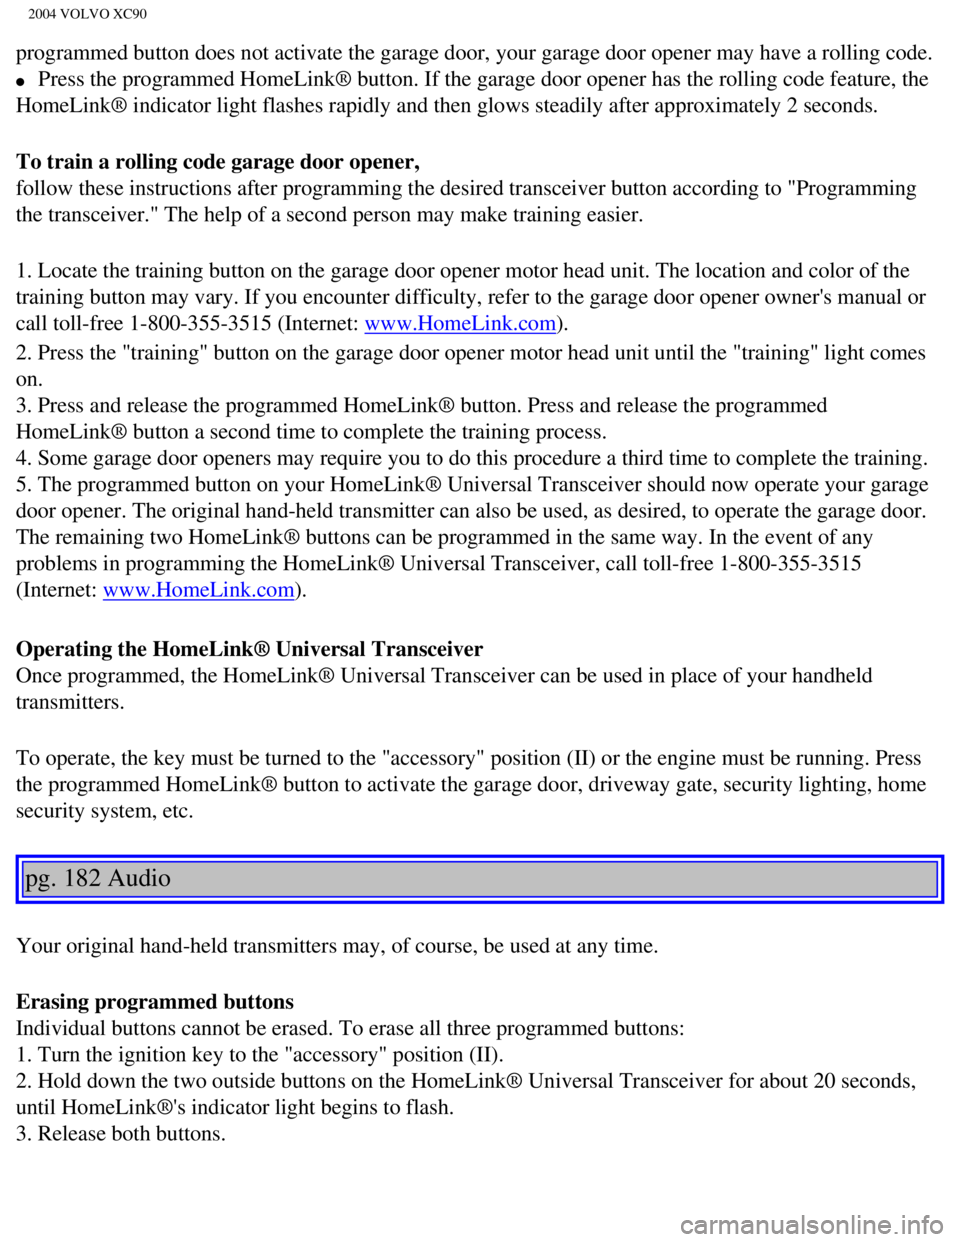
programmed button does not activate the garage door, your garage door op\
ener may have a rolling code.
l Press the programmed HomeLink® button. If the garage door opener has \
the rolling code feature, the
HomeLink® indicator light flashes rapidly and then glows steadily aft\
er approximately 2 seconds.
To train a rolling code garage door opener,
follow these instructions after programming the desired transceiver butt\
on according to "Programming
the transceiver." The help of a second person may make training easier.
1. Locate the training button on the garage door opener motor head unit.\
The location and color of the
training button may vary. If you encounter difficulty, refer to the gara\
ge door opener owner's manual or
call toll-free 1-800-355-3515 (Internet:
www.HomeLink.com).
2. Press the "training" button on the garage door opener motor head unit\
until the "training" light comes
on.
3. Press and release the programmed HomeLink® button. Press and relea\
se the programmed
HomeLink® button a second time to complete the training process.
4. Some garage door openers may require you to do this procedure a third\
time to complete the training.
5. The programmed button on your HomeLink® Universal Transceiver shou\
ld now operate your garage
door opener. The original hand-held transmitter can also be used, as des\
ired, to operate the garage door.
The remaining two HomeLink® buttons can be programmed in the same way\
. In the event of any
problems in programming the HomeLink® Universal Transceiver, call tol\
l-free 1-800-355-3515
(Internet:
www.HomeLink.com).
Operating the HomeLink® Universal Transceiver
Once programmed, the HomeLink® Universal Transceiver can be used in p\
lace of your handheld
transmitters.
To operate, the key must be turned to the "accessory" position (II) or\
the engine must be running. Press
the programmed HomeLink® button to activate the garage door, driveway\
gate, security lighting, home
security system, etc.
pg. 182 Audio
Your original hand-held transmitters may, of course, be used at any time\
.
Erasing programmed buttons
Individual buttons cannot be erased. To erase all three programmed butto\
ns:
1. Turn the ignition key to the "accessory" position (II).
2. Hold down the two outside buttons on the HomeLink® Universal Trans\
ceiver for about 20 seconds,
until HomeLink®'s indicator light begins to flash.
3. Release both buttons.
file:///K|/ownersdocs/2004/2004_XC90/04xc90_11b.htm (10 of 11)12/30/20\
06 4:35:32 PM
Page 234 of 245
2004 VOLVO XC90
Automatic climate control, ECC 48
Automatic gearbox
89
Auxiliary 12-volt socket
39
Auxiliary lamps
29
Average speed
36
AWD
94
B
Bass
165
Battery
126, 133, 155
Battery - replacing
135
Battery drain - avoiding
90
Battery maintenance
134
Belt check
127
Blower (fan)
49
Booster cushion
17
Brake circuit
95
Brake system
26, 95
Bulbs
137, 156
C
Capacities
152
Carbon Monoxide - Important Warning
85
Catalytic converter
154
CD changer
177
Ceiling lighting
143
Center console - storage compartments
64
Central locking system - remote control
75
Changing coolant
127
Changing oil and oil filter
129
Check Engine warning light
27
Child safety
17
Child safety locks
79
Child seat (Isofix fasteners)
18
file:///K|/ownersdocs/2004/2004_XC90/04xc90_12.htm (2 of 13)12/30/2006\
4:35:33 PM
Page 235 of 245
2004 VOLVO XC90
Climate control systems - general information 46
Clock
24
Coat hanger
66
Coin compartment
64
Cold weather precautions
105
Coolant
131
Coolant - changing
127, 131
Coolant - checking level of
127
Cooling system
153
Courtesy light
61
Cruise control
37
Cup holder
64, 65
Cup holder in rear seat
64
Current fuel consumption
36
D
Defroster
49
Dimension designation (tires)
110
Direction indicators
33
Dolby Pro Logic II (DPL II)
165
Door mirror defroster
35
Driving economically
89
DSTC
29, 97
Dual-threshold air bags
5
E
ECC
48
Economical driving
89
Electric socket
29
Electrical current - conserving
90
Electrical system
155
Engine
128
Engine - starting
87
Engine compartment
128
file:///K|/ownersdocs/2004/2004_XC90/04xc90_12.htm (3 of 13)12/30/2006\
4:35:33 PM
Page 236 of 245
2004 VOLVO XC90
Engine oil 129
Engine oil, capacity
152
Engine specifications
157
Engne oil - checking
130
Environment
iii
F
Fader
165
Federal Clean Air Act
124
FIX NEXT SERVICE
28
Floor mats
62
Fog lamp
27
Folding sideview mirrors
42
Front seat - backrest
55
Front seats
54
Front seats - heated
35
Front seats - manual adjustment
54
Front seats - power
56
Front suspension
153
Fuel
ii, 84
Fuel filler cap
ii, 86
Fuel filler door
ii, 86
Fuel filler door - unlocking
31
Fuel filler door - unlocking manually
32
Fuel Formulations
85
Fuel gauge
24
Fuel tank, capacity
152
Fuses
145
G
Gasoline
84
Geartronic
91
Geartronic - kickdown
92
Geartronic - manual shifting
92
file:///K|/ownersdocs/2004/2004_XC90/04xc90_12.htm (4 of 13)12/30/2006\
4:35:33 PM
Page 240 of 245
2004 VOLVO XC90
Seat belt reminder 42
Seat belts (keeping child seats in place)
20
SEL button
162
Service
124
Service key
74
Service reminder
27
SERVICE REQUIRED
28
SERVICE URGENT
28
Shiftlock
ii, 87
Side airbags
10
Sideview mirrors
42
SIPS airbags
10
Snow chains
111
Snow tires
111
Spare tire - accessing
115
Spare tires
112
Spark plugs
155
Specifications
149
Speedometer
24
Spoiler lamps
31
SRS
4
Start inhibitor (immobilizer)
74
Starting the car
87
Steering
88
Steering wheel adjustment
30
Steering wheel lock
88
Stone chips
120
STOP
28
STOP ENGINE
28
Storage compartments
64
Studded tires
111
Supplemental Restraint System (SRS)
4
file:///K|/ownersdocs/2004/2004_XC90/04xc90_12.htm (8 of 13)12/30/2006\
4:35:33 PM
Page 244 of 245
2004 VOLVO XC90
2. Power steering - When cold, the level must not be above the COLD mark\
and when hot it must not be
above the HOT mark. Top up if the level drops to the ADD mark with ATF f\
luid. See
page 130.
3. Coolant level should be between the expansion tank marks. Mixture: 50\
% antifreeze and 50% water.
See
page 125.
4. Engine oil should be checked each time the vehicle is refueled. The o\
il level should be between the
dipstick marks. The distance between the marks represents approx. 1.6 US\
qt. (1.5 liter). See
page 128.
5. Brake fluid - check, without removing the cap, that the level is abov\
e the MIN mark. Use brake fluid
DOT 4+. See
page 130.
Fuel octane rating, see
page 82.
Tire pressure, see
page 110, and the label located on the inside of the fuel tank cover.
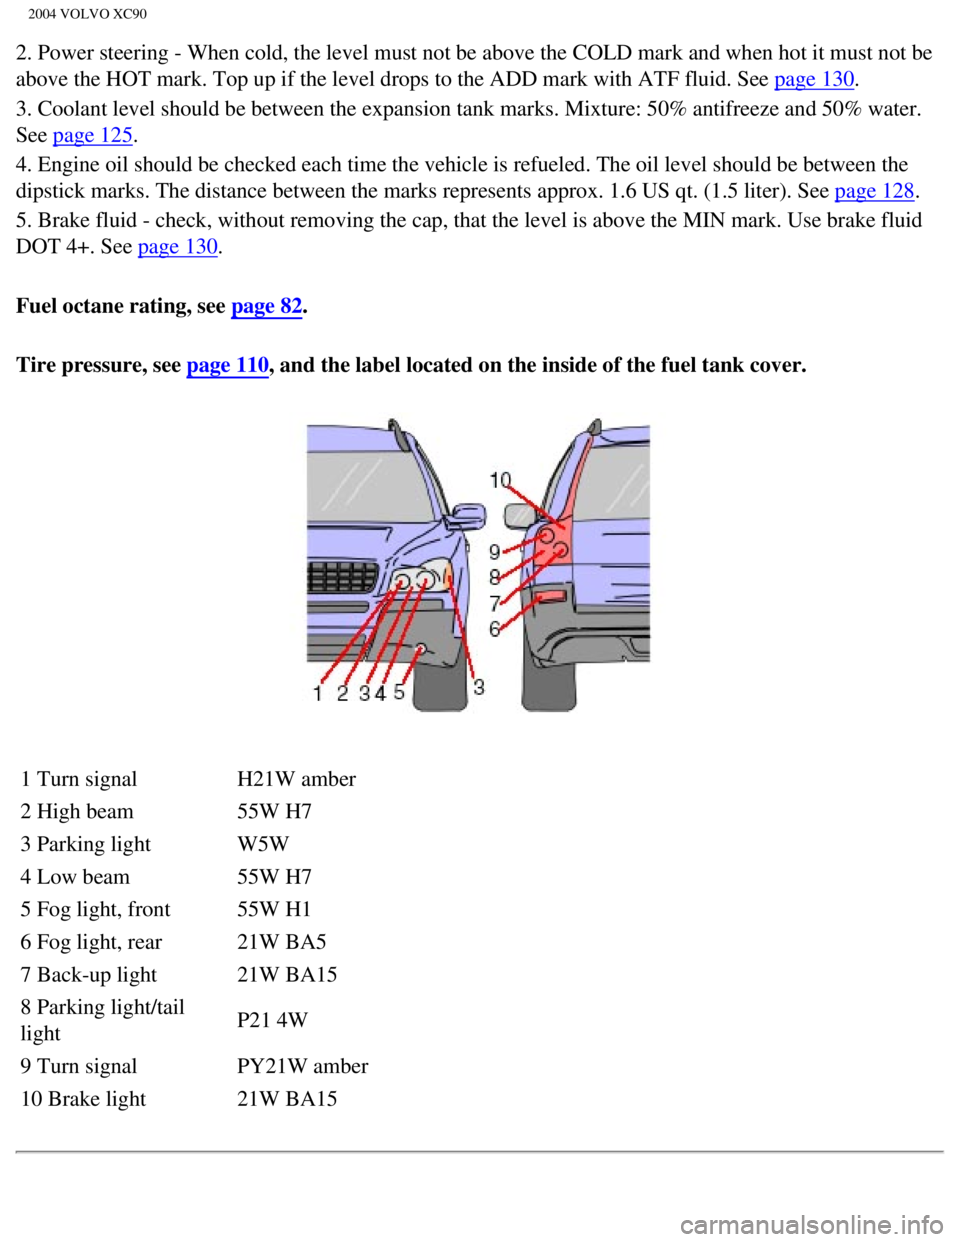
1 Turn signal H21W amber
2 High beam 55W H7
3 Parking light W5W
4 Low beam 55W H7
5 Fog light, front 55W H1
6 Fog light, rear 21W BA5
7 Back-up light 21W BA15
8 Parking light/tail
light P21 4W
9 Turn signal PY21W amber
10 Brake light 21W BA15
file:///K|/ownersdocs/2004/2004_XC90/04xc90_12.htm (12 of 13)12/30/200\
6 4:35:33 PM