color VOLVO XC90 2005 Owners Manual
[x] Cancel search | Manufacturer: VOLVO, Model Year: 2005, Model line: XC90, Model: VOLVO XC90 2005Pages: 263, PDF Size: 6.99 MB
Page 117 of 263

2005 VOLVO XC90
Gasoline containing alcohol and ethers
"Oxygenated fuels"
Some fuel suppliers sell gasoline containing "oxygenates" which are usua\
lly alcohols or ethers. In some
areas, state or local laws require that the service pump be marked indic\
ating use of alcohols or ethers.
However, there are areas in which the pumps are unmarked. If you are not\
sure whether there is alcohol
or ethers in the gasoline you buy, check with the service station operat\
or. To meet seasonal air quality
standards, some areas require the use of "oxygenated" fuel.
Volvo allows the use of the following "oxygenated" fuels; however, the o\
ctane ratings listed on this page
must still be met.
Alcohol - Ethanol: Fuels containing up to 10% ethanol by volume may be u\
sed. Ethanol may also be
referred to as Ethyl alcohol, or "Gasohol".
Ethers - MTBE: Fuels containing up to 15% MTBE may be used.
pg. 87 Starting and driving
Carbon Monoxide - Important Warning
Carbon monoxide is a poisonous, colorless, and odorless gas. It is prese\
nt in all exhaust gases. If you
ever smell exhaust fumes inside the vehicle, make sure the passenger com\
partment is ventilated, and
immediately return the vehicle to your retailer for correction.
Fuel Formulations
Do not use gasoline that contains lead as a knock inhibitor, and do not \
use lead additives. Besides
damaging the exhaust emission control systems on your vehicle, lead has \
been strongly linked to certain
forms of cancer.
Many fuels contain benzene as a solvent. Unburned benzene has been stron\
gly linked to certain forms of
cancer. If you live in an area where you must fill your own gas tank, ta\
ke precautions. These may
include:
l standing upwind away from the filler nozzle while refueling
l refueling only at gas stations with vapor recovery systems that fully se\
al the mouth of the filler neck
during refueling
l wearing neoprene gloves while handling a fuel filler nozzle.
Use of Additives
With the exception of gas line antifreeze during winter months, do not a\
dd solvents, thickeners, or other
store-bought additives to your vehicle's fuel, cooling, or lubricating s\
ystems. Overuse may damage your
file:///K|/ownersdocs/2005/2005_XC90/05xc90_06a.htm (3 of 16)12/30/200\
6 4:42:33 PM
Page 152 of 263

2005 VOLVO XC90
AlcanteraTM suede-like material
Suede-like upholstery can be cleaned with a soft cloth and mild soap sol\
ution.
Leather care
Volvo's leather upholstery is manufactured with a protectant to repel so\
iling. Over time, sunlight, grease
and dirt can break down the protection. Staining, cracking, scuffing, an\
d fading can result.
Volvo offers an easy-to-use, non-greasy leather care kit formulated to c\
lean and beautify your vehicle's
leather, and to renew the protective qualities of its finish. The cleane\
r removes dirt and oil buildup. The
light cream protectant restores a barrier against soil and sunlight.
Volvo also offers a special leather softener that should be applied afte\
r the cleaner and protectant. It
leaves leather soft and smooth, and reduces friction between leather and\
other finishes in the vehicle.
Volvo recommends cleaning, protecting and conditioning your vehicle's le\
ather two to four times a year.
Ask your Volvo retailer about Leather Care Kit 951 0251 and Leather Soft\
ener 943 7429.
CAUTION:
- Under no circumstances should gasoline, naphtha or similar cleaning ag\
ents be used on the plastic or
the leather since these can cause damage.
- Take extra care when removing stains such as ink or lipstick since the\
coloring can spread.
- Use solvents sparingly. Too much solvent can damage the seat padding. \
- Start from the outside of the stain and work toward the center.
- Sharp objects (e.g. pencils or pens in a pocket) or velcro fasteners\
on clothing may damage the textile
upholstery.
Cleaning the seat belts
Clean only with lukewarm water and a mild soap solution.
Cleaning floor mats
The floor mats should be vacuumed or brushed clean regularly, especially\
during winter when they
should be taken out for drying. Spots on textile mats can be removed wit\
h a mild detergent.
pg. 133 Vehicle care
Paint touch up
file:///K|/ownersdocs/2005/2005_XC90/05xc90_07.htm (4 of 6)12/30/2006 \
4:42:36 PM
Page 153 of 263

2005 VOLVO XC90
Paint damage requires immediate attention to avoid rusting. Make it a ha\
bit to check the finish regularly
- when washing the vehicle for instance. Touch-up if necessary.
Paint repairs require special equipment and skill. Contact your Volvo re\
tailer for any extensive damage.
Minor scratches can be repaired by using Volvo touch-up paint.
NOTE: When ordering touch-up paint from your Volvo retailer, use the paint cod\
e indicated on the
model plate. The plate is located in the engine compartment.
Color code
Make sure you have the right color. The color code number is on the data\
plate in the engine
compartment.
Minor stone chips and scratches
Material:
l Primer - can
l Paint - touch-up pen
l Brush
l Masking tape
l If the stone chip has not gone down to the bare metal and an undamaged c\
olor coat remains, you can
add paint immediately after removing dirt.
NOTE: When touching up the vehicle, it should be clean and dry. The surface te\
mperature should be
above 60° F (15° C).
Minor scratches on the surface
If the stone chip has not penetrated down to the metal and an undamaged \
layer of paint remains, the
touch-up paint can be applied as soon as the spot has been cleaned.
Deep scratches
1. Place a strip of masking tape over the damaged surface. Pull the tape\
off so that any loose flakes of
paint adhere to it.
file:///K|/ownersdocs/2005/2005_XC90/05xc90_07.htm (5 of 6)12/30/2006 \
4:42:36 PM
Page 202 of 263

2005 VOLVO XC90
Replacing fuses
If an electrical component fails to function, it is possible that a fuse\
has blown.
The fuse boxes are located in four different places:
1. Relays/fuse box in the engine compartment
2. Fuse box in the passenger compartment, behind the plastic cover
3. Fuse box in the passenger compartment, on the edge of the dashboard
4. Fuse box in the cargo compartment.
A label on the inside of each cover indicates the amperage and the elect\
rical components that are
connected to each fuse.
The easiest way to see if a fuse is blown is to remove it. Pull the fuse\
straight out. If a fuse is difficult to
remove, you will find a special fuse removal tool in the passenger compa\
rtment fuse box. From the side,
examine the curved metal wire (see next page) to see if it is broken. \
If so, put in a new fuse of the same
color and amperage (written on the fuse). Spare fuses are stored in the fuse box in the \
engine
compartment and the passenger compartment. If fuses burn out repeatedly,\
have the electrical system
inspected by an authorized Volvo retailer.
file:///K|/ownersdocs/2005/2005_XC90/05xc90_09b.htm (17 of 25)12/30/20\
06 4:42:40 PM
Page 204 of 263

2005 VOLVO XC90
A-To open, press the plastice catches on the rear side of the fuse box c\
over and lift.
Fuse box in the engine compartment
When replacing fuses, be sure to replace a blown fuse with a new one of \
the same color and amperage
(written on the fuse). Fuses in positions marked X are replacement fus\
es.
Fuses in the engine compartment
No. Amperage
1. -
2. Auxiliary lights (accessory) 20A
3. -
4. Oxygen sensors 20A
5. Crankcase ventilation heater, solenoid valves, fuel tank leakage moni\
tor 10A
6. Mass air flow sensor, engine control module, injectors 15A
7. -
8. A/C compressor, accelerator pedal position sensor, E-box fan 10A
9. -
10. -
11. Ignition coils 20A
12. -
13. Windshield wipers 25A
14. ABS 30A
file:///K|/ownersdocs/2005/2005_XC90/05xc90_09b.htm (19 of 25)12/30/20\
06 4:42:40 PM
Page 205 of 263

2005 VOLVO XC90
15. Headlight washers35A
16. -
17. Driver's side low beam 20A
18. Front parking lights 15A
19. ABS 30A
20. Passenger's side low beam 20A
21. Fuel pump 15A
22. Starter motor 35A
23. Engine control module, engine relay 10A
24. -
pg. 159 Maintenance
Fuses in the passenger compartment
Fuses are located inside the access panel on the edge of the dashboard, \
on the driver's side. There are
also a number of spare fuses. When replacing a blown fuse, be sure to re\
place it with a new one of the
same color and amperage (written on the fuse).
No. Amperage
1. Blower - climate system 30A
2. Audio amplifier 30A
3. Power driver's seat (option) 25A
4. Power passenger's seat (option) 25A
file:///K|/ownersdocs/2005/2005_XC90/05xc90_09b.htm (20 of 25)12/30/20\
06 4:42:40 PM
Page 208 of 263
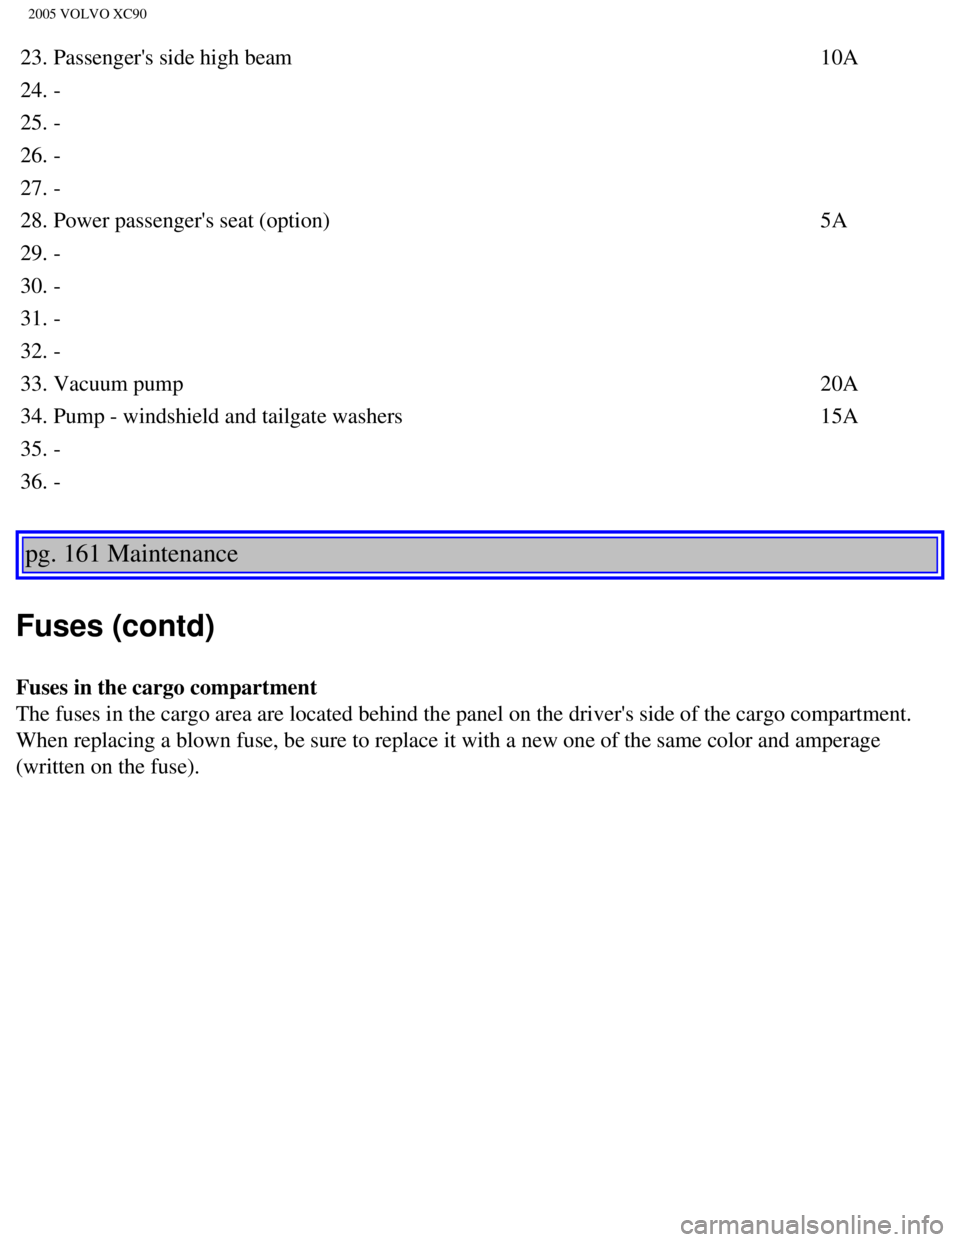
2005 VOLVO XC90
23. Passenger's side high beam10A
24. -
25. -
26. -
27. -
28. Power passenger's seat (option) 5A
29. -
30. -
31. -
32. -
33. Vacuum pump 20A
34. Pump - windshield and tailgate washers 15A
35. -
36. -
pg. 161 Maintenance
Fuses (contd)
Fuses in the cargo compartment
The fuses in the cargo area are located behind the panel on the driver's\
side of the cargo compartment.
When replacing a blown fuse, be sure to replace it with a new one of the\
same color and amperage
(written on the fuse).
file:///K|/ownersdocs/2005/2005_XC90/05xc90_09b.htm (23 of 25)12/30/20\
06 4:42:40 PM
Page 212 of 263

2005 VOLVO XC90
Label information
1. Vehicle Emission Control Information
Your Volvo is designed to meet all applicable emission standards, as evi\
denced by the certification label
on the underside of the hood. For further information regarding these re\
gulations, please consult your
Volvo retailer.
2. Vacuum hose routing
(underside of hood)
3. Loads and Tire Pressures
(on inside of fuel filler door). Canadian models only.
4. Model plate
Vehicle Identification Number (VIN). Codes for color and upholstery, e\
tc. The plate is located in the
engine compartment, on the inside of the left front fender.
file:///K|/ownersdocs/2005/2005_XC90/05xc90_10.htm (2 of 10)12/30/2006\
4:42:41 PM
Page 248 of 263

2005 VOLVO XC90
l Refer to the garage door opener owner's manual for verification.
l If your hand-held transmitter appears to program the HomeLink® Univer\
sal Transceiver but the
programmed button does not activate the garage door, your garage door op\
ener may have a rolling code.
l Press the programmed HomeLink® button. If the garage door opener has \
the rolling code feature, the
HomeLink® indicator light flashes rapidly and then glows steadily aft\
er approximately 2 seconds.
To train a rolling code garage door opener,
follow these instructions after programming the desired transceiver butt\
on according to "Programming
the transceiver." The help of a second person may make training easier.
1. Locate the training button on the garage door opener motor head unit.\
The location and color of the
training button may vary. If you encounter difficulty, refer to the gara\
ge door opener owner's manual or
call toll-free 1-800-355-3515 (Internet:
www.HomeLink.com).
2. Press the "training" button on the garage door opener motor head unit\
until the "training" light comes
on.
3. Press and release the programmed HomeLink® button. Press and relea\
se the programmed
HomeLink® button a second time to complete the training process.
4. Some garage door openers may require you to do this procedure a third\
time to complete the training.
5. The programmed button on your HomeLink® Universal Transceiver shou\
ld now operate your garage
door opener. The original hand-held transmitter can also be used, as des\
ired, to operate the garage door.
The remaining two HomeLink® buttons can be programmed in the same way\
. In the event of any
problems in programming the HomeLink® Universal Transceiver, call tol\
l-free 1-800-355-3515
(Internet:
www.HomeLink.com).
Operating the HomeLink® Universal Transceiver
Once programmed, the HomeLink® Universal Transceiver can be used in p\
lace of your handheld
transmitters.
To operate, the key must be turned to the "accessory" position (II) or\
the engine must be running. Press
the programmed HomeLink® button to activate the garage door, driveway\
gate, security lighting, home
security system, etc.
pg. 198 Audio
Your original hand-held transmitters may, of course, be used at any time\
.
Erasing programmed buttons
Individual buttons cannot be erased. To erase all three programmed butto\
ns:
1. Turn the ignition key to the "accessory" position (II).
2. Hold down the two outside buttons on the HomeLink® Universal Trans\
ceiver for about 20 seconds,
until HomeLink®'s indicator light begins to flash.
file:///K|/ownersdocs/2005/2005_XC90/05xc90_11b.htm (10 of 11)12/30/20\
06 4:42:44 PM
Page 256 of 263

2005 VOLVO XC90
Messages in the display 30
Mirror memory function
46
Mirror, rearview
46
Mirrors - sideview, adjusting
46
Mirrors - sideview, folding
31
Multifilter with air quality sensor
55
O
Occupant safety
23
Occupant Weight Sensor (OWS), disabling front passenger's side airbag \
7
Octane rating
86
Odometer
26
Oil pressure
29
Oil quality
141
Oil viscosity
141
Opening the hood
42
Opening the tailgate
43
P
Park
93
Paint - color code
133
Paintwork damage
133
Park assist
101
Parking brake
29, 42
Parking lights
33
Passenger's side front airbag, disabling
7
Permissible axle weight
120
Polishing
131
Power child locks
81
Power moonroof
47
Power seat
60
Power steering fluid
144
PremAir®
iii
PROPOSITION 65 WARNING
104, 148
file:///K|/ownersdocs/2005/2005_XC90/05xc90_12.htm (7 of 14)12/30/2006\
4:42:46 PM