roof VOLVO XC90 2013 Owner´s Manual
[x] Cancel search | Manufacturer: VOLVO, Model Year: 2013, Model line: XC90, Model: VOLVO XC90 2013Pages: 310, PDF Size: 8.62 MB
Page 4 of 310
Contents
2* Option/accessory, for more information, see Introduction.
00
00 Introduction
Important information................................. 8
Environment.............................................. 13
Important warnings................................... 14
01
01 Safety
Occupant safety........................................ 18
Seat belts.................................................. 20
Supplemental Restraint System............... 23
Front airbags............................................. 24
Occupant Weight Sensor.......................... 28
Side impact protection airbags................. 31
Inflatable Curtain....................................... 33
Whiplash Protection System..................... 35
Child safety............................................... 37
Child restraint systems............................. 40
Infant seats............................................... 42
Convertible seats...................................... 44
Booster cushions...................................... 47
ISOFIX/LATCH lower anchors.................. 48
Top tether anchors.................................... 50
Integrated booster cushion....................... 51
02
02 Instruments and controls
Instrument overview.................................. 56
Instrument panel....................................... 58
Information display................................... 62
Center console buttons............................ 64
Steering wheel adjustment....................... 66
Lighting panel........................................... 67
Manually unlocking the fuel filler door...... 70
Left-side steering wheel lever................... 71
Right-side steering wheel lever................. 72
Hazard warning flashers........................... 75
Trip computer........................................... 76
Cruise control............................................ 78
12-volt sockets......................................... 80
Hood/tailgate............................................ 81
Power windows......................................... 82
Mirrors....................................................... 84
Power moonroof....................................... 87
HomeLink
® Wireless Control System*...... 89
Page 35 of 310
01 Safety
Inflatable Curtain01
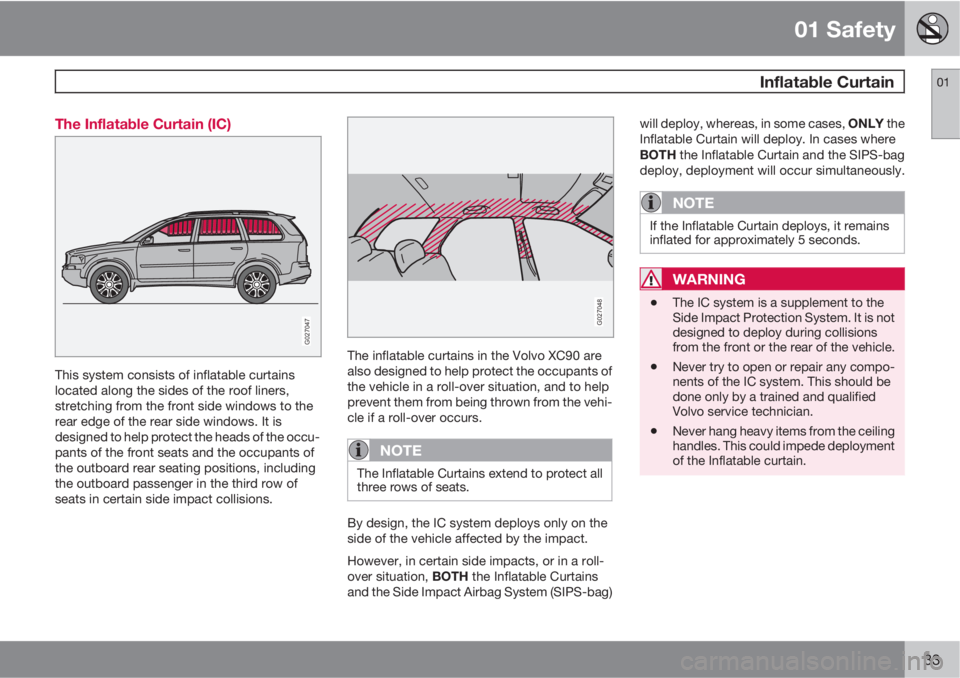
33 The Inflatable Curtain (IC)
G027047
This system consists of inflatable curtains
located along the sides of the roof liners,
stretching from the front side windows to the
rear edge of the rear side windows. It is
designed to help protect the heads of the occu-
pants of the front seats and the occupants of
the outboard rear seating positions, including
the outboard passenger in the third row of
seats in certain side impact collisions.
G027048
The inflatable curtains in the Volvo XC90 are
also designed to help protect the occupants of
the vehicle in a roll-over situation, and to help
prevent them from being thrown from the vehi-
cle if a roll-over occurs.
NOTE
The Inflatable Curtains extend to protect all
three rows of seats.
By design, the IC system deploys only on the
side of the vehicle affected by the impact.
However, in certain side impacts, or in a roll-
over situation, BOTH the Inflatable Curtains
and the Side Impact Airbag System (SIPS-bag)will deploy, whereas, in some cases, ONLY the
Inflatable Curtain will deploy. In cases where
BOTH the Inflatable Curtain and the SIPS-bag
deploy, deployment will occur simultaneously.
NOTE
If the Inflatable Curtain deploys, it remains
inflated for approximately 5 seconds.
WARNING
•The IC system is a supplement to the
Side Impact Protection System. It is not
designed to deploy during collisions
from the front or the rear of the vehicle.
•Never try to open or repair any compo-
nents of the IC system. This should be
done only by a trained and qualified
Volvo service technician.
•Never hang heavy items from the ceiling
handles. This could impede deployment
of the Inflatable curtain.
Page 56 of 310
54* Option/accessory, for more information, see Introduction.
Instrument overview................................................................................ 56
Instrument panel..................................................................................... 58
Information display.................................................................................. 62
Center console buttons........................................................................... 64
Steering wheel adjustment..................................................................... 66
Lighting panel.......................................................................................... 67
Manually unlocking the fuel filler door.................................................... 70
Left-side steering wheel lever................................................................. 71
Right-side steering wheel lever............................................................... 72
Hazard warning flashers......................................................................... 75
Trip computer.......................................................................................... 76
Cruise control.......................................................................................... 78
12-volt sockets....................................................................................... 80
Hood/tailgate.......................................................................................... 81
Power windows....................................................................................... 82
Mirrors..................................................................................................... 84
Power moonroof..................................................................................... 87
HomeLink
® Wireless Control System*.................................................... 89
Page 59 of 310
02 Instruments and controls
Instrument overview
02
* Option/accessory, for more information, see Introduction.57
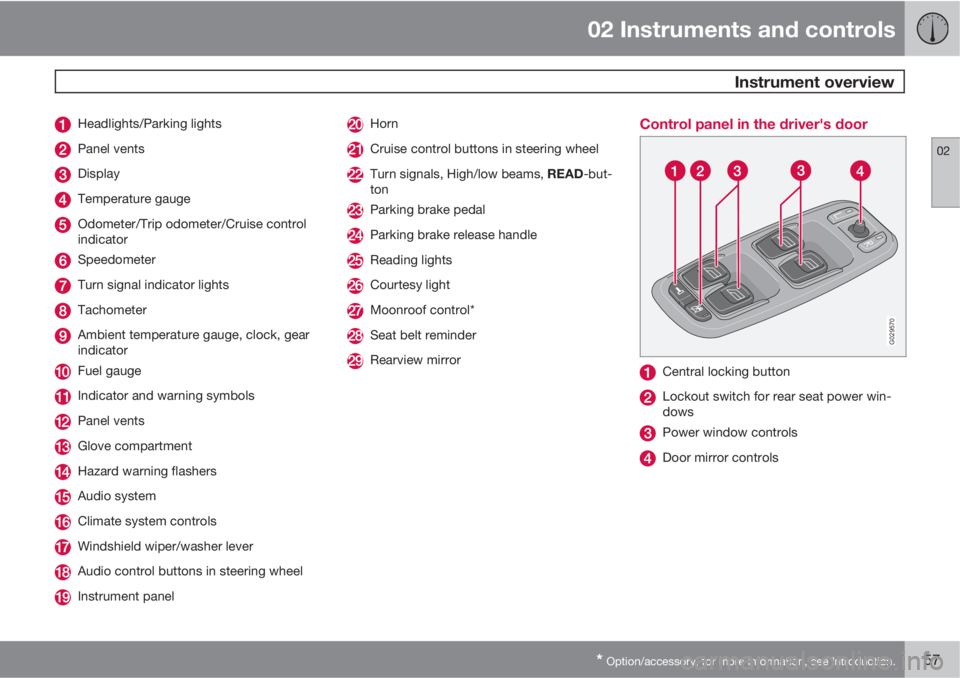
Headlights/Parking lights
Panel vents
Display
Temperature gauge
Odometer/Trip odometer/Cruise control
indicator
Speedometer
Turn signal indicator lights
Tachometer
Ambient temperature gauge, clock, gear
indicator
Fuel gauge
Indicator and warning symbols
Panel vents
Glove compartment
Hazard warning flashers
Audio system
Climate system controls
Windshield wiper/washer lever
Audio control buttons in steering wheel
Instrument panel
Horn
Cruise control buttons in steering wheel
Turn signals, High/low beams, READ-but-
ton
Parking brake pedal
Parking brake release handle
Reading lights
Courtesy light
Moonroof control*
Seat belt reminder
Rearview mirror
Control panel in the driver's door
G029570
Central locking button
Lockout switch for rear seat power win-
dows
Power window controls
Door mirror controls
Page 89 of 310
02 Instruments and controls
Power moonroof
02
87 Power moonroof
G007503
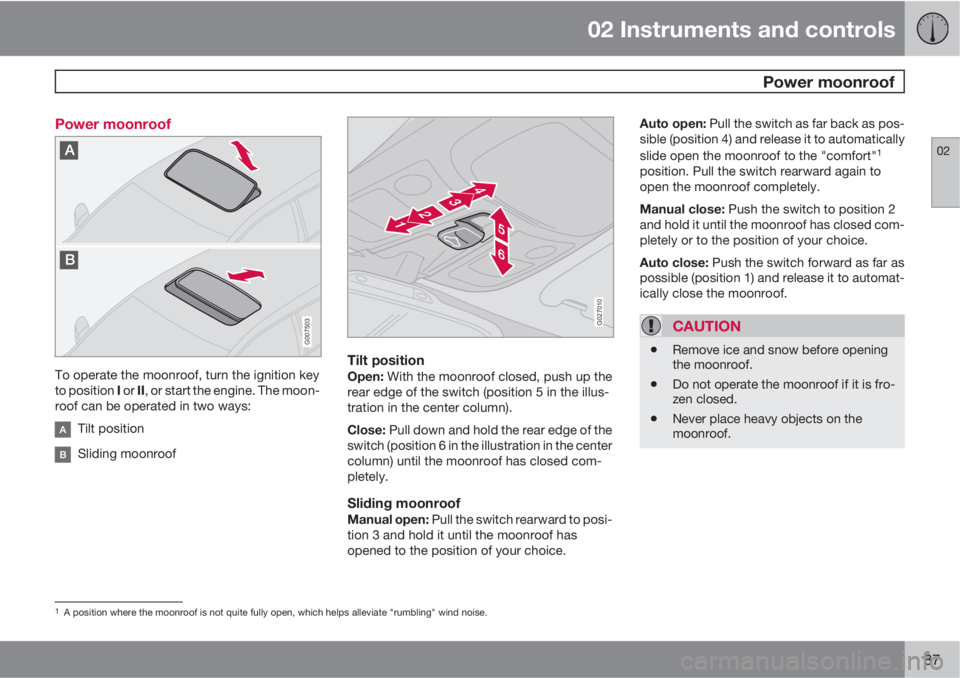
To operate the moonroof, turn the ignition key
to position I or II, or start the engine. The moon-
roof can be operated in two ways:
Tilt position
Sliding moonroof
G027010
Tilt positionOpen: With the moonroof closed, push up the
rear edge of the switch (position 5 in the illus-
tration in the center column).
Close: Pull down and hold the rear edge of the
switch (position 6 in the illustration in the center
column) until the moonroof has closed com-
pletely.
Sliding moonroofManual open: Pull the switch rearward to posi-
tion 3 and hold it until the moonroof has
opened to the position of your choice.Auto open: Pull the switch as far back as pos-
sible (position 4) and release it to automatically
slide open the moonroof to the "comfort"
1
position. Pull the switch rearward again to
open the moonroof completely.
Manual close: Push the switch to position 2
and hold it until the moonroof has closed com-
pletely or to the position of your choice.
Auto close: Push the switch forward as far as
possible (position 1) and release it to automat-
ically close the moonroof.
CAUTION
•Remove ice and snow before opening
the moonroof.
•Do not operate the moonroof if it is fro-
zen closed.
•Never place heavy objects on the
moonroof.
1A position where the moonroof is not quite fully open, which helps alleviate "rumbling" wind noise.
Page 90 of 310
02 Instruments and controls
Power moonroof
02
88
WARNING
•Never open/close the moonroof if it is
obstructed in any way when in opera-
tion.
•Never allow a child to operate the
moonroof.
•Never extend any object or body part
through the open moonroof, even if the
vehicle's ignition is completely
switched off.
•Never leave a child alone in a vehicle.
If the moonroof is obstructed during auto-close
operation, it will automatically reverse direction
and return to its starting position. If the moon-
roof is repeatedly obstructed during auto-close
operation, an overload circuit breaker will tem-
porarily halt moonroof function. The moonroof
will return to normal function after a brief cool-
down period.G020157
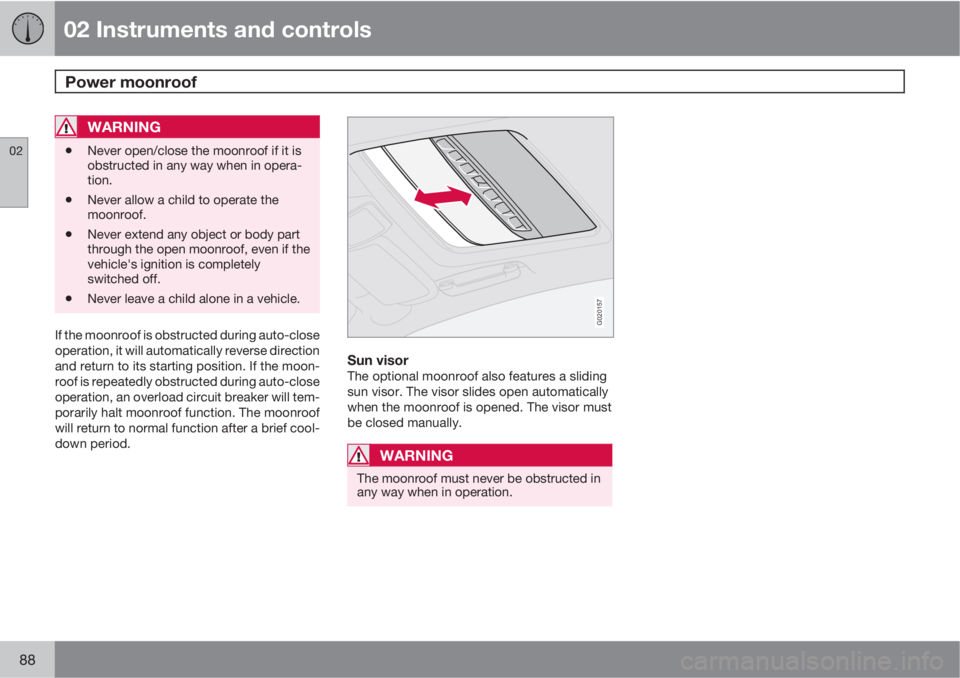
Sun visorThe optional moonroof also features a sliding
sun visor. The visor slides open automatically
when the moonroof is opened. The visor must
be closed manually.
WARNING
The moonroof must never be obstructed in
any way when in operation.
Page 96 of 310
03 Climate
Climate control system – general information
03
94* Option/accessory, for more information, see Introduction.
Condensation on the inside of the
windows
Keeping the insides of the windows clean will
help reduce the amount of condensation that
forms on the windows. Use a commercial win-
dow cleaning agent to clean the windows.
Ice and snow
Always keep the air intake grille at the base of
the windshield free of snow.
Cabin air filter
Replace the cabin air filter with a new one at
the recommended intervals. Please refer to
your Warranty and Service Records Informa-
tion booklet, or consult a trained and qualified
Volvo service technician for these intervals.
The filter should be replaced more often when
driving under dirty and dusty conditions. The
filter cannot be cleaned and therefore should
always be replaced with a new one.
Sensors
The sunlight sensor on the dashboard and pas-
senger compartment temperature sensor in
the ECC control panel should not be covered
in any way as this could cause incorrect infor-
mation to be sent to the ECC system.
Parking the vehicle in warm weather
If your vehicle has been parked in the sun in
warm weather, opening the windows and
moonroof* for several minutes before driving
will help release the warm air from the passen-
ger compartment. When the engine is running,
close the windows and moonroof and use the
recirculation function for several minutes to
enable the air conditioning to cool the com-
partment as quickly as possible.
Windows and optional moonroof
The ECC system will function best if the win-
dows and optional moonroof are closed. If you
drive with the moonroof open, we recommend
that you manually adjust the temperature and
blower control (the LED in the AUTO switch
should be off).
Acceleration
The air conditioning is momentarily disen-
gaged during full-throttle acceleration.
Climate control maintenance
Special tools and equipment are required to
maintain and carry out repairs on the climate
system. Work of this type should only be done
by a trained and qualified Volvo service tech-
nician.
Refrigerant
Volvo cares about the environment. The air
conditioning system in your vehicle contains a
CFC-free refrigerant – R134a (HFC134a). This
substance will not deplete the ozone layer. The
approximate amount of R134a contained in the
system is a follows:
6-cylinder engine
Single A/C system: 1.5 lbs (700 g)
Dual
1 A/C system: 2.2 lbs (1000 g)
The system also uses PAG oil.
1Includes the optional rear A/C system
Page 131 of 310
05 Locks and alarm
Remote keys and key blades
05
129
WARNING
Never use the transmitter to lock the doors
from inside the vehicle.
•Doing so would ACTIVATE:
•the break-in alarm, which would sound
if one of the doors were opened
•the optional interior motion and inclina-
tion alarm sensors.
•Doing so would DEACTIVATE:
•the moonroof and interior courtesy light
controls.
•the central locking buttons on the front
door armrests, although the interior
door handles would still function to
allow occupants to leave the vehicle.
•Disabled features would remain disa-
bled until the remote is used again to
unlock the vehicle.
•In addition, locking an occupied vehicle
would hinder rapid access to the occu-
pants in an accident or emergency.
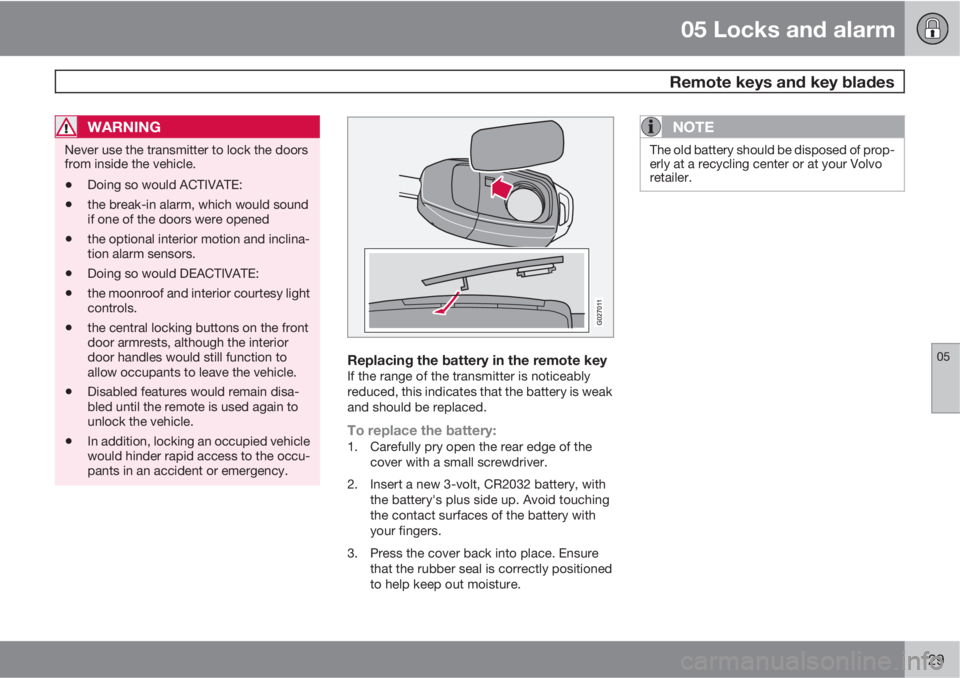
Replacing the battery in the remote keyIf the range of the transmitter is noticeably
reduced, this indicates that the battery is weak
and should be replaced.
To replace the battery:1. Carefully pry open the rear edge of the
cover with a small screwdriver.
2. Insert a new 3-volt, CR2032 battery, with
the battery's plus side up. Avoid touching
the contact surfaces of the battery with
your fingers.
3. Press the cover back into place. Ensure
that the rubber seal is correctly positioned
to help keep out moisture.
NOTE
The old battery should be disposed of prop-
erly at a recycling center or at your Volvo
retailer.
Page 135 of 310
05 Locks and alarm
Alarm
05
* Option/accessory, for more information, see Introduction.133
The alarm is automatically armed whenever
you lock your vehicle.
When armed, the alarm continuously monitors
a number of points on the vehicle. The follow-
ing conditions will set off the alarm:
•The hood is forced open.
•The tailgate is forced open.
•A door is forced open.
•The ignition switch is tampered with.
•If there is movement in the passenger com-
partment (if the vehicle is equipped with
the optional movement sensor).
•The vehicle is lifted or towed (if the vehicle
is equipped with the optional inclination
sensor).
•The battery is disconnected (while the
alarm is armed).
•The siren is disconnected when the alarm
is disarmed.
Arming the alarm1.
Press the LOCK button on the remote key.
2. Lock the vehicle using the key blade in the
driver's door or press the central lock but-
ton on the driver's door with the door open.
One long flash of the turn signals will confirm
that the alarm is armed.
Movement sensor*In addition to triggering the alarm if there is
movement in the passenger compartment,
currents of air may also affect the movement
sensor. This means that locking the vehicle
with the windows or the moonroof open, or
using an accessory portable passenger com-
partment heater, could trigger the alarm.
To help avoid this, close the windows and
moonroof before locking the vehicle. If a pas-
senger compartment heater is used when the
vehicle is locked, direct airflow from the heat-
er's vent(s) so that it isn't directed upward in
the passenger compartment.
Disarming the alarmPress the UNLOCK button on the remote key
or unlock the doors with the key blade.
Turning off (stopping) the alarmIf the alarm is sounding, it can be stopped by
pressing the UNLOCK button on the remote
key or by unlocking the driver's door with the
key blade.
Visual alarm signalThe visual alarm signal is given by flashing all
turn signals and turning on the interior lighting
for approximately 5 minutes.
Audible alarm signalAn audible alarm signal is given by a battery
powered siren. One alarm cycle lasts for
25 seconds.
"Panic" buttonIn an emergency situation, this feature can be
used to attract attention.
Activate the "panic" button by pressing the red
button on the remote key ( see page 127 for
illustration) for at least 3 seconds or by press-
ing this button twice within 3 seconds. The turn
signals will flash, and the vehicle's horn will
sound.
The function can be turned off by pressing any
of the buttons on the remote key or will stop
automatically after 25 seconds. When a button
is pressed, there is a 5 second delay before the
panic alarm is deactivated.
NOTE
This button will NOT unlock the vehicle.
LED alarm status signalsThe status of the alarm system is indicated by
the red LED at the top of the dash:
•LED off – the alarm is not armed
•LED flashes once per second – the alarm
is armed
Page 148 of 310
06 Starting and driving
Economical driving
06
146
Economical driving conserves natural
resources
Better driving economy may be obtained by
thinking ahead, avoiding rapid starts and stops
and adjusting the speed of your vehicle to
immediate traffic conditions. Observe the fol-
lowing rules:
•Bring the engine to normal operating tem-
perature as soon as possible by driving
with a light foot on the accelerator pedal for
the first few minutes of operation. A cold
engine uses more fuel and is subject to
increased wear.
•Whenever possible, avoid using the vehicle
for driving short distances. This does not
allow the engine to reach normal operating
temperature.
•Drive carefully and avoid rapid acceleration
and hard braking.
•Use the transmission's D (Drive) position
as often as possible and avoid using "kick-
down" to help improve fuel economy.
•Do not exceed posted speed limits.
•Avoid carrying unnecessary items (extra
load) in the vehicle.
•Maintain correct tire pressure. Check tire
pressure regularly (when tires are cold).
•Remove snow tires when threat of snow or
ice has ended.
•Note that roof racks, ski racks, etc,
increase air resistance and also fuel con-
sumption.
•At highway driving speeds, fuel consump-
tion will be lower with the air conditioning
on and the windows closed than with the
air conditioning off and the windows open.
•Using the onboard trip computer's fuel
consumption modes can help you learn
how to drive more economically.
Other factors that decrease gas mileage
are:
•Dirty air cleaner
•Dirty engine oil and clogged oil filter
•Dragging brakes
•Incorrect front end alignment.
Some of the above mentioned items and others
are checked at the standard Maintenance
Service intervals.
CAUTION
Drive slowly and carefully if going through
standing water (i.e. flooded roadways, etc.).
Damage to the engine could result if excess
water is drawn in through the air intake sys-
tem. Never drive the vehicle in water deeper
than 18 inches (48 cm).