sensor VOLVO XC90 2014 Owner´s Manual
[x] Cancel search | Manufacturer: VOLVO, Model Year: 2014, Model line: XC90, Model: VOLVO XC90 2014Pages: 308, PDF Size: 13.31 MB
Page 33 of 308
01 Safety
Occupant Weight Sensor01
31
interfere with the OWS system's func- tion.
Page 45 of 308
01 Safety
Infant seats01
43
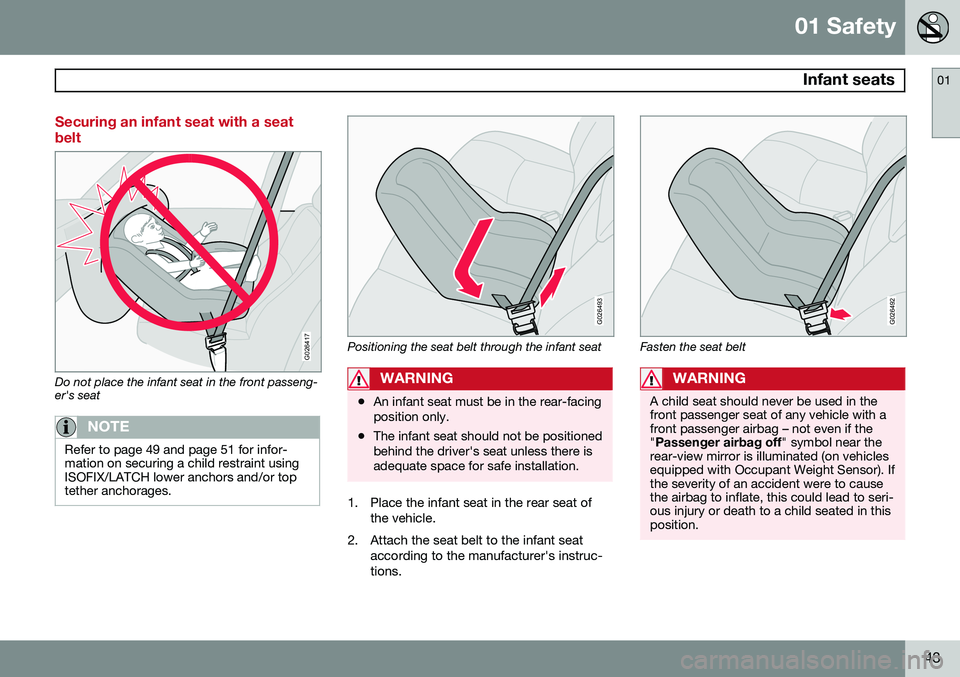
Securing an infant seat with a seat belt
G026417
Do not place the infant seat in the front passeng- er's seat
NOTE
Refer to page 49 and page 51 for infor- mation on securing a child restraint usingISOFIX/LATCH lower anchors and/or toptether anchorages.
G026493
Positioning the seat belt through the infant seat
WARNING
•An infant seat must be in the rear-facing position only.
• The infant seat should not be positionedbehind the driver's seat unless there isadequate space for safe installation.
1. Place the infant seat in the rear seat of
the vehicle.
2. Attach the seat belt to the infant seat according to the manufacturer's instruc- tions.
G026492
Fasten the seat belt
WARNING
A child seat should never be used in the front passenger seat of any vehicle with afront passenger airbag – not even if the"Passenger airbag off " symbol near the
rear-view mirror is illuminated (on vehiclesequipped with Occupant Weight Sensor). Ifthe severity of an accident were to causethe airbag to inflate, this could lead to seri-ous injury or death to a child seated in thisposition.
Page 70 of 308
02 Instruments and controls
Lighting panel
02
68
wheel (see the right-pointing beam in the illustration).
NOTE
When driving in daylight conditions, the headlights will switch off and the daytimerunning lights will come on. In darkness,the daytime running lights will switch offand the Active Bending Lights will switchon.
The ABL function is activated automatically when the engine is started and the headlight switch is in the
position and can be
deactivated/reactivated by pressing the but- ton in the center console (see page 64.
LED Daytime Running Lights (DRL)
To help conserve fuel by reducing the use of electrical current in the vehicle, DRL can beused in daylight conditions instead of the lowbeam headlights, which consume more elec-trical current. The daytime running lights aremounted in the front spoiler and use bright,electricity-saving LEDs (light emitting diodes).
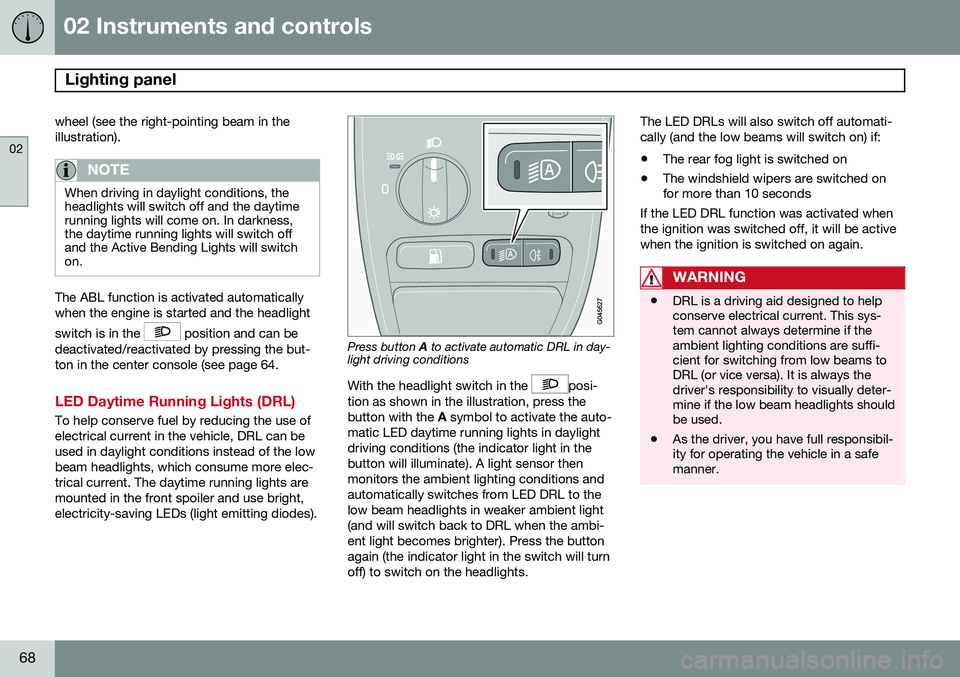
Press button A to activate automatic DRL in day-
light driving conditions
With the headlight switch in the
posi-
tion as shown in the illustration, press the button with the A symbol to activate the auto-
matic LED daytime running lights in daylightdriving conditions (the indicator light in thebutton will illuminate). A light sensor thenmonitors the ambient lighting conditions andautomatically switches from LED DRL to thelow beam headlights in weaker ambient light(and will switch back to DRL when the ambi-ent light becomes brighter). Press the buttonagain (the indicator light in the switch will turnoff) to switch on the headlights. The LED DRLs will also switch off automati-cally (and the low beams will switch on) if:
• The rear fog light is switched on
• The windshield wipers are switched on for more than 10 seconds
If the LED DRL function was activated when the ignition was switched off, it will be activewhen the ignition is switched on again.
WARNING
• DRL is a driving aid designed to help conserve electrical current. This sys-tem cannot always determine if theambient lighting conditions are suffi-cient for switching from low beams toDRL (or vice versa). It is always thedriver's responsibility to visually deter-mine if the low beam headlights shouldbe used.
• As the driver, you have full responsibil-ity for operating the vehicle in a safemanner.
Page 74 of 308
02 Instruments and controls
Right-side steering wheel lever
02
72
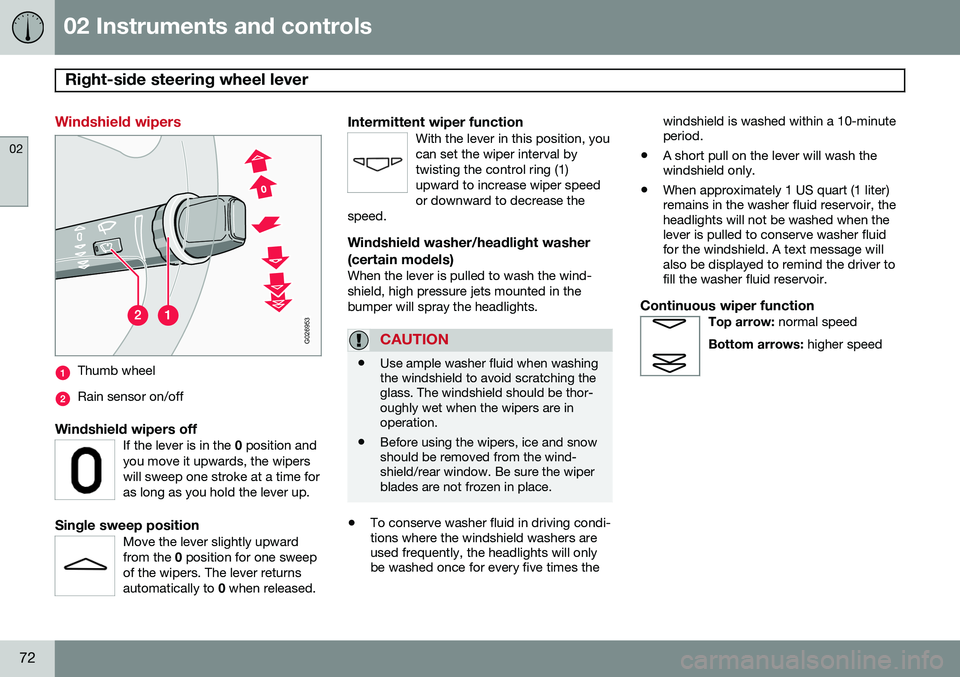
Windshield wipers
G026953
Thumb wheel
Rain sensor on/off
Windshield wipers offIf the lever is in the 0 position and
you move it upwards, the wipers will sweep one stroke at a time foras long as you hold the lever up.
Single sweep positionMove the lever slightly upward from the 0 position for one sweep
of the wipers. The lever returnsautomatically to 0 when released.
Intermittent wiper functionWith the lever in this position, you can set the wiper interval bytwisting the control ring (1)upward to increase wiper speedor downward to decrease the
speed.
Windshield washer/headlight washer (certain models)
When the lever is pulled to wash the wind- shield, high pressure jets mounted in thebumper will spray the headlights.
CAUTION
• Use ample washer fluid when washing the windshield to avoid scratching theglass. The windshield should be thor-oughly wet when the wipers are inoperation.
• Before using the wipers, ice and snowshould be removed from the wind-shield/rear window. Be sure the wiperblades are not frozen in place.
•
To conserve washer fluid in driving condi- tions where the windshield washers areused frequently, the headlights will onlybe washed once for every five times the windshield is washed within a 10-minuteperiod.
• A short pull on the lever will wash thewindshield only.
• When approximately 1 US quart (1 liter)remains in the washer fluid reservoir, theheadlights will not be washed when thelever is pulled to conserve washer fluidfor the windshield. A text message willalso be displayed to remind the driver tofill the washer fluid reservoir.
Continuous wiper functionTop arrow:
normal speed
Bottom arrows: higher speed
Page 75 of 308
02 Instruments and controls
Right-side steering wheel lever
02
* Option/accessory, for more information, see Introduction.73
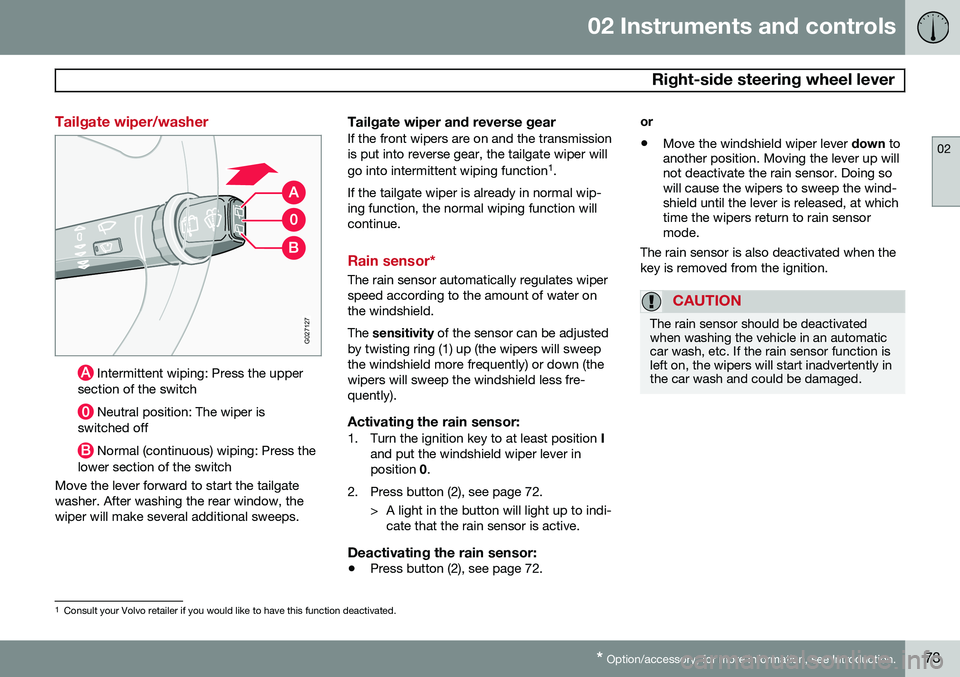
Tailgate wiper/washer
G027127
Intermittent wiping: Press the upper
section of the switch
Neutral position: The wiper is
switched off
Normal (continuous) wiping: Press the
lower section of the switch
Move the lever forward to start the tailgate washer. After washing the rear window, thewiper will make several additional sweeps.
Tailgate wiper and reverse gearIf the front wipers are on and the transmissionis put into reverse gear, the tailgate wiper will go into intermittent wiping function 1
.
If the tailgate wiper is already in normal wip- ing function, the normal wiping function willcontinue.
Rain sensor*
The rain sensor automatically regulates wiper speed according to the amount of water onthe windshield. The sensitivity of the sensor can be adjusted
by twisting ring (1) up (the wipers will sweep the windshield more frequently) or down (thewipers will sweep the windshield less fre-quently).
Activating the rain sensor:1. Turn the ignition key to at least position I
and put the windshield wiper lever inposition 0.
2. Press button (2), see page 72. > A light in the button will light up to indi-cate that the rain sensor is active.
Deactivating the rain sensor:
• Press button (2), see page 72. or •
Move the windshield wiper lever
down to
another position. Moving the lever up will not deactivate the rain sensor. Doing sowill cause the wipers to sweep the wind-shield until the lever is released, at whichtime the wipers return to rain sensormode.
The rain sensor is also deactivated when the key is removed from the ignition.
CAUTION
The rain sensor should be deactivated when washing the vehicle in an automaticcar wash, etc. If the rain sensor function isleft on, the wipers will start inadvertently inthe car wash and could be damaged.
1 Consult your Volvo retailer if you would like to have this function deactivated.
Page 96 of 308
03 Climate
Climate control system – general information
03
94* Option/accessory, for more information, see Introduction.
Condensation on the inside of the windows
Keeping the insides of the windows clean will help reduce the amount of condensation thatforms on the windows. Use a commercialwindow cleaning agent to clean the windows.
Ice and snow
Always keep the air intake grille at the base of the windshield free of snow.
Cabin air filter
Replace the cabin air filter with a new one at the recommended intervals. Please refer toyour Warranty and Service Records Informa-tion booklet, or consult a trained and qualifiedVolvo service technician for these intervals.The filter should be replaced more often whendriving under dirty and dusty conditions. Thefilter cannot be cleaned and therefore shouldalways be replaced with a new one.
Sensors
The sunlight sensor on the dashboard and passenger compartment temperature sensorin the ECC control panel should not be cov-ered in any way as this could cause incorrectinformation to be sent to the ECC system.
Parking the vehicle in warm weather
If your vehicle has been parked in the sun in warm weather, opening the windows andmoonroof* for several minutes before drivingwill help release the warm air from the pas-senger compartment. When the engine is run-ning, close the windows and moonroof anduse the recirculation function for severalminutes to enable the air conditioning to coolthe compartment as quickly as possible.
Windows and optional moonroof
The ECC system will function best if the win- dows and optional moonroof are closed. Ifyou drive with the moonroof open, we recom-mend that you manually adjust the tempera-ture and blower control (the LED in the AUTO
switch should be off).
Acceleration
The air conditioning is momentarily disen- gaged during full-throttle acceleration.
Climate control maintenance
Special tools and equipment are required to maintain and carry out repairs on the climatesystem. Work of this type should only bedone by a trained and qualified Volvo servicetechnician.
Refrigerant
Volvo cares about the environment. The air conditioning system in your vehicle containsa CFC-free refrigerant – R134a (HFC134a).This substance will not deplete the ozonelayer. The approximate amount of R134acontained in the system is a follows: 6-cylinder engine Single A/C system: 1.5 lbs (700 g) Dual 1
A/C system: 2.2 lbs (1000 g)
The system also uses PAG oil.
1 Includes the optional rear A/C system
Page 100 of 308
03 Climate
Electronic climate control (ECC)
03
98* Option/accessory, for more information, see Introduction.
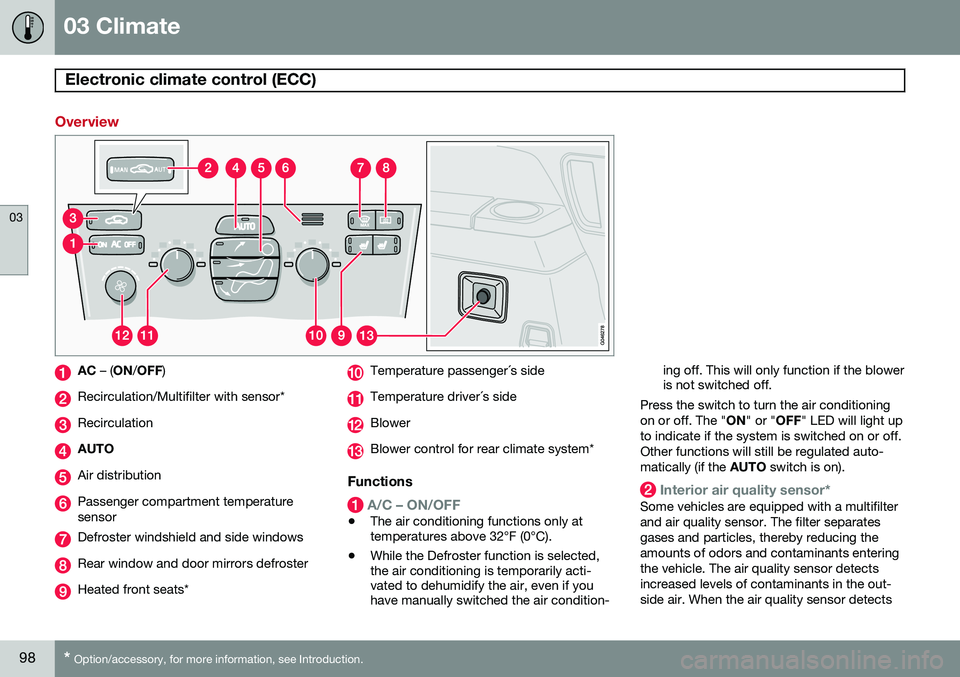
Overview
AC – (ON /OFF )
Recirculation/Multifilter with sensor*
Recirculation
AUTO
Air distribution
Passenger compartment temperature sensor
Defroster windshield and side windows
Rear window and door mirrors defroster
Heated front seats*
Temperature passenger´s side
Temperature driver´s side
Blower
Blower control for rear climate system*
Functions
A/C – ON/OFF
•The air conditioning functions only at temperatures above 32°F (0°C).
• While the Defroster function is selected,the air conditioning is temporarily acti-vated to dehumidify the air, even if youhave manually switched the air condition- ing off. This will only function if the bloweris not switched off.
Press the switch to turn the air conditioning on or off. The " ON" or " OFF" LED will light up
to indicate if the system is switched on or off.Other functions will still be regulated auto-matically (if the AUTO switch is on).
Interior air quality sensor*
Some vehicles are equipped with a multifilter and air quality sensor. The filter separatesgases and particles, thereby reducing theamounts of odors and contaminants enteringthe vehicle. The air quality sensor detectsincreased levels of contaminants in the out-side air. When the air quality sensor detects
Page 101 of 308
03 Climate
Electronic climate control (ECC)
03
}}
99
contaminated outside air, the air intake closes and the air inside the passenger compart-ment is recirculated, i.e. no outside air entersthe vehicle. The filter also cleans recirculatedpassenger compartment air. When the ECC system is in the
AUTO mode,
the green LED will be on.
Recirculation
Press this switch to engage the recirculation function (air in the passenger compartmentrecirculates – no fresh air enters the compart-ment). The LED in the switch will light up toindicate that the function is engaged. • Use this function if the outside air is con- taminated with exhaust gases, smoke,etc or to heat/cool the vehicle quickly.
• Recirculation should not be used for morethan 15 minutes. If your windows begin tofog or mist, make sure that the recircula-tion function is switched off.
• Selecting
Defroster automatically
switches recirculation off.
• Timer mode activation: (Vehicles equip-ped with the Interior Air Quality systemhave no timer mode) Press and hold therecirculation button for at least 3 secondsto activate a recirculation timer mode.The amber LED in the recirculation buttonwill flash 5 times to show that the timermode is being activated. In timer mode, each time the recirculation button ispressed, the climate control system willrecirculate the air in the passenger com-partment for 5 – 12 minutes, dependingon the outside air temperature, and thenrevert back to fresh air.
• Timer mode deactivation: Press and holdthe recirculation button for 3 seconds.The amber LED in the recirculation buttonwill illuminate steadily for 5 seconds toshow a return to "normal" mode.
• In normal mode, when the recirculationbutton is pressed, the climate controlsystem will recirculate the air in the pas-senger compartment until the recircula-tion button is pressed again.
• Timer mode memory: If the vehicle isturned off while timer mode is active,timer mode will still be active when thevehicle is restarted.
AUTO
This function automatically regulates the Electronic Climate Control system so that theselected temperatures are maintained. Theblower, heating, air distribution (air flow), airconditioning, and optional air quality sensorare controlled. If you prefer to manually setany of these functions, the remaining func-tions will still be controlled automatically.Pressing the
AUTO button overrides any set-
tings that were previously made manually.
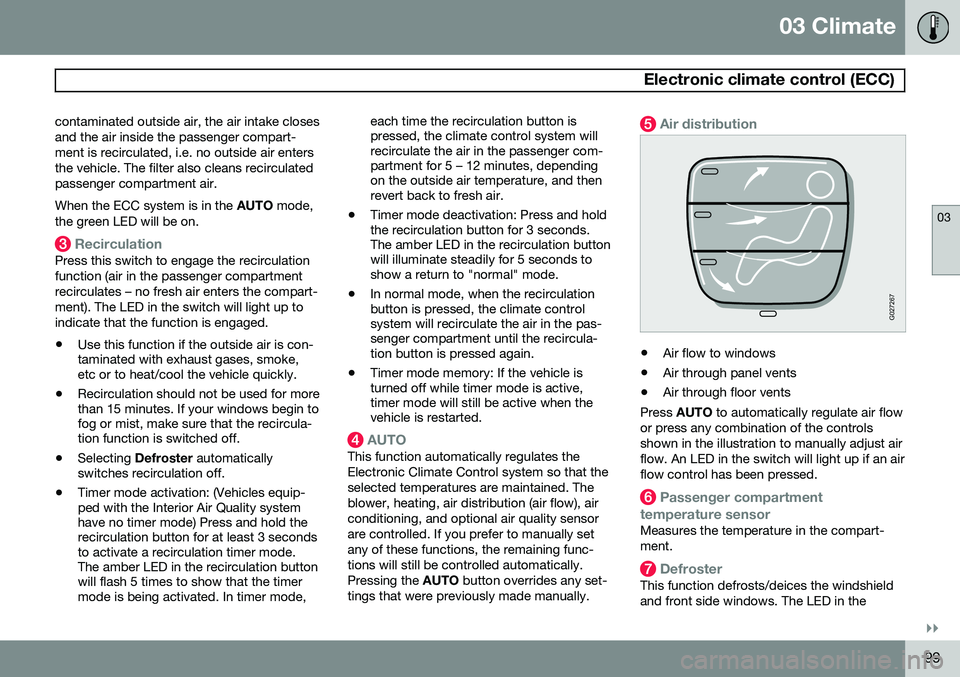
Air distribution
G027267
• Air flow to windows
• Air through panel vents
• Air through floor vents
Press AUTO to automatically regulate air flow
or press any combination of the controls shown in the illustration to manually adjust airflow. An LED in the switch will light up if an airflow control has been pressed.
Passenger compartment
temperature sensor
Measures the temperature in the compart- ment.
Defroster
This function defrosts/deices the windshield and front side windows. The LED in the
Page 103 of 308
03 Climate
Electronic climate control (ECC)
03
* Option/accessory, for more information, see Introduction.101
Blower control for rear climate
system*
Turn the control to increase or decrease blower speed.
OperationPress to operate the air quality sensor (nor-mal setting). or: Select one of the following three functions by pressing 1, 2 or 3 times.
1. The AUT LED lights. The air quality sen-
sor is now activated.
2. No LED lights. Recirculation is not acti- vated unless needed to cool the passen- ger compartment in a warm climate.
3. The MAN LED lights. Recirculation is now
activated.
Keep in mind the following:
• Make it a rule to have the air quality sen- sor activated at all times.
• Recirculation is limited in cold climates toavoid fogging.
• If window fogging occurs, you shoulddeactivate the air quality sensor. Also usethe defroster functions for the windshield,side windows and rear window, seepage 98. •
The filter should be changed at the inter-vals recommended in the service sched-ule. However, if the vehicle is used in aseverely contaminated environment, itmay be necessary to change the filtermore frequently.
Page 131 of 308
05 Locks and alarm
Remote keys and key blades
05
129
WARNING
Never use the transmitter to lock the doors from inside the vehicle.• Doing so would ACTIVATE:
• the break-in alarm, which would sound if one of the doors were opened
• the optional interior motion and incli-nation alarm sensors.
• Doing so would DEACTIVATE:
• the moonroof and interior courtesylight controls.
• the central locking buttons on the frontdoor armrests, although the interiordoor handles would still function toallow occupants to leave the vehicle.
• Disabled features would remain disa-bled until the remote is used again tounlock the vehicle.
• In addition, locking an occupied vehi-cle would hinder rapid access to theoccupants in an accident or emer-gency.
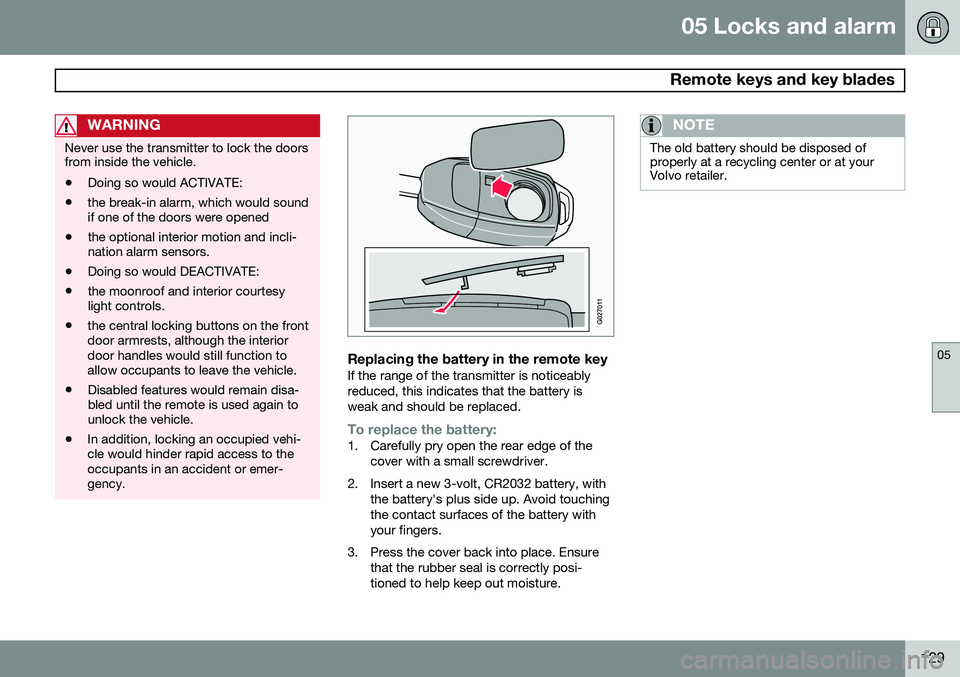
Replacing the battery in the remote keyIf the range of the transmitter is noticeably reduced, this indicates that the battery isweak and should be replaced.
To replace the battery:1. Carefully pry open the rear edge of the
cover with a small screwdriver.
2. Insert a new 3-volt, CR2032 battery, with the battery's plus side up. Avoid touching the contact surfaces of the battery withyour fingers.
3. Press the cover back into place. Ensure that the rubber seal is correctly posi-tioned to help keep out moisture.
NOTE
The old battery should be disposed of properly at a recycling center or at yourVolvo retailer.