stop start VOLVO XC90 2014 Owner´s Manual
[x] Cancel search | Manufacturer: VOLVO, Model Year: 2014, Model line: XC90, Model: VOLVO XC90 2014Pages: 308, PDF Size: 13.31 MB
Page 158 of 308
06 Starting and driving
Brake system
06
156
ABS with EBD (Electronic Brake Force
Distribution)
EBD is an integrated part of the ABS system. EBD regulates the hydraulic pressure to therear brakes to help provide optimal brakingcapacity. The brake pedal will pulsate duringbraking, which is normal. If the BRAKE and ABS warning lights come on at the same time, this could indicate afault in the brake system.
1. Stop the vehicle in a suitable place and switch off the engine.
2. Restart the engine.
• If both warning lights go off, no further action is required.
• If both lights are still on after the enginehas been restarted, switch off the engineagain and check the brake fluid level (seepage 225 for the location of the brakefluid reservoir).
WARNING
If the fluid level is below the
MIN mark in
the reservoir or if a Brake failure –
Service urgent message is displayed in
the text window: DO NOT DRIVE. Have the vehicle towed to a trained and qualifiedVolvo service technician and have thebrake system inspected.
• If the brake fluid level is above the
MIN
mark, drive carefully to a trained and qualified Volvo service technician andhave the brake system inspected.
Emergency Brake Assistance (EBA)The EBA function is designed to provide full brake effect immediately in the event of sud-den, hard braking. The system is activated bythe speed with which you depress the brakepedal.
NOTE
• When the EBA system is activated, the brake pedal will go down and pressurein the brake system immediatelyincreases to the maximum level. Youmust maintain full pressure on thebrake pedal in order to utilize the sys-tem completely. There will be no brak-ing effect if the pedal is released. EBAis automatically deactivated when thebrake pedal is released.
• When the vehicle has been parked forsome time, the brake pedal may sinkmore than usual when the engine isstarted. This is normal and the pedalwill return to its usual position when itis released.
Page 161 of 308
06 Starting and driving
Stability system
06
159
DSTC-related messages in the text window
•TRACTION CONTROL TEMPORARILY OFF : The system has been temporarily
switched off due to high brake tempera- ture and will automatically switch onagain when the brakes have cooled.
•
ANTI-SKID SERVICE REQUIRED: The
system has been automatically disen- gaged due to a fault. A trained and quali-fied Volvo service technician shouldcheck the system.
Symbols in the instrument panel
The Stability Control indicator lightThis light indicates different con- ditions, depending on how it illu-minates.
The Stability Control indicator light illuminates for approximately 2 seconds
This indicates that the system is performing a self-diagnostic test when the ignition isswitched on.
The Stability Control indicator light
flashes
This indicates that the stability system is actively functioning to help counteract wheelspin and/or a skid.
The Stability Control indicator light glows steadily
ANTI-SKID SERVICE REQUIRED will be
displayed in the text window at the same time. A fault is indicated in the stability system.
• Stop the vehicle in a safe place and switch off the engine.
• Restart the engine.
• If the indicator light goes out, the faultwas temporary and no further action isrequired.
• If the indicator light remains on, drive toan authorized Volvo workshop as soon aspossible to have the system checked.
The Stability Control indicator light
glows steadily
If DSTC SPIN CONTROL OFF is displayed
in the text window at the same time, this is a reminder that spin control has been disabledby the driver.
The warning symbolThe warning symbol glowssteadily yellow
The system has been temporarily switched off due to high brake temperature.
TRACTION CONTROL TEMPORARILY OFF will be displayed. The system will auto-
matically switch on again when the brakes have cooled.
WARNING
The stability system is intended to help improve driving safety. It supplements, butcan never replace, the driver's judgementand responsibility when operating the vehi-cle. Speed and driving style should alwaysbe adapted to traffic and road conditions.
Page 167 of 308
06 Starting and driving
Towing a trailer
06
165
Points to keep in mind when towing a trailer
•When towing trailers
without brakes, the
maximum permissible trailer weight is 1,700 lbs (750 kg).
• If necessary, redistribute the weight ofany cargo in the trailer to avoid excessiveweight on the trailer hitch.
• The maximum trailer weight listed in thetable for All Wheel Drive models,5,000 lbs (2250 kg) is only applicablewhen there are not more than two occu-pants in the vehicle, in the front seats,with a combined weight of 300 lbs(135 kg), with no other cargo in the vehi-cle.
• The maximum weight listed for FrontWheel Drive models, 4,000 lbs (1800 kg)is only applicable when there are notmore than four occupants in the vehicle,in the front seats and second row ofseats, with a combined weight of 600 lbs(270 kg), with no other cargo in the vehi-cle.
• Vehicles used for towing a trailer on aregular basis, or for long-distance high-way towing should be equipped with anautomatic transmission oil cooler andVolvo's automatic self-leveling system forthe rear suspension. Consult your Volvoretailer. •
Volvo recommends the use of Volvotrailer hitches that are specially designedfor the vehicle.
• All Volvo models are equipped withenergy-absorbing shock-mounted bump-ers. Trailer hitch installation should notinterfere with the proper operation of thisbumper system.
• Increase tire pressure to recommendedfull inflation pressure. See chapter"Wheels and tires."
• When your vehicle is new, avoid towingheavy trailers during the first 620 miles(1,000 km).
• Engine and transmission are subject toincreased loads. Therefore, engine cool-ant temperature should be closelywatched when driving in hot climates orhilly terrain. Use a lower gear and turn offthe air conditioner if the temperaturegauge needle enters the red range.
• If the automatic transmission begins tooverheat, a message will be displayed inthe text window.
• Hauling a trailer affects handling, durabil-ity, and economy.
• It is necessary to balance trailer brakeswith the towing vehicle brakes to providea safe stop (check and observe state/local regulations). •
Do not connect the trailer's brake systemdirectly to the vehicle's brake system.
• Remove the ball and drawbar assemblywhen the hitch is not being used.
• Volvo recommends the use of syntheticengine oil when towing a trailer over longdistances or in mountainous areas.
NOTE
•When parking the vehicle with a trailer on a hill, apply the parking brakebefore putting the gear selector in
P.
When starting on a hill, put the gearselector in D before releasing the park-
ing brake. Always follow the trailermanufacturer's recommendations forwheel chocking.
• If you use the manual (Geartronic) shiftpositions while towing a trailer, makesure the gear you select does not puttoo much strain on the engine (usingtoo high a gear).
Page 205 of 308
07 Wheels and tires
Tire Pressure Monitoring System (TPMS)
07
203
The tire pressure monitoring system
1
uses
sensors mounted in the tire valves to check inflation pressure levels. When the vehicle ismoving at a speed of approximately 20 mph(30 km/h) or faster, these sensors transmitinflation pressure data to a receiver located inthe vehicle.
USA – FCC ID: MRXG403MA4 A
This device complies with part 15 of the
FCC rules. Operation is subject to the fol- lowing conditions: (1) This device may notcause harmful interference, and (2) thisdevice must accept any interferencereceived, including interference that maycause undesired operation. When low inflation pressure is detected, TPMS will light up the tire pressure warn-ing light (also referred to as a telltale) in theinstrument panel (see page 61), and willdisplay a message in the text window. Thewording of this message is determined bythe degree of inflation pressure loss.
A On certain models, the FCC code is MRXTG315AM04
When low inflation pressure is detected, TPMS will light up the tire pressure warning light
(also referred to as a telltale) in the instrument panel and will display one of the following messages in the text window:
LOW
TIRE PRESS. CHECK TIRES or VERY LOW
TIRE PRESSURE.
NOTE
If a fault occurs in TPMS, the tire pressure warning light will flash for approximately 1 minute and
TIRE PRESS SYST
SERVICE REQUIRED will be displayed.
Each tire, including the spare (if provided), should be checked monthly when cold andinflated to the inflation pressure recom-mended by the vehicle manufacturer on thevehicle placard or tire inflation pressure label.(If your vehicle has tires of a different sizethan the size indicated on the vehicle placardor tire inflation pressure label, you shoulddetermine the proper tire inflation pressure forthose tires.) As an added safety feature, your vehicle has been equipped with a tire pressure monitor-ing system (TPMS) that illuminates a low tirepressure telltale when one or more of yourtires is significantly under-inflated. Accord-ingly, when the low tire pressure telltale illu-minates, you should stop and check yourtires as soon as possible, and inflate them to the proper pressure. Driving on a significantlyunder-inflated tire causes the tire to overheatand can lead to tire failure. Under-inflationalso reduces fuel efficiency and tire tread life,and may affect the vehicle's handling andstopping ability. Please note that the TPMS is not a substitute for proper tire maintenance, and it is the driv-er's responsibility to maintain correct tirepressure, even if under-inflation has notreached the level to trigger illumination of theTPMS low tire pressure telltale. Your vehicle has also been equipped with a TPMS malfunction indicator to indicate whenthe system is not operating properly. TheTPMS malfunction indicator is combined withthe low tire pressure telltale. When the sys-tem detects a malfunction, the telltale willflash for approximately one minute and thenremain continuously illuminated. Thissequence will continue upon subsequentvehicle start-ups as long as the malfunctionexists. When the malfunction indicator is illu-minated, the system may not be able todetect or signal low tire pressure as intended.TPMS malfunctions may occur for a variety ofreasons, including the installation of replace-ment or alternate tires or wheels on the vehi-cle that prevent the TPMS from functioning
1
This system is standard on U.S. models and optional on Canadian models
Page 260 of 308
10 Audio
Radio functions
10
258
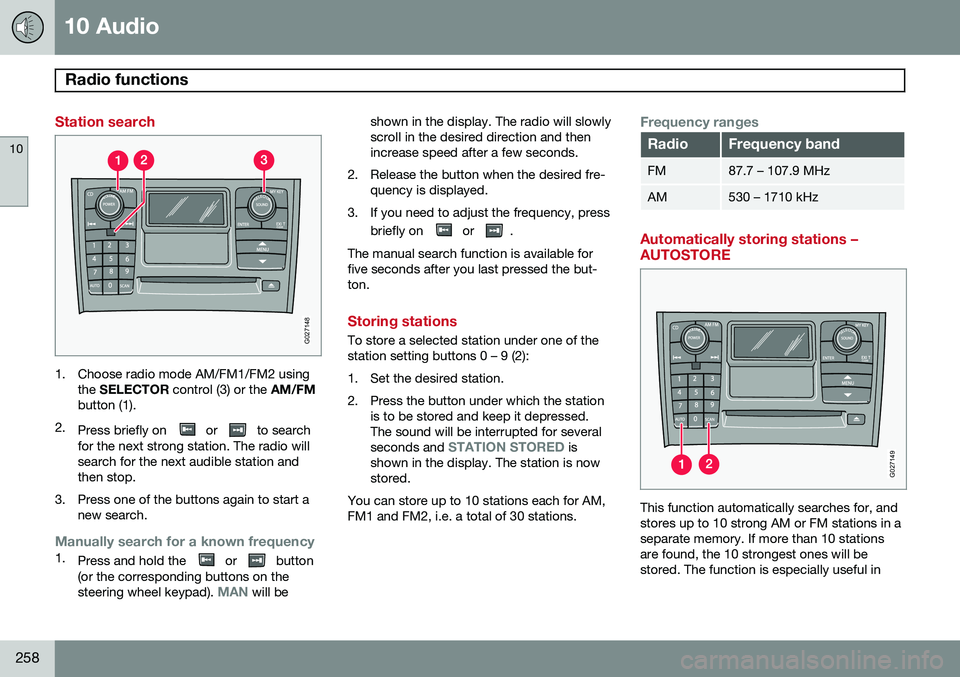
Station search
G027148
1. Choose radio mode AM/FM1/FM2 usingthe SELECTOR control (3) or the AM/FM
button (1).
2. Press briefly on
or to search
for the next strong station. The radio will search for the next audible station andthen stop.
3. Press one of the buttons again to start a new search.
Manually search for a known frequency1.Press and hold the or button
(or the corresponding buttons on the steering wheel keypad).
MAN will be shown in the display. The radio will slowly scroll in the desired direction and thenincrease speed after a few seconds.
2. Release the button when the desired fre- quency is displayed.
3. If you need to adjust the frequency, press briefly on
or .
The manual search function is available for five seconds after you last pressed the but-ton.
Storing stations
To store a selected station under one of the station setting buttons 0 – 9 (2):
1. Set the desired station.
2. Press the button under which the station is to be stored and keep it depressed. The sound will be interrupted for several seconds and
STATION STORED is
shown in the display. The station is now stored.
You can store up to 10 stations each for AM,FM1 and FM2, i.e. a total of 30 stations.
Frequency ranges
RadioFrequency band
FM87.7 – 107.9 MHz
AM530 – 1710 kHz
Automatically storing stations – AUTOSTORE
G027149
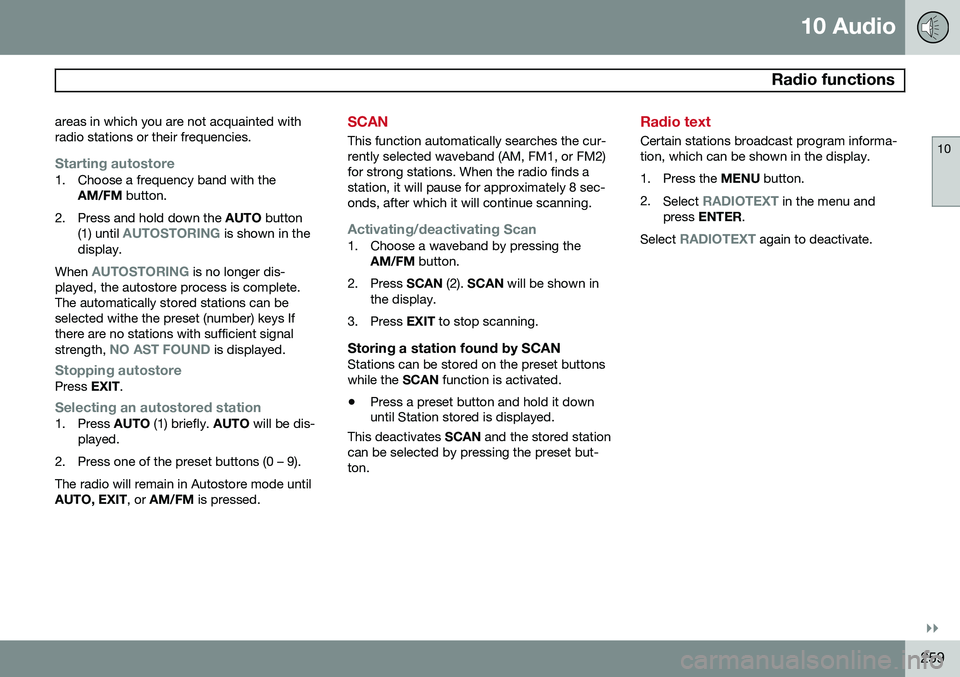
This function automatically searches for, and stores up to 10 strong AM or FM stations in aseparate memory. If more than 10 stationsare found, the 10 strongest ones will bestored. The function is especially useful in
Page 261 of 308
10 Audio
Radio functions
10
}}
259
areas in which you are not acquainted with radio stations or their frequencies.
Starting autostore1. Choose a frequency band with the
AM/FM button.
2. Press and hold down the AUTO button
(1) until
AUTOSTORING is shown in the
display.
When
AUTOSTORING is no longer dis-
played, the autostore process is complete. The automatically stored stations can beselected withe the preset (number) keys Ifthere are no stations with sufficient signal strength,
NO AST FOUND is displayed.
Stopping autostorePress EXIT.
Selecting an autostored station1. Press AUTO (1) briefly. AUTO will be dis-
played.
2. Press one of the preset buttons (0 – 9). The radio will remain in Autostore mode until AUTO, EXIT , or AM/FM is pressed.
SCAN
This function automatically searches the cur- rently selected waveband (AM, FM1, or FM2)for strong stations. When the radio finds astation, it will pause for approximately 8 sec-onds, after which it will continue scanning.
Activating/deactivating Scan1. Choose a waveband by pressing the
AM/FM button.
2. Press SCAN (2). SCAN will be shown in
the display.
3. Press EXIT to stop scanning.
Storing a station found by SCANStations can be stored on the preset buttons while the SCAN function is activated.
• Press a preset button and hold it down until Station stored is displayed.
This deactivates SCAN and the stored station
can be selected by pressing the preset but- ton.
Radio text
Certain stations broadcast program informa- tion, which can be shown in the display.
1. Press the MENU button.
2. Select
RADIOTEXT in the menu and
press ENTER .
Select
RADIOTEXT again to deactivate.