engine coolant VOLVO XC90 2018 Owner´s Manual
[x] Cancel search | Manufacturer: VOLVO, Model Year: 2018, Model line: XC90, Model: VOLVO XC90 2018Pages: 666, PDF Size: 11.32 MB
Page 15 of 666
13
LOADING, STORAGE AND
PASSENGER COMPARTMENT
Passenger compartment interior558
Tunnel console 559
Electrical outlets 560
Using the electrical outlets 562
Using the glove compartment 563
Sun visors 564
Cargo compartment 564
Loading recommendations 564
Roof loads and load carriers 566
Grocery bag holders 566
Load anchoring eyelets 567
Installing and removing the cargo compartment cover * 567
Operating the cargo compartment cover *
568
Installing and removing the steelcargo grid * 570
Installing and removing the cargo net *
571
MAINTENANCE AND SERVICE
Volvo's service program
576
Data transfer between vehicle and workshop over Wi-Fi 578
Download Center 579
Handling system updates via Down-load Center 579
Vehicle status 580
Scheduling service and repairs 580
Sending vehicle information to theworkshop 582
Hoisting the vehicle 583
Opening and closing the hood 585
Climate control system service 586
Replacing a windshield with head-up display * 586
Engine compartment overview 587
Engine oil 587
Checking and filling engine oil 588
Refilling coolant 590
Replacing bulbs 591
Removing the plastic cover to replace bulbs 593
Removing the rectangular headlightcover 593
Location of exterior lights 594
Replacing the low beam headlight bulbs 595
Replacing the high beam headlight bulbs595
Replacing daytime running lights/ front parking light bulbs 596
Replacing front turn signal bulbs 597
Bulb specifications 597
Start battery 598
Support battery 601
Battery symbols 602
Fuses and fuseboxes 603
Replacing fuses 604
Fuses in the engine compartment 605
Fuses under the glove compartment 608
Fuses in the cargo compartment 611
Cleaning the interior 615
Cleaning the center display 615
Cleaning the head-up display *
616
Cleaning fabric upholstery and ceil-ing liner 617
Cleaning the seat belt 617
Cleaning floor mats and inlay mats 617
Cleaning leather upholstery 618
Cleaning the leather steering wheel 619
Cleaning interior plastic, metal andwood surfaces 620
Cleaning the exterior 620
Page 16 of 666
14
Polishing and waxing621
Hand washing 621
Automatic car washes 623
High-pressure washing 624
Cleaning the wiper blades 624
Cleaning exterior plastic, rubber and trim components 625
Cleaning rims 626
Corrosion protection 626
Paintwork 627
Touching up minor paint damage 627
Color codes 628
Changing rear window wipers 629
Replacing windshield wiper blades 630
Windshield wipers in the service position 631
Filling washer fluid 632
SPECIFICATIONS
Type designations636
Dimensions 639
Weights 641
Towing capacity and tongue weight 642
Engine specifications 643
Engine oil specifications 644
Coolant specifications 645
Transmission fluid specifications 645
Brake fluid specifications 645
Fuel tank volume 646
Air conditioning specifications 646
Approved tire pressure 647
INDEX
Index 649
Page 25 of 666
OWNER'S INFORMATION
23
If there are no illustrations associated with step- by-step instructions, the steps are indicated byordinary numbers.
Position listsRed circles containing a number are used in general overview illustrations of components.The corresponding number is used in theposition list's description of that component.
Bullet listsBullets are used for items (components, func-tions, information, etc.) that can be listed in a ran-dom order. For example:
• Coolant
• Engine oil
Related informationRelated information offers references to other parts of the manual containing information asso-ciated with the information you are currentlyreading.
ImagesIllustrations and images used in the Owner'sManual are sometimes generic and are intendedto provide an overview or an example of a certainfunction or feature. These images vary dependingon equipment level and market and may differfrom the appearance of your vehicle.
Continues on next page
}}
This symbol is shown in the lower right-hand
corner to indicate that the current topic continues on the next page.
Continuation from previous page
|| This symbol is shown in the upper left-hand
corner to indicate that the current topic is a con- tinuation from the previous page.
Related information
• Owner's Manual in the center display (p. 17)
• Owner's manual in mobile devices (p. 20)
• Volvo Cars support site (p. 20)
The Owner's Manual and theenvironment
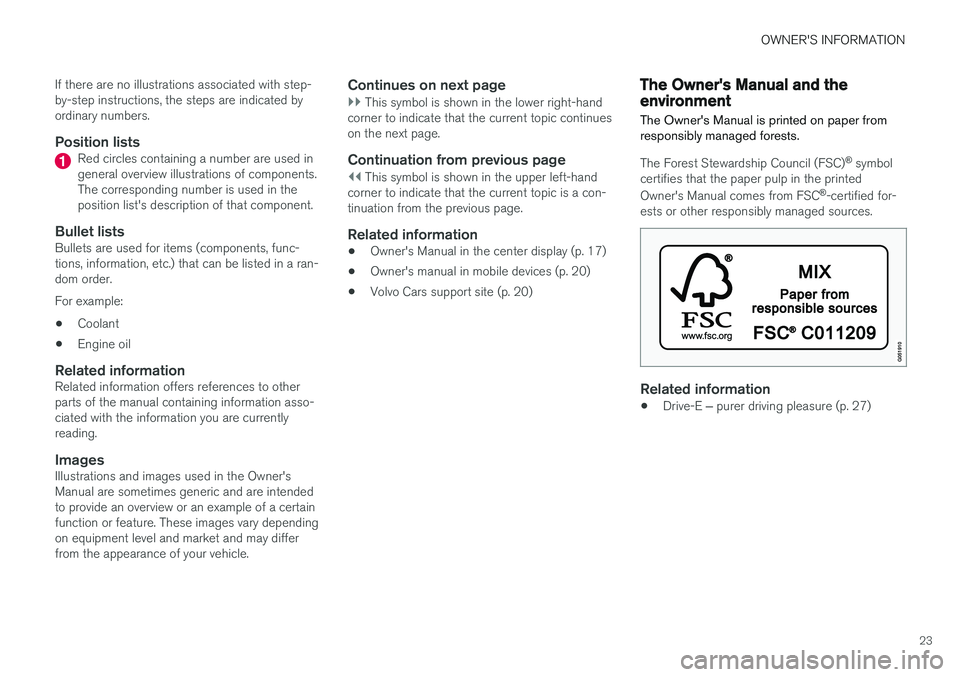
The Owner's Manual is printed on paper from responsibly managed forests.
The Forest Stewardship Council (FSC) ®
symbol
certifies that the paper pulp in the printed Owner's Manual comes from FSC ®
-certified for-
ests or other responsibly managed sources.
Related information
• Drive-E
‒ purer driving pleasure (p. 27)
Page 442 of 666
STARTING AND DRIVING
440•
Speed limiter (p. 276)
• Tire sealing system (p. 550)
Winter driving
It is important to check the vehicle before driving in cold/snowy conditions to make sure it can bedriven safely.
Before the cold season arrives:
• Make sure the engine coolant contains 50% antifreeze. This mixture helps protect theengine from frost erosion down toapprox. -35 °C (-31 °F). Do not mix differenttypes of antifreeze as this could pose ahealth risk.
• Keep the fuel tank well filled to prevent con-densation from forming.
• Check the viscosity of the engine oil. Oil withlow viscosity (thinner oil) improves cold-weather starting and reduces fuel consump-tion when driving with a cold engine.
CAUTION
Low-viscosity oil should not be used with hard driving or in hot weather.
•
Check the condition and charge level of the start battery. Cold weather places greaterdemands on the start battery and reduces itscapacity.
• Use washer fluid containing antifreeze tohelp prevent ice from forming in the washerfluid reservoir.
Slippery driving conditionsFor optimal traction and roadholding, Volvo rec-ommends using snow tires on all wheels when-ever there is a risk of snow or ice on the road.
NOTE
Certain countries require use of winter tires by law. Not all countries permit the use ofstudded tires.
Practice driving on slippery surfaces under con- trolled conditions to learn how the vehicle reacts.
Related information
•Snow tires (p. 549)
• Snow chains (p. 549)
• Braking on salted roads (p. 411)
• Braking on wet roads (p. 410)
• Filling washer fluid (p. 632)
• Start battery (p. 598)
• Replacing windshield wiper blades (p. 630)
• Changing rear window wipers (p. 629)
• Refilling coolant (p. 590)
Page 448 of 666
STARTING AND DRIVING
* Option/accessory.
446
Overheating of engine andtransmission
In demanding driving conditions, such as driving in mountainous areas or hot weather, there is arisk of the engine or transmission overheating,especially when carrying heavy loads.
• Engine power may be temporarily limited.
• Remove any auxiliary lights mounted in front of the grille when driving in hot weather.
• If the temperature in the engine's coolingsystem becomes too high, a warning symbolwill appear in the instrument panel along with the message
Engine temperature High
temperature Stop safely. Pull over to a
safe location and let the engine idle for a few minutes to cool down.
• If the message
Engine temperature High
temperature Turn off engine or Engine
coolant Level low, turn off engine is dis-
played, stop the vehicle and turn off the engine.
• If the transmission begins to overheat, analternative gear shifting program will beselected. An integrated protective functionwill also be activated, the warning symbol will illuminate and the message
Transmission
warm Reduce speed to lower
temperature or Transmission hot Stop
safely, wait for cooling will be displayed in
the instrument panel. Follow the recommen- dations given by reducing speed or stopping the vehicle safely and letting the engine idle for a few minutes to let the transmissioncool.
• If the vehicle begins to overheat, the air con-ditioning may be temporarily switched off.
• After a prolonged period of driving indemanding conditions, do not turn off theengine immediately after stopping.
NOTE
It is normal for the engine's cooling fan to operate for a short time after the engine isswitched off.
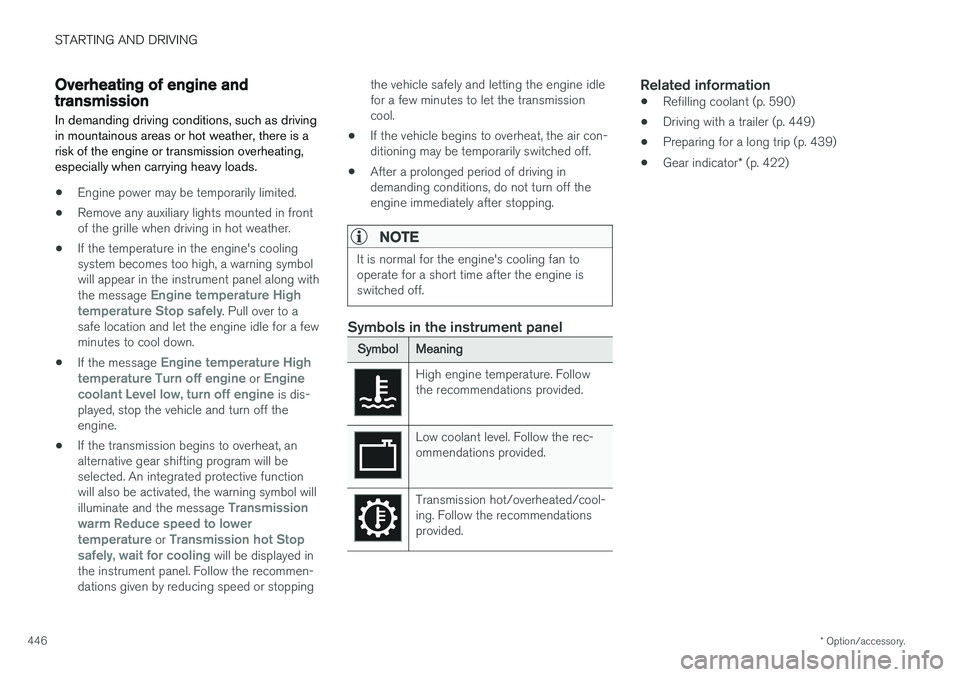
Symbols in the instrument panel
SymbolMeaning
High engine temperature. Follow the recommendations provided.
Low coolant level. Follow the rec- ommendations provided.
Transmission hot/overheated/cool- ing. Follow the recommendationsprovided.
Related information
• Refilling coolant (p. 590)
• Driving with a trailer (p. 449)
• Preparing for a long trip (p. 439)
• Gear indicator
* (p. 422)
Page 579 of 666
MAINTENANCE AND SERVICE
}}
577
Emission inspection readiness
How do states use OBD II for emission
inspections?
Many states connect a computer directly to a vehicle's OBD II system. The inspector can thenread "faults." In some states, this type of inspec-tion has replaced the tailpipe emission test.
How can my vehicle fail OBD II emission
inspection?
Your vehicle can fail OBD II emission inspection for any of the following reasons:
• If your Check Engine (MIL) light is lit, yourvehicle may fail inspection.
• If your vehicle's Check Engine light was lit,but went out without any action on your part,OBD II will still have a recorded fault. Yourvehicle may pass or fail, depending on theinspection practices in your area.
• If you had recent service that required dis-connecting the battery, OBD II diagnosticinformation may be incomplete and "notready" for inspection. A vehicle that is notready may fail inspection.
How can I prepare for my next OBD II
emission inspection?
• If your Check Engine (MIL) light is lit - or was lit but went out without service, have your vehicle diagnosed and, if necessary, servicedby a qualified Volvo technician.
• If you recently had service for a lit CheckEngine light, or if you had service thatrequired disconnecting the battery, a periodof driving is necessary to bring the OBD IIsystem to "ready" for inspection. Two half-hour trips of mixed stop-and-go/highwaydriving are typically needed to allow OBD II toreach readiness. Your Volvo retailer can pro-vide you with more information on planning atrip.
• Maintain your vehicle in accordance with yourvehicle's maintenance schedule.
Owner maintenancePeriodic maintenance requirements and intervalsare described in your vehicle's Warranty andService Records Information booklet. The following points can be carried out between the normally scheduled maintenance services.
Each time the car is refueled:
•Check the engine oil level.
• Clean the windshield, windshield wipers, headlights, and taillights.
Monthly:
• Check cold tire pressure in all tires. Inspect the tires for wear.
• Check that engine coolant and other fluidlevels are between the indicated "min" and"max" markings.
• Clean interior glass surfaces with a glasscleaner and soft paper towels.
• Wipe driver information displays with a softcloth.
• Visually inspect battery terminals for corro-sion. Corrosion may indicate a loose terminalconnector, or a battery near the end of itsuseful service life. Consult your Volvo retailerfor additional information.
As needed:
Wash the car, including the undercarriage, to reduce wear that can be caused by a buildup ofdirt, and corrosion that can be caused by salt res-idues. Clean leaves and twigs from air intake vents at the base of the windshield, and from other placeswhere they may collect.
NOTE
Complete service information for qualified technicians is available online for purchase orsubscription at www.volvotechinfo.com.
Page 589 of 666
MAINTENANCE AND SERVICE
}}
587
Engine compartment overview
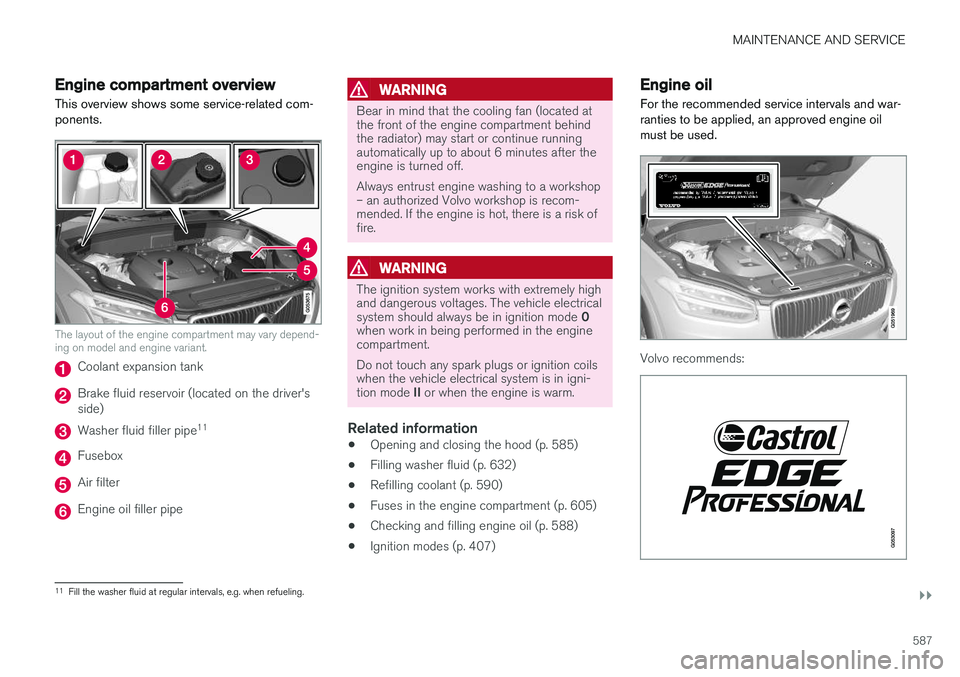
This overview shows some service-related com- ponents.
The layout of the engine compartment may vary depend- ing on model and engine variant.
Coolant expansion tank
Brake fluid reservoir (located on the driver's side)
Washer fluid filler pipe 11
Fusebox
Air filter
Engine oil filler pipe
WARNING
Bear in mind that the cooling fan (located at the front of the engine compartment behindthe radiator) may start or continue runningautomatically up to about 6 minutes after theengine is turned off. Always entrust engine washing to a workshop – an authorized Volvo workshop is recom-mended. If the engine is hot, there is a risk offire.
WARNING
The ignition system works with extremely high and dangerous voltages. The vehicle electrical system should always be in ignition mode
0
when work in being performed in the engine compartment. Do not touch any spark plugs or ignition coils when the vehicle electrical system is in igni- tion mode II or when the engine is warm.
Related information
• Opening and closing the hood (p. 585)
• Filling washer fluid (p. 632)
• Refilling coolant (p. 590)
• Fuses in the engine compartment (p. 605)
• Checking and filling engine oil (p. 588)
• Ignition modes (p. 407)
Engine oil
For the recommended service intervals and war- ranties to be applied, an approved engine oilmust be used.
Volvo recommends:
11 Fill the washer fluid at regular intervals, e.g. when refueling.
Page 592 of 666
||
MAINTENANCE AND SERVICE
590
NOTE
If the conditions for measuring oil level are not properly fulfilled (time after engine shut-down, vehicle inclination, ambient tempera- ture, etc.) the message
No value availablewill be shown in the center display. This does not mean that anything is wrong in the vehi-
cle systems.
Related information
• Engine oil (p. 587)
• Engine oil specifications (p. 644)
• Ignition modes (p. 407)
• Vehicle status (p. 580)
Refilling coolant
Coolant helps keep the combustion engine at the right operating temperature. The heat trans-ferred from the engine to the coolant can beused to warm the passenger compartment.
When refilling coolant, follow the instructions on the package. Never fill the cooling system withonly water. The risk of freezing is increased withtoo low or too high amounts of coolant. If there is coolant under the vehicle, smoke from the cooling system, or if more than 2 liters (about2 quarts) of coolant has been added to the sys-tem, there could be something wrong with thecooling system and starting the vehicle coulddamage the engine. Call a tow truck and do notattempt to start the engine.
WARNING
The coolant may be very hot. Never unscrew the cap when the coolant is hot. If coolantmust be filled, unscrew the expansion tankcap slowly to relieve overpressure.
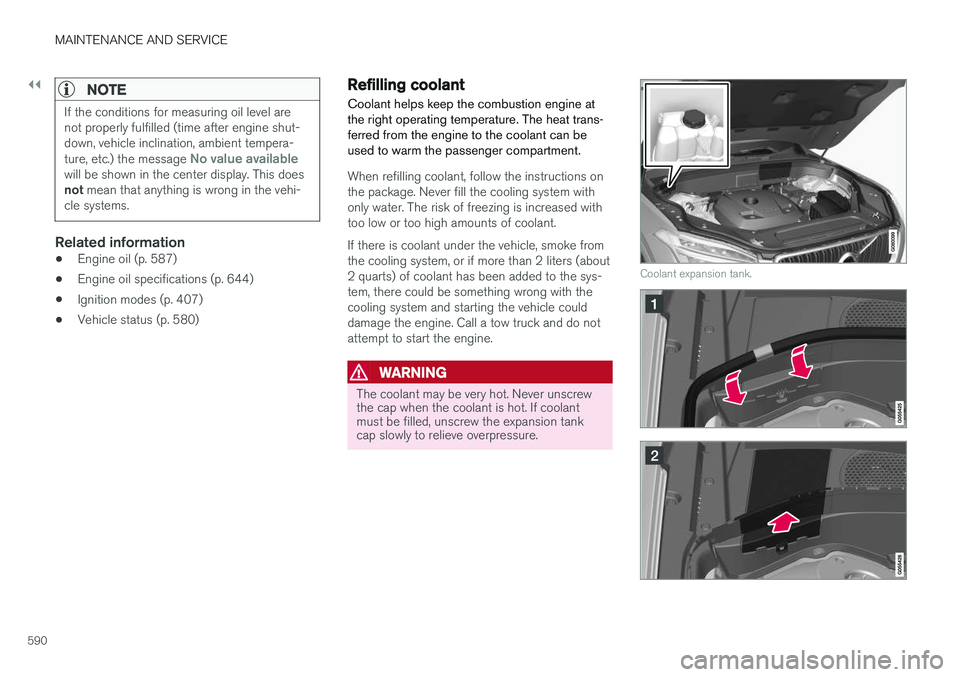
Coolant expansion tank.
Page 593 of 666
MAINTENANCE AND SERVICE
}}
591
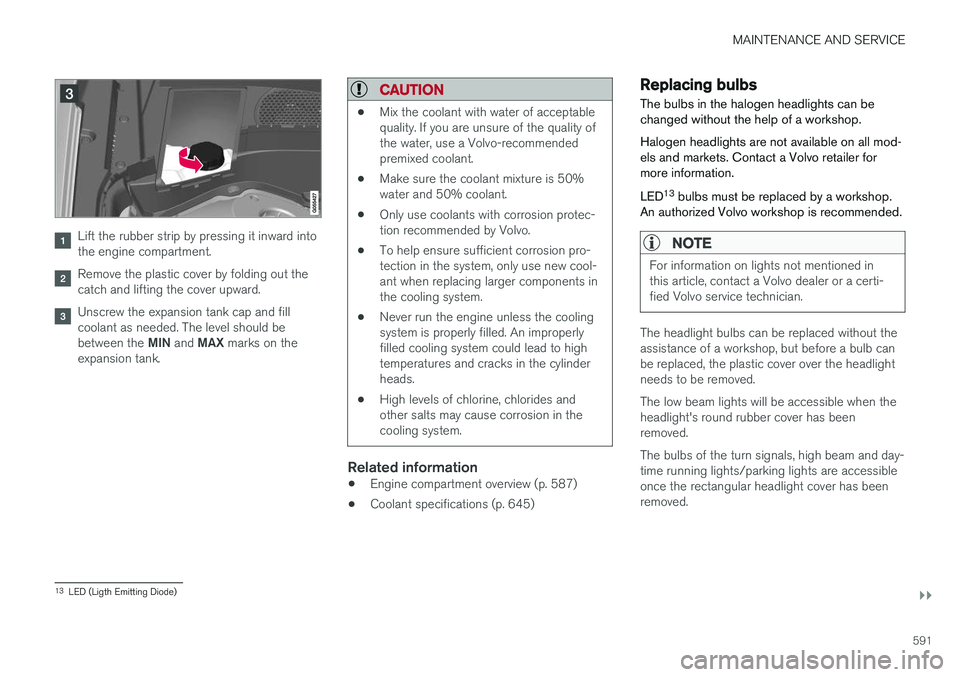
Lift the rubber strip by pressing it inward into the engine compartment.
Remove the plastic cover by folding out the catch and lifting the cover upward.
Unscrew the expansion tank cap and fill coolant as needed. The level should be between the MIN and MAX marks on the
expansion tank.
CAUTION
• Mix the coolant with water of acceptable quality. If you are unsure of the quality ofthe water, use a Volvo-recommendedpremixed coolant.
• Make sure the coolant mixture is 50%water and 50% coolant.
• Only use coolants with corrosion protec-tion recommended by Volvo.
• To help ensure sufficient corrosion pro-tection in the system, only use new cool-ant when replacing larger components inthe cooling system.
• Never run the engine unless the coolingsystem is properly filled. An improperlyfilled cooling system could lead to hightemperatures and cracks in the cylinderheads.
• High levels of chlorine, chlorides andother salts may cause corrosion in thecooling system.
Related information
•
Engine compartment overview (p. 587)
• Coolant specifications (p. 645)
Replacing bulbs
The bulbs in the halogen headlights can be changed without the help of a workshop. Halogen headlights are not available on all mod- els and markets. Contact a Volvo retailer formore information. LED 13
bulbs must be replaced by a workshop.
An authorized Volvo workshop is recommended.
NOTE
For information on lights not mentioned in this article, contact a Volvo dealer or a certi-fied Volvo service technician.
The headlight bulbs can be replaced without the assistance of a workshop, but before a bulb canbe replaced, the plastic cover over the headlightneeds to be removed. The low beam lights will be accessible when the headlight's round rubber cover has beenremoved. The bulbs of the turn signals, high beam and day- time running lights/parking lights are accessibleonce the rectangular headlight cover has beenremoved.
13 LED (Ligth Emitting Diode)
Page 645 of 666
SPECIFICATIONS
643
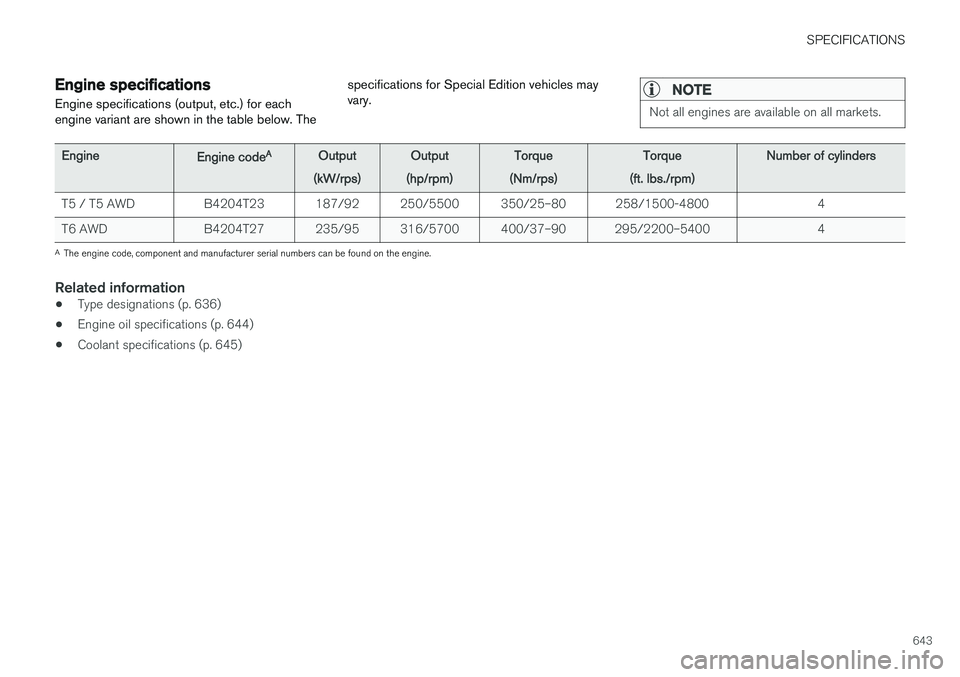
Engine specificationsEngine specifications (output, etc.) for each engine variant are shown in the table below. The specifications for Special Edition vehicles mayvary.NOTE
Not all engines are available on all markets.
EngineEngine codeAOutput
(kW/rps)
Output
(hp/rpm)
Torque
(Nm/rps)
Torque
(ft. lbs./rpm)
Number of cylinders
T5 / T5 AWD B4204T23 187/92 250/5500 350/25–80 258/1500-4800 4
T6 AWD B4204T27 235/95 316/5700 400/37–90 295/2200–5400 4
A The engine code, component and manufacturer serial numbers can be found on the engine.
Related information
• Type designations (p. 636)
• Engine oil specifications (p. 644)
• Coolant specifications (p. 645)