manual transmission VOLVO XC90 2018 Owner´s Manual
[x] Cancel search | Manufacturer: VOLVO, Model Year: 2018, Model line: XC90, Model: VOLVO XC90 2018Pages: 666, PDF Size: 11.32 MB
Page 85 of 666
DISPLAYS AND VOICE CONTROL
* Option/accessory.83
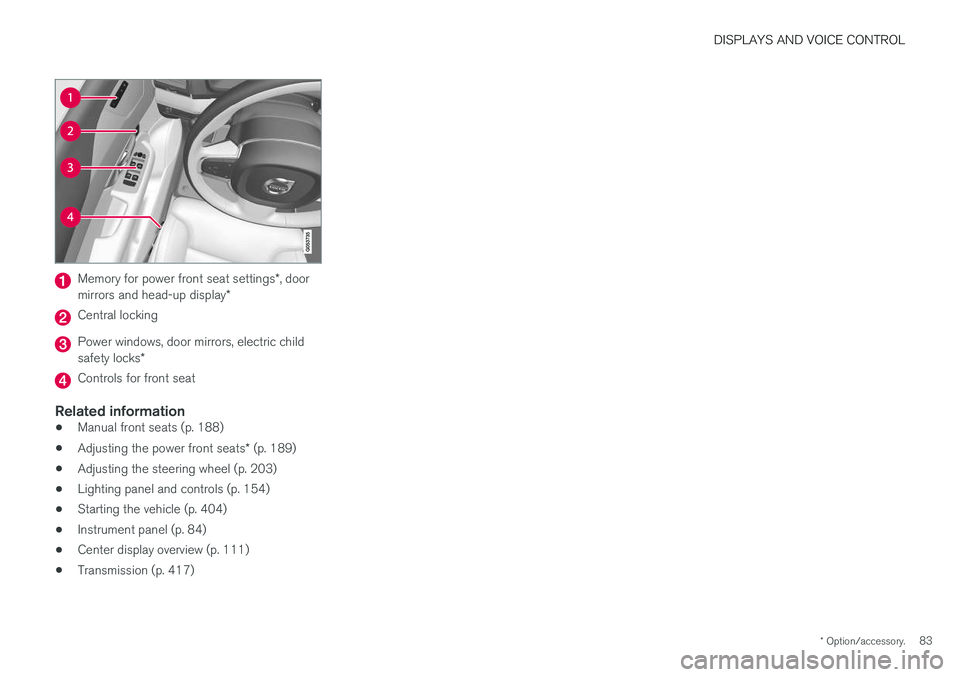
Memory for power front seat settings *, door
mirrors and head-up display *
Central locking
Power windows, door mirrors, electric child safety locks*
Controls for front seat
Related information
•Manual front seats (p. 188)
• Adjusting the power front seats
* (p. 189)
• Adjusting the steering wheel (p. 203)
• Lighting panel and controls (p. 154)
• Starting the vehicle (p. 404)
• Instrument panel (p. 84)
• Center display overview (p. 111)
• Transmission (p. 417)
Page 205 of 666
SEATS AND STEERING WHEEL
}}
* Option/accessory.203
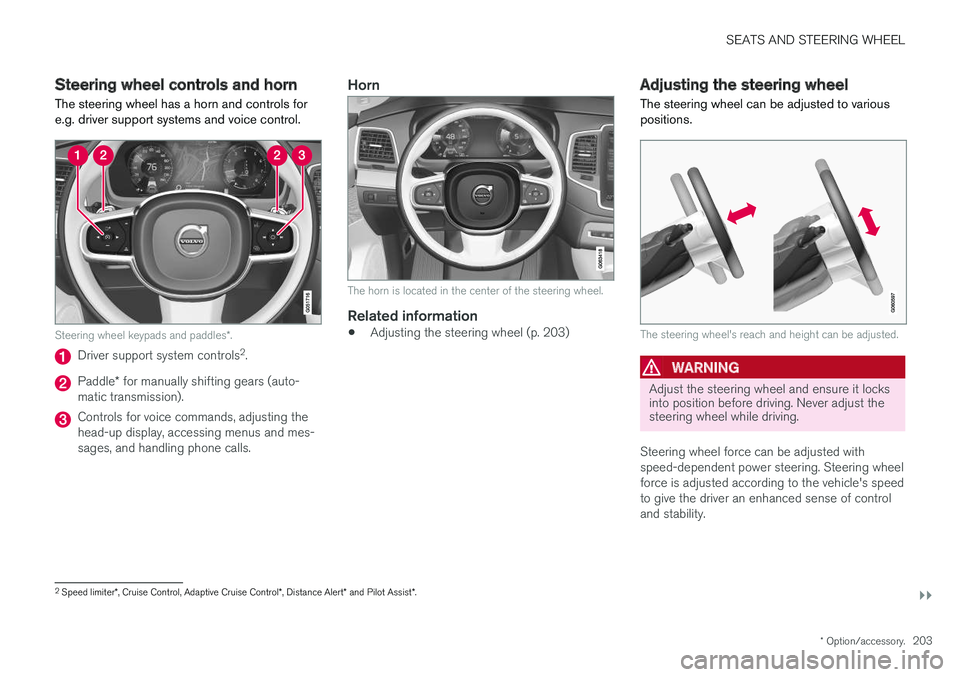
Steering wheel controls and horn The steering wheel has a horn and controls for e.g. driver support systems and voice control.
Steering wheel keypads and paddles *.
Driver support system controls 2
.
Paddle * for manually shifting gears (auto-
matic transmission).
Controls for voice commands, adjusting the head-up display, accessing menus and mes-sages, and handling phone calls.
Horn
The horn is located in the center of the steering wheel.
Related information
• Adjusting the steering wheel (p. 203)
Adjusting the steering wheel
The steering wheel can be adjusted to various positions.
The steering wheel's reach and height can be adjusted.
WARNING
Adjust the steering wheel and ensure it locks into position before driving. Never adjust thesteering wheel while driving.
Steering wheel force can be adjusted with speed-dependent power steering. Steering wheelforce is adjusted according to the vehicle's speedto give the driver an enhanced sense of controland stability.
2 Speed limiter *, Cruise Control, Adaptive Cruise Control *, Distance Alert * and Pilot Assist *.
Page 410 of 666
STARTING AND DRIVING
* Option/accessory.
408
Selecting ignition mode
The vehicle's ignition can be put in various modes (levels) to make different functions availa-ble.
Selecting an ignition mode
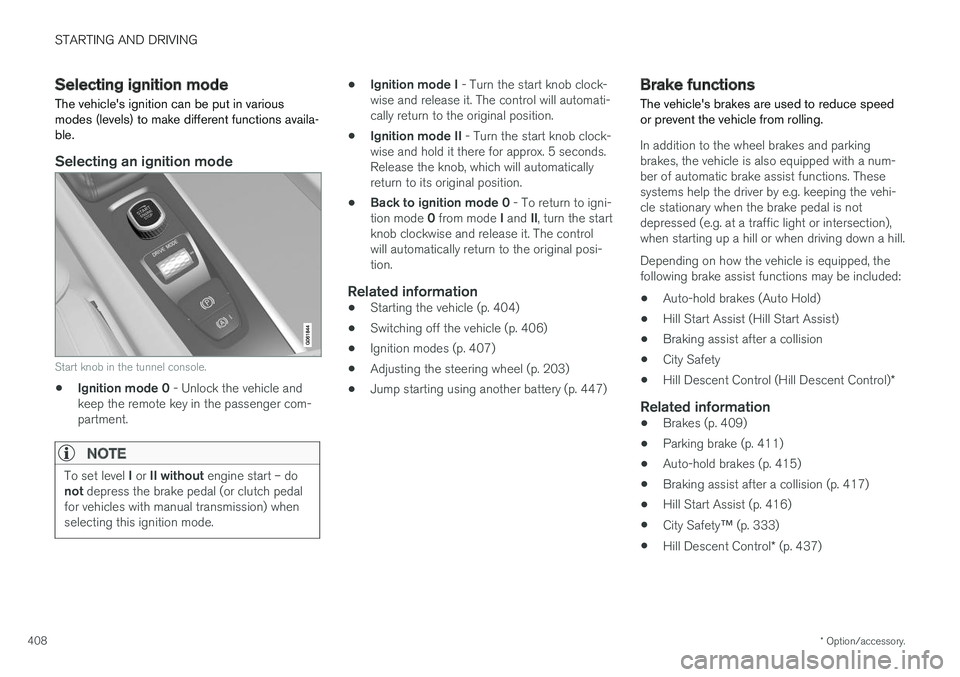
Start knob in the tunnel console.
• Ignition mode 0
- Unlock the vehicle and
keep the remote key in the passenger com- partment.
NOTE
To set level I or II without engine start – do
not depress the brake pedal (or clutch pedal
for vehicles with manual transmission) when selecting this ignition mode.
• Ignition mode I
- Turn the start knob clock-
wise and release it. The control will automati- cally return to the original position.
• Ignition mode II
- Turn the start knob clock-
wise and hold it there for approx. 5 seconds.Release the knob, which will automaticallyreturn to its original position.
• Back to ignition mode 0
- To return to igni-
tion mode 0 from mode I and II, turn the start
knob clockwise and release it. The controlwill automatically return to the original posi-tion.
Related information
• Starting the vehicle (p. 404)
• Switching off the vehicle (p. 406)
• Ignition modes (p. 407)
• Adjusting the steering wheel (p. 203)
• Jump starting using another battery (p. 447)
Brake functions
The vehicle's brakes are used to reduce speed or prevent the vehicle from rolling.
In addition to the wheel brakes and parking brakes, the vehicle is also equipped with a num-ber of automatic brake assist functions. Thesesystems help the driver by e.g. keeping the vehi-cle stationary when the brake pedal is notdepressed (e.g. at a traffic light or intersection),when starting up a hill or when driving down a hill. Depending on how the vehicle is equipped, the following brake assist functions may be included:
• Auto-hold brakes (Auto Hold)
• Hill Start Assist (Hill Start Assist)
• Braking assist after a collision
• City Safety
• Hill Descent Control (Hill Descent Control)
*
Related information
•Brakes (p. 409)
• Parking brake (p. 411)
• Auto-hold brakes (p. 415)
• Braking assist after a collision (p. 417)
• Hill Start Assist (p. 416)
• City Safety
™ (p. 333)
• Hill Descent Control
* (p. 437)
Page 419 of 666
STARTING AND DRIVING
}}
* Option/accessory.417
Braking assist after a collision In a collision in which the activation level is reached for the pyrotechnic seat belt tensionersor airbags, or if a collision with a large animal isdetected, the vehicle's brakes will be automati-cally activated. This function is intended to helpprevent or reduce the effects of any subsequentcollision.
After a serious collision, it may no longer be pos- sible to control and steer the vehicle. In order toavoid or mitigate a possible further collision witha vehicle or an object in the vehicle's path, thebrake assist system is activated automatically tohelp stop the vehicle safely. The brake lights and hazard warning flashers are activated during braking. When the vehicle has stopped, the hazard warning flashers will con-tinue to flash and the parking brake will beapplied. If braking is not appropriate, e.g. if there is a risk of being hit by passing traffic, the driver can over-ride the system by depressing the acceleratorpedal. This function assumes that the brake system is intact after a collision. Brake assist is part of the Rear Collision Warning and Blind Spot Information safety systems.
Related information
•Rear Collision Warning (p. 345)
• BLIS
* (p. 346)
• Brake functions (p. 408)
Transmission The transmission is part of the vehicle's driveline (power transmission) between the engine andthe drive wheels. The function of the transmis-sion is to change gears depending on speedand power needs.
The vehicle has an 8-speed automatic transmis- sion. The number of gears allows the engine'storque and power band to be effectively utilized.Two of the gears are overdrive gears that savefuel when driving at a constant engine speed.Manual shifting is also possible. The instrumentpanel shows the gear currently in use.
CAUTION
Check the operating temperature of the transmission to help avoid damage to any ofthe drive system components. If there is a riskof overheating, a warning symbol will appearin the instrument panel and a text messagewill be displayed. Follow the recommenda-tions given.
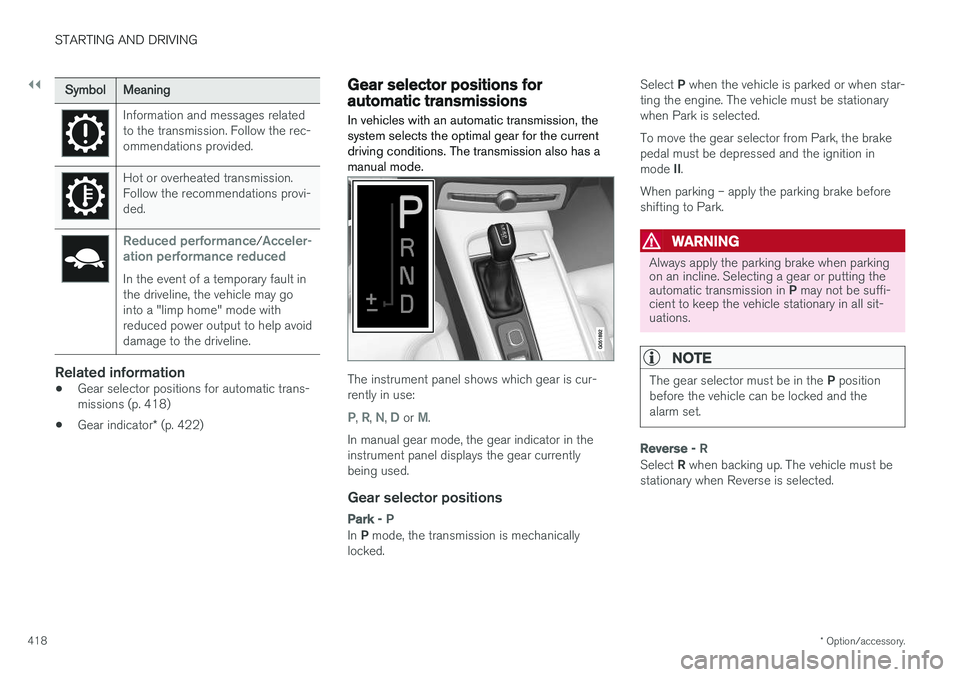
Symbols in the instrument panelIf a problem should occur with the transmission, a symbol and a message will appear in the instru-ment panel.
Page 420 of 666
||
STARTING AND DRIVING
* Option/accessory.
418
SymbolMeaning
Information and messages related to the transmission. Follow the rec-ommendations provided.
Hot or overheated transmission. Follow the recommendations provi-ded.
Reduced performance/Acceler-
ation performance reduced
In the event of a temporary fault in the driveline, the vehicle may gointo a "limp home" mode withreduced power output to help avoiddamage to the driveline.
Related information
• Gear selector positions for automatic trans- missions (p. 418)
• Gear indicator
* (p. 422)
Gear selector positions forautomatic transmissions In vehicles with an automatic transmission, the system selects the optimal gear for the currentdriving conditions. The transmission also has amanual mode.
The instrument panel shows which gear is cur- rently in use:
P, R, N, D or M.
In manual gear mode, the gear indicator in the instrument panel displays the gear currentlybeing used.
Gear selector positions
Park - P
In P mode, the transmission is mechanically
locked. Select
P when the vehicle is parked or when star-
ting the engine. The vehicle must be stationary when Park is selected. To move the gear selector from Park, the brake pedal must be depressed and the ignition in mode II.
When parking – apply the parking brake before shifting to Park.
WARNING
Always apply the parking brake when parking on an incline. Selecting a gear or putting the automatic transmission in P may not be suffi-
cient to keep the vehicle stationary in all sit- uations.
NOTE
The gear selector must be in the P position
before the vehicle can be locked and the alarm set.
Reverse - R
Select R when backing up. The vehicle must be
stationary when Reverse is selected.
Page 421 of 666
STARTING AND DRIVING
}}
* Option/accessory.419
Neutral - N
No gear is selected and the engine can be started. Apply the parking brake if the vehicle is stationary with the gear selector in N.
To move the gear selector from Neutral to another gear, the brake pedal must be depressed and the ignition in mode II.
D drive mode
D is the normal driving gear position. The trans-
mission shifts up or down automatically depend- ing on acceleration and speed. The vehicle mustbe stationary when the gear selector is moved from R to D.
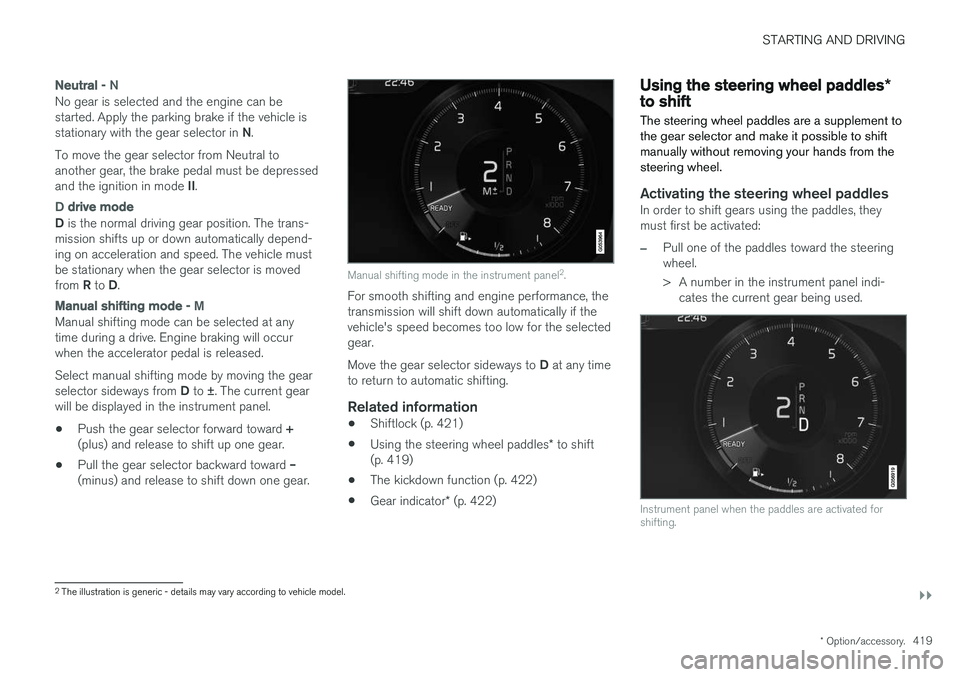
Manual shifting mode - M
Manual shifting mode can be selected at any time during a drive. Engine braking will occurwhen the accelerator pedal is released. Select manual shifting mode by moving the gear selector sideways from D to ±
. The current gear
will be displayed in the instrument panel.
• Push the gear selector forward toward
+
(plus) and release to shift up one gear.
• Pull the gear selector backward toward
–
(minus) and release to shift down one gear.
Manual shifting mode in the instrument panel 2
.
For smooth shifting and engine performance, the transmission will shift down automatically if thevehicle's speed becomes too low for the selectedgear. Move the gear selector sideways to D at any time
to return to automatic shifting.
Related information
• Shiftlock (p. 421)
• Using the steering wheel paddles
* to shift
(p. 419)
• The kickdown function (p. 422)
• Gear indicator
* (p. 422)
Using the steering wheel paddles *to shift
The steering wheel paddles are a supplement to the gear selector and make it possible to shiftmanually without removing your hands from thesteering wheel.
Activating the steering wheel paddlesIn order to shift gears using the paddles, they must first be activated:
–Pull one of the paddles toward the steering wheel.
> A number in the instrument panel indi- cates the current gear being used.
Instrument panel when the paddles are activated for shifting.
2The illustration is generic - details may vary according to vehicle model.
Page 424 of 666
||
STARTING AND DRIVING
* Option/accessory.
422
Related information
• Shiftlock (p. 421)
• Gear selector positions for automatic trans- missions (p. 418)
The kickdown function
Kickdown is used when maximum acceleration is needed, e.g. when passing.
When the accelerator pedal is depressed all the way to the floor (past the normal full acceleratorposition), the transmission will automaticallyengage kickdown, i.e. immediately shift down to alower gear. If the accelerator pedal is released from the kick- down position, the transmission will automaticallyshift up again.
Safety function
The transmission control module is equipped with a downshift protection feature to help prevent theengine from overheating. In some conditions, the transmission will prevent downshifting/kickdown if this would lead to suchhigh engine speed (rpm) that the engine couldbe damaged. If the driver still attempts downshift-ing or kickdown at a high rpm, nothing will hap-pen and the original gear will remain selected. With kickdown, the vehicle can downshift one or more steps at a time depending on the enginespeed. The vehicle upshifts when the engine rea-ches its maximum rpm to prevent engine dam-age.
Related information
• Gear selector positions for automatic trans-missions (p. 418)
Gear indicator
*
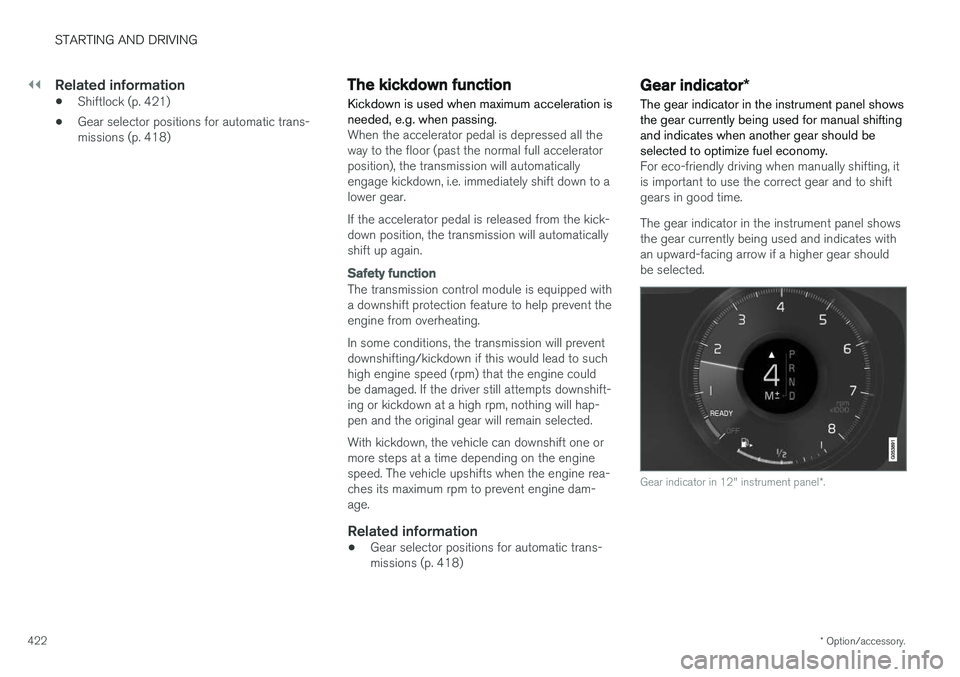
The gear indicator in the instrument panel shows the gear currently being used for manual shiftingand indicates when another gear should beselected to optimize fuel economy.
For eco-friendly driving when manually shifting, it is important to use the correct gear and to shiftgears in good time. The gear indicator in the instrument panel shows the gear currently being used and indicates withan upward-facing arrow if a higher gear shouldbe selected.
Gear indicator in 12" instrument panel *.
Page 428 of 666
STARTING AND DRIVING
* Option/accessory.
426
ECO drive mode
The Eco drive mode optimizes the vehicle's driv- ing characteristics for more fuel-efficient andeco-friendly driving.
Use this mode to save fuel and promote eco- friendly driving. When ECO mode is activated, the following cha- racteristics are modified:
• The automatic transmission's shifting points.
• Engine control and accelerator pedalresponse.
• Eco Coast functionality is activated andengine braking is disabled when the acceler-ator pedal is released at speeds between65 and 140 km/h (40 and 87 mph).
• Some of the climate system settings will bereduced or switched off.
• The suspension's self-leveling function
* will
lower ground clearance to help reduce windresistance.
• Information will be shown in the ECO gaugein the instrument panel to help promotemore eco-friendly and economical driving.
Coast function Eco CoastEco Coast essentially deactivates engine braking,allowing the vehicle's kinetic energy to be usedto roll greater distances. When the driver releasesthe accelerator pedal, the transmission is auto-matically disengaged from the engine. Engine speed is reduced to idling speed to reduce fuelconsumption. This function is most effective in driving situa- tions where the vehicle can roll freely for a longdistance, e.g. on roads with slight downgrades orwhen a decrease in speed is anticipated, such aswhen approaching an area with a lower speedlimit.
Activating Eco Coast
The function is activated when the accelerator pedal is fully released and the following condi-tions are met:
• Eco drive mode is activated.
• The gear selector is in
D.
• The vehicle's speed is approximately65-140 km/h (40-87 mph).
• The gradient of the downgrade is less thanapproximately 6%.
COASTING will be displayed in the instrument
panel when Eco Coast is being used.
Limitations
Eco Coast is not available if:
• The engine and/or transmission are not at normal working temperatures.
• The gear selector is moved from
D to manual
shifting mode.
• The vehicle's speed is not within the65-140 km/h (40-87 mph) range. •
The gradient of the downgrade is more thanapproximately 6%.
• The steering wheel paddles
* are being used
for manual shifting.
Deactivating and turning off Eco Coast
In certain situations, it may be advisable to deac- tivate or turn off Eco Coast so that engine brak-ing can be used. These situations might includedriving down steep hills or before passinganother vehicle to help ensure this can be doneas safely as possible. Deactivate Eco Coast by:
• Pressing the accelerator or brake pedal.
• Moving the gear selector to manual mode.
• Using the steering wheel paddles
* to shift.
Turn off Eco Coast by:
• Switching drive mode
* or switching off drive
mode Eco in Function view.
It is possible to roll short distances even without Eco Coast in order to help conserve fuel. How-ever, for the best fuel economy, Eco Coast shouldbe activated and used to roll longer distances.
Cruise control Eco CruiseWhen cruise control is activated in the Eco drivemode, the vehicle's acceleration and decelerationwill be slower than in other drive modes to helpfurther conserve fuel. Because of this, the vehi-cle's actual speed may be slightly above or belowthe set speed.
Page 429 of 666
STARTING AND DRIVING
* Option/accessory.427
•
On a level road, the vehicle's actual speed may differ from the set speed when cruisecontrol is active and the vehicle is coasting.
• On a steep uphill gradient, the vehicle'sspeed is reduced until the transmissiondownshifts. Reduced acceleration is then ini-tiated in order to reach the set speed.
• On a downhill gradient in which the vehicle iscoasting, the vehicle's actual speed may beslightly above or below the set speed. Thefunction uses engine braking to keep the setspeed. If necessary, the normal brakes arealso applied.
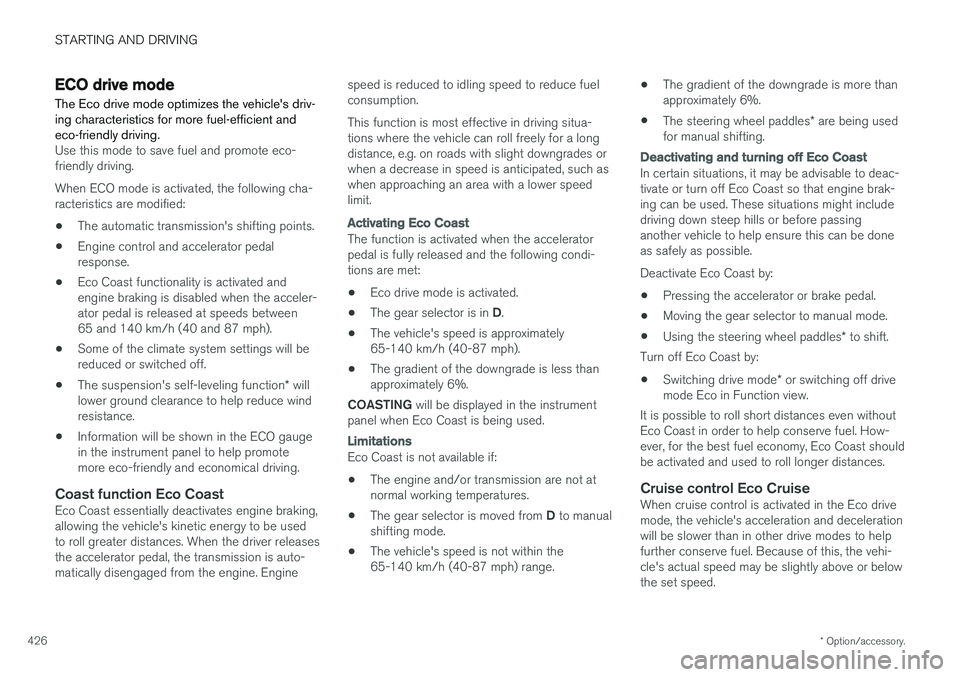
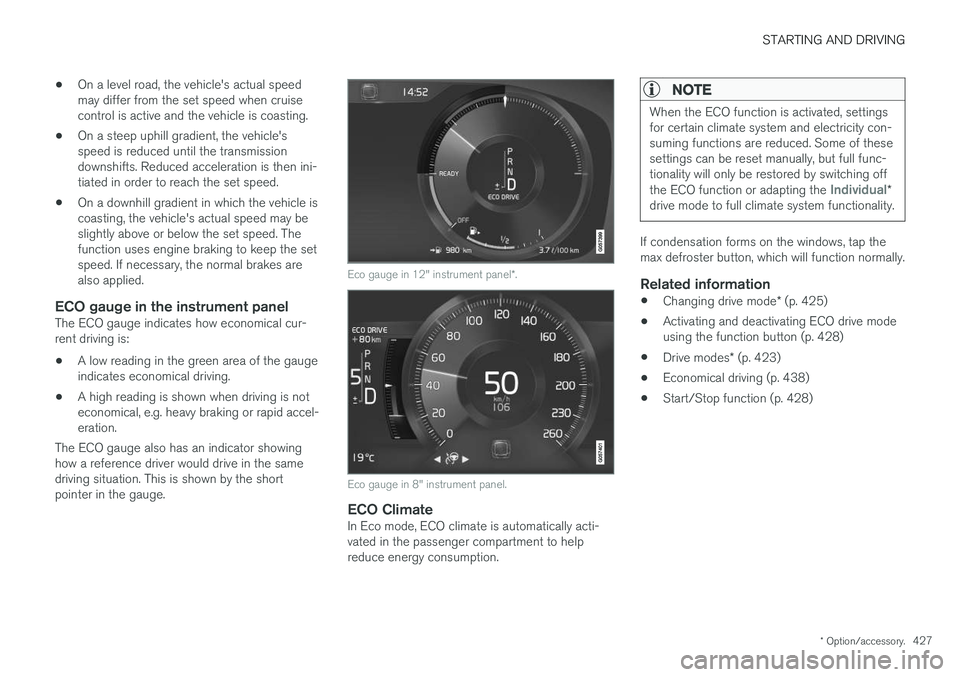
ECO gauge in the instrument panelThe ECO gauge indicates how economical cur-rent driving is:
• A low reading in the green area of the gaugeindicates economical driving.
• A high reading is shown when driving is noteconomical, e.g. heavy braking or rapid accel-eration.
The ECO gauge also has an indicator showinghow a reference driver would drive in the samedriving situation. This is shown by the shortpointer in the gauge.
Eco gauge in 12" instrument panel *.
Eco gauge in 8" instrument panel.
ECO ClimateIn Eco mode, ECO climate is automatically acti- vated in the passenger compartment to helpreduce energy consumption.
NOTE
When the ECO function is activated, settings for certain climate system and electricity con-suming functions are reduced. Some of thesesettings can be reset manually, but full func-tionality will only be restored by switching off the ECO function or adapting the
Individual*
drive mode to full climate system functionality.
If condensation forms on the windows, tap the max defroster button, which will function normally.
Related information
• Changing drive mode
* (p. 425)
• Activating and deactivating ECO drive modeusing the function button (p. 428)
• Drive modes
* (p. 423)
• Economical driving (p. 438)
• Start/Stop function (p. 428)
Page 455 of 666
STARTING AND DRIVING
}}
453
Disabling the automatic check
The automatic light check can be disabled in the center display. 1.Tap
Settings in the Top view.
2. Tap
My CarLights and Lighting.
3. Deselect
Automatic Trailer Lamp Check.
Manual check
If the automatic check has been disabled, the check can be started manually. 1.Tap
Settings in the Top view.
2. Tap
My CarLights and Lighting.
3. Select
Manual Trailer Lamp Check.
> The light check will begin. Get out of the vehicle to perform the check.
Related information
• Driving with a trailer (p. 449)
Towing using a towline
This section refers to one vehicle being towed behind another using a towline.
Before towing another vehicle, check applicable speed limit regulations.
Preparations and towing
CAUTION
Note that the vehicle must always be towed with the wheels rolling forward.
• Do not tow a vehicle with automatictransmission at a speed greater than80 km/h (50 mph) or for a distancegreater than 80 km (50 miles).
WARNING
•
Ignition mode
II must be active – all air-
bags are deactivated in ignition mode I.
• Always have the remote key in the vehicle when it is towed.
WARNING
The brake and steering servos do not work when the engine is off – it takesabout 5 times more pressure on the brakepedal and steering requires much more effortthan normal. 1. Turn on the hazard warning flashers.
2. Attach the towline to the towing eyelet.3.
Put the vehicle in ignition mode II – without
pressing the brake pedal, turn the start knob clockwise and hold it there for about4 seconds. Release the knob, which willautomatically return to its original position.
4. Move the gear selector to neutral ( N) and
release the parking brake. If the battery charge level is too low, it may not be possible to release the parking brake.Connect an auxiliary battery to the vehicle ifthe battery is discharged.
> The towing vehicle can now start driving.
5. Keep the towline taut when the towing vehi- cle slows down by applying light pressure to the brake pedal. This will help avoid jarringmovements.
6. Be prepared to apply the brakes to stop the vehicle.
Jump startingDo not tow the vehicle to start the engine. Use anauxiliary battery if the start battery's charge levelis so low that the engine cannot be started.