recommended oil VOLVO XC90 2018 Owner´s Manual
[x] Cancel search | Manufacturer: VOLVO, Model Year: 2018, Model line: XC90, Model: VOLVO XC90 2018Pages: 666, PDF Size: 11.32 MB
Page 30 of 666
||
YOUR VOLVO
* Option/accessory.
28 goal. In addition to continuous environmental refinement of conventional gasoline-poweredinternal combustion engines, Volvo is activelylooking at advanced technology alternative-fuelvehicles. When you drive a Volvo, you become our partner in the work to lessen the vehicle's impact on theenvironment. To reduce your vehicle's environ-mental impact, you can:
• Maintain proper air pressure in your tires.Tests have shown decreased fuel economywith improperly inflated tires.
• Follow the recommended maintenanceschedule in your Warranty and ServiceRecords Information booklet.
• Drive at a constant speed whenever possible.
• See a trained and qualified Volvo servicetechnician as soon as possible for inspectionif the check engine (malfunction indicator)light illuminates, or stays on after the vehiclehas started.
• Properly dispose of any vehicle-related wastesuch as used motor oil, used batteries, brakepads, etc.
• When cleaning your vehicle, please use gen-uine Volvo car care products. All Volvo carcare products are formulated to be environ-mentally friendly.
Related information
•Economical driving (p. 438)
• The Owner's Manual and the environment(p. 23)
• Air quality (p. 209)
IntelliSafe - driver support
IntelliSafe is Volvo Cars' philosophy regarding vehicle safety. IntelliSafe consists of a number ofsystems, both standard and optional, that aredesigned to help make driving safer, preventaccidents and protect passengers and otherroad users.
SupportIntelliSafe includes driver support functions such as Adaptive cruise control * which helps the driver
to maintain an even speed combined with a pre- selected time interval to the vehicle ahead. Pilot Assist 4
helps the driver keep the vehicle in
the current traffic lane by providing steering assistance and maintaining an even speed and aset time interval to the vehicle ahead. Park Assist Pilot * helps the driver pull into and
out of parking spaces. Other examples of systems that can help the driver are the Active main beam, Cross Traffic Alert (CTA) * and Blind Spot Information (BLIS) *
systems.
PreventionCity Safety is a function intended to help prevent accidents. The function can help prevent or miti-gate a collision with pedestrians, cyclists, largeanimals or other vehicles. Light, sound and pulsa-tions in the brake pedal are provided to alert of a
4 Depending on market, this function can be either standard or optional.
Page 443 of 666
STARTING AND DRIVING
* Option/accessory.441
Driving through standing water
Driving the vehicle through a deep pool of stand- ing water on a water-covered roadway is calledfording. This must be done with great caution.
The vehicle can be driven through water up to a depth of 45 cm (17.7 in) at no more than walkingspeed. Be particularly careful when drivingthrough flowing water. When driving through standing water, drive slowly and do not stop the vehicle. When you havepassed the water, press lightly on the brake pedaland check that the brakes are functioning prop-erly. Water, mud, slush, etc. can make the brakelinings slippery, resulting in delayed brakingeffect.
• If the vehicle is equipped with contacts for anelectric heater or trailer coupling, clean theseafter driving in water or mud.
• Do not allow the vehicle to stand in water upto the sills any longer than absolutely neces-sary. This could result in electrical malfunc-tions.
CAUTION
•Engine damage could occur if water enters the air cleaner.
• If water enters the transmission, the lubri-cating ability of the oils is reduced andthe service life of these systems is short-ened.
• Damage to any component, engine,transmission, turbocharger, differential orits internal components caused by flood-ing, vapor lock or insufficient oil is notcovered under warranty.
• If the engine stalls while the vehicle is inwater, do not attempt to restart it. Havethe vehicle towed out of the water to aworkshop. An authorized Volvo workshopis recommended. Risk of engine failure.
Related information
• Recovery (p. 455)
• Low Speed Control
* (p. 435)
Opening/closing the fuel filler door The vehicle must be unlocked before the fuel filler door can be opened 5
.
An arrow next to the fuel pump symbol in the instrument panelindicates the side of the vehicleon which the fuel filler door islocated.
1. Open the fuel filler door by pressing lightly
on its rear edge.
2. After refueling, press the fuel filler door lightly to close it.
Related information
• Refueling (p. 442)
5
Only locking and unlocking using the remote key, Passive Entry or Volvo On Call will affect the status of the fuel filler door.
Page 531 of 666
WHEELS AND TIRES
}}
529
imprinted on the sidewall of the tire. The last four digits in the series is the Department ofTransportation (DOT) stamp and indicates theweek and year the tire was manufactured. Thetire in the illustration has 0717 as the last fourdigits, which means it was manufactured week 7of 2017.
Tire ageTires degrade over time, even when they are notbeing used. It is recommended that tires gener-ally be replaced after 6 years of normal service.Heat caused by hot climates, frequent high load-ing conditions or Ultra Violet (U.V.) exposure canaccelerate the aging process. The temporary spare
2
should also be replaced at 6-year inter-
vals, even if it has never been used. A tire with e.g., visible cracks or discoloration should bereplaced immediately.
Tire economy
• Maintain correct tire pressure.
• Avoid fast starts, hard braking and tirescreeching.
• Tire wear increases with speed.
• Correct front wheel alignment is very impor-tant.
• Unbalanced wheels impair tire economy anddriving comfort. •
Tires must maintain the same direction ofrotation throughout their lifetime.
• When replacing tires, the tires with the mosttread should be mounted on the rear wheelsto reduce the chance of oversteer duringhard braking.
• Hitting curbs or potholes can damage thetires and/or wheels permanently.
Tire rotationYour vehicle has no required tire rotation. Drivingstyle, tire pressure, climate and road conditionsaffect how quickly the tires age and exhibit signsof wear. Maintaining the correct tire pressurehelps keep tread wear evenly distributed. To help prevent differences in tread depth and wear patterns forming on the tires, the front andrear wheels should be rotated, i.e. the front tiresmoved to the rear and the rear tires moved to thefront. Ideally, tire rotation should be done the firsttime after approximately 5000 km (ca3100 miles) and thereafter at 10,000 km(approx. 6200 miles) intervals. If you have any questions regarding tread depth, Volvo recommends consulting an authorizedVolvo workshop. If significant differences in wear(> 1 mm difference in tread depth) between thetires have already occurred, the least worn tiresshould always be mounted on the rear wheels. Afront-wheel skid (understeer) is usually easier to control than a rear-wheel skid (oversteer). If thefront wheels skid, the vehicle will continue in astraight line instead of the rear wheels skiddingto the side, which could cause you to completelylose control of the vehicle. It is therefore impor-tant that the rear wheels never lose grip beforethe front wheels.
Storing wheels and tiresWhen storing complete wheels (tires mounted onrims), they should be suspended off the floor orplaced on their sides on the floor. Tires not mounted on rims should be stored on their sides or standing upright, but should not besuspended.
CAUTION
Tires should preferably be stored in a cool, dry, dark place, and should never be stored inclose proximity to solvents, gasoline, oils, etc.
2
Not available on all models.
Page 589 of 666
MAINTENANCE AND SERVICE
}}
587
Engine compartment overview
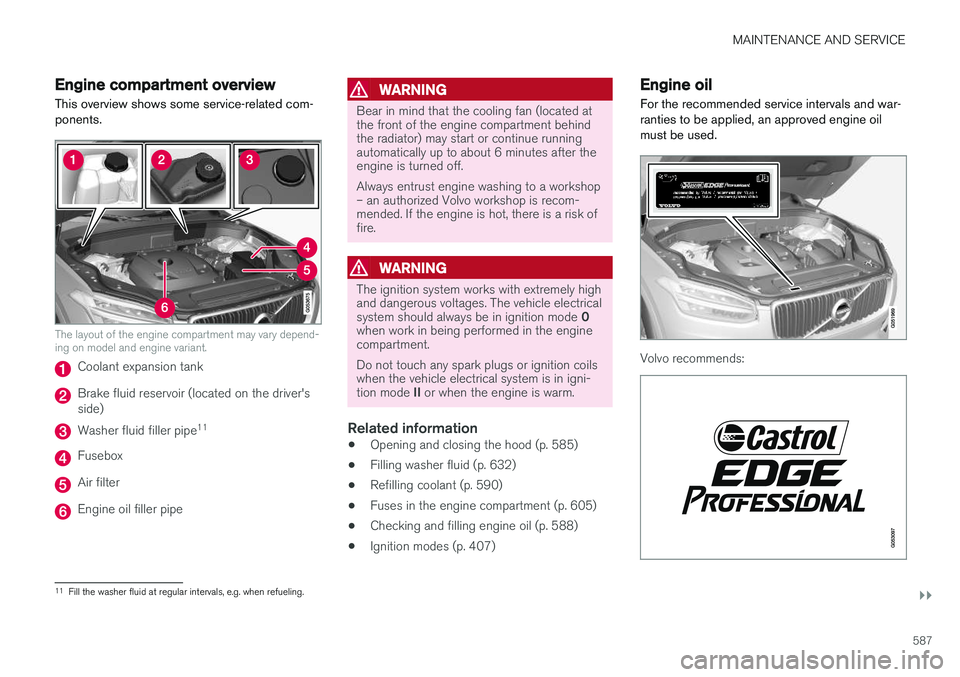
This overview shows some service-related com- ponents.
The layout of the engine compartment may vary depend- ing on model and engine variant.
Coolant expansion tank
Brake fluid reservoir (located on the driver's side)
Washer fluid filler pipe 11
Fusebox
Air filter
Engine oil filler pipe
WARNING
Bear in mind that the cooling fan (located at the front of the engine compartment behindthe radiator) may start or continue runningautomatically up to about 6 minutes after theengine is turned off. Always entrust engine washing to a workshop – an authorized Volvo workshop is recom-mended. If the engine is hot, there is a risk offire.
WARNING
The ignition system works with extremely high and dangerous voltages. The vehicle electrical system should always be in ignition mode
0
when work in being performed in the engine compartment. Do not touch any spark plugs or ignition coils when the vehicle electrical system is in igni- tion mode II or when the engine is warm.
Related information
• Opening and closing the hood (p. 585)
• Filling washer fluid (p. 632)
• Refilling coolant (p. 590)
• Fuses in the engine compartment (p. 605)
• Checking and filling engine oil (p. 588)
• Ignition modes (p. 407)
Engine oil
For the recommended service intervals and war- ranties to be applied, an approved engine oilmust be used.
Volvo recommends:
11 Fill the washer fluid at regular intervals, e.g. when refueling.
Page 590 of 666
||
MAINTENANCE AND SERVICE
588If the engine oil is not checked regularly and the level becomes low, this could cause seriousengine damage.
CAUTION
To satisfy the requirements for the engine's service intervals, all engines are factory-filledwith a specially adapted synthetic engine oil.Great care has been put into the choice of oil,with consideration given to service life, starta-bility, fuel consumption and environmentalimpact. For the recommended service intervals to apply, an approved engine oil must be used.Only use the prescribed oil grade to top off orchange the oil. Otherwise, there is a risk ofthe vehicle's service life, startability, fuel con-sumption and environmental impact beingaffected. Failure to use engine oil of the prescribed grade and viscosity could cause damage toengine-related components. Volvo Car Corpo-ration disclaims warranty liability for such typeof damage. Volvo recommends entrusting oil changes to an authorized Volvo workshop.
Volvo uses different systems to warn if the oil level is too low/high or the oil pressure is low. Onengine variants with an oil pressure sensor, a
warning symbol is displayed in the instrument panel when oil pressure is low
. On engine
variants with an oil level sensor, the
warn-
ing symbol in the instrument panel and display messages are used to alert the driver. Someengine variants have both systems. Contact aVolvo retailer for more information. Change the engine oil and oil filter according to the schedule specified in the Warranty and Main-tenance Records Information booklet. Oils of ahigher grade than that specified may be used. Ifthe vehicle is driven in adverse conditions, Volvorecommends using an oil with a higher gradethan that specified.
Related information
• Checking and filling engine oil (p. 588)
• Engine oil specifications (p. 644)
Checking and filling engine oil
The engine oil level is monitored by an electronic oil level sensor.
Page 591 of 666
MAINTENANCE AND SERVICE
}}
589
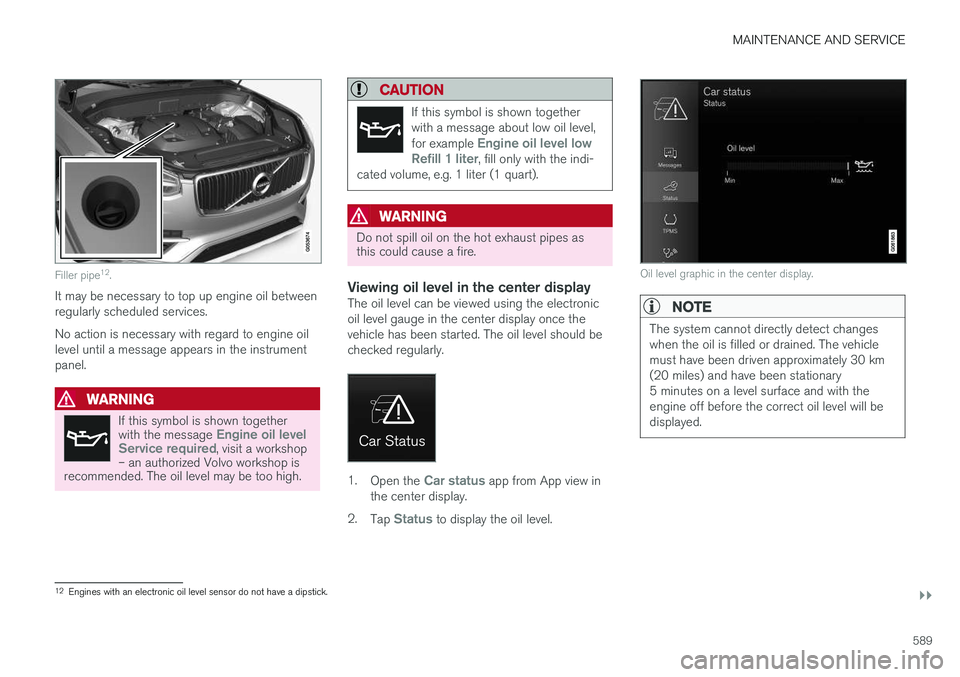
Filler pipe12
.
It may be necessary to top up engine oil between regularly scheduled services. No action is necessary with regard to engine oil level until a message appears in the instrumentpanel.
WARNING
If this symbol is shown together with the message Engine oil level
Service required, visit a workshop
– an authorized Volvo workshop is
recommended. The oil level may be too high.
CAUTION
If this symbol is shown together with a message about low oil level, for example
Engine oil level low
Refill 1 liter, fill only with the indi-
cated volume, e.g. 1 liter (1 quart).
WARNING
Do not spill oil on the hot exhaust pipes as this could cause a fire.
Viewing oil level in the center displayThe oil level can be viewed using the electronic oil level gauge in the center display once thevehicle has been started. The oil level should bechecked regularly.
1. Open the Car status app from App view in
the center display.
2. Tap
Status to display the oil level.
Oil level graphic in the center display.
NOTE
The system cannot directly detect changes when the oil is filled or drained. The vehiclemust have been driven approximately 30 km(20 miles) and have been stationary5 minutes on a level surface and with theengine off before the correct oil level will bedisplayed.
12
Engines with an electronic oil level sensor do not have a dipstick.
Page 594 of 666
||
MAINTENANCE AND SERVICE
* Option/accessory.
592 If you are experiencing problems with any lights other than light bulbs, contact a workshop
14
. If
there is a problem with an LED 13
light, the entire
lamp unit will normally need to be replaced.
WARNING
The vehicle electrical system must be in igni- tion mode 0 when bulbs are replaced.
CAUTION
Never touch the bulb glass with your bare fin- gers. Grease and oils from your fingers vapor-ize in the heat and will leave a deposit on thereflector, which may damage it.
NOTE
If the error message persists after the defec- tive bulb has been replaced, we recommend avisit to an authorized Volvo workshop.
NOTE
Exterior lighting such as headlights and tail- lights may develop temporary condensationon the inside of the lens. This is normal. Allexterior lighting is designed to resist this.Condensation is normally vented out of thelamp housing once the light has been lit forsome period of time.
NOTE
Bulbs for active curve lighting * contain traces
of mercury and should therefore always be submitted to a certified Volvo service techni-cian.
Related information
• Location of exterior lights (p. 594)
• Removing the plastic cover to replace bulbs (p. 593)
• Removing the rectangular headlight cover(p. 593)
• Replacing the low beam headlight bulbs(p. 595)
• Replacing the high beam headlight bulbs(p. 595)
• Replacing daytime running lights/front park-ing light bulbs (p. 596) •
Replacing front turn signal bulbs (p. 597)
• Bulb specifications (p. 597)
14
An authorized Volvo workshop is recommended.
13 LED (Ligth Emitting Diode)
Page 608 of 666

||
MAINTENANCE AND SERVICE
* Option/accessory.
606 Fuse pliers are provided on the inside of the fuse box cover to assist in removing and insertingfuses. There are also spaces for several extra fuses in the fusebox.
PositionsThere is a decal with a diagram of the locationsof the fuses on the inside of the cover.
• Fuses 1-13, 18-30, 35-37 and 46-54 are"Micro" fuses.
• Fuses 14-17, 31-34 and 38-45 are"MCase" fuses and should only be replaced by a workshop 21
.
FunctionAA
– –
– –
– –
Ignition coils (gasoline); spark plugs (gasoline) 15
Oil pump solenoid; A/C mag- netic coupling; heated oxygensensor, center (gasoline); heatedoxygen sensor, rear (diesel)15
FunctionAA
Vacuum regulators; valve; valve for power pulse (diesel)
7.5
Engine control module; actuator; throttle unit; EGR valve (diesel);turbo position sensor (diesel);turbocharger valve (gasoline) 20
Engine control module 5
– –
Solenoids (gasoline); valve; Engine cooling system thermo-stat (gasoline); EGR coolingpump (diesel); glow controlmodule (diesel)10
Spoiler shutter control module; Radiator shutter control module;Relay windings for power pulse(diesel)
5
Heated oxygen sensor, front; Heated oxygen sensor, rear(gasoline)
15
Engine control module 20
Starter motor 40
FunctionAA
Starter motor Shunt
Fuel filter heater (diesel) 30
– –
– –
– –
– –
– –
– –
– –
12 V outlet in tunnel console, front
15
12 V outlet in tunnel console between rear seats15
12 V outlet in trunk/cargo com- partment
* 15
– –
– –
– –
21
An authorized Volvo workshop is recommended.
Page 619 of 666
MAINTENANCE AND SERVICE
}}
617
Cleaning fabric upholstery andceiling liner Only use cleaning agents and car care products recommended by Volvo. Clean regularly andtreat stains immediately for best results. It isimportant to vacuum before using a cleaningagent.
Fabric upholstery and ceiling linerNever scrape or rub a stain, as this could damage the upholstery. Never use strong stain removers,as this could change the color of the upholstery. Use soapy water or a similar detergent. For more difficult stains caused by oil, ice cream, shoe pol-ish, etc., use a stain remover. Consult with yourVolvo retailer.
Related information
•Cleaning the interior (p. 615)
• Cleaning the center display (p. 615)
• Cleaning the seat belt (p. 617)
• Cleaning floor mats and inlay mats (p. 617)
• Cleaning leather upholstery (p. 618)
• Cleaning the leather steering wheel(p. 619)
• Cleaning interior plastic, metal and wood sur-faces (p. 620)
Cleaning the seat belt
Only use cleaning agents and car care products recommended by Volvo. Clean regularly andtreat stains immediately for best results. It isimportant to vacuum before using a cleaningagent.
Seat beltsUse water and a synthetic soap solution. Spe- cially designed textile cleaning agents are availa-ble for purchase at Volvo retailers. Make sure thebelt is dry before it is retracted.
Related information
• Cleaning the interior (p. 615)
• Cleaning the center display (p. 615)
• Cleaning fabric upholstery and ceiling liner(p. 617)
• Cleaning floor mats and inlay mats (p. 617)
• Cleaning leather upholstery (p. 618)
• Cleaning the leather steering wheel(p. 619)
• Cleaning interior plastic, metal and wood sur-faces (p. 620)
Cleaning floor mats and inlay mats
Only use cleaning agents and car care products recommended by Volvo. Clean regularly andtreat stains immediately for best results. It isimportant to vacuum before using a cleaningagent.
Inlay mats and floor matsRemove the inlay mats to clean the floor mats and inlay mats separately. Use a vacuum toremove dust and dirt. Each inlay mat is securedinto place with pins. Remove the inlay mat by grasping the inlay mat at each pin and lifting the mat straight up. Put the inlay mat back into place by pressing it in at each pin.
Page 621 of 666

MAINTENANCE AND SERVICE
619
Cleaning the leather upholstery
1. Apply the leather cleaner to a damp spongeand squeeze it until the cleaner foams.
2. Move the sponge in circular motions to apply the foam to the stain.
3. Dampen the stain thoroughly with the sponge. Let the sponge absorb the stain and do not rub.
4. Dry the stain using a soft towel and let the leather dry completely.
Protecting the leather upholstery
1. Apply a small amount of leather protector toa cloth and then apply the protector to the leather using light circular movements.
2. Let it dry for approximately 20 minutes. Protecting the leather upholstery makes it better able to withstand sunlight's harmful UV rays.
Related information
• Cleaning the interior (p. 615)
• Cleaning the center display (p. 615)
• Cleaning fabric upholstery and ceiling liner(p. 617)
• Cleaning the seat belt (p. 617)
• Cleaning floor mats and inlay mats (p. 617)
• Cleaning the leather steering wheel(p. 619)
• Cleaning interior plastic, metal and wood sur-faces (p. 620)
Cleaning the leather steering wheel
Only use cleaning agents and car care products recommended by Volvo. Clean regularly andtreat stains immediately for best results. It isimportant to vacuum before using a cleaningagent.
Leather steering wheelLeather needs to breathe. Never cover the leather steering wheel with a plastic protector.Volvo Leather Care Kit 951 0251 and LeatherSoftener 943 7429 are recommended for clean-ing the leather steering wheel. First, remove dirt,dust, etc. with a damp sponge or cloth.
CAUTION
Sharp objects such as rings could damage the leather on the steering wheel.
If there are stains on the steering wheel:
Type 1 (ink, wine, coffee, milk, sweat or blood)
–Use a soft cloth or sponge. Wipe the steering wheel using a solution of 5% ammonia. Forblood stains, mix approximately 2 dl(1 cup) ofwater with 25 g (one ounce) of salt and wipethe stain.
Type 2 (grease, oil, sauces or chocolate)
1. Same procedure as for Type 1 stains.
2. Finish by wiping the wheel with an absorbent paper or towel. Type 3
(dry dirt or dust)
1. Remove the dirt/dust using a soft brush.
2. Same procedure as for Type 1 stains.
Related information
• Cleaning the interior (p. 615)
• Cleaning the center display (p. 615)
• Cleaning fabric upholstery and ceiling liner (p. 617)
• Cleaning the seat belt (p. 617)
• Cleaning floor mats and inlay mats (p. 617)
• Cleaning leather upholstery (p. 618)
• Cleaning interior plastic, metal and wood sur-faces (p. 620)