engine VOLVO XC90 RECHARGE 2022 Quick Guide
[x] Cancel search | Manufacturer: VOLVO, Model Year: 2022, Model line: XC90 RECHARGE, Model: VOLVO XC90 RECHARGE 2022Pages: 48, PDF Size: 6.72 MB
Page 7 of 48
EXTERIOR OVERVIEW
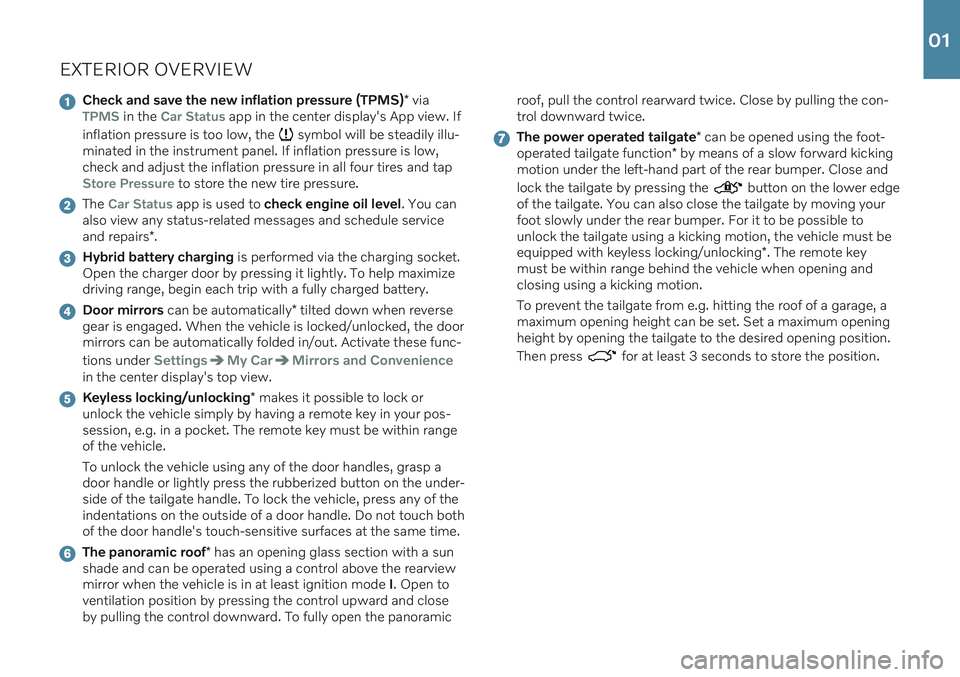
Check and save the new inflation pressure (TPMS)* viaTPMS in the Car Status app in the center display's App view. If
inflation pressure is too low, the
symbol will be steadily illu-
minated in the instrument panel. If inflation pressure is low, check and adjust the inflation pressure in all four tires and tap
Store Pressure to store the new tire pressure.
The Car Status app is used to check engine oil level . You can
also view any status-related messages and schedule service and repairs *.
Hybrid battery charging is performed via the charging socket.
Open the charger door by pressing it lightly. To help maximize driving range, begin each trip with a fully charged battery.
Door mirrors can be automatically * tilted down when reverse
gear is engaged. When the vehicle is locked/unlocked, the door mirrors can be automatically folded in/out. Activate these func- tions under
SettingsMy CarMirrors and Convenience
in the center display's top view.
Keyless locking/unlocking * makes it possible to lock or
unlock the vehicle simply by having a remote key in your pos- session, e.g. in a pocket. The remote key must be within rangeof the vehicle. To unlock the vehicle using any of the door handles, grasp a door handle or lightly press the rubberized button on the under-side of the tailgate handle. To lock the vehicle, press any of theindentations on the outside of a door handle. Do not touch bothof the door handle's touch-sensitive surfaces at the same time.
The panoramic roof * has an opening glass section with a sun
shade and can be operated using a control above the rearview mirror when the vehicle is in at least ignition mode I. Open to
ventilation position by pressing the control upward and closeby pulling the control downward. To fully open the panoramic roof, pull the control rearward twice. Close by pulling the con-trol downward twice.
The power operated tailgate
* can be opened using the foot-
operated tailgate function * by means of a slow forward kicking
motion under the left-hand part of the rear bumper. Close and lock the tailgate by pressing the
button on the lower edge
of the tailgate. You can also close the tailgate by moving your foot slowly under the rear bumper. For it to be possible tounlock the tailgate using a kicking motion, the vehicle must be equipped with keyless locking/unlocking *. The remote key
must be within range behind the vehicle when opening and closing using a kicking motion. To prevent the tailgate from e.g. hitting the roof of a garage, a maximum opening height can be set. Set a maximum openingheight by opening the tailgate to the desired opening position. Then press
for at least 3 seconds to store the position.
01
Page 11 of 48
INTERIOR OVERVIEW
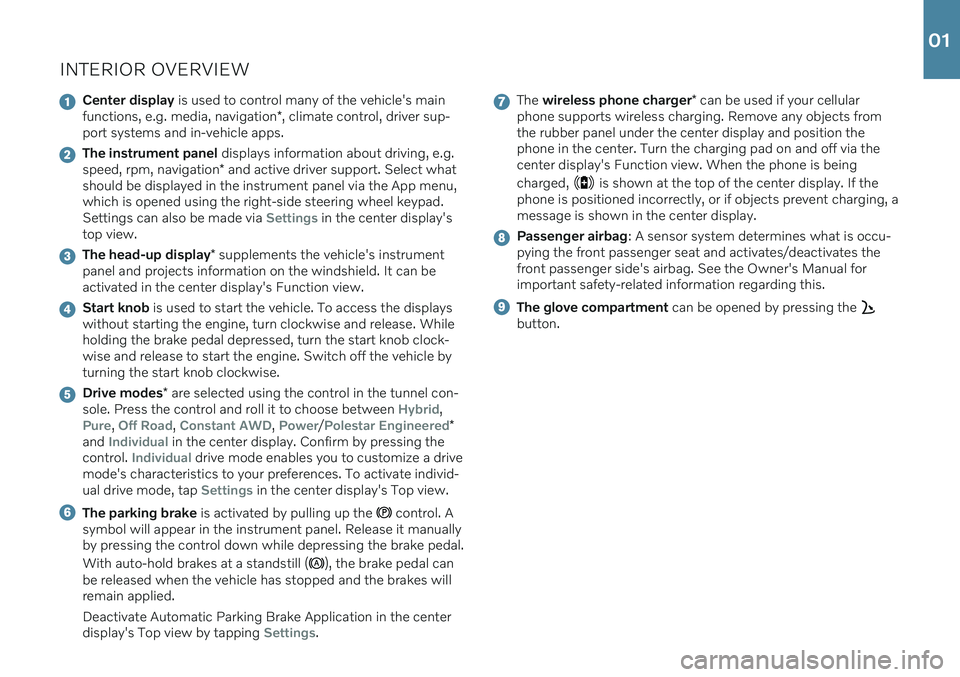
Center display is used to control many of the vehicle's main
functions, e.g. media, navigation *, climate control, driver sup-
port systems and in-vehicle apps.
The instrument panel displays information about driving, e.g.
speed, rpm, navigation * and active driver support. Select what
should be displayed in the instrument panel via the App menu, which is opened using the right-side steering wheel keypad.Settings can also be made via
Settings in the center display's
top view.
The head-up display * supplements the vehicle's instrument
panel and projects information on the windshield. It can be activated in the center display's Function view.
Start knob is used to start the vehicle. To access the displays
without starting the engine, turn clockwise and release. While holding the brake pedal depressed, turn the start knob clock-wise and release to start the engine. Switch off the vehicle byturning the start knob clockwise.
Drive modes * are selected using the control in the tunnel con-
sole. Press the control and roll it to choose between Hybrid,
Pure, Off Road, Constant AWD, Power/Polestar Engineered*
and Individual in the center display. Confirm by pressing the
control. Individual drive mode enables you to customize a drive
mode's characteristics to your preferences. To activate individ- ual drive mode, tap
Settings in the center display's Top view.
The parking brake is activated by pulling up the control. A
symbol will appear in the instrument panel. Release it manually by pressing the control down while depressing the brake pedal. With auto-hold brakes at a standstill (
), the brake pedal can
be released when the vehicle has stopped and the brakes will remain applied. Deactivate Automatic Parking Brake Application in the center display's Top view by tapping
Settings.
The wireless phone charger * can be used if your cellular
phone supports wireless charging. Remove any objects from the rubber panel under the center display and position thephone in the center. Turn the charging pad on and off via thecenter display's Function view. When the phone is being charged,
is shown at the top of the center display. If the
phone is positioned incorrectly, or if objects prevent charging, a message is shown in the center display.
Passenger airbag : A sensor system determines what is occu-
pying the front passenger seat and activates/deactivates the front passenger side's airbag. See the Owner's Manual forimportant safety-related information regarding this.
The glove compartment can be opened by pressing the
button.
01
Page 15 of 48
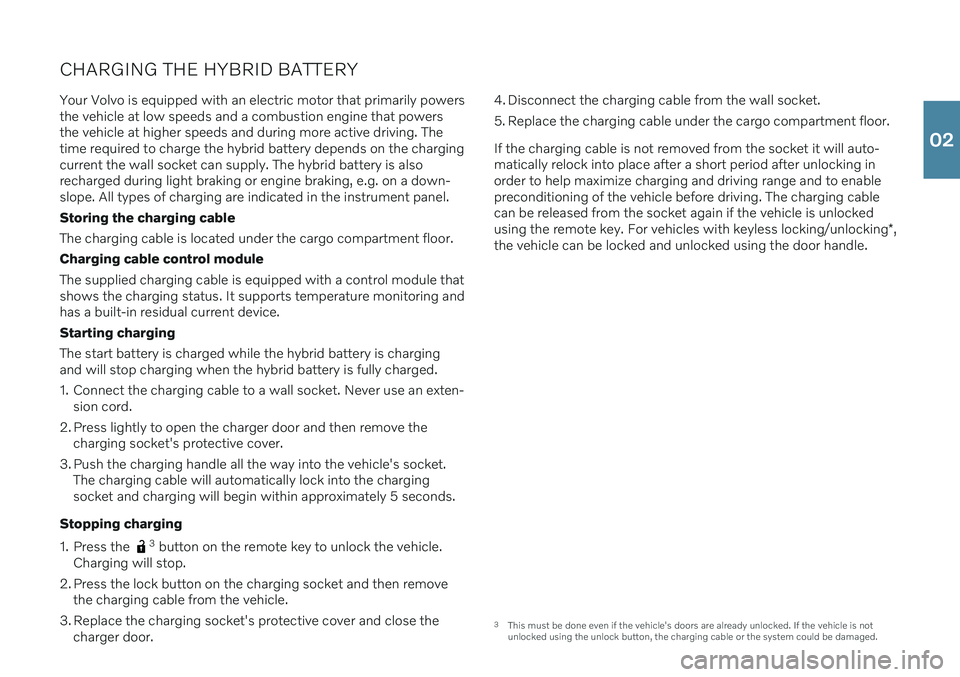
CHARGING THE HYBRID BATTERYYour Volvo is equipped with an electric motor that primarily powers the vehicle at low speeds and a combustion engine that powersthe vehicle at higher speeds and during more active driving. Thetime required to charge the hybrid battery depends on the chargingcurrent the wall socket can supply. The hybrid battery is alsorecharged during light braking or engine braking, e.g. on a down-slope. All types of charging are indicated in the instrument panel. Storing the charging cableThe charging cable is located under the cargo compartment floor.Charging cable control module The supplied charging cable is equipped with a control module that shows the charging status. It supports temperature monitoring andhas a built-in residual current device. Starting charging The start battery is charged while the hybrid battery is charging and will stop charging when the hybrid battery is fully charged.
1. Connect the charging cable to a wall socket. Never use an exten- sion cord.
2. Press lightly to open the charger door and then remove the charging socket's protective cover.
3. Push the charging handle all the way into the vehicle's socket. The charging cable will automatically lock into the charging socket and charging will begin within approximately 5 seconds.
Stopping charging
1. Press the
3 button on the remote key to unlock the vehicle.
Charging will stop.
2. Press the lock button on the charging socket and then remove the charging cable from the vehicle.
3. Replace the charging socket's protective cover and close the charger door. 4. Disconnect the charging cable from the wall socket.
5. Replace the charging cable under the cargo compartment floor. If the charging cable is not removed from the socket it will auto- matically relock into place after a short period after unlocking inorder to help maximize charging and driving range and to enablepreconditioning of the vehicle before driving. The charging cablecan be released from the socket again if the vehicle is unlocked using the remote key. For vehicles with keyless locking/unlocking
*,
the vehicle can be locked and unlocked using the door handle.
3 This must be done even if the vehicle's doors are already unlocked. If the vehicle is not unlocked using the unlock button, the charging cable or the system could be damaged.
02
Page 17 of 48
4.5
14:21
Fully charged at
HYBRID-RELATED INFORMATION IN THE INSTRUMENT PANEL
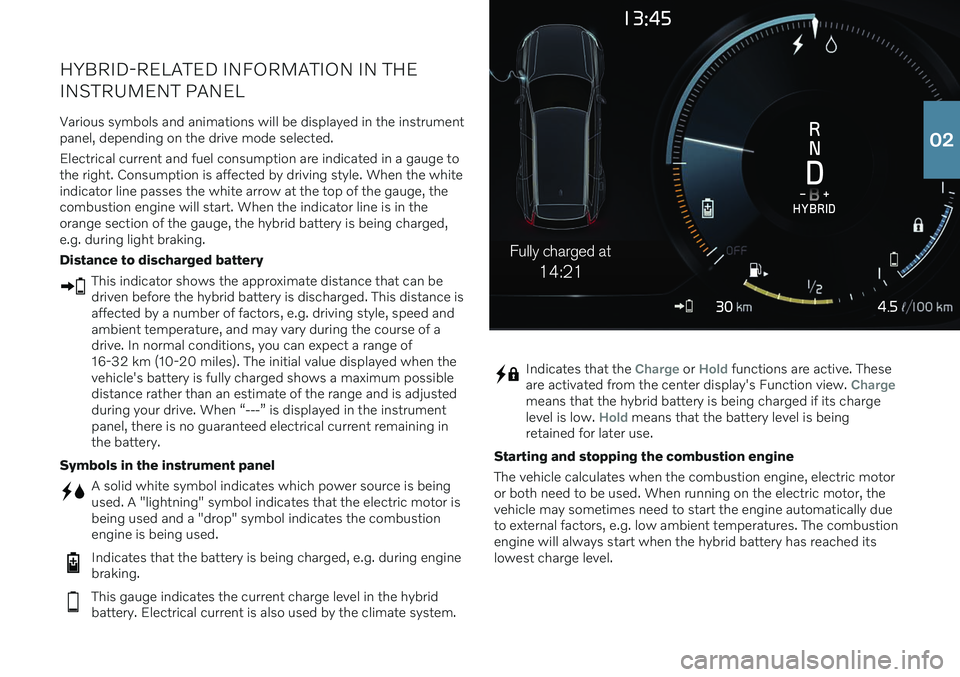
Various symbols and animations will be displayed in the instrument panel, depending on the drive mode selected. Electrical current and fuel consumption are indicated in a gauge to the right. Consumption is affected by driving style. When the whiteindicator line passes the white arrow at the top of the gauge, thecombustion engine will start. When the indicator line is in theorange section of the gauge, the hybrid battery is being charged,e.g. during light braking. Distance to discharged battery
This indicator shows the approximate distance that can be driven before the hybrid battery is discharged. This distance isaffected by a number of factors, e.g. driving style, speed andambient temperature, and may vary during the course of adrive. In normal conditions, you can expect a range of16-32 km (10-20 miles). The initial value displayed when thevehicle's battery is fully charged shows a maximum possibledistance rather than an estimate of the range and is adjustedduring your drive. When “---” is displayed in the instrumentpanel, there is no guaranteed electrical current remaining inthe battery.
Symbols in the instrument panel
A solid white symbol indicates which power source is being used. A "lightning" symbol indicates that the electric motor isbeing used and a "drop" symbol indicates the combustionengine is being used.
Indicates that the battery is being charged, e.g. during engine braking.
This gauge indicates the current charge level in the hybrid battery. Electrical current is also used by the climate system.
Indicates that the Charge or Hold functions are active. These
are activated from the center display's Function view. Chargemeans that the hybrid battery is being charged if its charge level is low. Hold means that the battery level is being
retained for later use.
Starting and stopping the combustion engine The vehicle calculates when the combustion engine, electric motor or both need to be used. When running on the electric motor, thevehicle may sometimes need to start the engine automatically dueto external factors, e.g. low ambient temperatures. The combustionengine will always start when the hybrid battery has reached itslowest charge level.
02
Page 22 of 48
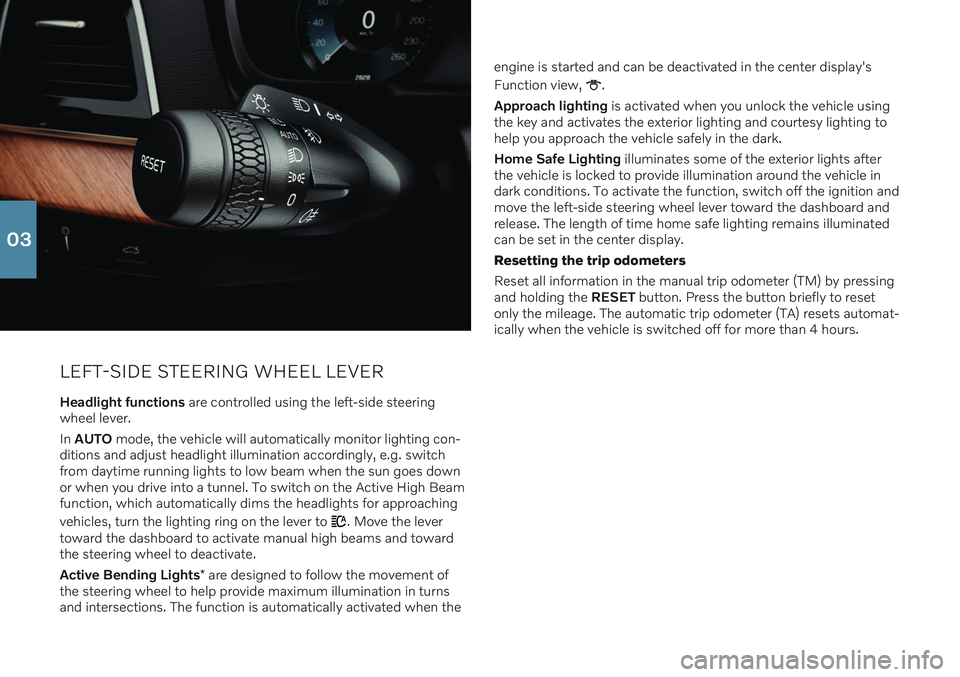
LEFT-SIDE STEERING WHEEL LEVER
Headlight functions are controlled using the left-side steering
wheel lever. In AUTO mode, the vehicle will automatically monitor lighting con-
ditions and adjust headlight illumination accordingly, e.g. switch from daytime running lights to low beam when the sun goes downor when you drive into a tunnel. To switch on the Active High Beamfunction, which automatically dims the headlights for approaching vehicles, turn the lighting ring on the lever to
. Move the lever
toward the dashboard to activate manual high beams and toward the steering wheel to deactivate. Active Bending Lights * are designed to follow the movement of
the steering wheel to help provide maximum illumination in turns and intersections. The function is automatically activated when the engine is started and can be deactivated in the center display's Function view,
.
Approach lighting is activated when you unlock the vehicle using
the key and activates the exterior lighting and courtesy lighting to help you approach the vehicle safely in the dark. Home Safe Lighting illuminates some of the exterior lights after
the vehicle is locked to provide illumination around the vehicle in dark conditions. To activate the function, switch off the ignition andmove the left-side steering wheel lever toward the dashboard andrelease. The length of time home safe lighting remains illuminatedcan be set in the center display. Resetting the trip odometers Reset all information in the manual trip odometer (TM) by pressing and holding the RESET button. Press the button briefly to reset
only the mileage. The automatic trip odometer (TA) resets automat-ically when the vehicle is switched off for more than 4 hours.
03
Page 26 of 48

CONNECTIONSThe vehicle's various types of connections can be used to play or voice-control media, send or receive text messages, make orreceive phone calls, connect to the Internet, etc. from an externaldevice such as a smartphone. In order to connect your devices tothe vehicle, the ignition must be in at least mode I.
Vehicle's modem 6
The easiest and most efficient way to connect the vehicle to theInternet is to use its own modem. This provides the highest per-formance, is activated automatically each time the engine is startedand does not require the use of a smartphone.
1. Insert a personal SIM card in the holder in the cargo compart- ment. 2. Tap
SettingsCommunicationVehicle Modem Internet in
top view.
3. Activate by checking the box for
Vehicle modem Internet.
Sharing Internet connection (tethering) When the vehicle is connected to the Internet via the vehicle's modem, you can share the vehicle's Internet connection (Wi-Fi hot-spot) with other devices. Tap
Settings in Top view and
CommunicationVehicle Wi-Fi Hotspot.
Bluetooth Use Bluetooth as first choice for handling phone calls, text mes- sages and media from your phone to the vehicle's systems.Bluetooth can also be used to connect the vehicle to the Internet.Two Bluetooth devices can be connected at the same time but only
03
Page 37 of 48

DRIVER SUPPORTYour vehicle is equipped with a number of functions to help you drive safely. These functions can be activated in the center dis-play's Function view. Keep in mind that these driver support func-tions are only aids. The driver always has full responsibility for oper-ating the vehicle in a safe manner. City Safety ™
City Safety 12
can help assist the driver in order to help prevent or
mitigate a collision with other vehicles, large animals, pedestrians or cyclists. Visual, acoustic and haptic signals are given to alert thedriver of a collision and assist you to act in time to avoid it. If you donot react in time and a collision is almost unavoidable, the vehiclecan be braked automatically. City Safety steering assistance canalso strengthen your grip on the steering wheel if you have begunan evasive maneuver. City Safety is activated when the engine isswitched on and cannot be switched off. Blind Spot Information (BLIS) *
BLIS can notify the driver of vehicles in your blind spot and of rapidly approaching vehicles in adjacent lanes.
Cross Traffic Alert (CTA) *
Cross Traffic Alert with auto-brake is a supplementary
driver support system for BLIS that can alert the driver of crossing traffic behind the vehicle. If the driver does notreact to the Cross Traffic Alert warning and a collision isimminent, the function can help bring the vehicle to a stop.The function is activated if reverse gear is engaged or if thevehicle is rolling backwards.
Lane Keeping Aid
Lane Keeping Aid can help the driver reduce the risk of the vehicle unintentionally veering out of the lane. To select the type of assistance that should be provided, select
Settingsin the center display's top view.
Steering assistance during collision risks
The Collision avoidance function can help the driver
reduce the risk of the vehicle unintentionally veering out of the lane and/or colliding with another vehicle/obstacle byactively steering the vehicle back into the lane and/orswerving out of the way. The function consists of the sub-functions Run-Off Mitigation with steering assistance,Steering assistance during collision risks from oncomingtraffic and Steering assistance during collision risks from behind *.
Pilot Assist Pilot Assist 13
is a convenience function that can assist the driver in
keeping the vehicle in its own lane and at a set distance to the vehi- cle ahead. For steering assistance to be possible, certain conditionsmust be met, e.g. both of the driver's hands must be on the steer-ing wheel and the lane markings must be visible. When steeringassistance is active, a GREEN steering wheel symbol will be dis-played in the instrument panel.
12 Not available on all markets.
13 Depending on market, this function can be either standard or optional.
05
Page 45 of 48
detected when scanning. The driver is always responsible for assessing whether the spacesuggested by Park Assist Pilot is suitable forparking. Park Assist Camera is supplementary driver
support intended to assist when parking the vehicle. The function is never a substitute for thedriver's attention and judgment. The camerashave dead/blind spots where objects cannot bedetected. Pay particular attention to people andanimals near the vehicle. Bear in mind that thefront end of the vehicle may swing out towardsoncoming traffic during the parking maneuver. Before driving your vehicle, read all sections of the Owner's Manual concerning driver supportsystems in the vehicle. VOICE COMMANDS The driver is always responsible for ensuring that the vehicle is operated in a safe manner and thatall applicable traffic regulations are followed.
CAUTION
INTERIOR OVERVIEW Start knob – The vehicle cannot be started if the
charging cable is still plugged in. Make sure that the charging cable is removed from the chargingsocket before starting the vehicle. Do not use the OFF ROAD drive mode when
towing a trailer without an electrical connection. This could result in damage to the pneumaticsuspension system's bellows. The information is projected from a head-up
display unit * located in the dashboard. To help
prevent damage to the display unit's glass cover, do not place any objects on the glass and pre-vent objects from falling onto it. Wireless phone charger Keep cellular phones
and charger stations away from other objects while charging to help avoid overheating. Do notplace cards with NFC (Near Field Communica-tion), e.g. debit cards for contactless payment,next to the phone. This type of card could bedestroyed during charging. CENTER DISPLAY When cleaning
the center display, use a micro-
fiber cloth that is free from sand and similar deb- ris. When cleaning the center display, apply onlylight pressure to the display. Pressing too hardcould damage the display. Do not spray liquid or corrosive chemicals directly onto the center display. Do not use win-dow cleaners, cleaning agents, aerosol sprays,solvents, alcohol, ammonia or detergents thatcontain abrasives. Never use abrasive cloths,paper towels or tissue paper, as these mayscratch the display. CHARGING THE HYBRID BATTERY Charging cable - Never connect the charging
cable if there is a risk of a thunderstorm or there is lightning. Never detach the charging cablefrom the 120/240-volt outlet while charging isin progress – the 120/240-volt outlet could bedamaged in such circumstances. Always inter-rupt charging first and then disconnect thecharging cable – first from the vehicle's chargingsocket and then from the 120/240 V outlet. Power strips, extension cords, surge protectors or similar devices must not be used togetherwith the charging cable since this may involve arisk of fire, electric shocks, etc. An adapter maynot be used between the 120/240-volt outletand the charging cable. Control unit – Avoid exposing the control unit
and its plug to direct sunlight. In such cases, the overheating protection in the plug could reduceor cut off charging of the hybrid battery. Check that the 120/240-volt outlet has a power supply sufficient for charging electric vehicles –if uncertain, you should have the outlet checkedby a professional. Wipe the charging cable with a clean cloth lightly moistened with water or a mild detergent.Do not use chemicals or solvents. Do not sub-merge the charging cable. Only use the charging cable provided with your vehicle or a replacement cable purchased from aVolvo retailer.
Check the capacity of the socket.
Other electronic equipment connected on thesame fuse circuit must be disconnected if thetotal load is exceeded.
Do not connect the charging cable if thesocket is damaged.
Make sure that the fuse to the wall outlet canhandle the current specified for the chargingcable.
FOLDING DOWN THE REAR SEAT BACK- RESTS When the backrest is folded down, make sure there are no objects in the rear seat, and the seatbelts are not buckled. The integrated booster cushion */armrest * on the center seating position
must be in the stowed position. RIGHT-SIDE STEERING WHEEL LEVER Wiper blades in service position - Before plac-
ing the wipers in service position, ensure that they have not frozen to the windshield. If thewiper arms in service position are raised fromthe windshield, they must be folded backagainst the windshield before activating wiping,washing or rain sensor as well as before depar-ture. This is to prevent scratching the paint onthe hood. CONNECTIONS Electrical outlet – Each 12-volt socket can sup-
ply a maximum of 120 W (10 A).
NOTE
EXTERIOR OVERVIEW Foot-operated tailgate - There is a risk of
reduced or lost function if there are large amounts of snow, ice, dirt, etc. on the rearbumper. Make sure to keep the bumper clean. Please note that the system could be inadver- tently activated in a car wash or similar if theremote key is within range. Setting maximum opening height – If the sys-
tem has been working continuously for a pro- longed period of time, it will be switched off toavoid overload. It can be used again afterapproximately 2 minutes Electromagnetic fields and obstructing objectsmay interfere with
remote key functions . Avoid
storing the remote key near metal objects orelectronic devices, e.g. cell phones, tablets, lap-tops or chargers – preferably no closer than10-15 cm (4-6 in.). INTERIOR OVERVIEW OFF ROAD drive mode is not designed to be
used for normal street driving. With a cold start , idling speed may be consider-
ably higher than normal for certain engine types. This is done to get the emissions system up tonormal operating temperature as quickly as pos-sible, which minimizes exhaust emissions andprotects the environment. Head-up display * – When a City Safety function
is activated, the information in the head-up dis- play will be replaced by a City Safety graphic.This graphic will illuminate even if the head-updisplay is turned off. The driver's ability to see information in the head-up display may be impeded by the use ofe.g. polarizing sunglasses, a driving posture inwhich the driver is not centered in the seat,objects on the display unit's glass cover and/orunfavorable lighting conditions. People with cer-tain types of vision problems may experienceheadaches or eye strain when using the head-updisplay. STEERING WHEEL Trip computer - Calculation of driving range
may vary if your driving style changes. PASSENGER COMPARTMENT CLIMATE Heating/cooling cannot be accelerated by choosing a higher/lower temperature than thedesired temperature. Preconditioning is only available when the vehi-
cle is connected to an electrical outlet. A charg- ing post that is not always active, for examplebecause of a timer, can cause loss of function forpreconditioning. If the vehicle is not connectedto an electrical socket it is still possible in awarm climate to achieve brief cooling of the pas-senger compartment by direct starting precondi-tioning. The vehicle doors and windows should
07
Page 47 of 48

WARNING
California Proposition 65 Operating, servicing and maintaining a pas- senger vehicle can expose you to chemicalsincluding engine exhaust, carbon monoxide,phthalates, and lead, which are known tothe State of California to cause cancer andbirth defects or other reproductive harm. Tominimize exposure, avoid breathing exhaust,do not idle the engine except as necessary,service your vehicle in a well ventilated areaand wear gloves or wash your hands fre-quently when servicing your vehicle. Formore information go towww.P65Warnings.ca.gov/passenger-vehicle.