belt VOLVO XC90 T8 2016 Owner´s Manual
[x] Cancel search | Manufacturer: VOLVO, Model Year: 2016, Model line: XC90 T8, Model: VOLVO XC90 T8 2016Pages: 546, PDF Size: 10.26 MB
Page 164 of 546

• Adjusting the second row backrest tilt(p. 171)")
INSTRUMENTS AND CONTROLS
* Option/accessory, for more information, see Introduction.
162 •
Moving the second row seats forward/rear- ward (p. 174)
• Adjusting the second row backrest tilt(p. 171)
Manually operated front seats
The front seats can be adjusted in a number of ways to help provide the most comfortable seat-ing position.
Raise/lower the front edge of seat cushion by pumping up/down
Move the seat forward/rearward by pulling the bar upward and moving the seat.
Change lumbar support by pressing the but- ton *
Raise/lower the seat by moving the control up/down
Change backrest tilt by turning the wheel
WARNING
• Do not adjust the seat while driving. The seat should be adjusted so that the brakepedal can be depressed fully. In addition,position the seat as far rearward as com-fort and control allow.
• Check that the seat is securely lockedinto position after adjusting.
Related information
•
Turning seat heating
* on and off (p. 199)
• Power front seats
* (p. 163)
• Multifunctional front seats
* (p. 165)
• Seat belts (p. 64)
Page 165 of 546

INSTRUMENTS AND CONTROLS
* Option/accessory, for more information, see Introduction.163
Power front seats*
The power front seats offer a number of adjust- ment possibilities to help maximize comfort andergonomics.
The power seats have an overload protector that
activates if a seat is blocked by any object. If this occurs, put the ignition in mode I or 0 and wait
for a short period before operating the seat again. The power seat(s) can be adjusted for a short period after unlocking the door with the remotekey without switching the ignition on. Seat adjust-ment can always be made when the engine isrunning.
Related information
• Multifunctional front seats
* (p. 165)
• Adjusting power front seats
* (p. 163)
• Using the power seat memory function
*
(p. 164)
• Manually operated front seats (p. 162)
• Turning seat heating
* on and off (p. 199)
• Turning front seat ventilation
* on and off
(p. 200)
• Easy access to and from the driver seat (p. 169)
Adjusting power front seats
*
The power front seat(s) can be adjusted to many positions to help improve comfort and ergonom-ics.
Adjust lumbar support by pressing the con- trol up/down/forward/rearward
Raise/lower the front edge of the seat cush- ion by moving the control up/down
Raise/lower the seat by moving the control up/down
Move the seat forward/rearward by moving the control forward/rearward
Change backrest tilt by moving the control forward/rearward
Only one of the power seat's controls can beused at the same time. The front seat backrests can be folded down completely.
Related information
• Power front seats
* (p. 163)
• Using the power seat memory function
*
(p. 164)
• Multifunctional front seats
* (p. 165)
• Seat belts (p. 64)
Page 166 of 546
INSTRUMENTS AND CONTROLS
* Option/accessory, for more information, see Introduction.
164
Adjusting the passenger's seat from the driver's seat *
Using the controls on the side of the driver's seat, the driver can adjust the position of thefront passenger's seat.
Activating the function in the center
display
From the center display, the function can be acti- vated in two ways. After activating the function, adjust the passeng- er's seat within 10 seconds . If no adjustments
are made in that time span, the function deacti- vates automatically.
Activating from Function view
1. Go to the center display's Function view. 2. Activate the function by tapping
Adjust
passenger seat.
Activating from Settings
–In the center display, select SettingsMy
Car
SeatsAdjust Passenger Seat
From Driver Position.
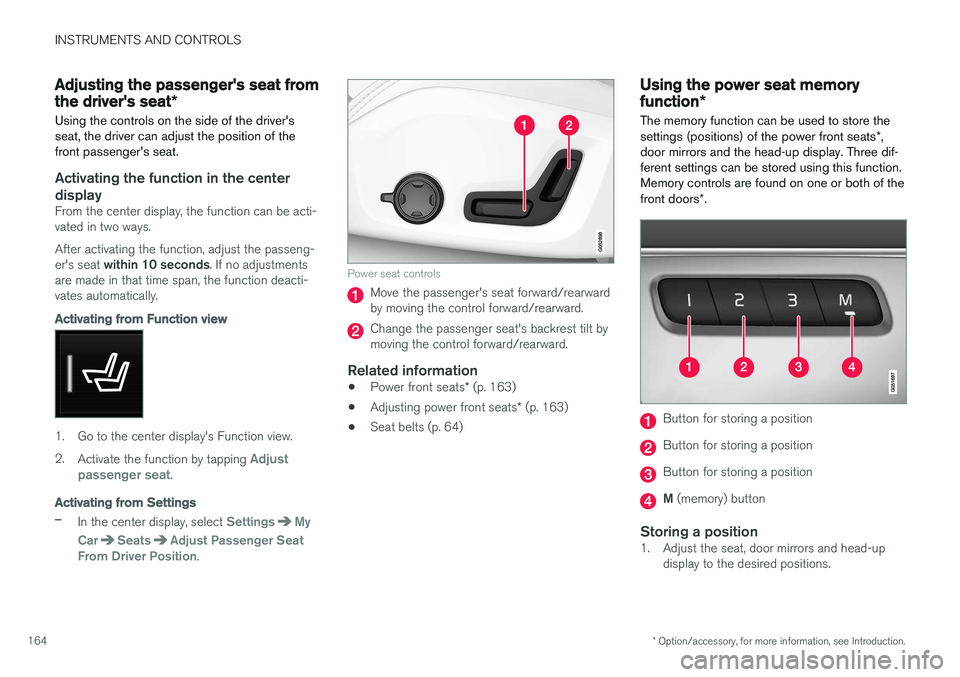
Power seat controls
Move the passenger's seat forward/rearward by moving the control forward/rearward.
Change the passenger seat's backrest tilt by moving the control forward/rearward.
Related information
• Power front seats
* (p. 163)
• Adjusting power front seats
* (p. 163)
• Seat belts (p. 64)
Using the power seat memory function
*
The memory function can be used to store the settings (positions) of the power front seats *,
door mirrors and the head-up display. Three dif- ferent settings can be stored using this function.Memory controls are found on one or both of the front doors *.
Button for storing a position
Button for storing a position
Button for storing a position
M (memory) button
Storing a position1. Adjust the seat, door mirrors and head-up
display to the desired positions.
Page 171 of 546

Rear seats
Your vehicle has three rows of seats")
INSTRUMENTS AND CONTROLS
}}
* Option/accessory, for more information, see Introduction.169
Related information
•Multifunctional front seats
* (p. 165)
Rear seats
Your vehicle has three rows of seats. The sec- ond row of seats has three individual seatingpositions and the optional third row of seats hastwo individual seating positions.
Related information
• Adjusting the second row backrest tilt (p. 171)
• Adjusting the second row head restraints(p. 170)
• Folding the second row backrests (p. 172)
• Folding the third row backrests (p. 175)
• Getting into and out of the third row of seats(p. 174)
• Moving the second row seats forward/rear-ward (p. 174)
• Turning seat heating
* on and off (p. 199)
Easy access to and from the driver seat
The
Easy Ingress & Egress function can be
used to make getting into and out of the driver's seat easier.
Easy egressTo make getting out of the driver's seat easier, the seat is lowered, the side bolsters deflate andthe seat cushion retracts at the same time. The easy egress function must be activated in the center display. 1. Move the gear selector to the P position.
2. Switch off the engine.
3. Unbuckle the seat belt.
4. Open the driver's door. > The seat, side bolsters and seat cushionall move at the same time to a position that makes it easier to leave the seat.
Easy ingressThe seat remains in the easy egress positionwhen the driver leaves the vehicle. When thedriver returns to the vehicle, the seat is in a posi-tion to make sitting down easier. When the driveris seated, has buckled the seat belt and has put the ignition in at least mode 1, the seat will return
to the driver's preferred position.
Page 174 of 546

||
INSTRUMENTS AND CONTROLS
* Option/accessory, for more information, see Introduction.
172
Outboard seats
1. Pull the handle on the side of the seat
upward.
2. Adjust backrest tilt forward/rearward by decreasing/increasing pressure on it.
3. Release the handle to lock the backrest in the new position and press the backrest until its lock engages.
WARNING
Check that all backrests are securely locked in place after changing the tilt angle.
Related information
• Rear seats (p. 169)
• Moving the second row seats forward/rear- ward (p. 174)
• Folding the second row backrests (p. 172) •
Seat belts (p. 64)
Folding the second row backrests
The second row of seats has three individual seating positions whose backrests can befolded down separately.
CAUTION
• To help avoid damage to the seat uphols- tery, before a rear seat backrest is foldeddown, remove any objects from the seatand ensure that the seat belts are notbuckled.
• The integrated booster cushion
* in the
center position must be stowed (foldeddown) before the backrest is foldeddown.
• The center seating position armrest mustbe folded up before the backrest isfolded down.
NOTE
•It may be necessary to adjust the front seat backrests and/or move these seatsforward in order to fold down the rearseat backrests completely.
• It may also be necessary to move thesecond row of seats rearward.
WARNING
Adjust the seat and be sure it is locked in the new position before driving.
Page 217 of 546

LOADING AND STORAGE
}}
* Option/accessory, for more information, see Introduction.215
Loading
The load carrying capacity of your vehicle is determined by factors such as the number ofpassengers, the amount of cargo, the weight ofany accessories that may be installed, etc.
Tailgate opening button on the lighting panel
Open the tailgate by pressing the button on the lighting panel, pressing the
button on the
remote key or by using the optional foot move- ment sensor under the rear bumper.
Loading recommendations
• Load objects in the cargo compartment against the backrest whenever possible.
• If the backrests of the second row seats arefolded down, they should not be in contactwith the front seat backrests. This could impede the function of the WhiplashProtection System (WHIPS).
• Unstable loads can be secured to the loadanchoring eyelets with straps or web lash-ings to help keep them from shifting.
• Stop the engine and apply the parking brakewhen loading or unloading long objects. Thegear selector can be knocked out of positionby long loads, which could set the vehicle inmotion.
WARNING
•
Stop the engine, put the gear selector in P
, and apply the parking brake when
loading or unloading long objects.
• The vehicle's driving characteristics may change depending on the weight and dis-tribution of the load.
• A 44-pound (20 kg) object produces aforce of 2,200 pounds (1,000 kg) in ahead-on collision at 30 mph (50 km/h).
• The cargo area and rear seat should notbe loaded to a level higher than 2 in.(5 cm) below the upper edge of the rearside windows. Objects placed higher thanthis level could impede the function ofthe Inflatable Curtain.
WARNING
•
Cover sharp edges on long loads to help prevent injury to occupants. Secure theload to help prevent shifting during sud-den stops.
• Always secure large and heavy objectswith a seat belt or cargo retaining straps.
• Always secure the load to help prevent itfrom moving in the event of sudden stops.
• Switch off the engine, apply the parking brake and put the gear selector in
P
when loading and unloading the vehicle.
Raising/lowering the rear-end of the vehicle *
Using the buttons on the read edge of the cargo compartment, the rear-end of the vehicle (thelevel of the cargo compartment floor) can beraised or lowered for easier loading or to make attaching a trailer 2
simpler.
2 An accessory trailer hitch can be purchased from a Volvo retailer.
Page 222 of 546

||
LOADING AND STORAGE
* Option/accessory, for more information, see Introduction.
220
5. Attach the mounting bracket's hook through
the cargo anchoring eyelet near the floor of the cargo compartment and insert the threa-ded section of the bracket through the grid'slower attachment hole (1).
6. Slide the plastic sleeve onto the threaded section of the of the mounting bracket withthe sleeve's flange turned upward and pressit down through the hole. Screw the screwcover into place until its underside is approx.0.2 in. (5 mm) from the grid (2).
7. Repeat steps 5 and 6 for the opposite side.
8. Center the grid and tighten both mounting brackets alternately until the grid is held securely in place.
RemovingPerform the steps above in reverse order. Thehooks can be removed before the plastic sleevesare removed from the holes in the grid.
Related information
• Cargo net (p. 217)
• Cargo compartment cover
* (p. 221)
• Load anchoring eyelets (p. 220)
• Loading (p. 215)
Load anchoring eyelets
The eyelets in the cargo compartment can be folded out to secure objects with straps, a net,etc.
Load anchoring eyelets
WARNING
• Cover sharp edges on long loads to help prevent injury to occupants. Secure theload to help prevent shifting during sud-den stops.
• Always secure large and heavy objectswith a seat belt or cargo retaining straps.
• Always secure the load to help prevent itfrom moving in the event of sudden stops.
• Switch off the engine, apply the parking brake and put the gear selector in
P
when loading and unloading the vehicle.
Page 223 of 546

Cargo compartment cover
*
The cover can be used to conceal objects in the")
LOADING AND STORAGE
}}
* Option/accessory, for more information, see Introduction.221
Related information
•Loading (p. 215)
Cargo compartment cover
*
The cover can be used to conceal objects in the cargo area.
Installing the cover 5
With the cover retracted, press the end piece on one side of the cargo area cover into theretaining bracket in the side panel of thecargo area.
Do the same on the opposite side.
Press both sides of the cover, one at a time, until they click into place.
> The red mark will no longer be visible.
Check that both ends of the cover are securely locked in place.
UseThe cover can be used in two positions: fullyopen to completely cover the cargo compartmentor partially retracted to make it easier to reachfarther into the cargo compartment.
Fully open
Third row seats, 7-seat models *: hang the
seat belt latches in the hooks provided in the side panels. For 5-seat models, see the fol-lowing step.
With the cover retracted, grasp its handle and pull it out completely.
Press the attaching pins on the rear corners of the cover into the grooves in the side pan-els and release the cover.
> The cover is now fixed in the fully open position.
5XC90 Excellence only: the cover is permanently mounted and cannot be retracted or removed.
Page 224 of 546

||
LOADING AND STORAGE
222
Partially retracted
With the cover retracted, grasp its handle and pull it so that it is above the cargo com-partment's side panels until it is fully open.Press the attaching pins on the rear cornersof the cover into the grooves in the side pan-els. If the cover is already fully open see thenext step.
With the cover completely pulled out, press it upward lightly and allow it to retract slowly.
> Allow the cover to retract until it stops inthe partially retracted position.
If you are holding something in one of your hands:
From the fully open position, push the cover's handle slightly upward with e.g., your elbow. >
The cover will close until it reaches the
partially retracted position.
To fully open the cover from the partially open position:
1. Grasp the handle and pull out the cover to the fully open position.
2. Let the cover retract slightly and press the handle slightly downward.
> The cover will be secured n the fully openposition.
Avoid placing any objects on the cover when it is open.
WARNING
7-seat models: remove the cargo compart- ment cover completely from the vehicle if oneor both of the third row seats will be occupied.
Retracting the cover 5
From the fully open position:
–Lift the cover's handle and pull it rearward slightly to release the attaching pins fromtheir grooves. Allow the cover to retract.
From the partially retracted position:
–Grasp the handle and lift it slightly to release the attaching pins from their grooves. Pullthe cover to the fully open position.
> Allow the cover to retract completely.
Removing the cover 51. With the cover retracted, press the button on
one of the cover's ends and lift out that end.
2. For 7-seat models: Release the seat belt latches from the hooks in the side panels. For 5-seat models, see the following step.
3. Carefully lift the cover up/out. > The other end will release automatically.Lift the cover out of the cargo compart-ment.
5XC90 Excellence only: the cover is permanently mounted and cannot be retracted or removed.
Page 271 of 546

Before ACC can be put in active mode:
• The driver'")
DRIVER SUPPORT
}}
* Option/accessory, for more information, see Introduction.269
Activating ACC (putting it in active mode and setting a speed)
Before ACC can be put in active mode:
• The driver's seat belt must be buckled and the driver's door must be closed.
• There must be a vehicle ahead (a target vehi-cle) or your vehicle's current speed must beat least 10 mph (15 km/h).
–With the symbol displayed (ACC is in
standby mode), press the
button (1) on
the left-side steering wheel keypad.
> This puts ACC in active mode and sets the vehicle's current speed, which is indi- cated by digits in the center of the speed-ometer. The
time interval to the vehi-
cle ahead will only be shownwhen two vehicles are dis-played.
A speed interval will also be indicated:
• The higher speed is the one set in ACC
• The lower one is the speed of the vehicle ahead (the target vehicle).
Related information
•
Adaptive Cruise Control (ACC)
* (p. 266)
• Setting an Adaptive Cruise Control timeinterval (p. 272)
• Deactivating/resuming Adaptive CruiseControl (ACC) (p. 269)
Deactivating/resuming Adaptive Cruise Control (ACC)
ACC can be put temporarily in standby mode and then reactivated.
Deactivating and putting ACC in standby mode
If ACC is in standby mode and your vehicle comes too close to the vehicle ahead, the driverwill be warned by the Distance Alert systeminstead.