heating VOLVO XC90 T8 2016 Owner´s Manual
[x] Cancel search | Manufacturer: VOLVO, Model Year: 2016, Model line: XC90 T8, Model: VOLVO XC90 T8 2016Pages: 546, PDF Size: 10.26 MB
Page 7 of 546
5
Defrosting windows and mirrors195
Turning steering wheel heating * on
and off 197
Air conditioning 198
Turning seat heating * on and off
199
Turning front seat ventilation * on and off
200
Air distribution 201
Opening/closing/directing air vents 202
Adjusting air distribution 202
Air distribution table 204
LOADING AND STORAGE
Cargo space208
Passenger compartment storage spaces 208
Using the glove compartment 209
Tunnel console 210
Sun visors 211
Electrical sockets 212
Loading 215
Grocery bag holder 217
Cargo net 217
Steel cargo grid *
219
Load anchoring eyelets 220
Cargo compartment cover *
221
LOCKS AND ALARM
Locks and remote keys
226
Alarm 226
Automatically arming/disarming the alarm 228
Deactivating the alarm without afunctioning remote key 228
Child safety locks 228
Antenna locations for the start andlock system 230
Start and lock system type designations 230
Immobilizer 231
Changing the remote key's battery 232
Remote key's range 235
Remote key 235
Detachable key blade 237
Foot movement tailgate operation *
238
Locking and unlocking confirmation 240
Locking/unlocking from inside thevehicle 242
Locking/unlocking from outside thevehicle 243
Locking/unlocking the tailgate 244
Power tailgate *
246
Locking/unlocking with the detacha-ble key blade 248
Page 9 of 546
7
Electronic Stability Control (ESC) sport mode324
Electronic Stability Control (ESC)symbols and messages 325
Roll stability control (RSC) 327
Driver Alert Control (DAC) 327
Driver Alert Control limitations 328
Using Driver Alert Control (DAC) 328
Distance Alert *
329
Using Distance Alert *
329
Distance Alert * limitations
330
Blind Spot Information (BLIS) *
330
Blind Spot Information (BLIS) * On/Off
332
Blind Spot Information (BLIS) * limitations
332
Cross Traffic Alert (CTA) *
333
Activating/deactivating Cross Traffic Alert (CTA) * 334
Cross Traffic Alert (CTA) * limitations
335
Blind Spot Information (BLIS) * with
Cross Traffic Alert (CTA) * symbols
and messages 337
Driving lane assistance 338
Activating/deactivating Lane Departure Warning (LDW) 340
Activating/deactivating Lane Keeping Aid (LKA) * 340
Driving lane assistance symbols and messages
342
STARTING AND DRIVING
Starting and driving
346
Brakes 346
Brake functions 348
Auto-hold brake function 349
Brake assist system 349
Braking effect after a collision 350
Emergency brake lights 350
Hill Descent Control (HDC) 350
Hill Start Assist 351
Parking brake 352
Using the parking brake 352
Parking brake malfunctions 354
Before a long distance trip 355
Driving economically 355
Driving through standing water 357
Overheating the engine and transmission 357
Winter driving 358
Towing eyelet 359
Towing recommendations 360
Fuel 361
Octane rating 362
Opening/closing the fuel filler door 363
Emission controls 364
Jump starting 365
Page 22 of 546
INTRODUCTION
20
Volvo and the environment Volvo is committed to the well-being of its cus- tomers. As a natural part of this commitment, wecare about the environment in which we all live.Concern for the environment means an everydayinvolvement in reducing our environmentalimpact.
Volvo's environmental activities are based on a holistic view, which means we consider the over-all environmental impact of a product throughoutits complete life cycle. In this context, design, pro-duction, product use, and recycling are all impor-tant considerations. In production, Volvo haspartly or completely phased out several chemicalsincluding CFCs, lead chromates, asbestos, andcadmium; and reduced the number of chemicalsused in our plants 50% since 1991. Volvo was the first in the world to introduce into production a three-way catalytic converter with aLambda sond, now called the heated oxygen sen-sor, in 1976. The current version of this highlyefficient system reduces emissions of harmfulsubstances (CO, HC, NOx) from the exhaust pipeby approximately 95 – 99% and the search toeliminate the remaining emissions continues.Volvo is the only automobile manufacturer tooffer CFC-free retrofit kits for the air conditioningsystem of all models as far back as the 1975model 240. Advanced electronic engine controlsand cleaner fuels are bringing us closer to ourgoal. In addition to continuous environmentalrefinement of conventional gasoline-poweredinternal combustion engines, Volvo is activelylooking at advanced technology alternative-fuelvehicles. When you drive a Volvo, you become our partner in the work to lessen the car's impact on theenvironment. To reduce your vehicle's environ-mental impact, you can:
• Maintain proper air pressure in your tires. Tests have shown decreased fuel economywith improperly inflated tires.
• Follow the recommended maintenanceschedule in your Warranty and ServiceRecords Information booklet.
• Drive at a constant speed whenever possible.
• See a trained and qualified Volvo servicetechnician as soon as possible for inspectionif the check engine (malfunction indicator)light illuminates, or stays on after the vehiclehas started.
• Properly dispose of any vehicle-related wastesuch as used motor oil, used batteries, brakepads, etc.
• When cleaning your vehicle, please use gen-uine Volvo car care products. All Volvo carcare products are formulated to be environ-mentally friendly.
Volvo XC90 T8 Twin Engine Plug-in Hybrid
• If possible, precondition the vehicle with the charging cable before driving.
• If preconditioning is not possible in coldweather, use the seat and steering wheelheating primarily. Avoid heating the entirepassenger compartment, which reduces thehybrid battery's charge level.
• Choose the
Pure drive mode to help mini-
mize electric power consumption.
• In hilly terrain, put the gear selector in mode B
to utilize the electric motor's braking func-
tion when the accelerator pedal is released. This helps charge the hybrid battery.
• Select the
Save drive mode for higher
speeds when driving farther than is possible using the electric motor only.
Related information
• Driving economically (p. 355)
Page 35 of 546
INTRODUCTION
* Option/accessory, for more information, see Introduction.33
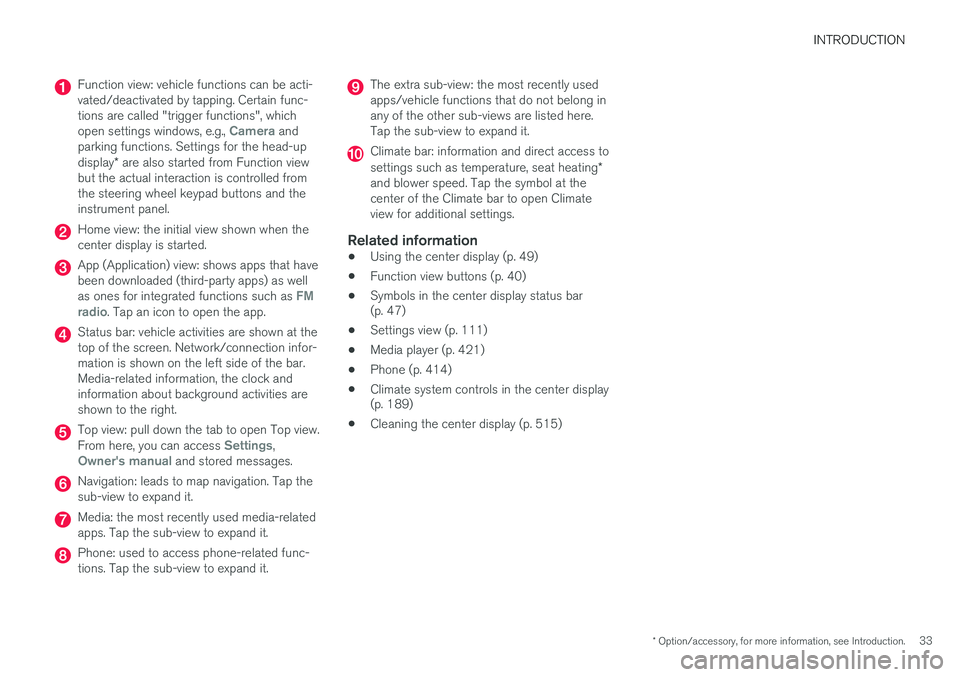
Function view: vehicle functions can be acti- vated/deactivated by tapping. Certain func-tions are called "trigger functions", which open settings windows, e.g.,
Camera and
parking functions. Settings for the head-up display * are also started from Function view
but the actual interaction is controlled from the steering wheel keypad buttons and theinstrument panel.
Home view: the initial view shown when the center display is started.
App (Application) view: shows apps that have been downloaded (third-party apps) as well as ones for integrated functions such as
FM
radio. Tap an icon to open the app.
Status bar: vehicle activities are shown at the top of the screen. Network/connection infor-mation is shown on the left side of the bar.Media-related information, the clock andinformation about background activities areshown to the right.
Top view: pull down the tab to open Top view. From here, you can access Settings,Owner's manual and stored messages.
Navigation: leads to map navigation. Tap the sub-view to expand it.
Media: the most recently used media-related apps. Tap the sub-view to expand it.
Phone: used to access phone-related func- tions. Tap the sub-view to expand it.
The extra sub-view: the most recently used apps/vehicle functions that do not belong inany of the other sub-views are listed here.Tap the sub-view to expand it.
Climate bar: information and direct access to settings such as temperature, seat heating *
and blower speed. Tap the symbol at the center of the Climate bar to open Climateview for additional settings.
Related information
• Using the center display (p. 49)
• Function view buttons (p. 40)
• Symbols in the center display status bar (p. 47)
• Settings view (p. 111)
• Media player (p. 421)
• Phone (p. 414)
• Climate system controls in the center display(p. 189)
• Cleaning the center display (p. 515)
Page 98 of 546
INSTRUMENTS AND CONTROLS
96
Trip computer The trip computer registers and calculates infor- mation such as distance driven, fuel consump-tion and average speed. This information is dis-played in the instrument panel.
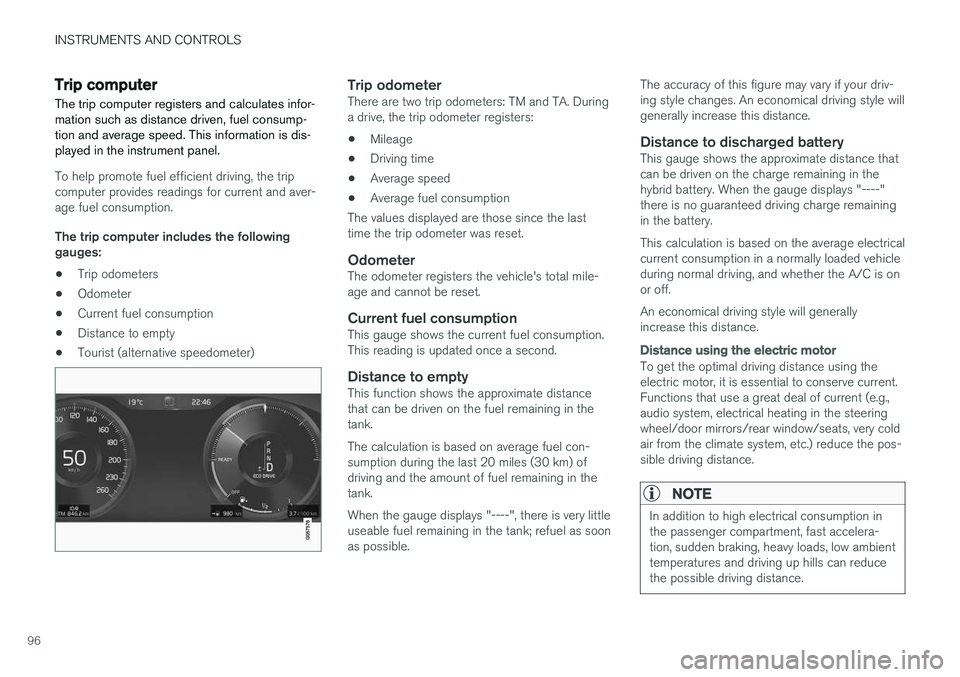
To help promote fuel efficient driving, the trip computer provides readings for current and aver-age fuel consumption. The trip computer includes the following gauges:
• Trip odometers
• Odometer
• Current fuel consumption
• Distance to empty
• Tourist (alternative speedometer)
Trip odometerThere are two trip odometers: TM and TA. During a drive, the trip odometer registers:
• Mileage
• Driving time
• Average speed
• Average fuel consumption
The values displayed are those since the lasttime the trip odometer was reset.
OdometerThe odometer registers the vehicle's total mile-age and cannot be reset.
Current fuel consumptionThis gauge shows the current fuel consumption.This reading is updated once a second.
Distance to emptyThis function shows the approximate distancethat can be driven on the fuel remaining in thetank. The calculation is based on average fuel con- sumption during the last 20 miles (30 km) ofdriving and the amount of fuel remaining in thetank. When the gauge displays "----", there is very little useable fuel remaining in the tank; refuel as soonas possible. The accuracy of this figure may vary if your driv-ing style changes. An economical driving style willgenerally increase this distance.
Distance to discharged batteryThis gauge shows the approximate distance thatcan be driven on the charge remaining in thehybrid battery. When the gauge displays "----"there is no guaranteed driving charge remainingin the battery. This calculation is based on the average electrical current consumption in a normally loaded vehicleduring normal driving, and whether the A/C is onor off. An economical driving style will generally increase this distance.
Distance using the electric motor
To get the optimal driving distance using the electric motor, it is essential to conserve current.Functions that use a great deal of current (e.g.,audio system, electrical heating in the steeringwheel/door mirrors/rear window/seats, very coldair from the climate system, etc.) reduce the pos-sible driving distance.
NOTE
In addition to high electrical consumption in the passenger compartment, fast accelera-tion, sudden braking, heavy loads, low ambienttemperatures and driving up hills can reducethe possible driving distance.
Page 114 of 546
||
INSTRUMENTS AND CONTROLS
* Option/accessory, for more information, see Introduction.
112
Changing a setting
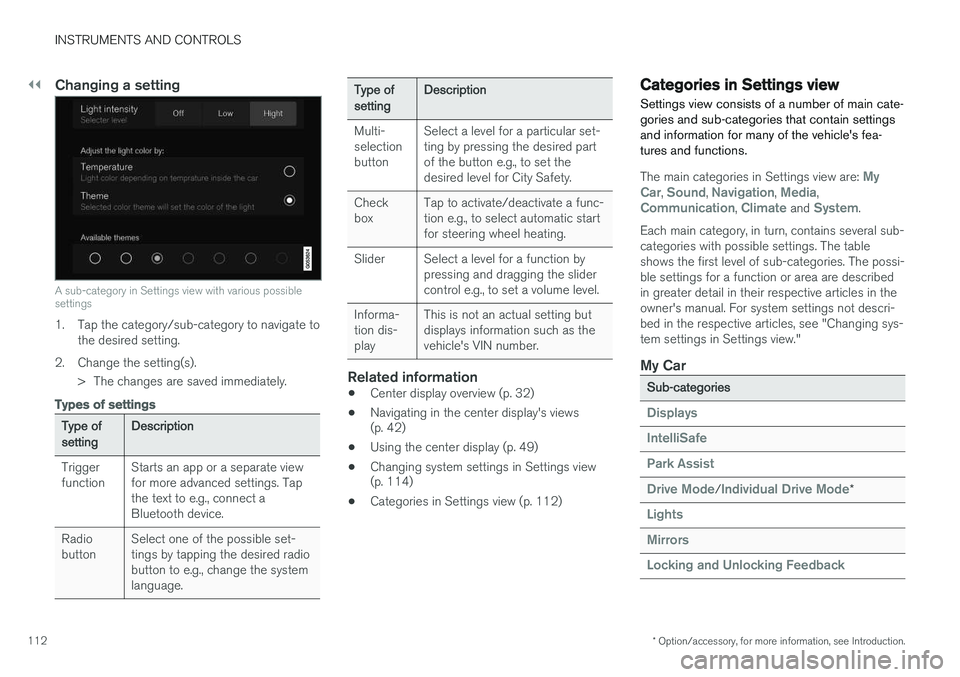
A sub-category in Settings view with various possible settings
1. Tap the category/sub-category to navigate to
the desired setting.
2. Change the setting(s). > The changes are saved immediately.
Types of settings
Type of settingDescription
Trigger functionStarts an app or a separate view for more advanced settings. Tapthe text to e.g., connect aBluetooth device.
Radio buttonSelect one of the possible set- tings by tapping the desired radiobutton to e.g., change the systemlanguage.
Type of settingDescription
Multi- selectionbuttonSelect a level for a particular set- ting by pressing the desired partof the button e.g., to set thedesired level for City Safety.
Check boxTap to activate/deactivate a func- tion e.g., to select automatic startfor steering wheel heating.
SliderSelect a level for a function by pressing and dragging the slidercontrol e.g., to set a volume level.
Informa- tion dis-playThis is not an actual setting but displays information such as thevehicle's VIN number.
Related information
• Center display overview (p. 32)
• Navigating in the center display's views (p. 42)
• Using the center display (p. 49)
• Changing system settings in Settings view(p. 114)
• Categories in Settings view (p. 112)
Categories in Settings view
Settings view consists of a number of main cate- gories and sub-categories that contain settingsand information for many of the vehicle's fea-tures and functions.
The main categories in Settings view are: My
Car, Sound, Navigation, Media,Communication, Climate and System.
Each main category, in turn, contains several sub- categories with possible settings. The tableshows the first level of sub-categories. The possi-ble settings for a function or area are describedin greater detail in their respective articles in theowner's manual. For system settings not descri-bed in the respective articles, see "Changing sys-tem settings in Settings view."
My Car
Sub-categories
Displays
IntelliSafe
Park Assist
Drive Mode/Individual Drive Mode*
Lights
Mirrors
Locking and Unlocking Feedback
Page 125 of 546
INSTRUMENTS AND CONTROLS
* Option/accessory, for more information, see Introduction.123
Climate system voice commands Voice commands can be used to control the cli- mate system to e.g., change the temperature, activate seat heating* or change blower (fan)
speed.
To use the voice control system, press the on the right-side steering wheel keypad and say one of the following commands after the tone:
• "
Climate": starts a command dialog and
provides examples of commands that can be used.
• "
Set temperature to X degrees": sets the
desired temperature.
• "
Raise temperature"/"Lower
temperature": raises/lowers the tempera-
ture.
• "
Sync temperature": synchronizes the tem-
perature in all of the vehicle's climate zones with the one set for the driver's side.
• "
Air on feet"/"Air on body": opens the
desired air vent.
• "
Air on feet off"/"Air on body off": closes
the desired air vent.
• "
Set fan to max"/"Turn off fan": changes
the blower speed to Max/Off.
• "
Raise fan speed"/"Lower fan speed":
raises/lowers the blower speed.
• "
Turn on auto": activates automatic climate
control. •
"
Air condition on"/"Air condition off":
activates/deactivates the air conditioning.
• "
Recirculation on"/"Recirculation off":
activates/deactivates recirculation.
• "
Turn on defroster "/"Turn off defroster":
activates/deactivates window and door mirror defrosting.
• "
Turn on max defroster"/"Turn off max
defroster": activates/deactivates max
defroster.
• "
Turn on electric defroster"/"Turn off
electric defroster": activates/deactivates
the electrically heated windshield *.
• "
Turn on rear defroster"/"Turn off rear
defroster": activates/deactivates the electri-
cally heated rear window and door mirrors.
• "
Turn steering wheel heat on"/"Turn
steering wheel heat off": activates/deacti-
vates the electrically heated steering wheel *.
• "
Raise steering wheel heat"/"Lower
steering wheel heat": raises/lowers the
heating level for the electrically heated steer- ing wheel *.
• "
Turn on seat heat"/"Turn off seat heat":
activates/deactivates the electrically heated seats *.
• "
Raise seat heat"/"Lower seat heat": rai-
ses/lowers the heating level for the electri- cally heated seats *. •
"
Turn on seat ventilation"/"Turn off seat
ventilation": activates/deactivates seat ven-
tilation *.
• "
Raise seat ventilation"/"Lower seat
ventilation": raises/lowers the level for seat
ventilation *.
Related information
• Climate system controls (p. 188)
• Voice control (p. 120)
• Using voice commands (p. 121)
Page 142 of 546
||
INSTRUMENTS AND CONTROLS
* Option/accessory, for more information, see Introduction.
140
15
14
13
12
11
9
8
7
6
5
4
3
2
1
10
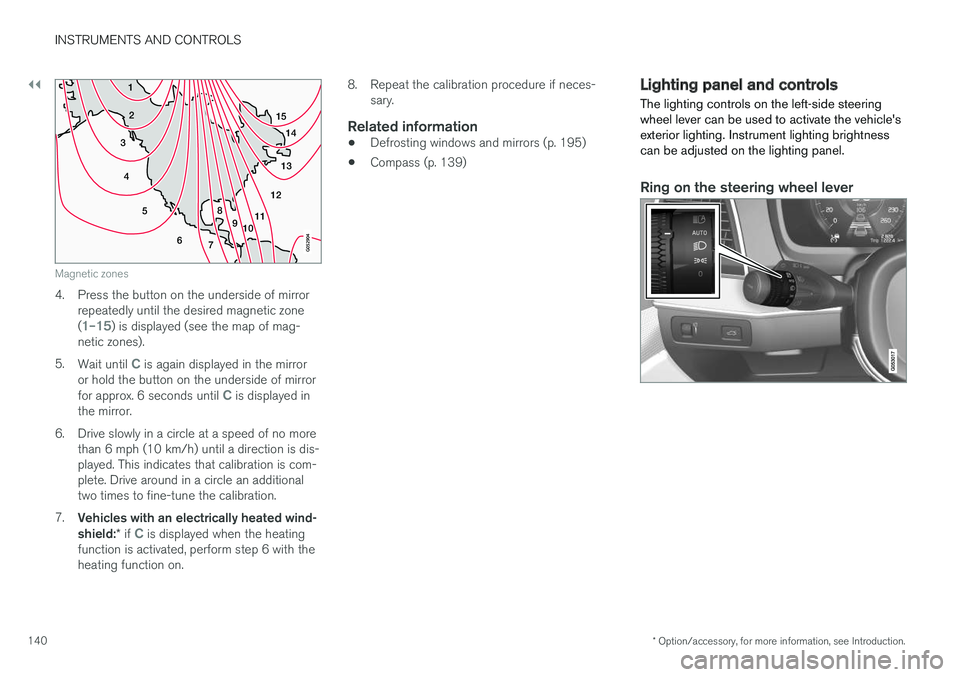
Magnetic zones
4. Press the button on the underside of mirrorrepeatedly until the desired magnetic zone (
1–15) is displayed (see the map of mag-
netic zones).
5. Wait until
C is again displayed in the mirror
or hold the button on the underside of mirror for approx. 6 seconds until
C is displayed in
the mirror.
6. Drive slowly in a circle at a speed of no more than 6 mph (10 km/h) until a direction is dis- played. This indicates that calibration is com-plete. Drive around in a circle an additionaltwo times to fine-tune the calibration.
7. Vehicles with an electrically heated wind- shield: * if
C is displayed when the heating
function is activated, perform step 6 with the heating function on. 8. Repeat the calibration procedure if neces-
sary.
Related information
• Defrosting windows and mirrors (p. 195)
• Compass (p. 139)
Lighting panel and controls
The lighting controls on the left-side steering wheel lever can be used to activate the vehicle'sexterior lighting. Instrument lighting brightnesscan be adjusted on the lighting panel.
Ring on the steering wheel lever
Page 162 of 546
INSTRUMENTS AND CONTROLS
* Option/accessory, for more information, see Introduction.
160
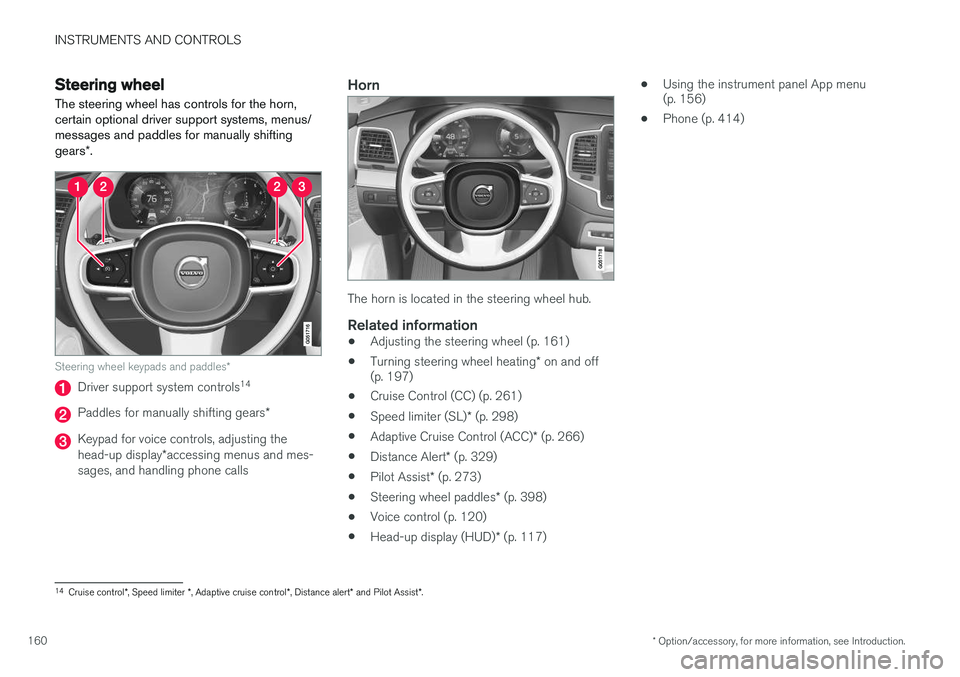
Steering wheel The steering wheel has controls for the horn, certain optional driver support systems, menus/messages and paddles for manually shifting gears *.
Steering wheel keypads and paddles *
Driver support system controls14
Paddles for manually shifting gears
*
Keypad for voice controls, adjusting the head-up display*accessing menus and mes-
sages, and handling phone calls
Horn
The horn is located in the steering wheel hub.
Related information
• Adjusting the steering wheel (p. 161)
• Turning steering wheel heating
* on and off
(p. 197)
• Cruise Control (CC) (p. 261)
• Speed limiter (SL)
* (p. 298)
• Adaptive Cruise Control (ACC)
* (p. 266)
• Distance Alert
* (p. 329)
• Pilot Assist
* (p. 273)
• Steering wheel paddles
* (p. 398)
• Voice control (p. 120)
• Head-up display (HUD)
* (p. 117) •
Using the instrument panel App menu (p. 156)
• Phone (p. 414)
14
Cruise control *, Speed limiter *, Adaptive cruise control *, Distance alert * and Pilot Assist *.
Page 164 of 546
INSTRUMENTS AND CONTROLS
* Option/accessory, for more information, see Introduction.
162 •
Moving the second row seats forward/rear- ward (p. 174)
• Adjusting the second row backrest tilt(p. 171)
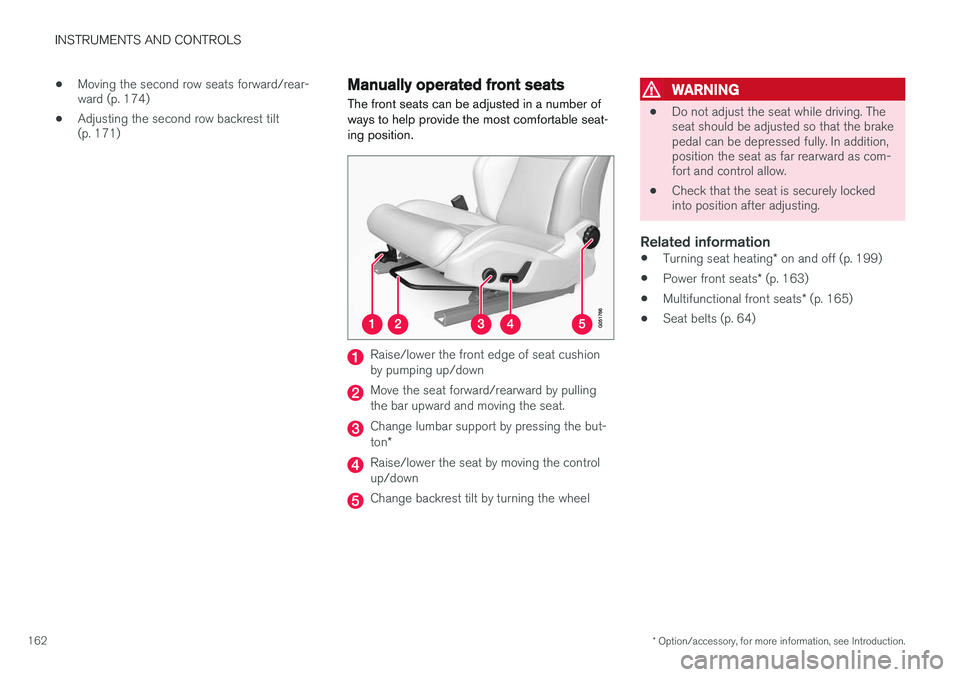
Manually operated front seats
The front seats can be adjusted in a number of ways to help provide the most comfortable seat-ing position.
Raise/lower the front edge of seat cushion by pumping up/down
Move the seat forward/rearward by pulling the bar upward and moving the seat.
Change lumbar support by pressing the but- ton *
Raise/lower the seat by moving the control up/down
Change backrest tilt by turning the wheel
WARNING
• Do not adjust the seat while driving. The seat should be adjusted so that the brakepedal can be depressed fully. In addition,position the seat as far rearward as com-fort and control allow.
• Check that the seat is securely lockedinto position after adjusting.
Related information
•
Turning seat heating
* on and off (p. 199)
• Power front seats
* (p. 163)
• Multifunctional front seats
* (p. 165)
• Seat belts (p. 64)