start stop button VOLVO XC90 T8 2016 Owner´s Manual
[x] Cancel search | Manufacturer: VOLVO, Model Year: 2016, Model line: XC90 T8, Model: VOLVO XC90 T8 2016Pages: 546, PDF Size: 10.26 MB
Page 141 of 546
INSTRUMENTS AND CONTROLS
}}
139
Compass
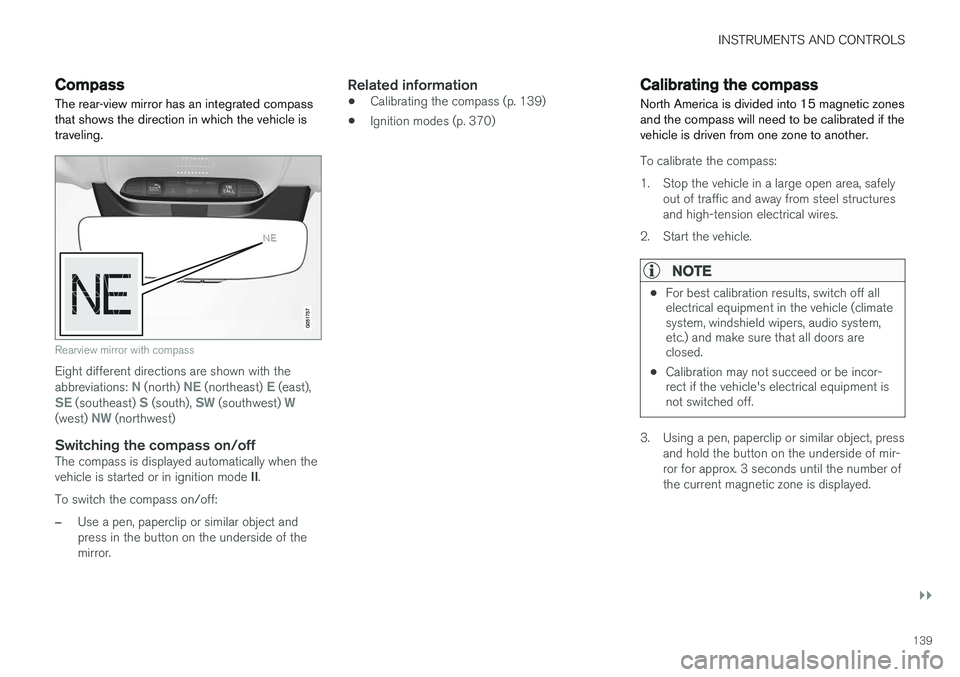
The rear-view mirror has an integrated compass that shows the direction in which the vehicle istraveling.
Rearview mirror with compass
Eight different directions are shown with the abbreviations: N (north) NE (northeast) E (east),SE (southeast) S (south), SW (southwest) W(west) NW (northwest)
Switching the compass on/offThe compass is displayed automatically when the vehicle is started or in ignition mode II.
To switch the compass on/off:
–Use a pen, paperclip or similar object and press in the button on the underside of themirror.
Related information
• Calibrating the compass (p. 139)
• Ignition modes (p. 370)
Calibrating the compass
North America is divided into 15 magnetic zones and the compass will need to be calibrated if thevehicle is driven from one zone to another.
To calibrate the compass:
1. Stop the vehicle in a large open area, safely out of traffic and away from steel structures and high-tension electrical wires.
2. Start the vehicle.
NOTE
• For best calibration results, switch off all electrical equipment in the vehicle (climatesystem, windshield wipers, audio system,etc.) and make sure that all doors areclosed.
• Calibration may not succeed or be incor-rect if the vehicle's electrical equipment isnot switched off.
3. Using a pen, paperclip or similar object, press
and hold the button on the underside of mir- ror for approx. 3 seconds until the number ofthe current magnetic zone is displayed.
Page 148 of 546
INSTRUMENTS AND CONTROLS
* Option/accessory, for more information, see Introduction.
146
Brake lights The brake lights illuminate automatically when the brakes are applied.
In addition to illuminating when the brake pedal is depressed, the brake lights also illuminate whenone of the driver support systems (e.g., adaptivecruise control, City Safety or collision warning)slow the vehicle.
Related information
• Adaptive Cruise Control (ACC)
* (p. 266)
• City Safety
™ (p. 287)
• Emergency brake lights (p. 350)
Rear fog lights
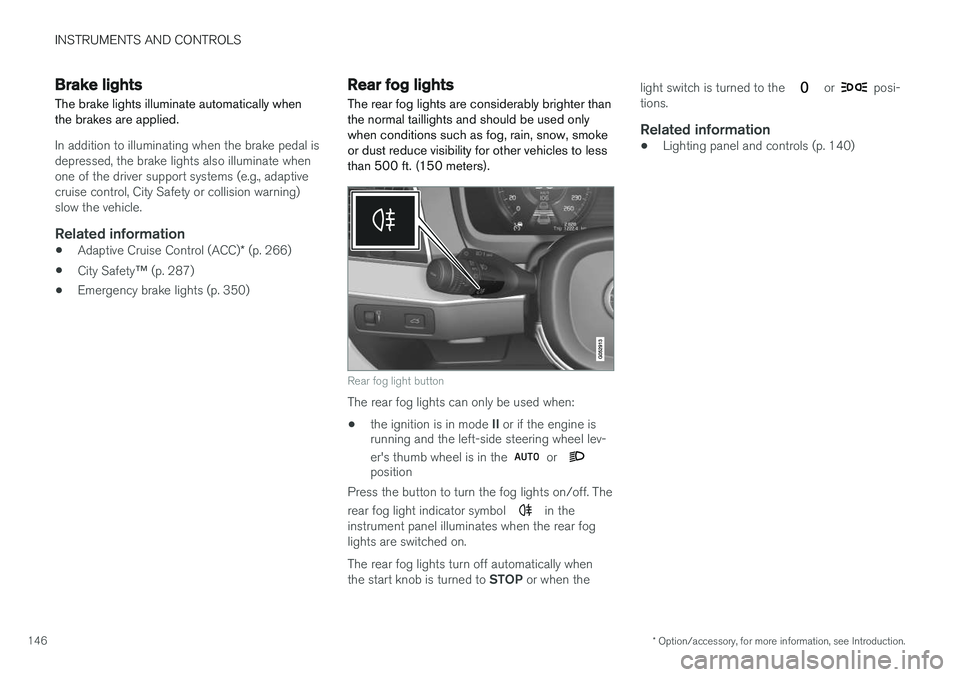
The rear fog lights are considerably brighter than the normal taillights and should be used onlywhen conditions such as fog, rain, snow, smokeor dust reduce visibility for other vehicles to lessthan 500 ft. (150 meters).
Rear fog light button
The rear fog lights can only be used when:
• the ignition is in mode
II or if the engine is
running and the left-side steering wheel lev- er's thumb wheel is in the
or position
Press the button to turn the fog lights on/off. The rear fog light indicator symbol
in the
instrument panel illuminates when the rear fog lights are switched on. The rear fog lights turn off automatically when the start knob is turned to STOP or when the light switch is turned to the
or posi-
tions.
Related information
• Lighting panel and controls (p. 140)
Page 154 of 546
||
INSTRUMENTS AND CONTROLS
152The message may be displayed along with graph- ics, symbols or buttons for e.g., confirming themessage or accepting a request.
Service messages
The following table lists a selection of important service messages and the action that should betaken.
MessageAction
Stop safelyAStop and switch off the engine. There is a risk ofserious damage to the vehi- cle
B
.
Turn off engineAStop and switch off the engine. There is a risk ofserious damage to the vehi- cle B
.
Service urgent Drive to workshop
A
Contact a workshop B
to have
the vehicle inspected imme- diately.
Service requiredAContact a workshop B
to have
the vehicle inspected as soon as possible.
Book time for maintenance Time for maintenanceTime for the next scheduled service. Contact a work- shop B
.
MessageAction
Maintenance overdueTime for the next scheduled service. Contact a work- shop B
. If the service sched-
ule is not followed, this may void all or part of the vehi-cle's warranty and result indamage to vehicle compo-nents.
Temporarily offAA function has been tempo- rarily deactivated and will bereactivated automaticallywhile driving or after theengine is restarted.
A Part of the message is context-dependent.
B Contact a Volvo retailer or a trained and qualified Volvo service technician.
Center display
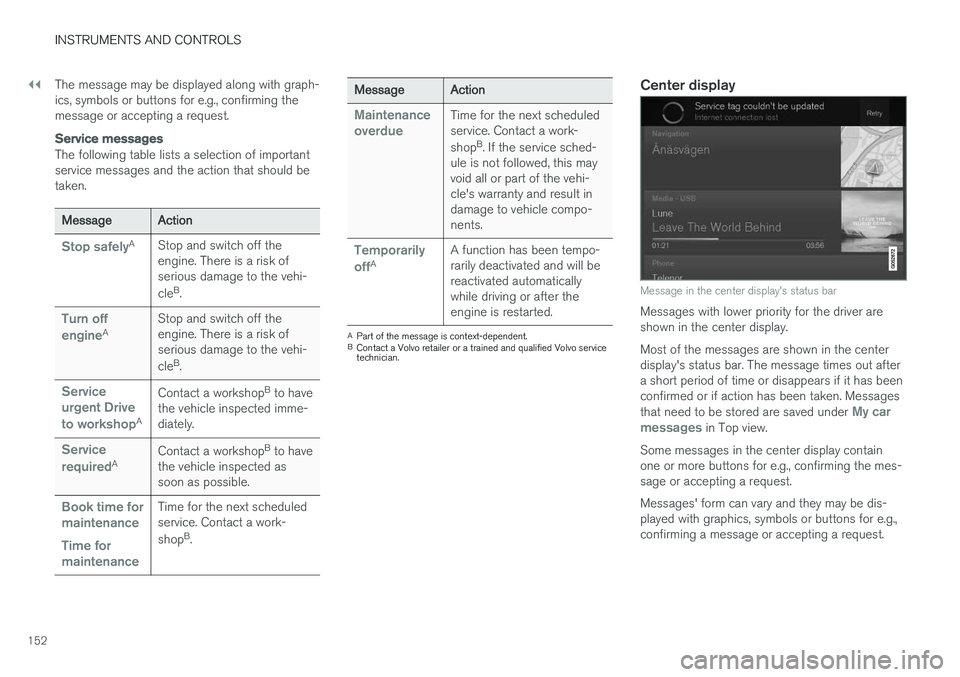
Message in the center display's status bar
Messages with lower priority for the driver are shown in the center display. Most of the messages are shown in the center display's status bar. The message times out aftera short period of time or disappears if it has beenconfirmed or if action has been taken. Messages that need to be stored are saved under
My car
messages in Top view.
Some messages in the center display contain one or more buttons for e.g., confirming the mes-sage or accepting a request. Messages' form can vary and they may be dis- played with graphics, symbols or buttons for e.g.,confirming a message or accepting a request.
Page 186 of 546
CLIMATE
* Option/accessory, for more information, see Introduction.
184
Starting and stopping preconditioning
Preconditioning heats/cools the passenger com- partment prior to driving. Please note that thecharging cable must be connected.
Starting/stopping from the centerdisplay
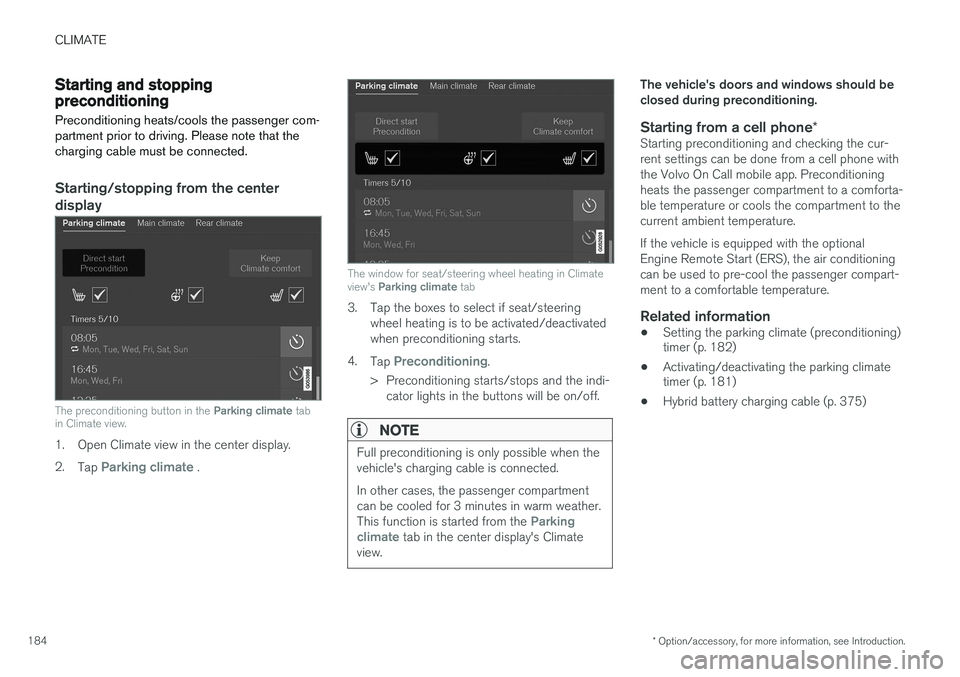
The preconditioning button in the Parking climate tab
in Climate view.
1. Open Climate view in the center display. 2. Tap
Parking climate .
The window for seat/steering wheel heating in Climate view's Parking climate tab
3. Tap the boxes to select if seat/steering
wheel heating is to be activated/deactivated when preconditioning starts.
4. Tap
Preconditioning.
> Preconditioning starts/stops and the indi- cator lights in the buttons will be on/off.
NOTE
Full preconditioning is only possible when the vehicle's charging cable is connected. In other cases, the passenger compartment can be cooled for 3 minutes in warm weather. This function is started from the
Parking
climate tab in the center display's Climate
view.
The vehicle's doors and windows should be closed during preconditioning.
Starting from a cell phone *Starting preconditioning and checking the cur-rent settings can be done from a cell phone withthe Volvo On Call mobile app. Preconditioningheats the passenger compartment to a comforta-ble temperature or cools the compartment to thecurrent ambient temperature. If the vehicle is equipped with the optional Engine Remote Start (ERS), the air conditioningcan be used to pre-cool the passenger compart-ment to a comfortable temperature.
Related information
•Setting the parking climate (preconditioning) timer (p. 182)
• Activating/deactivating the parking climatetimer (p. 181)
• Hybrid battery charging cable (p. 375)
Page 320 of 546
DRIVER SUPPORT
* Option/accessory, for more information, see Introduction.
318
Using Park Assist Pilot (PAP) *
Park Assist Pilot (PAP) gives the driver instruc- tions during the parking procedure.
Symbols, images and text in the center display indicate when the various steps in the parkingprocedure will be carried out. PAP can be activated if the following conditions are met after the engine has started:
• The vehicle may not be towing a trailer.
• The vehicle's speed must be below approx. 30 mph (50 km/h).
NOTE
If a trailer hitch is configured in the vehicle's electrical system, PAP will take the trailerhitch into consideration when determining thenecessary size of a parking space.
ParkingProcedure for parking:
1. The system searches for and measures a
possible parking space.
2. The vehicle is steered while it is backing into the parking space.
3. The vehicle's position is adjusted in the park- ing space by moving forward and rearward.
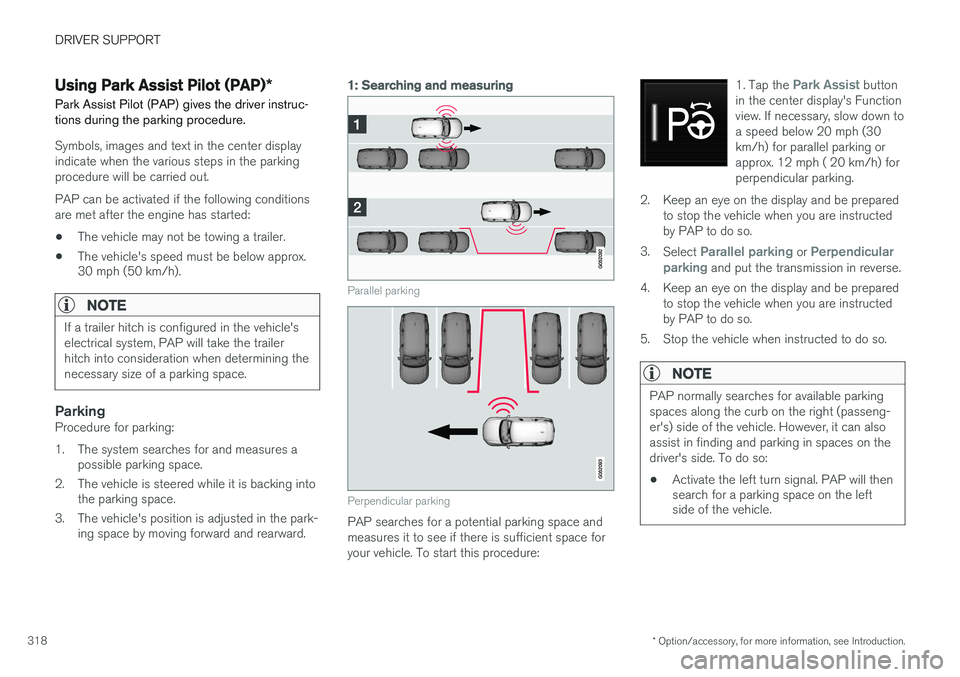
1: Searching and measuring
Parallel parking
Perpendicular parking
PAP searches for a potential parking space and measures it to see if there is sufficient space foryour vehicle. To start this procedure: 1. Tap the
Park Assist button
in the center display's Function view. If necessary, slow down toa speed below 20 mph (30km/h) for parallel parking orapprox. 12 mph ( 20 km/h) forperpendicular parking.
2. Keep an eye on the display and be prepared to stop the vehicle when you are instructed by PAP to do so.
3. Select
Parallel parking or Perpendicular
parking and put the transmission in reverse.
4. Keep an eye on the display and be prepared to stop the vehicle when you are instructed by PAP to do so.
5. Stop the vehicle when instructed to do so.
NOTE
PAP normally searches for available parking spaces along the curb on the right (passeng-er's) side of the vehicle. However, it can alsoassist in finding and parking in spaces on thedriver's side. To do so:
• Activate the left turn signal. PAP will then search for a parking space on the leftside of the vehicle.
Page 378 of 546
||
STARTING AND DRIVING
376
WARNING
•The charging cable must be grounded when in use. It is equipped with a cordwith a grounding conductor and agrounding plug. The plug must beinserted into an appropriate outlet that isproperly installed and grounded inaccordance with all local codes and ordi-nances and is not damaged in any way
• Children should be supervised when inthe vicinity of the charging cable when itis plugged in
• High voltage is present in your electricmeter housing and power distributionservice panel. Contact with high voltagecan cause death or serious personalinjury
• Do not use the charging cable if it isdamaged in any way
• Always position the charging cable sothat it will not be driven over, stepped on,tripped over or otherwise damaged, orcause personal injury
• Disconnect the charger from the wall out-let before cleaning it
• Never connect the charging cable to anextension cord or a multiple plug socket
•If the hybrid battery needs to be replaced, this may only be done by Volvo retailer orauthorized Volvo workshop
Also, refer to the manufacturer's instructions for using the charging cable and its compo-nents.
CAUTION
• Never unplug the charging cable from a 120-/240-volt socket while the hybridbattery is being recharged. This couldresult in damage to the socket. Alwaysstop the charging process before unplug-ging the charging cable
• To clean the charging cable, wipe it witha clean cloth dampened with water or amild detergent solution suitable for useon automobile paint. Do not use chemi-cals or solvents. Do not submerge thecharging cable
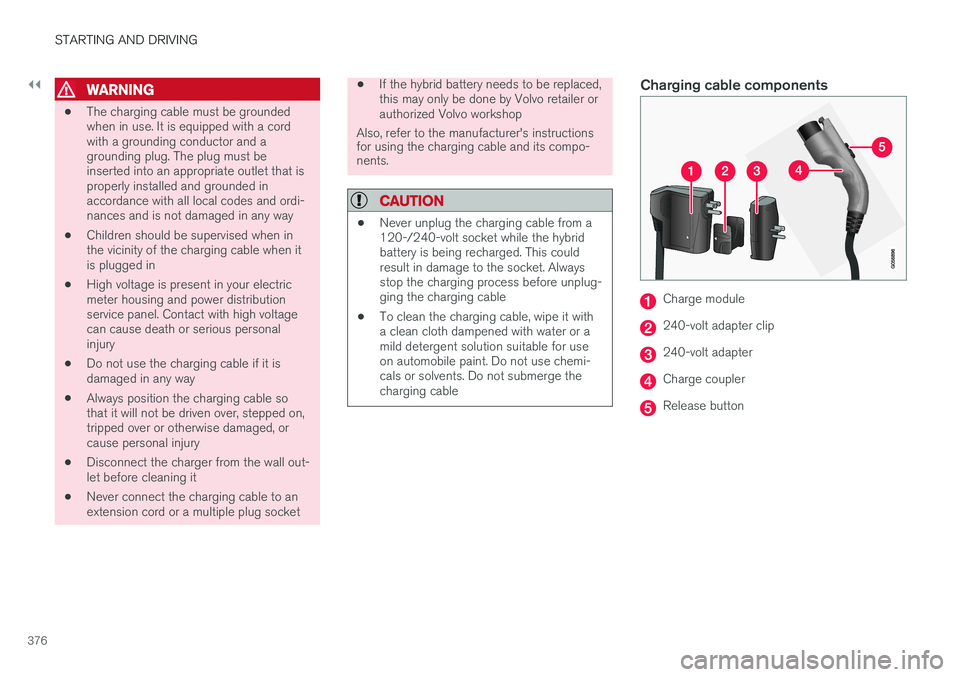
Charging cable components
Charge module
240-volt adapter clip
240-volt adapter
Charge coupler
Release button
Page 383 of 546
STARTING AND DRIVING
}}
381
Press in the rear section of the door and release it.
Open the door.
Pull off the charging socket's protective cover and place it in the holder on the insideof the door. Be sure that the protective cov-er's rubber plug faces down to help keep thecover from falling out of the holder.
Put the cover back in position and close the doorin reverse order.
Stopping hybrid battery charging
Stop hybrid battery charging by unlocking the vehicle, disconnecting the charging cable fromthe vehicle's charging socket and then unplug-ging the cable from the 120-/240-volt socket.
NOTE
Always unlock the vehicle to stop the charg- ing process before disconnecting the charg-ing cable from the vehicle's charging socketand then unplugging it from the120-/240-volt socket. The cable must be disconnected from the vehicle's charging socket before it isunplugged from the 120-/240-volt socketto help prevent damage to the chargingsystem.
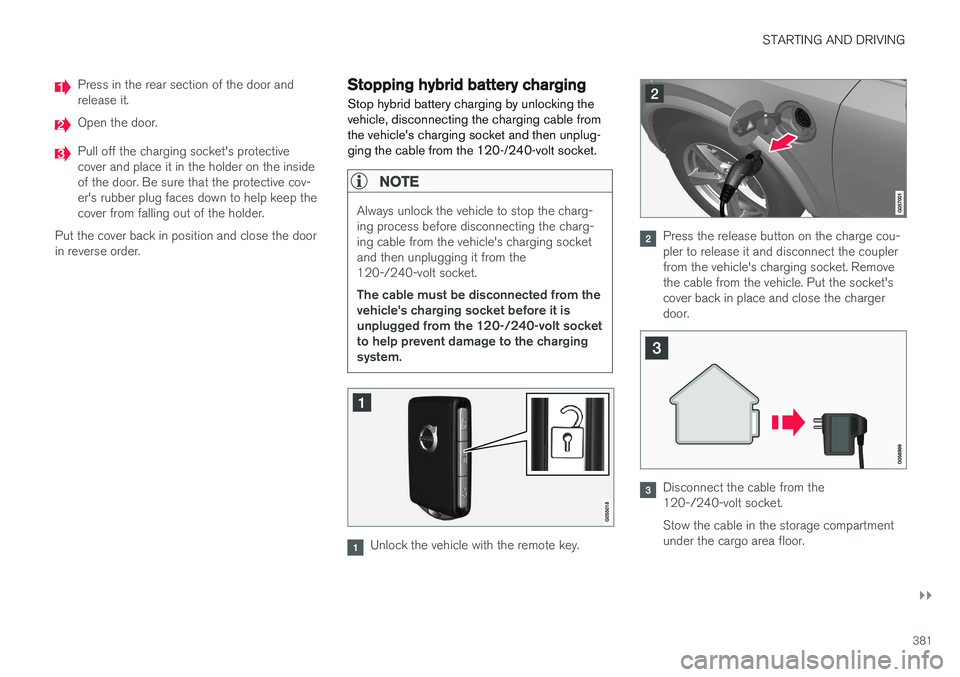
Unlock the vehicle with the remote key.
Press the release button on the charge cou- pler to release it and disconnect the couplerfrom the vehicle's charging socket. Removethe cable from the vehicle. Put the socket'scover back in place and close the chargerdoor.
Disconnect the cable from the 120-/240-volt socket. Stow the cable in the storage compartment under the cargo area floor.
Page 389 of 546
STARTING AND DRIVING
}}
387
Charger status indicators
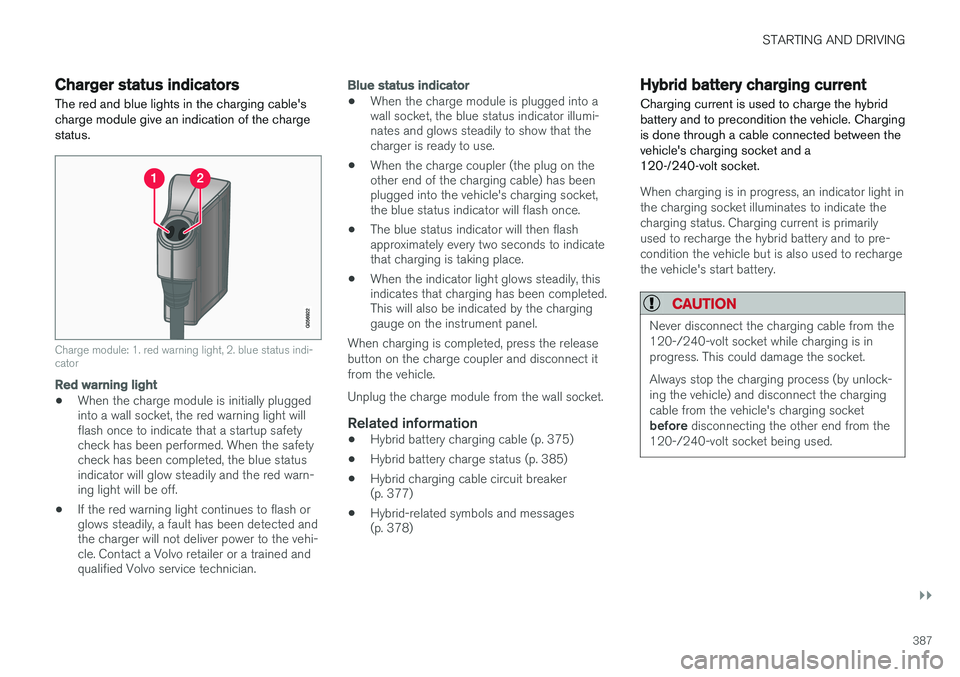
The red and blue lights in the charging cable's charge module give an indication of the chargestatus.
Charge module: 1. red warning light, 2. blue status indi- cator
Red warning light
• When the charge module is initially plugged into a wall socket, the red warning light willflash once to indicate that a startup safetycheck has been performed. When the safetycheck has been completed, the blue statusindicator will glow steadily and the red warn-ing light will be off.
• If the red warning light continues to flash orglows steadily, a fault has been detected andthe charger will not deliver power to the vehi-cle. Contact a Volvo retailer or a trained andqualified Volvo service technician.
Blue status indicator
• When the charge module is plugged into a wall socket, the blue status indicator illumi-nates and glows steadily to show that thecharger is ready to use.
• When the charge coupler (the plug on theother end of the charging cable) has beenplugged into the vehicle's charging socket,the blue status indicator will flash once.
• The blue status indicator will then flashapproximately every two seconds to indicatethat charging is taking place.
• When the indicator light glows steadily, thisindicates that charging has been completed.This will also be indicated by the charginggauge on the instrument panel.
When charging is completed, press the release button on the charge coupler and disconnect itfrom the vehicle. Unplug the charge module from the wall socket.
Related information
• Hybrid battery charging cable (p. 375)
• Hybrid battery charge status (p. 385)
• Hybrid charging cable circuit breaker (p. 377)
• Hybrid-related symbols and messages(p. 378)
Hybrid battery charging current
Charging current is used to charge the hybrid battery and to precondition the vehicle. Chargingis done through a cable connected between thevehicle's charging socket and a120-/240-volt socket.
When charging is in progress, an indicator light in the charging socket illuminates to indicate thecharging status. Charging current is primarilyused to recharge the hybrid battery and to pre-condition the vehicle but is also used to rechargethe vehicle's start battery.
CAUTION
Never disconnect the charging cable from the 120-/240-volt socket while charging is inprogress. This could damage the socket. Always stop the charging process (by unlock- ing the vehicle) and disconnect the chargingcable from the vehicle's charging socket before disconnecting the other end from the
120-/240-volt socket being used.
Page 403 of 546
STARTING AND DRIVING
401
Suspension leveling settings
Easy entry
The vehicle can be lowered to entering and exit- ing easier. Select
SettingsVehicleEasy Entry/Exit
Control via the center display's Top view to lower
the vehicle when getting in or out. When the vehicle is parked and the engine is turned off, the level is lowered (if a side door isopened, the level adjustment will stop). When theengine is started and the vehicle begins to move,the level will be raised to the height set by theselected drive mode.
Turning off suspension and leveling control
In certain situations, this function has to be turned off, for example when lifting the vehicle ona jack or garage hoist. 1. Tap
Settings in the center display's Top
view.
2. Tap
My CarSuspension .
3. Select
Deactivate Suspension & Leveling
Control.
Changing suspension control
Three different levels of suspension control can be selected from the center display: 1. Tap
Settings in the center display's Top
view. 2.
Tap
My CarDrive Mode.
3. Under
Suspension Control, select Eco,Comfort or Dynamic.
Loading mode
Use the buttons in the cargo compartment to raise or lower the vehicle to make loading orunloading easier or when attaching a trailer.
Parking the vehicleWhen parking, be sure that there is adequatespace above and below the vehicle since itsground clearance may vary, e.g., depending onthe ambient temperature, how the vehicle is loa-ded, if loading mode is being used or the drivemode selected after the engine is started. The level may also be adjusted for a certain time after the vehicle has been parked to compensatefor possible height adjustments due to tempera-ture changes in the pneumatic suspension whenthe vehicle has cooled.
TransportWhen transporting the vehicle on a ferry, train ora tow truck, it may only be secured (lashed)around the tires, not using any other chassiscomponents. Changes in the pneumatic suspen-sion may occur during transport that could nega-tively affect the lashing and result in damage.
Related information
• Drive modes (p. 390)
• Driving with a trailer (p. 367)
• Loading (p. 215)
8
Standard equipment on certain models.
Page 480 of 546
MAINTENANCE AND SERVICING
478
Wi-Fi connection to a workshop The time a vehicle is in a workshop for service or repairs can be reduced by transmitting trouble-shooting information as soon as the car reachesthe workshop. This is done most conveniently by selecting
Automatically connect when I arrive in the
center display's Settings menu.
Each time the vehicle slows down to a sufficiently low speed, it begins searching for a Wi-Fi net-work. If an authorized Volvo network (at a retaileror workshop) is found, a message will be dis-played or a pop-up window will open in the cen-ter display (this applies to manual connections,see the section "Manually connecting to a work-shop" below).
Automatically connecting to a
workshop
Without driver confirmation
This is the most convenient way to transmit trou- ble-shooting data. The driver does not need toconfirm that the vehicle will establish a connec-tion. If the vehicle stops at a workshop and the engine is switched off using the start knob, a messagewill appear above the status bar in the center dis-play. The vehicle will be automatically connectedwhen the driver's door is opened if the driver does not tap the
Cancel button in the message. To help prevent the driver from being disturbed by unwanted requests to connect (e.g., if thevehicle is often parked near a workshop with anauthorized Volvo network), the vehicle will switchto manual connection if the driver cancels a con-nection request twice within 5 days.
With driver confirmation
With this alternative, the driver must confirm a connection. If the vehicle stops at a workshop and the engine is switched off using the start knob, a pop-upwindow will open in the center display. The vehi-cle will be automatically connected when the driv- er's door is opened if the driver taps
Connect in
the pop-up window. If the driver does nothing or taps the pop-up window's
Abort button, no
attempt will be made to establish a connection.
NOTE
To help prevent the driver from being distur- bed by unwanted requests to connect (e.g., ifthe vehicle is often parked near a workshopwith an authorized Volvo network), the vehiclewill switch to manual connection if the drivercancels a connection request twice within5 days.
Manually connecting to a workshopManual connections are handled by the service technician.
Changing the way a connection is madeThe type of connection (manual or automatic)can be changed in the center display's Settingsmenu.
1. Pull down the center display's Top view and
tap
Settings.
2. Tap
CommunicationVolvo Service
Networks.
3. Select
Automatically connect when I
arrive, Ask before connecting or Never
connect and never ask (manual connec-
tions).
Related information
• Internet connected vehicle (p. 431)
• Settings view (p. 111)