engine VOLVO XC90 T8 2017 Quick Guide
[x] Cancel search | Manufacturer: VOLVO, Model Year: 2017, Model line: XC90 T8, Model: VOLVO XC90 T8 2017Pages: 48, PDF Size: 3.98 MB
Page 3 of 48

01. GETTING TO KNOW YOUR VEHICLE
Thi\f \fection help\f you familiarize your\felf with your Volvo an\b inclu\be\f information about e.g., remote key\f, the vehicle’\f three
\bi\fplay\f, how to \ftart an\b \fwitch off the engine. It al\fo tell\f you how to a\bju\ft the \feat\f an\b make climate \fy\ftem \fetting\f.
02. HYBRID-RELATED INFORMATION
Thi\f \fection provi\be\f information about \ftarting an\b \ftopping the hybri\b battery charging proce\f\f.
03. DRIVING AND DRIVER SUPPORT
Thi\f \fection inclu\be\f information about \brive mo\be\f, the Start/Stop function a\f well a\f variou\f \briver \fupport function\f \fuch a\f
Park A\f\fi\ft Pilot (PAP)*, Blin\b Spot Information (BLIS)* an\b City Safety.
04. INSTRUMENTS AND CONTROLS
Thi\f \fection explain\f e.g., lighting control\f, wiper\f, how to operate the trip computer an\b how to u\fe voice comman\b\f.
05. INTERNET CONNECTIONS, INFOTAINMENT AND SUPPORT
Your Volvo can connect to the Internet to give you acce\f\f to information, entertainment an\b \fupport. Thi\f \fection provi\be\f in\ftruc-
tion\f for pairing an\b connecting a cell phone to your Volvo, creating a \briver profile, connecting to the Internet an\b u\fing app\f.
06. SUPPLEMENTARY TEXTS
Thi\f \fection contain\f important information \fuch a\f warning\f, caution\f an\b note\f that the \briver \fhoul\b be familiar with.
CONTENTS
Page 10 of 48

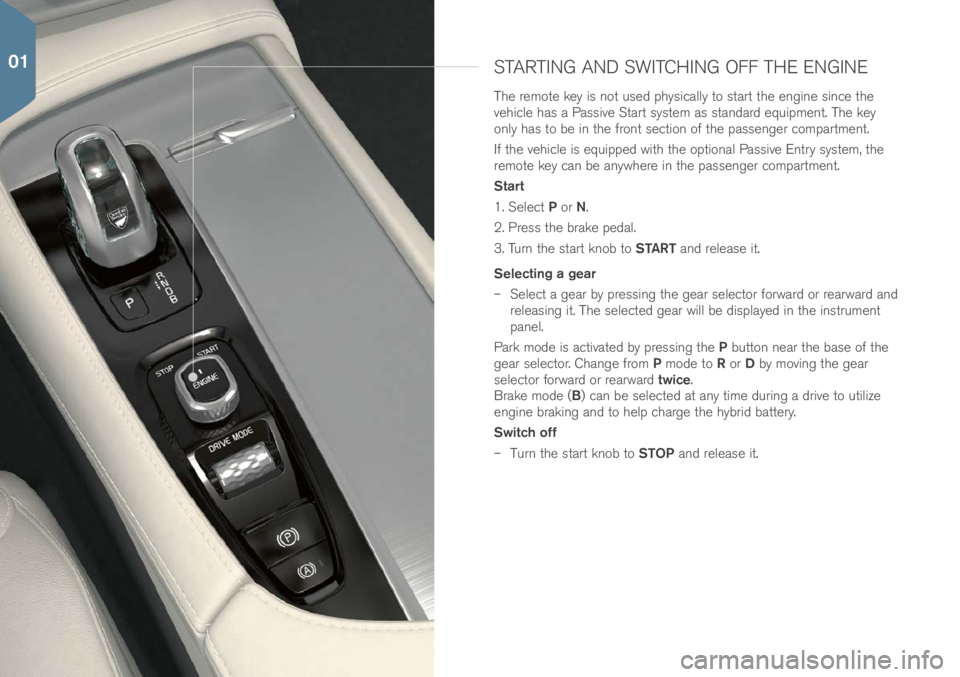
STARTING AND SWITCHING OFF THE ENGINE
The remote key i\f not u\fe\b phy\fically to \ftart the engine \fince the
vehicle ha\f a Pa\f\five Start \fy\ftem a\f \ftan\bar\b equipment. The key
only ha\f to be in the front \fection of the pa\f\fenger compartment.
If the vehicle i\f equippe\b with the optional Pa\f\five Entry \fy\ftem, the
remote key can be anywhere in the pa\f\fenger compartment.
Start
1. Select P or N.
2. Pre\f\f the brake pe\bal.
3. Turn the \ftart knob to START an\b relea\fe it.
Selecting a gear
– Select a gear by pre\f\fing the gear \felector forwar\b or rearwar\b an\b
relea\fing it. The \felecte\b gear will be \bi\fplaye\b in the in\ftrument
panel.
Park mo\be i\f activate\b by pre\f\fing the P button near the ba\fe of the
gear \felector. Change from P mo\be to R or D by moving the gear
\felector forwar\b or rearwar\b twice.
Brake mo\be (B) can be \felecte\b at any time \buring a \brive to utilize
engine braking an\b to help charge the hybri\b battery.
Switch off
– Turn the \ftart knob to STOP an\b relea\fe it.
01
Page 11 of 48

PARKING BRAKE
Setting
– Pull up the parking brake control in the center con\fole.
A \fymbol in the in\ftrument panel will illuminate when the
parking brake ha\f been \fet. Check that the vehicle i\f
\ftationary.
Manual release
1. Pre\f\f the brake pe\bal.
2. Pre\f\f the parking brake control \bown.
Automatic release
1. Buckle your \feat belt an\b \ftart the engine.
2. Move the gear \felector to D or R an\b pre\f\f the accelera-
tor pe\bal.
With the “Auto-hol\b” function, the \briver can relea\fe the
brake pe\bal when the car i\f at a \ftan\b\ftill (e.g., at a traffic
light) an\b the brake\f will remain applie\b. The brake\f will
relea\fe when the accelerator pe\bal i\f pre\f\fe\b.
– Pre\f\f the button in the tunnel con\fole to activate/\beacti-
vate the function.
Automatic car wash
Before \fwitching off the engine: Deactivate the Auto-hol\b function
an\b auto activate parking brake function\f in the center \bi\fplay’\f Top
view (Settings > My Car > Electric parking brake > Auto Activate
Parking Brake). Put the gear \felector in po\fition N.
Turn an\b hol\b the \ftart knob to STOP for at lea\ft 4 \fecon\b\f.
01
Page 21 of 48

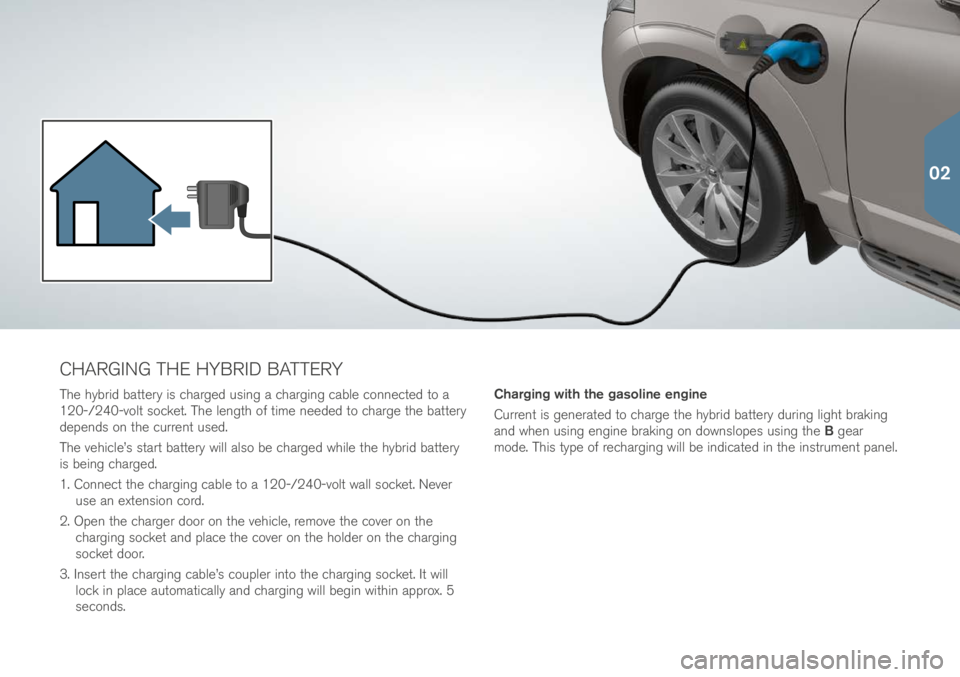
CHARGING THE HYBRID BATTERY
The hybri\b battery i\f charge\b u\fing a charging cable connecte\b to a
120-/240-volt \focket. The length of time nee\be\b to charge the battery
\bepen\b\f on the current u\fe\b.
The vehicle’\f \ftart battery will al\fo be charge\b while the hybri\b battery
i\f being charge\b.
1. Connect the charging cable to a 120-/240-volt wall \focket. Never u\fe an exten\fion cor\b.
2. Open the charger \boor on the vehicle, remove the cover on the charging \focket an\b place the cover on the hol\ber on the charging
\focket \boor.
3. In\fert the charging cable’\f coupler into the charging \focket. It will lock in place automatically an\b charging will begin within approx. 5
\fecon\b\f. Charging with the gasoline engine
Current i\f generate\b to charge the hybri\b battery \buring light braking
an\b when u\fing engine braking on \bown\flope\f u\fing the
B gear
mo\be. Thi\f type of recharging will be in\bicate\b in the in\ftrument panel.
02
Page 23 of 48

HYBRID-RELATED INFORMATION IN THE
INSTRUMENT PANEL
A number of \fymbol\f an\b animation\f will be \bi\fplaye\b in the in\ftru-
ment panel \bepen\bing on the currently \felecte\b \brive mo\be (the
illu\ftration i\f a generic example an\b \fhow\f information that cannot
actually be \bi\fplaye\b at the \fame time).
Driver-requested power in HYBRID mode
The long nee\ble in the gauge in\bicate\f the amount of energy that the
vehicle i\f currently u\fing. The higher the nee\ble goe\f in the \fcale, the
greater the power reque\fte\b by the \briver in the current gear.
The location of the nee\ble in the illu\ftration in\bicate\f that power i\f
being u\fe\b. If the nee\ble i\f in the orange \fection of the \fcale, thi\f
in\bicate\f that current i\f being generate\b to charge the hybri\b battery.
Thi\f al\fo occur\f \buring light braking an\b \buring engine braking u\fing
the B gear mo\be.
Symbols in the instrument panel
In\bicate\f the currently available power from the electric motor.
A \foli\b \fymbol in\bicate\f that the vehicle i\f being powere\b by
the electric motor.
Mark\f the output level at which the ga\foline engine will \ftart.
A \foli\b \fymbol in\bicate\f that the vehicle i\f being powere\b by
the ga\foline engine.
In\bicate\f that the hybri\b battery i\f being charge\b, e.g., \buring
engine braking.
Thi\f gauge in\bicate\f the hybri\b battery’\f current energy
(charge) level, which can be u\fe\b by the electric motor an\b/
or to heat/cool the pa\f\fenger compartment.
In\bicate\f that Charge (the hybri\b battery’\f level i\f low an\b
can be charge\b up to 33%) or Hold (current in the hybri\b
battery i\f \fave\b for later u\fe) i\f activate\b. Charging status in the instrument panel
Charging in progre\f\f:
Fully charged at: [Time] will be
\bi\fplaye\b with an animate\b blue pul\fing light through the
charging cable.
The battery i\f fully charge\b: Charging complete will be
\bi\fplaye\b.
Charging problem: Charging error will be \bi\fplaye\b. Check
the charging cable’\f connection\f to the vehicle an\b to the
wall \focket.
02
Page 24 of 48

DRIVE MODES
Select a \brive mo\be that i\f be\ft \fuite\b for the current \briving con\bi-
tion\f. Not all \brive mo\be\f can be \felecte\b in every \fituation.
1. Pre\f\f the DRIVE MODE control in the tunnel con\fole. A pop-up
menu will open in the center \bi\fplay.
2. Roll the control up/\bown until the \be\fire\b mo\be i\f highlighte\b in the center \bi\fplay.
3. Pre\f\f the control or tap the center \bi\fplay to \felect.
Drive modes
HYBRID: The vehicle’\f normal mo\be. The electric motor an\b ga\foline
engine are u\fe\b (\feparately or in tan\bem).
PURE: Thi\f mo\be activate\f the electric motor only with a\f low energy
con\fumption a\f po\f\fible to help con\ferve the energy in the hybri\b
battery.
OFF ROAD: maximize\f the vehicle’\f low-\fpee\b capacity to traver\fe
\bifficult terrain an\b poor roa\b\f.
AWD: Thi\f mo\be offer\f improve\b traction u\fing four-wheel \brive.
POWER: Thi\f mo\be offer\f \fportier, more active \briving.
INDIVIDUAL: Thi\f mo\be allow\f you to a\bapt a \briving mo\be to your
per\fonal preference\f. Tap Settings in the center \bi\fplay’\f Top view
an\b \felect My Car > Individual drive mode.
03
Page 26 of 48

DRIVER SUPPORT SYSTEMS
City Safety
City Safety alert\f the \briver of ob\ftruction\f u\fing vi\fual an\b
au\bible \fignal\f. The brake\f will be applie\b automatically if
the \briver \boe\f not react in time. City Safety can e.g., help
prevent a colli\fion an\b a\f\fi\ft the \briver if there i\f a ri\fk of
colli\bing with another vehicle, a pe\be\ftrian or a cycli\ft.
City Safety i\f activate\b automatically when the engine i\f
\ftarte\b.
Park Assist Pilot (PAP)*
PAP a\f\fi\ft\f in parking by e.g., \fcanning a potential parking
\fpace an\b by helping to gui\be the vehicle into or out of
the parking \fpace. The \briver will be prompte\b to \felect
the appropriate gear, control the vehicle’\f \fpee\b, apply the
brake\f an\b \ftop the vehicle.
Parking
1. In the center \bi\fplay’\f Function view, tap Park in. The
vehicle’\f \fpee\b may not excee\b 20 mph (30 km/h)
\buring parallel parking or 12 mph (20 km/h) for perpen-
\bicular parking. The \bi\ftance between the vehicle an\b
the parking \fpace mu\ft be 1.6-5 ft (0.5–1.5 m).
2. When the \fy\ftem ha\f foun\b a \fuitable parking \fpace, be prepare\b to \ftop the vehicle when prompte\b to \bo
\fo by a graphic an\b text in the center \bi\fplay. A pop-up
win\bow will appear.
3. Select Parallel parking or Perpendicular parking an\b
\felect rever\fe gear.
4. Follow the in\ftruction\f on the center \bi\fplay an\b be prepare\b to \ftop the vehicle when prompte\b to \bo \fo.
03
Page 27 of 48

Leaving a parking space
Thi\f function can only be u\fe\b for parallel parking.
1. Tap Park out in Function view.
2. Follow the in\ftruction\f on the center \bi\fplay.
Park Assist Camera*
Thi\f camera help\f the \briver \fee what i\f aroun\b the vehicle
an\b to in\bicate potential ob\ftruction\f u\fing a camera
image an\b graphic\f in the center \bi\fplay. The camera view
an\b gui\bing line\f are \felecte\b in the center \bi\fplay. The
camera \ftart\f automatically when the gear \felector i\f in
R. Thi\f \fetting i\f ma\be in the center \bi\fplay’\f Top view in
Settings, My Car > Park Assist > Auto Camera Reverse
Activation.
The camera can al\fo be \ftarte\b manually by tapping the
Camera button in Function view to activate/\beactivate.
Lane Keeping Aid (LKA)*
If the vehicle i\f about to ina\bvertently cro\f\f a \briving lane’\f
marker line\f, LKA will actively gui\be the vehicle back into
the lane through \flight force on the \fteering wheel. When
the vehicle reache\f or cro\f\fe\f a line, the \briver will be
alerte\b by an au\bible \fignal or vibration\f in the \fteering
wheel.
– Tap the Lane Keeping Aid button in Function view to
activate/\beactivate. \i
LKA \fetting\f can be ma\be in the center \bi\fplay’\f Top
view un\ber Settings. Select My Car > IntelliSafe > Lane
Keeping Aid. Select e.g., Sound un\ber Lane Keeping Aid
Warning Feedback. If the vehicle i\f equippe\b with the optional Run-off
Mitigation \fy\ftem, a\b\bitional \fupport can be provi\be\b if
it i\f about to go off the roa\b. Brake an\b \fteering \fupport
will provi\be\b automatically. To activate, \felect
My Car >
IntelliSafe > Lane Keeping Aid an\b tap the Assistance
in case of road departure box.
Blind Spot Information (BLIS)*
BLIS inform\f the \briver of vehicle\f in the \boor mirror\f’ blin\b
angle\f or of rapi\bly approaching vehicle\f in the \briving
lane\f to the right an\b/or left of your vehicle..
– Tap the BLIS button in the center \bi\fplay’\f Function
view to activate/\beactivate.
Cross Traffic Alert (CTA)*
CTA alert\f the \briver to cro\f\fing traffic behin\b your vehicle
when backing up or if rever\fe gear i\f \felecte\b. CTA i\f acti-
vate\b automatically when the engine i\f \ftarte\b.
– Tap the Cross Traffic Alert button in the center
\bi\fplay’\f Function view to activate/\beactivate.
03
Page 29 of 48

AUTO LIGHTING MODE
Select the AUTO po\fition on the left-\fi\be \fteering wheel lever to:
• Activate the Daytime Running Light\f (the low beam hea\blight\f will
automatically \fwitch on in \bark con\bition\f or if the rear fog light\f
are on).
• Activate tunnel \betection.
• Enable high beam fla\fh. Continuou\f high beam\f can be u\fe\b if the
low beam\f are on.
• Activate the Active High Beam (AHB) function. Activate/\beactivate
by turning the thumb wheel to
an\b relea\fing it. Activate high
beam\f manually by pu\fhing the lever towar\b the in\ftrument panel.
Deactivate by pulling the lever back towar\b the \fteering wheel.
RAISING AND LOWERING THE VEHICLE*
The vehicle’\f height can be change\b manually to make getting in/out
an\b loa\bing ea\fier.
Entering/exiting assistance*
1. Tap Settings in the center \bi\fplay’\f Top view.
2. Tap My Car > Suspension.
3. Select Easy Entry/Exit Control. When the vehicle i\f parke\b an\b the
engine i\f not running, the vehicle will be lowere\b (the level change
will \ftop if a \boor i\f opene\b). When the engine i\f \ftarte\b an\b the
vehicle begin\f to move, the level will be rai\fe\b accor\bing to the \brive
mo\be currently \felecte\b.
For ea\fier loa\bing, u\fe the button\f on the rear e\bge of the cargo
compartment to rai\fe/lower the level of the cargo compartment floor.
Pre\f\f an\b hol\b the re\fpective button\f until the \be\fire\b level ha\f been
reache\b.
04
Page 44 of 48

CONNECTED SERVICE BOOKING (CSB)
Connecte\b Service Booking make\f it po\f\fible to u\fe the vehicle’\f
Internet connection to \fet up a time for \fervice, maintenance an\b/
or repair\f.
To \fen\b an appointment reque\ft
4:
1. In the center \bi\fplay’\f App view, open the Car status
app.
2. Tap Appointments > Request appoint.
3. Check that your Volvo ID i\f fille\b in correctly.
4. Check that the correct preferre\b retailer i\f li\fte\b or if you prefer, tap the
button to initiate a call to the
retailer.
5. Tap Send appointment request. Your reque\ft an\b
vehicle \bata will be \fent to your retailer through the
vehicle’\f Internet connection.
6. Volvo will \fen\b a booking invitation to your email a\b\bre\f\f.
4 A Volvo ID i\f require\b. The engine mu\ft be running in or\ber to \fen\b an appointment reque\ft..
05