service indicator VOLVO XC90 TWIN ENGINE 2018 User Guide
[x] Cancel search | Manufacturer: VOLVO, Model Year: 2018, Model line: XC90 TWIN ENGINE, Model: VOLVO XC90 TWIN ENGINE 2018Pages: 686, PDF Size: 17 MB
Page 562 of 686
||WHEELS AND TIRES
* Option/accessory.
560 function, the telltale will flash for approximately
one minute and then remain continuously illumi-
nated. This sequence will continue upon subse-
quent vehicle start-ups as long as the malfunc-
tion exists. When the malfunction indicator is illu-
minated, the system may not be able to detect or
signal low tire pressure as intended.
TPMS malfunctions may occur for a variety of
reasons, including the installation of replacement
or alternate tires or wheels on the vehicle that
prevent the TPMS from functioning properly.
Always check the TPMS malfunction telltale after
replacing one or more tires or wheels on your
vehicle to ensure that the replacement or alter-
nate tires and wheels allow the TPMS to con-
tinue to function properly.
Messages in the instrument panelIf tire pressure is too low, the low tire pressure
warning symbol is shown in the instrument panel
along with a message.
• Tire pressure low Check tires, calibrate
after fill
• Tire pressure system Temporarily
unavailable
• Tire pressure system Service required
To keep in mind
•Always calibrate the system after changing
wheels or adjusting tire pressure. See the tire pressure placard on the driver's side B pillar
for Volvo-recommended tire pressures.
• If you switch to a tire of another size than the
factory-mounted tires, the system must be
calibrated for these tires to avoid false warn-
ings.
• If a spare wheel 7
is used, it is possible that
the tire pressure monitoring system will not
work correctly due to the differences
between the wheels.
• The system does not replace the need for
regular tire inspection and maintenance.
• It is not possible to deactivate the tire pres-
sure monitoring system.
WARNING •
Incorrect inflation pressure could lead to
tire failure, which could cause the driver
to lose control of the vehicle.
• The system cannot predict sudden tire
damage.
Related information
• Recommended tire pressure (p. 559)
• Viewing tire pressure status in the center
display* (p. 562)
• Action when warned of low tire pressure
(p. 563) •
Calibrating the tire pressure monitoring sys-
tem* (p. 561) 7
Not available on all models.
Page 565 of 686

WHEELS AND TIRES
}}
* Option/accessory. 563
The vehicle may need to be driven for a few
minutes at a speed above 35 km/h (22 mph) to
activate the system.
All tires gray and a message:
•
Tire pressure system Temporarily
unavailable. The indicator symbol will flash
for about 1 minute and then glow steadily.
The system is temporarily unavailable and will
be activated momentarily.
• Tire pressure system Service required.
The indicator symbol will flash for about 1
minute and then glow steadily. If the system
is not working properly, contact a workshop 9
.
Related information
• Calibrating the tire pressure monitoring sys-
tem* (p. 561)
• Action when warned of low tire pressure
(p. 563)
• Tire pressure monitoring system* (p. 559)
• Vehicle status (p. 602) Action when warned of low tire
pressure
When the tire pressure monitoring system, Tyre
Pressure Monitoring System (TPMS), detects
low pressure in one or more of the vehicle's
tires, the driver will be alerted that action is nee-
ded. If the system's indicator symbol illumi-
nates and the message Tire pressure
low is displayed, check the tire pres-
sure and inflate if necessary. 1. Switch off the ignition.
2.
Check the inflation pressure on all four tires
using a tire pressure gauge.
3. Inflate the tire to the correct pressure (see the tire pressure decal on the driver's side
door pillar).
4. Through calibration of the system via the center display after the tire pressure has
been adjusted.
Please be aware that the indicator symbol
will not go out until the low tire pressure has
been corrected and the system has been
recalibrated.
NOTE To help prevent incorrect inflation pressure,
pressure should be checked when the tires
are cold. The tires are considered to be cold
when they have reached the same tempera-
ture as the ambient temperature (about 3
hours after the vehicle was last driven). After
driving for a few kilometers, the tires will warm
up and the pressure will increase.
NOTE
•
After inflating a tire, always replace the
valve cap to help prevent valve damage
caused by gravel, dirt, etc.
• Use plastic valve caps only. Metal caps
could corrode and become difficult to
remove.
WARNING •
Incorrect inflation pressure could lead to
tire failure, which could cause the driver
to lose control of the vehicle.
• The system cannot predict sudden tire
damage. 9
An authorized Volvo workshop is recommended.
Page 573 of 686
WHEELS AND TIRES
}}
571
Snow tires
Snow tires are designed for winter driving.
Volvo recommends snow tires with specific
dimensions. The tire dimensions vary depending
on engine type. When driving with snow tires, the
correct type of tires must be mounted on all four
wheels.
NOTE Contact a Volvo dealer for advice on the best
choice of rims and tires.
Tips for changing snow tiresWhen switching between regular tires and snow
tires, mark the tires according to which side they
were mounted on, e.g. L for left and R for right.
Studded tiresStudded tires should be broken in by driving
500–1000 km (300–600 miles) slowly and gen-
tly to help the studs settle properly in the tires.
This gives the tire, and especially the studs, a
longer service life.
NOTE
Regulations regarding the use of studded
tires vary from country to country.
Tread depthRoad conditions with ice, slush and low tempera-
tures place considerably higher demands on tires
than summer conditions. Volvo therefore recom-
mends not driving on snow tires that have a tread
depth of less than 4 mm (0.15 inch).
Related information
•
When changing wheels (p. 564)
• Winter driving (p. 461)
• Tread wear indicator (p. 553) Snow chains
Using snow chains and/or snow tires can help
improve traction in winter driving conditions.
WARNING Use Volvo genuine snow chains or equivalent
snow chains that are suitable for the vehicle
model and the tire and wheel sizes. Only one-
sided snow chains are permitted.
If uncertain about snow chains, Volvo recom-
mends contacting an authorized Volvo work-
shop. Use of the wrong snow chains could
cause serious damage to the vehicle and
result in an accident.
12
The backrest in the third row of seats* must be folded down.
Page 604 of 686
||MAINTENANCE AND SERVICE
* Option/accessory.
602
NOTE Data downloading can affect other services
such as transfer data, e.g. web radio. If the
affect on other services is experienced as
problematic, the download can be interrupted.
Alternatively, it may be appropriate to switch
off or cancel other services.
NOTE
An update can be interrupted when the igni-
tion is switched off and the vehicle is left.
However, the update does not have to be
completed before the vehicle is left as the
update is resumed the next time the vehicle is
used.
Updating all system software
–
Select Install all at the bottom of the list.
To avoid displaying a list, select Install all via the
System updates button.
Updating individual system software
–Select Install to choose the software you
would like to download.
Canceling software download
– Tap the checkbox in the activity indicator that
replaced the
Install button when the down-
load began. Note that only a download can be cancelled. An
installation cannot be cancelled once it has
begun.
Deactivating the background search for
software update
Automatic background searching for software
updates is activated as the default factory setting,
but the function can be deactivated.
1. Tap Settings in the center display's Top
view.
2.
Tap System Download Center
.
3. Tap to deselect Auto Software Update.
Related information
•Download Center (p. 601)
• Internet-connected vehicle* (p. 529)
• Navigating in the center display's views
(p. 115) Vehicle status
The vehicle's general status can be displayed in
the center display along with the option to
schedule service 3
.
The
Car status app is started
from the center display's App
view and has four tabs: •
Messages - status messages
• Status - engine oil level check
• TPMS - tire inflation pressure check
• Appointments - appointment information
and vehicle information 3
.
Related information
• Handling messages saved from the instru-
ment panel (p. 107)
• Checking and filling engine oil (p. 611)
• Tire pressure monitoring system* (p. 559)
• Scheduling service and repairs (p. 603)
• Sending vehicle information to the workshop
(p. 604)
• Navigating in the center display's views
(p. 115)
Page 606 of 686
||MAINTENANCE AND SERVICE
* Option/accessory.
604 2. To accept the suggested appointment, tap
Accept. To decline the suggested appoint-
ment, tap Send new proposal or Decline.
For some markets, the system reminds you when
an appointment time is approaching and the navi-
gation system 7
can also guide you to the work-
shop at the appointed time.
Related information
• Vehicle status (p. 602)
• Sending vehicle information to the workshop
(p. 604)
• Navigating in the center display's views
(p. 115)
• Volvo ID (p. 26)
• Internet-connected vehicle* (p. 529) Sending vehicle information to the
workshop
8
Vehicle-related information can be sent at any
time from the vehicle, e.g. if you schedule a visit
to a workshop and would like to assist your
workshop by providing additional basic informa-
tion. Sending vehicle information is not the same
as scheduling service. 1.
Open the Car status app from App view in
the center display.
2. Tap the Appointments button.
3. Tap the Send vehicle data button.
>
A message confirming that vehicle-related
information has been sent will appear at
the top of the center display. You can
cancel data transmission by tapping the
checkbox in the activity indicator.
Information is sent via the vehicle's Inter-
net connection 9
. Vehicle information can be accessed by any
retailer if they are provided with your vehicle iden-
tification number (VIN
10
).
Vehicle information contentsThe most recently saved vehicle-related informa-
tion will be sent (the last time the vehicle was
turned on). This includes information regarding:
• service requirements
• time since last service was performed
• function status
• fluid levels
• mileage (odometer reading)
• Vehicle Identification Number (VIN 10
)
• software version
• diagnostic information.
Related information
•Scheduling service and repairs (p. 603)
• Vehicle status (p. 602)
• Navigating in the center display's views
(p. 115)
• Internet-connected vehicle* (p. 529) 7
For vehicles with Sensus Navigation*.
8 Certain markets only.
9 There may be a charge for transmitting data over the Internet, depending\
on your service plan.
10 Vehicle Identification Number.
Page 629 of 686
MAINTENANCE AND SERVICE
}}
* Option/accessory. 627
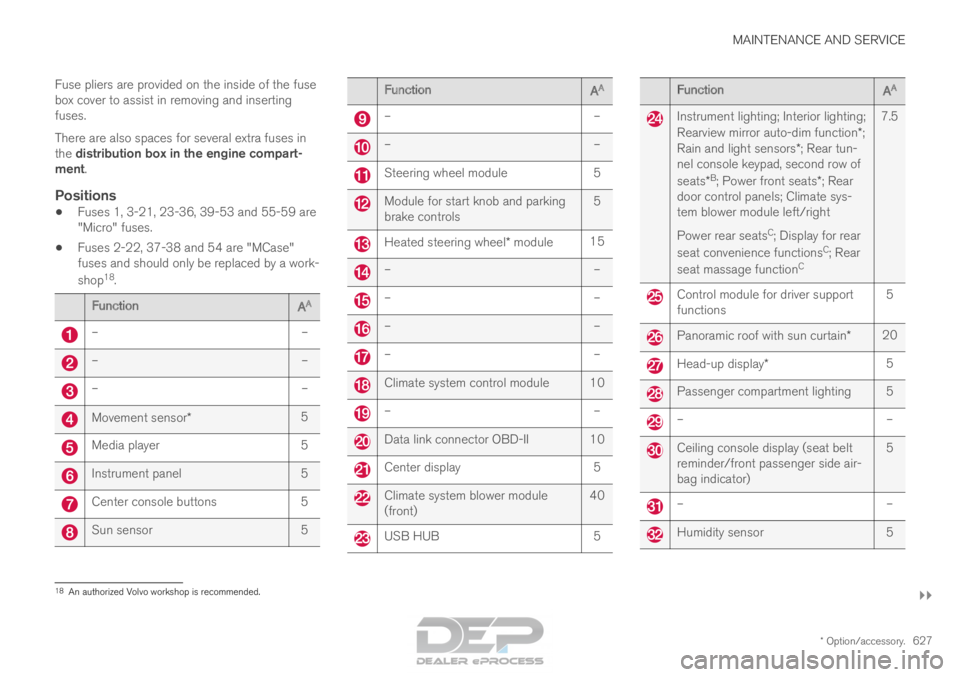
Fuse pliers are provided on the inside of the fuse
box cover to assist in removing and inserting
fuses.
There are also spaces for several extra fuses in
the distribution box in the engine compart-
ment.
Positions
•
Fuses 1, 3-21, 23-36, 39-53 and 55-59 are
"Micro" fuses.
• Fuses 2-22, 37-38 and 54 are "MCase"
fuses and should only be replaced by a work-
shop 18
. Function
AA –
––
––
–Movement sensor*
5Media player
5Instrument panel
5Center console buttons
5Sun sensor
5 Function
AA –
– –
– Steering wheel module
5 Module for start knob and parking
brake controls
5 Heated steering wheel* module
15 –
– –
– –
– –
– Climate system control module 10
–
– Data link connector OBD-II 10
Center display
5 Climate system blower module
(front)
40 USB HUB
5 Function
AA Instrument lighting; Interior lighting;
Rearview mirror auto-dim function*;
Rain and light sensors*; Rear tun-
nel console keypad, second row of
seats* B
; Power front seats*; Rear
door control panels; Climate sys-
tem blower module left/right
Power rear seats C
; Display for rear
seat convenience functions C
; Rear
seat massage function C7.5 Control module for driver support
functions
5 Panoramic roof with sun curtain*
20 Head-up display*
5 Passenger compartment lighting 5
–
– Ceiling console display (seat belt
reminder/front passenger side air-
bag indicator)
5 –
– Humidity sensor
518
An authorized Volvo workshop is recommended.
Page 651 of 686

MAINTENANCE AND SERVICE
}}
* Option/accessory. 649
NOTEThe wiper blades are different lengths. The
blade on the driver's side is longer than the
one on the passenger side.
Related information
•
Using the rain sensor (p. 177)
• Using the windshield and headlight washers
(p. 179)
• Using automatic rear window wiping when
backing up (p. 181)
• Heated windshield washer nozzles* (p. 177)
• Using the rain sensor's memory function
(p. 178)
• Using the rear window wiper/washer
(p. 180)
• Filling washer fluid (p. 650)
• Windshield wipers in the service position
(p. 649)
• Changing rear window wipers (p. 647)
• Using the windshield wipers (p. 176) Windshield wipers in the service
position
The windshield wiper blades must be in the serv-
ice (vertical) position when performing certain
operations, e.g. replacing the blades. Windshield wipers in the service position.
The windshield wipers must be in the service
position when replacing, washing or lifting the
blades (e.g. to scrape ice or snow from the wind-
shield).
CAUTION Before placing the wipers in service position,
ensure that they have not frozen to the wind-
shield.
Activating/deactivating service positionThe service position can be activated/deactivated
when the vehicle is stationary and the windshield
wipers are switched off. Service position is acti-
vated/deactivated via Function view in the center
display:
Tap the Wiper ServicePosition button. The indicator
light in the button will illuminate
when service position is acti-
vated. The windshield wipers
will move to the vertical posi-
tion when service position is
activated. To deactivate the service position, tap
Wiper Service Position once. The indicator light
in the button will go out when service position is
deactivated.
Page 680 of 686
INDEX
678Start battery 469, 615
overload 469
Start engine 424
Starting the engine after a collision 62
Start the vehicle 424
Steel cargo grid 592
Steering assistance at risk of colli-
sion 372, 373, 374, 375, 376, 377, 378, 380
Steering assistance at risk of rear-end col-
lision 377, 378
Steering power level, see Steering wheel
resistance 272
Steering resistance at risk of head-on colli-
sion 375, 376
Steering wheel 199 heating 218
keypad 199
paddle 199
steering wheel adjustment 199
Steering wheel keypad 199
Steering wheel paddles 441
Steering wheel resistance, speed-depend-
ent 272
Stone chips and scratches 645, 646
Storage compartments 580 center console 581 glove compartment
585
sun visor
586
Sunroof pinch protection 166
Sun shade panoramic roof 172, 175
pinch protection 166
rear door 169
Sun visor 586 mirror lighting 163
Symbols indicator symbols 94
Symbols and messages Adaptive Cruise Control 309
center display's status bar 124
Collision warner with auto-brake 346
hybrid-related 419
parking climate 236
Symbols and messages for Assistance at
risk of collision 380
system updates 601
T Tailgate
locking/unlocking
243, 256
open/close with foot movement 265 power
261
unlocking from inside
259
Technician certification 37
Temperature adjusting 226, 227, 228
perceived 203
Temperature monitoring 411
Temporary spare spare tire 569
Temporary tire sealing system execution, checking 573
Inflating tires 577
location 572
overview 572
sealing compound 572
Terms and conditions services 34
users 536
Tire dimensions 554, 564
Tire pressure decal 559
Tire pressure monitoring calibrating 561
Tires 550
direction of rotation 552
glossary of terms 553
inflation pressure table 665
mounting 568
pressure 665