warning light VOLVO XC90 TWIN ENGINE 2020 Owner's Manual
[x] Cancel search | Manufacturer: VOLVO, Model Year: 2020, Model line: XC90 TWIN ENGINE, Model: VOLVO XC90 TWIN ENGINE 2020Pages: 693, PDF Size: 13.34 MB
Page 248 of 693
KEY, LOCKS AND ALARM
* Option/accessory.
246
Remote key
The remote key is used to lock and unlock doors and the tailgate. The remote key mustbe in the vehicle in order to start the engine.
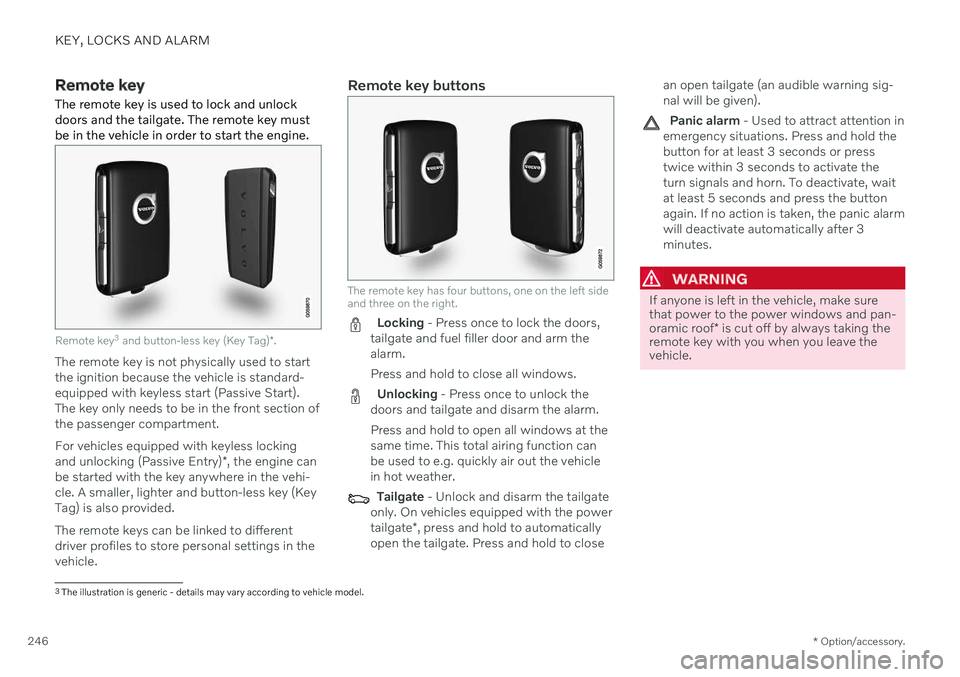
Remote key 3
and button-less key (Key Tag) *.
The remote key is not physically used to start the ignition because the vehicle is standard-equipped with keyless start (Passive Start).The key only needs to be in the front section ofthe passenger compartment. For vehicles equipped with keyless locking and unlocking (Passive Entry) *, the engine can
be started with the key anywhere in the vehi- cle. A smaller, lighter and button-less key (KeyTag) is also provided. The remote keys can be linked to different driver profiles to store personal settings in thevehicle.
Remote key buttons
The remote key has four buttons, one on the left side and three on the right.
Locking - Press once to lock the doors,
tailgate and fuel filler door and arm the alarm. Press and hold to close all windows.
Unlocking - Press once to unlock the
doors and tailgate and disarm the alarm. Press and hold to open all windows at the same time. This total airing function canbe used to e.g. quickly air out the vehiclein hot weather.
Tailgate - Unlock and disarm the tailgate
only. On vehicles equipped with the power tailgate *, press and hold to automatically
open the tailgate. Press and hold to close an open tailgate (an audible warning sig- nal will be given).
Panic alarm - Used to attract attention in
emergency situations. Press and hold the button for at least 3 seconds or presstwice within 3 seconds to activate theturn signals and horn. To deactivate, waitat least 5 seconds and press the buttonagain. If no action is taken, the panic alarmwill deactivate automatically after 3minutes.
WARNING
If anyone is left in the vehicle, make sure that power to the power windows and pan- oramic roof * is cut off by always taking the
remote key with you when you leave the vehicle.
3 The illustration is generic - details may vary according to vehicle model.
Page 253 of 693
KEY, LOCKS AND ALARM
}}
* Option/accessory.251
approx. 1.5 meter (5 feet) along the sides of the vehicle or approx. 1 meter (3 feet) from thetailgate.
NOTE
The functions of the remote control key can be disrupted by ambient radio waves,buildings, topographical conditions, etc.The vehicle can always be locked/unlockedusing the key blade.
If the remote key is removed from the vehicle
If the remote key is removed from the vehicle while the engine is run- ning, the warning message
Vehicle
key not found Removed from
vehicle will be displayed in the instrument
panel and an audible signal will sound when the last door is closed.
The message will disappear when the key is returned to the vehicle and the O button on
the right-side steering wheel keypad ispressed or when the last door is closed again.
Related information
Remote key (p. 246)
Antenna locations for the start and locksystem (p. 264)
Keyless and touch-sensitive surfaces
*
(p. 261)
Replacing the remote key's battery
The battery in the remote key must be replaced when it is discharged.
NOTE
All batteries have a limited service life and must eventually be replaced (does notapply for Key Tag). The battery's service lifevaries depending on how often thevehicle/key is used.
The remote key battery should be replaced if
the information symbol illuminates and the message
Vehicle key bat. low is dis-
played in the instrument panel
the locks do not react after several attempts to lock or unlock the vehicleusing the remote key within approx.20 meter (65 feet) from the vehicle.
NOTE
Move closer to the vehicle and try to unlock it again.
The battery in the smaller key without but- tons 7
(the Key Tag) cannot be replaced. A new key can be ordered from an authorized Volvo workshop.
CAUTION
An end-of-life Key Tag must be turned in to an authorized Volvo workshop. The keymust be deleted from the vehicle becauseit can still be used to start the vehicle viabackup start.
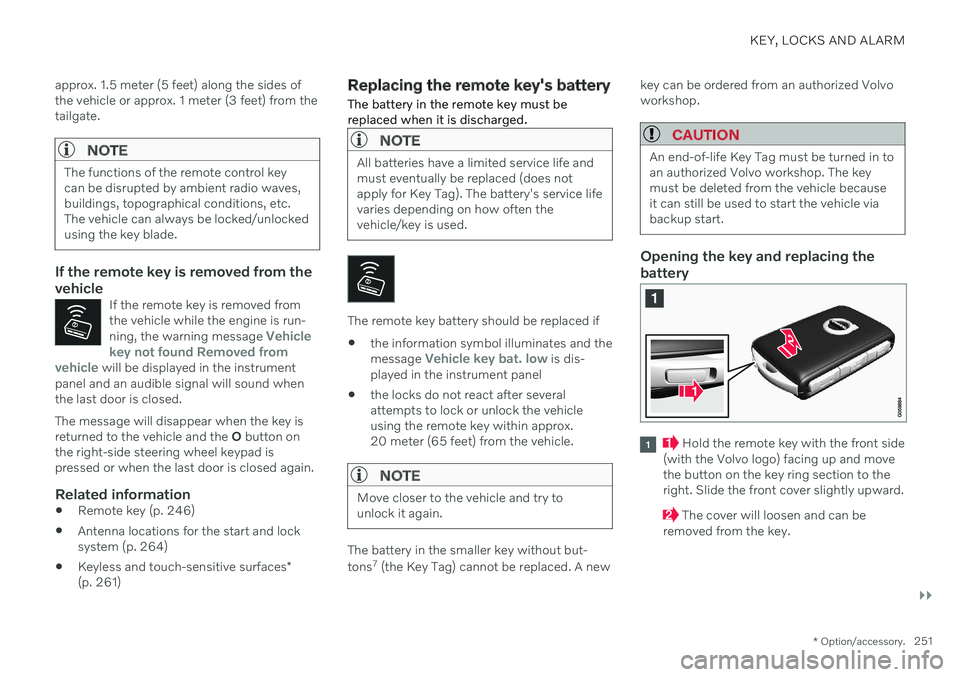
Opening the key and replacing the battery
Hold the remote key with the front side
(with the Volvo logo) facing up and move the button on the key ring section to theright. Slide the front cover slightly upward.
The cover will loosen and can be
removed from the key.
Page 266 of 693

KEY, LOCKS AND ALARM
* Option/accessory.
264
Keyless tailgate unlock *
With keyless locking/unlocking, touching the pressure-sensitive indentation on the tailgatehandle will unlock the tailgate.
NOTE
One of the vehicle's remote keys must be within range behind the vehicle for unlock-ing to be possible.
The tailgate is held closed by an electronic locking mechanism. To open:
1. Lightly press the rubberized pressure plate on the underside of the tailgate handle.
> The lock will disengage. 2. Lift the outer handle to open the tailgate.
CAUTION
Only light pressure on the rubberized pressure plate is necessary to releasethe tailgate's locking mechanism.
Use the handle to lift the tailgate and donot apply force to the rubberized pres-sure plate. Too much force can damagethe pressure plate's electrical connec-tions.
Hands-free unlocking of the tailgate is also possible using a foot movement under the rearbumper; see the separate section.
WARNING
Do not drive with the tailgate open. Toxic exhaust fumes can be sucked into the vehi-cle through the cargo compartment.
Related information
Keyless locking and unlocking
* (p. 262)
Keyless and touch-sensitive surfaces
*
(p. 261)
Remote key range (p. 250)
Foot movement tailgate operation
*
(p. 272)
Antenna locations for the start and lock system
The antennas for the keyless start system and keyless locking system * are integrated in the
vehicle.
Location of the antennas:
Under the cup holder in the front section of the tunnel console
In the upper front section of the left-side rear door 10
In the upper front section of the right-side rear door10
In the center of the rear seat backrest 10
10
Only in vehicles equipped with keyless locking and unlocking *.
Page 267 of 693

KEY, LOCKS AND ALARM
}}
* Option/accessory.265
WARNING
Individuals with an implanted pacemaker should not allow the pacemaker to comecloser than 22 cm (9 in.) to the Keylesssystem antennas. The aim of this is to pre-vent disturbances between the pacemakerand the Keyless system.
Related information
Keyless and touch-sensitive surfaces
*
(p. 261)
Remote key range (p. 250)
Locking and unlocking from inside the vehicle The doors and tailgate can be locked and unlocked from inside the vehicle using thecentral lock buttons in the front doors.
Central locking
Button with indicator light for locking and unlocking in front door.
Unlocking using the front door buttons
–Press the button to unlock all side
doors and the tailgate.
Alternative unlocking method
Alternative unlocking method using side door open- ing handle 11
.
–Pull either of the side door inside opening handles and release.
> Depending on the remote key settings,
either all doors will be unlocked or just the selected door will be unlocked andopened. To change this setting, tap
Settings
My CarLockingRemote and
Interior Unlock in the Top view of the
center display.
Locking using the front door buttons
–Press the button (both front doors
must be closed).
> All doors and the tailgate will lock.
11 The illustration is generic - details may vary according to vehicle model.
Page 278 of 693
KEY, LOCKS AND ALARM
276
Alarm The alarm emits sound and light signals if anyone without a valid remote key attemptsto break into the vehicle or interferes with thestart battery or alarm siren.
When armed, the alarm will be triggered if:
the hood, tailgate or any door is opened.
a battery cable is disconnected.
the alarm siren is disconnected.
Alarm signalsThe following occurs if the alarm is triggered:
A siren will sound for 30 seconds or until the alarm is turned off.
The hazard warning flashers will flash for5 minutes or until the alarm is turned off.
If the reason the alarm was triggered is notrectified, the alarm cycle will repeat up to 10 times 15
.
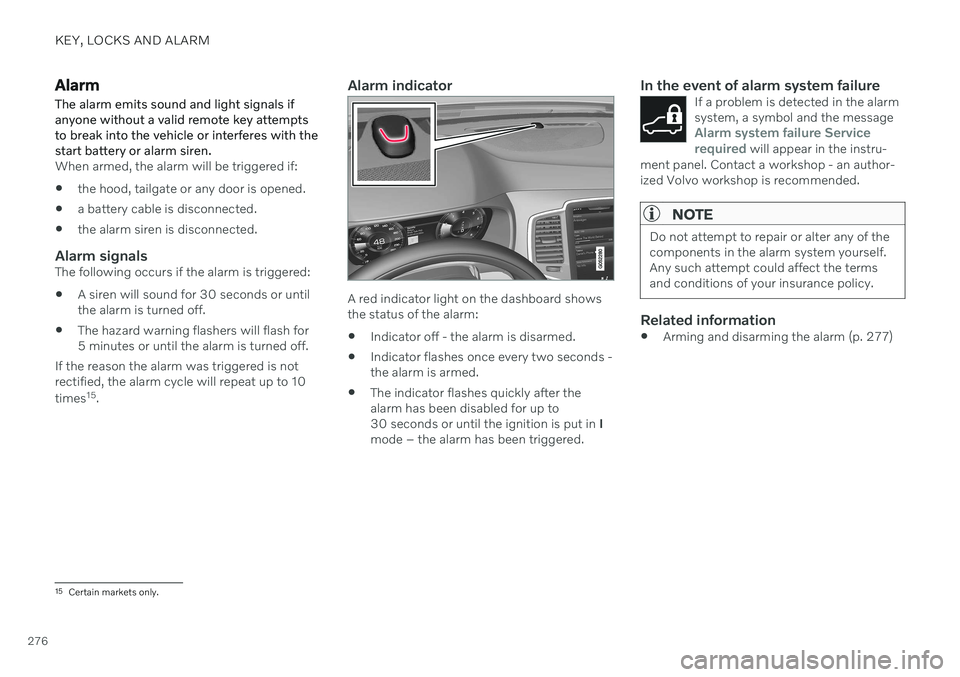
Alarm indicator
A red indicator light on the dashboard shows the status of the alarm:
Indicator off - the alarm is disarmed.
Indicator flashes once every two seconds -the alarm is armed.
The indicator flashes quickly after thealarm has been disabled for up to30 seconds or until the ignition is put in
I
mode – the alarm has been triggered.
In the event of alarm system failureIf a problem is detected in the alarmsystem, a symbol and the message
Alarm system failure Service
required will appear in the instru-
ment panel. Contact a workshop - an author- ized Volvo workshop is recommended.
NOTE
Do not attempt to repair or alter any of the components in the alarm system yourself.Any such attempt could affect the termsand conditions of your insurance policy.
Related information
Arming and disarming the alarm (p. 277)
15
Certain markets only.
Page 288 of 693
||
DRIVER SUPPORT
* Option/accessory.
286
NOTE
Visual warnings on the windshield may be difficult to notice in cases of strong sun-light, reflections, extreme light contrasts,or if the driver is wearing sunglasses or isnot looking straight ahead.
NOTE
Distance Alert is deactivated while Adap- tive Cruise Control * or Pilot Assist * is
active.
WARNING
Distance Alert only reacts of the time inter- val to the vehicle ahead is shorter than thepreset value – vehicle speed is not affec-ted.
WARNING
The function is supplementary driver support intended to facilitate drivingand help make it safer – it cannot han-dle all situations in all traffic, weatherand road conditions.
The driver is advised to read all sec-tions in the Owner's Manual about thisfunction to learn of its limitations,which the driver must be aware ofbefore using the function.
Driver support functions are not a sub-stitute for the driver's attention andjudgment. The driver is always respon-sible for ensuring the vehicle is drivenin a safe manner, at the appropriatespeed, with an appropriate distance toother vehicles, and in accordance withcurrent traffic rules and regulations.
Related information
Activating or deactivating Distance Alert(p. 286)
Distance Alert limitations (p. 287)
Setting time interval to the vehicle ahead(p. 312)
Collision risk warning from driver support(p. 309)
Head-up display
* (p. 145)
Activating or deactivating Distance Alert 12
Distance Alert can be turned off. The function is only available in vehicles that can displayinformation on the windshield with a head-up display *.
Activate or deactivate the function using this button inthe center display's Functionview.
GREEN button indicator light – the func- tion is activated.
GRAY button indicator light – the functionis deactivated.
Distance Alert is automatically activated eachtime the engine is started.
Related information
Distance Alert
* (p. 285)
Distance Alert limitations (p. 287)
Page 289 of 693

DRIVER SUPPORT
}}
* Option/accessory.287
Distance Alert limitations 13
Distance Alert functionality may be reduced in certain situations. The function is onlyavailable in vehicles that can display informa-tion on the windshield with a head-up dis- play *.
WARNING
Detection ability may be affected by vehicle size, e.g. motorcycles, whichcan cause the warning light to come onat a shorter time interval than that setor cause the warning to be temporarilyabsent.
Very high speeds can cause the light tocome on at a shorter time interval thanthat set due to limitations in the rangeof the radar unit.
NOTE
The function uses the vehicle's camera and radar sensor, which has certain generallimitations.
Related information
Distance Alert
* (p. 285)
Camera/radar sensor limitations (p. 322)
Head-up display
* (p. 145)
Cruise control
Cruise Control (CC 14
) can help the driver
maintain an even speed to provide a more relaxing driving experience on highways andlong, straight roads with even traffic flows.
Overview
Function buttons and symbols.
: Activates Cruise Control from
standby mode and resumes the set speed
: Increases the set speed
: From standby mode – activates
Cruise Control and sets the current speed
: From active mode – deactivates/
puts Cruise Control in standby mode
: Reduces the set speed
Marker for set speed
The vehicle's current speed
Set speed
NOTE
In vehicles equipped with Adaptive Cruise Control *(ACC 15
), it is possible to switch
between Cruise Control and Adaptive Cruise Control.
12 Distance Alert
13 Distance Alert
Page 290 of 693
||
DRIVER SUPPORT
* Option/accessory.
288
WARNING
The function is supplementary driver support intended to facilitate drivingand help make it safer – it cannot han-dle all situations in all traffic, weatherand road conditions.
The driver is advised to read all sec-tions in the Owner's Manual about thisfunction to learn of its limitations,which the driver must be aware ofbefore using the function.
Driver support functions are not a sub-stitute for the driver's attention andjudgment. The driver is always respon-sible for ensuring the vehicle is drivenin a safe manner, at the appropriatespeed, with an appropriate distance toother vehicles, and in accordance withcurrent traffic rules and regulations.
Using engine braking instead of applying the brakes
Cruise Control regulates speed by lightly applying the brakes. On downgrades, it cansometimes be desirable to roll a bit faster andlet speed be reduced instead by engine brak-ing alone. The driver can temporarily disen-gage the Cruise Control braking function. To disengage CC:
–Press the accelerator pedal about halfway down and then release it.
> Cruise Control will automatically disen-
gage the automatic brake function and speed will only be reduced using theengine braking function.
Related information
Driver support systems (p. 280)
Selecting and activating cruise control(p. 288)
Deactivating cruise control (p. 289)
Cruise control standby mode (p. 290)
Adjusting set speed for driver support(p. 311)
Switching between cruise control and Adaptive Cruise Control
* in the center dis-
play (p. 297)
Selecting and activating cruise control The Cruise Control (CC 16
) function must be
selected and activated in order to regulate speed.
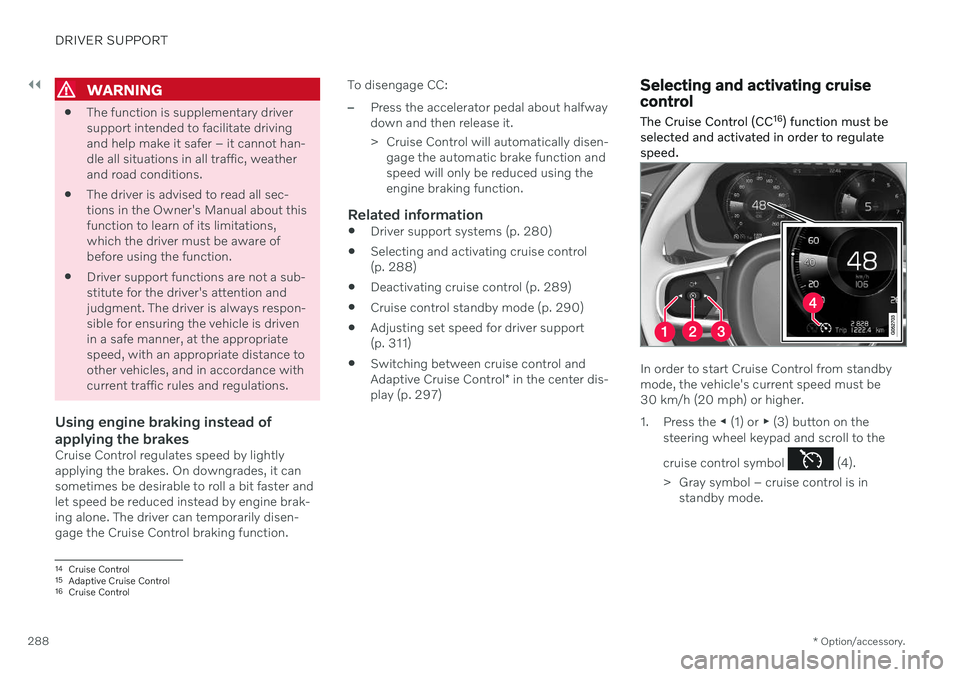
In order to start Cruise Control from standby mode, the vehicle's current speed must be30 km/h (20 mph) or higher.
1. Press the ◀ (1) or ▶ (3) button on the
steering wheel keypad and scroll to the cruise control symbol
(4).
> Gray symbol – cruise control is in standby mode.
14Cruise Control
15 Adaptive Cruise Control
16 Cruise Control
Page 293 of 693
DRIVER SUPPORT
* Option/accessory.291
vehicles ahead, the vehicle will return to the set speed. If the Curve Speed Assist (CSA)
* function is
activated, it may also affect the vehicle's speed.
WARNING
The function is supplementary driver support intended to facilitate drivingand help make it safer – it cannot han-dle all situations in all traffic, weatherand road conditions.
The driver is advised to read all sec-tions in the Owner's Manual about thisfunction to learn of its limitations,which the driver must be aware ofbefore using the function.
Driver support functions are not a sub-stitute for the driver's attention andjudgment. The driver is always respon-sible for ensuring the vehicle is drivenin a safe manner, at the appropriatespeed, with an appropriate distance toother vehicles, and in accordance withcurrent traffic rules and regulations.
Adaptive Cruise Control regulates speed byaccelerating and braking. It is normal for thebrakes to emit a slight sound when they arebeing used to adjust speed. Adaptive Cruise Control always attempts toregulate speed smoothly. The driver mustapply the brakes in situations requiring imme-diate braking. For example, when there aregreat differences in speed between vehicles orif the vehicle ahead brakes suddenly. Due tolimitations in the radar sensor, braking mayoccur unexpectedly or not at all. Adaptive Cruise Control is designed to follow a vehicle ahead in the same lane and maintaina time interval to that vehicle set by the driver.If the radar sensor does not detect a vehicleahead, it will instead maintain the speed setby the driver. This will also happen if the speedof the vehicle ahead exceeds the set speed foryour vehicle.
CAUTION
Only a workshop may perform mainte- nance on driver support components – anauthorized Volvo workshop is recom-mended.
Related information
Driver support systems (p. 280)
Adaptive Cruise Control
* controls and dis-
play (p. 292)
Selecting and activating Adaptive Cruise Control
* (p. 293)
Adaptive Cruise Control
* limitations
(p. 296)
Symbols and messages for AdaptiveCruise Control
* (p. 298)
Collision risk warning from driver support (p. 309)
Setting time interval to the vehicle ahead(p. 312)
Adjusting set speed for driver support(p. 311)
Auto-hold braking with driver support(p. 313)
Switching target vehicles with driver sup-port (p. 310)
Passing assistance (p. 317)
Page 296 of 693

DRIVER SUPPORT
* Option/accessory.
294
Switching between cruise control and Adaptive Cruise Control
* in the center dis-
play (p. 297)
Adaptive Cruise Control
* limitations
(p. 296)
Deactivating Adaptive Cruise Control *25
Adaptive Cruise Control (ACC 26
) can be deac-
tivated and switched off.
1. Press the button on the steering
wheel (2).
> The symbol and markings turn gray – Adaptive Cruise Control goes into standby mode. The time interval indica-tor light and any symbols for the targetvehicle will go out. 2. Press the
◀ (1) or ▶ (3) buttons on the
steering wheel to select another function.
> The Adaptive Cruise Control symbol and marking (4) in the instrument panel will go out and the stored maximumspeed will be erased.
WARNING
If Adaptive Cruise Control is in standby mode, the driver must intervene andregulate both speed and distance tothe vehicle ahead.
If the vehicle comes too close to a vehi-cle ahead when Adaptive Cruise Con-trol is in standby mode, the driver canbe warned of the short distance by the Distance Alert
* function.
Related information
Adaptive Cruise Control
* (p. 290)
Selecting and activating Adaptive CruiseControl
* (p. 293)
Switching between cruise control andAdaptive Cruise Control
* in the center dis-
play (p. 297)
Adaptive Cruise Control
* limitations
(p. 296)
25 Depending on market, this function can be either standard or optional.
26 Adaptive Cruise Control