key battery VOLVO XC90 TWIN ENGINE HYBRID 2017 Owners Manual
[x] Cancel search | Manufacturer: VOLVO, Model Year: 2017, Model line: XC90 TWIN ENGINE HYBRID, Model: VOLVO XC90 TWIN ENGINE HYBRID 2017Pages: 584, PDF Size: 14.2 MB
Page 7 of 584
5
Defrosting windows and mirrors206
Turning steering wheel heating* onand off208
Air conditioning209
Turning seat heating* on and off210
Turning front seat ventilation* on and off211
Air distribution212
Opening/closing/directing air vents213
Adjusting air distribution213
Air distribution table215
LOADING AND STORAGE
Cargo space218
Loading218
Passenger compartment storage spaces220
Using the glove compartment221
Tunnel console222
Grocery bag holder223
Cargo net223
Steel cargo grid*225
Load anchoring eyelets226
Cargo compartment cover*227
Sun visors229
Electrical sockets230
LOCKS AND ALARM
Locks and remote keys234
Immobilizer234
Changing the remote key's battery235
Remote key238
Remote key's range240
Red Key*240
Detachable key blade242
Foot movement tailgate operation*243
Locking/unlocking from outside thevehicle244
Locking/unlocking from inside thevehicle246
Antenna locations for the start andlock system247
Locking and unlocking confirmation248
Locking/unlocking the tailgate249
Power tailgate*251
Private (valet) locking253
Locking/unlocking with the detacha-ble key blade254
Automatically arming/disarming thealarm255
Alarm256
Deactivating the alarm without afunctioning remote key257
Child safety locks257
Page 105 of 584
INSTRUMENTS AND CONTROLS
* Option/accessory, for more information, see Introduction.103
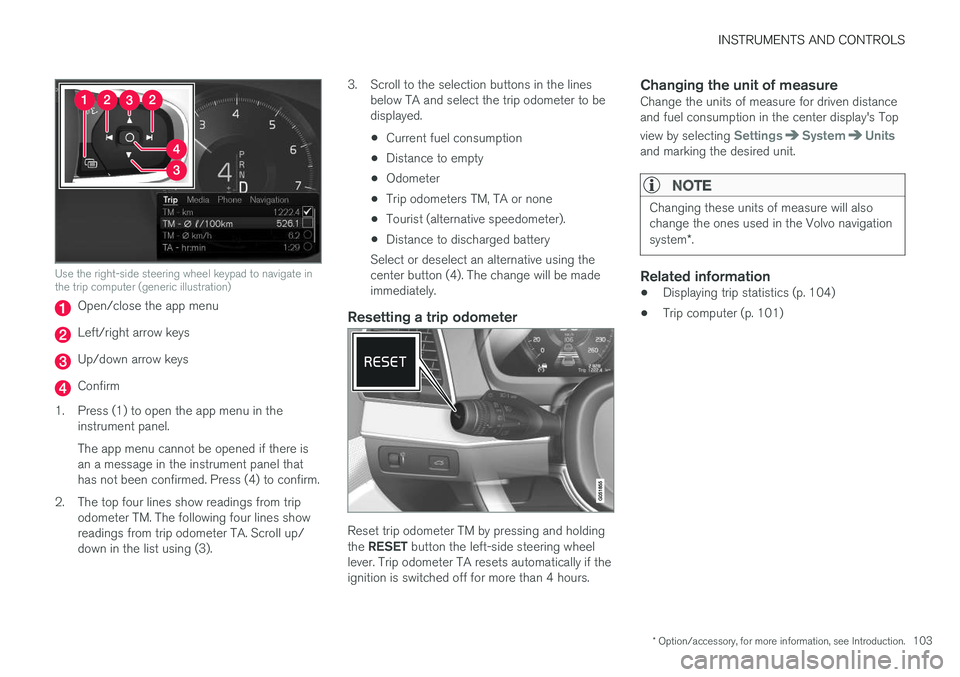
Use the right-side steering wheel keypad to navigate inthe trip computer (generic illustration)
Open/close the app menu
Left/right arrow keys
Up/down arrow keys
Confirm
1.Press (1) to open the app menu in theinstrument panel.
The app menu cannot be opened if there isan a message in the instrument panel thathas not been confirmed. Press (4) to confirm.
2. The top four lines show readings from tripodometer TM. The following four lines showreadings from trip odometer TA. Scroll up/down in the list using (3).
3. Scroll to the selection buttons in the linesbelow TA and select the trip odometer to bedisplayed.
•Current fuel consumption
•Distance to empty
•Odometer
•Trip odometers TM, TA or none
•Tourist (alternative speedometer).
•Distance to discharged battery
Select or deselect an alternative using thecenter button (4). The change will be madeimmediately.
Resetting a trip odometer
Reset trip odometer TM by pressing and holdingthe RESET button the left-side steering wheellever. Trip odometer TA resets automatically if theignition is switched off for more than 4 hours.
Changing the unit of measure
Change the units of measure for driven distanceand fuel consumption in the center display's Top
view by selecting SettingsSystemUnitsand marking the desired unit.
NOTE
Changing these units of measure will alsochange the ones used in the Volvo navigationsystem*.
Related information
•Displaying trip statistics (p. 104)
•Trip computer (p. 101)
Page 135 of 584
INSTRUMENTS AND CONTROLS
}}
133
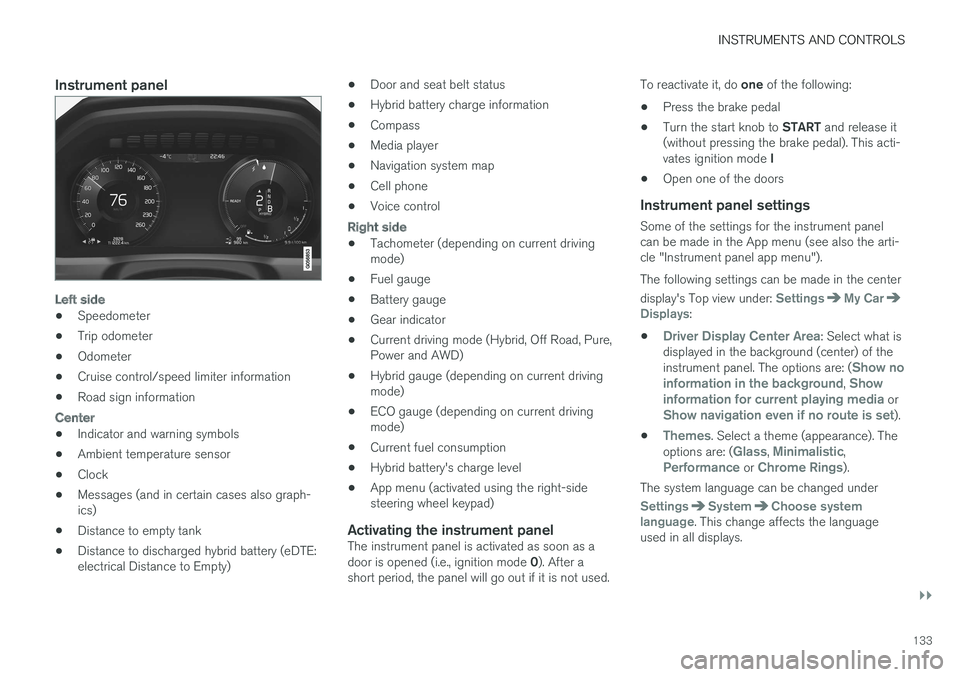
Instrument panel
Left side
•Speedometer
•Trip odometer
•Odometer
•Cruise control/speed limiter information
•Road sign information
Center
•Indicator and warning symbols
•Ambient temperature sensor
•Clock
•Messages (and in certain cases also graph-ics)
•Distance to empty tank
•Distance to discharged hybrid battery (eDTE:electrical Distance to Empty)
•Door and seat belt status
•Hybrid battery charge information
•Compass
•Media player
•Navigation system map
•Cell phone
•Voice control
Right side
•Tachometer (depending on current drivingmode)
•Fuel gauge
•Battery gauge
•Gear indicator
•Current driving mode (Hybrid, Off Road, Pure,Power and AWD)
•Hybrid gauge (depending on current drivingmode)
•ECO gauge (depending on current drivingmode)
•Current fuel consumption
•Hybrid battery's charge level
•App menu (activated using the right-sidesteering wheel keypad)
Activating the instrument panel
The instrument panel is activated as soon as adoor is opened (i.e., ignition mode 0). After ashort period, the panel will go out if it is not used.
To reactivate it, do one of the following:
•Press the brake pedal
•Turn the start knob to START and release it(without pressing the brake pedal). This acti-vates ignition mode I
•Open one of the doors
Instrument panel settings
Some of the settings for the instrument panelcan be made in the App menu (see also the arti-cle "Instrument panel app menu").
The following settings can be made in the center
display's Top view under: SettingsMy CarDisplays:
•Driver Display Center Area: Select what isdisplayed in the background (center) of theinstrument panel. The options are: (Show noinformation in the background, Showinformation for current playing media orShow navigation even if no route is set).
•Themes. Select a theme (appearance). Theoptions are: (Glass, Minimalistic,Performance or Chrome Rings).
The system language can be changed under
SettingsSystemChoose systemlanguage. This change affects the languageused in all displays.
Page 237 of 584

LOCKS AND ALARM
}}
235
Changing the remote key's battery
The remote key can be opened if the batteryneeds to be replaced.
The battery should be replaced if:
•The information symbol illuminates andUnavailable Charge level too low isshown in the display
and/or
•if the locks do not react after severalattempts to unlock or lock the vehicle
Replacing the battery
Hold the remote key with the front side(with the Volvo symbol) toward you and movethe button on lower edge of the key near thekey ring to the right. Slide the front coverslightly upward.
The cover will loosen and can beremoved from the key.
Move the button to the side and sliderear cover slightly upward.
The cover will loosen and can beremoved from the key.
Page 238 of 584

||
LOCKS AND ALARM
236
Use e.g., a screwdriver to turn the batterycover counterclockwise so that the markersalign toward OPEN.
Remove the cover carefully by pressinge.g., a finger nail into the indentation.
Pry the cover up.
The battery's positive (+) side is up. Pryout the battery as shown in the illustration.
CAUTION
When handling batteries, avoid touching theircontact surfaces as this could result in poorbattery function in the remote key.
Insert a new battery1 with the positive (+)side up. Put the battery cover back in placeby:
Placing the battery's edge downward inthe holder. Slide the battery forward so that itis held in place by the two plastic catches.
Pressing the battery downward so that itis also held in place by the two uppercatches under the upper black holder.
and turn until the marker points to CLOSE.
1Use a CR2032, 3 V battery.
Page 239 of 584

LOCKS AND ALARM
237
NOTE
Volvo recommends that the batteries used inthe remote control meet the UN Manual ofTest and Criteria, Part III, sub-section 38.3.
Batteries installed in the key from the factoryand batteries exchanged by an authorizedVolvo workshop fulfill the above criteria.
Old batteries should be disposed of properlyat a recycling center or at your Volvo retailer.
Put the battery cover in place and turn itclockwise until the marker points to CLOSE.
Put the rear cover in position and pressdown until it clicks into place.
Slide the cover into place as indicated byarrow 2 in the illustration.
>Another click indicates that it is correctlyin position and closed.
Turn the key over and press the frontcover (with the Volvo logo) until it clicks intoplace.
Slide the cover into position as indicatedby arrow 2 in the illustration.
>Another click indicates that it is correctlyin position and closed.
Dispose of old batteries properly, preferably atrecycling station.
Related information
•Remote key (p. 238)
Page 240 of 584
LOCKS AND ALARM
238
Remote key
The remote key is used to lock/unlock the vehi-cle and must be in the passenger compartmentin order to start the engine.
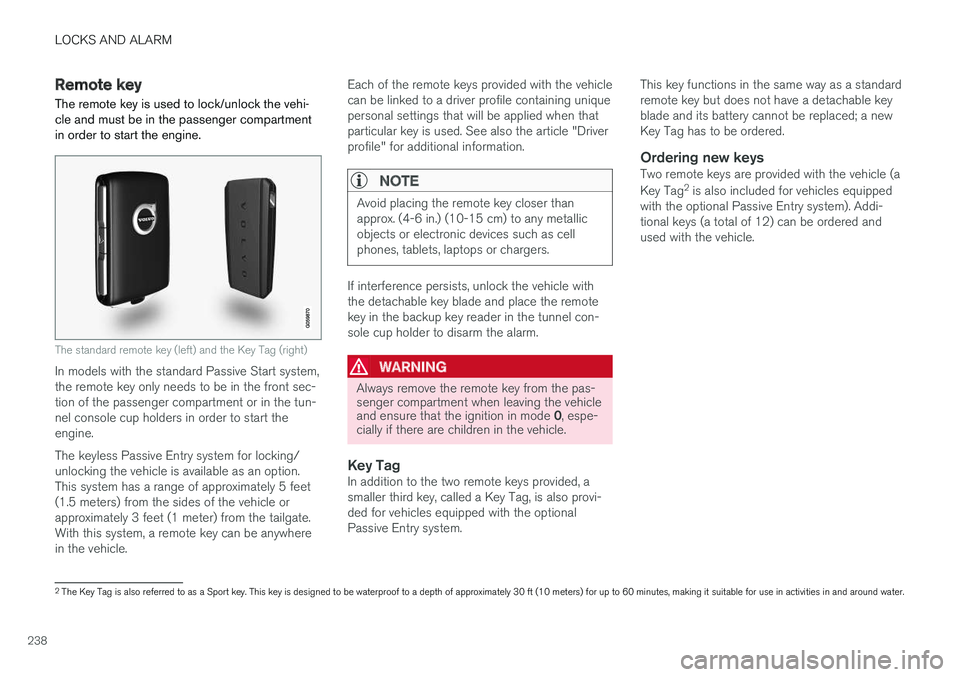
The standard remote key (left) and the Key Tag (right)
In models with the standard Passive Start system,the remote key only needs to be in the front sec-tion of the passenger compartment or in the tun-nel console cup holders in order to start theengine.
The keyless Passive Entry system for locking/unlocking the vehicle is available as an option.This system has a range of approximately 5 feet(1.5 meters) from the sides of the vehicle orapproximately 3 feet (1 meter) from the tailgate.With this system, a remote key can be anywherein the vehicle.
Each of the remote keys provided with the vehiclecan be linked to a driver profile containing uniquepersonal settings that will be applied when thatparticular key is used. See also the article "Driverprofile" for additional information.
NOTE
Avoid placing the remote key closer thanapprox. (4-6 in.) (10-15 cm) to any metallicobjects or electronic devices such as cellphones, tablets, laptops or chargers.
If interference persists, unlock the vehicle withthe detachable key blade and place the remotekey in the backup key reader in the tunnel con-sole cup holder to disarm the alarm.
WARNING
Always remove the remote key from the pas-senger compartment when leaving the vehicleand ensure that the ignition in mode 0, espe-cially if there are children in the vehicle.
Key Tag
In addition to the two remote keys provided, asmaller third key, called a Key Tag, is also provi-ded for vehicles equipped with the optionalPassive Entry system.
This key functions in the same way as a standardremote key but does not have a detachable keyblade and its battery cannot be replaced; a newKey Tag has to be ordered.
Ordering new keys
Two remote keys are provided with the vehicle (a
Key Tag2 is also included for vehicles equippedwith the optional Passive Entry system). Addi-tional keys (a total of 12) can be ordered andused with the vehicle.
2The Key Tag is also referred to as a Sport key. This key is designed to be waterproof to a depth of approximately 30 ft (10 meters) for up to 60 minutes, making it suitable for use in activities in and around water.
Page 241 of 584
LOCKS AND ALARM
* Option/accessory, for more information, see Introduction.239
The remote key's buttons
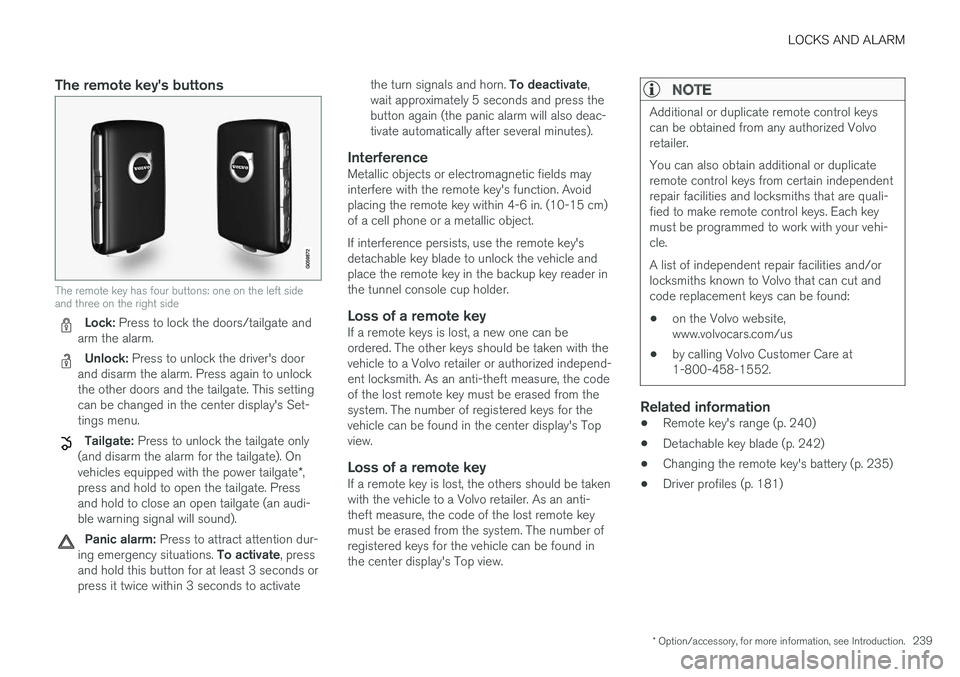
The remote key has four buttons: one on the left sideand three on the right side
Lock: Press to lock the doors/tailgate andarm the alarm.
Unlock: Press to unlock the driver's doorand disarm the alarm. Press again to unlockthe other doors and the tailgate. This settingcan be changed in the center display's Set-tings menu.
Tailgate: Press to unlock the tailgate only(and disarm the alarm for the tailgate). Onvehicles equipped with the power tailgate*,press and hold to open the tailgate. Pressand hold to close an open tailgate (an audi-ble warning signal will sound).
Panic alarm: Press to attract attention dur-ing emergency situations. To activate, pressand hold this button for at least 3 seconds orpress it twice within 3 seconds to activate
the turn signals and horn. To deactivate,wait approximately 5 seconds and press thebutton again (the panic alarm will also deac-tivate automatically after several minutes).
Interference
Metallic objects or electromagnetic fields mayinterfere with the remote key's function. Avoidplacing the remote key within 4-6 in. (10-15 cm)of a cell phone or a metallic object.
If interference persists, use the remote key'sdetachable key blade to unlock the vehicle andplace the remote key in the backup key reader inthe tunnel console cup holder.
Loss of a remote key
If a remote keys is lost, a new one can beordered. The other keys should be taken with thevehicle to a Volvo retailer or authorized independ-ent locksmith. As an anti-theft measure, the codeof the lost remote key must be erased from thesystem. The number of registered keys for thevehicle can be found in the center display's Topview.
Loss of a remote key
If a remote key is lost, the others should be takenwith the vehicle to a Volvo retailer. As an anti-theft measure, the code of the lost remote keymust be erased from the system. The number ofregistered keys for the vehicle can be found inthe center display's Top view.
NOTE
Additional or duplicate remote control keyscan be obtained from any authorized Volvoretailer.
You can also obtain additional or duplicateremote control keys from certain independentrepair facilities and locksmiths that are quali-fied to make remote control keys. Each keymust be programmed to work with your vehi-cle.
A list of independent repair facilities and/orlocksmiths known to Volvo that can cut andcode replacement keys can be found:
•on the Volvo website,www.volvocars.com/us
•by calling Volvo Customer Care at1-800-458-1552.
Related information
•Remote key's range (p. 240)
•Detachable key blade (p. 242)
•Changing the remote key's battery (p. 235)
•Driver profiles (p. 181)
Page 247 of 584
LOCKS AND ALARM
}}
* Option/accessory, for more information, see Introduction.245
door is opened from inside the vehicle using adoor handle. See also the article "Locking/unlocking from inside the vehicle" for additionalinformation.
If the locks repeatedly do not react when theunlock button is pressed, begin by moving closerto the vehicle. However, it may be necessary toreplace the battery in the remote. In this case, thedriver's door can be unlocked with the detacha-ble key blade. See also the article "Detachablekey blade" for additional information.
Keyless Passive Entry *
If the vehicle is equipped with this system, it isonly necessary to have a remote key in your pos-session to operate the central locking system.
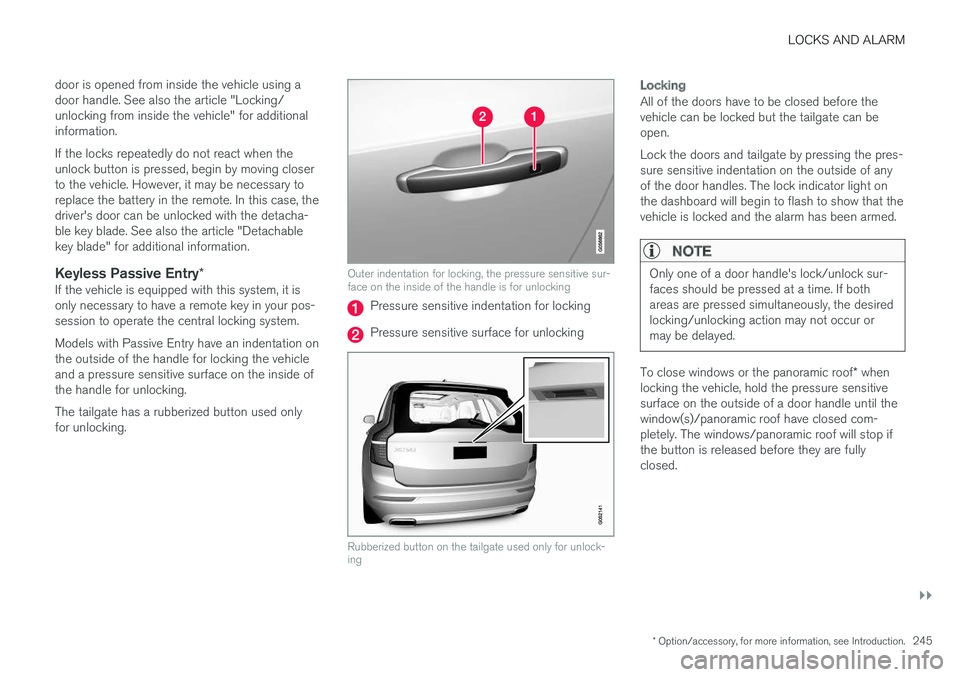
Models with Passive Entry have an indentation onthe outside of the handle for locking the vehicleand a pressure sensitive surface on the inside ofthe handle for unlocking.
The tailgate has a rubberized button used onlyfor unlocking.
Outer indentation for locking, the pressure sensitive sur-face on the inside of the handle is for unlocking
Pressure sensitive indentation for locking
Pressure sensitive surface for unlocking
Rubberized button on the tailgate used only for unlock-ing
Locking
All of the doors have to be closed before thevehicle can be locked but the tailgate can beopen.
Lock the doors and tailgate by pressing the pres-sure sensitive indentation on the outside of anyof the door handles. The lock indicator light onthe dashboard will begin to flash to show that thevehicle is locked and the alarm has been armed.
NOTE
Only one of a door handle's lock/unlock sur-faces should be pressed at a time. If bothareas are pressed simultaneously, the desiredlocking/unlocking action may not occur ormay be delayed.
To close windows or the panoramic roof* whenlocking the vehicle, hold the pressure sensitivesurface on the outside of a door handle until thewindow(s)/panoramic roof have closed com-pletely. The windows/panoramic roof will stop ifthe button is released before they are fullyclosed.
Page 254 of 584

||
LOCKS AND ALARM
* Option/accessory, for more information, see Introduction.252
–Press the button14 on the lower edge ofthe tailgate.
>The tailgate will close automatically butwill not be locked.
–Press the button14 on the lower edge ofthe tailgate.
>The tailgate will close automatically. Thetailgate and doors will also be locked andthe alarm will be armed.
If the remote key is not close enough to the tail-gate, automatic locking/unlocking/opening/clos-ing will not be possible. Three short audible sig-nals will sound.
Interrupting opening/closing
–This can be done in five ways:
•Press the button on the lighting panel
•Press the button on the remote key
•Press either of the buttons on the loweredge of the tailgate
•Press lightly on the rubber-covered buttonunder the tailgate's outside handle
•Move your foot under a sensor beneaththe rear bumper*
>The tailgate will stop moving
Programming the tailgate's maximum
opening angle
The tailgate's maximum opening angle can beprogrammed, for example, if the tailgate has to beopened in a garage with a low ceiling.
Programming the opening angle:
–Open the tailgate manually to the desiredangle and press and hold the closing buttonon the tailgate's lower edge for at least 3seconds. Release the tailgate.
>Two audible signals will sound to indicatethat the selected opening angle has beenstored.
Erasing tailgate programming
–Open the tailgate manually to its highestposition and press and hold the closing but-ton on the tailgate's lower edge for at least 3seconds. Release the tailgate.
>Two audible signals will sound to indicatethat the programmed opening angle hasbeen erased.
NOTE
If the tailgate has been opened and closedcontinuously too long, the automatic functionwill be deactivated to avoid overloading theelectrical system. The automatic function canbe used again after approximately 2 minutes.
If the vehicle's battery has been discharged ordisconnected, or if the tailgate has been openfor more than 24 hours, the tailgate must beopened and closed once manually to resetthe system.
Pinch protection
If the tailgate is obstructed when being opened/closed, a pinch protection mechanism is acti-vated.
•While opening: the tailgate will stop movingand an audible signal will sound.
•While closing: the tailgate will stop andreturn to the currently programmed maximumopening position. An audible signal willsound.
WARNING
Pay attention to the risk of injury when open-ing/ closing the tailgate. Before opening/closing: Make sure that no one is in the pathof the tailgate as an injury could occur.
14Models equipped with the optional Passive Entry system have a button to close the tailgate and a button to close and lock the tailgate.