engine YAMAHA AEROX50 2004 Owner's Manual
[x] Cancel search | Manufacturer: YAMAHA, Model Year: 2004, Model line: AEROX50, Model: YAMAHA AEROX50 2004Pages: 84, PDF Size: 0.96 MB
Page 50 of 84
PERIODIC MAINTENANCE AND MINOR REPAIR
6
EC000080
•If coolant is not available, use
distilled water or soft tap water
instead. Do not use hard water
or salt water since it is harmful
to the engine.
•If water has been used instead
of coolant, replace it with
coolant as soon as possible,
otherwise the engine may not
be sufficiently cooled and the
cooling system will not be
protected against frost and cor-
rosion.
•If water has been added to the
coolant, have a Yamaha dealer
check the antifreeze content of
the coolant as soon as possi-
ble, otherwise the effectiveness
of the coolant will be reduced.
EW000067
Never attempt to remove the radiator
cap when the engine is hot.
CAUTION:
WARNING
EAU01808*
Coolant
To check the coolant level
1. Place the scooter on a level sur-
face and hold it in an upright po-
sition.
NOTE :
•The coolant level must be
checked on a cold engine since
the level varies with engine
temperature.
•Make sure that the scooter is
positioned straight up when
checking the coolant level. A slight
tilt to the side can result in a false
reading.
2. Remove cowling A. (See page
6-5 for cowling removal and ins-
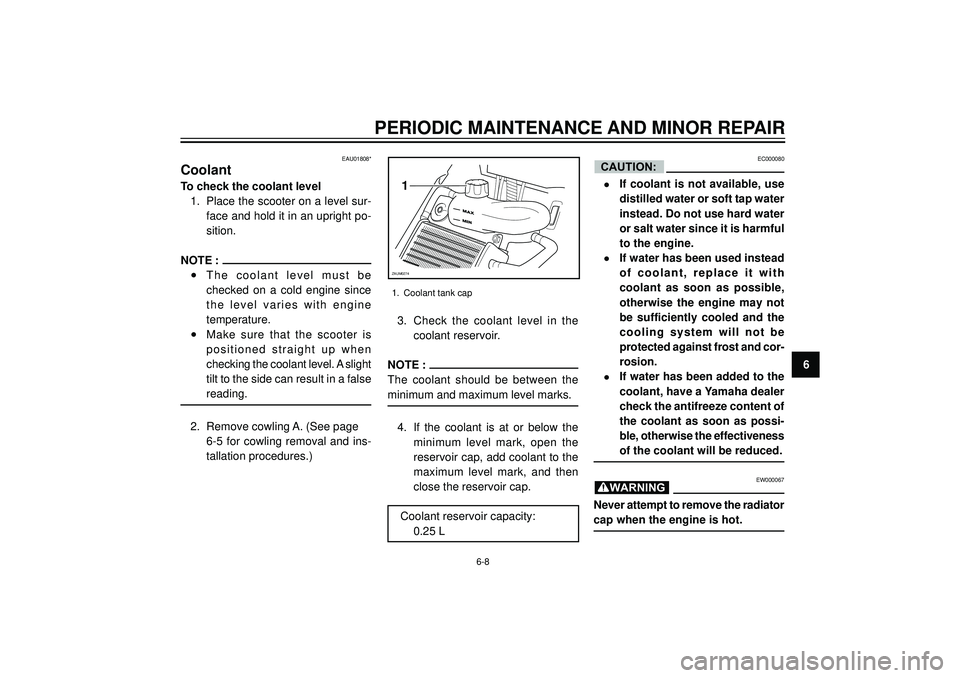
tallation procedures.)3. Check the coolant level in the
coolant reservoir.
NOTE :
The coolant should be between the
minimum and maximum level marks.
4. If the coolant is at or below the
minimum level mark, open the
reservoir cap, add coolant to the
maximum level mark, and then
close the reservoir cap.
Coolant reservoir capacity:
0.25 L
�
1
ZAUM0274
1. Coolant tank cap
6-8
Page 51 of 84

PERIODIC MAINTENANCE AND MINOR REPAIR
6
1
ZAUM0276
1. Air filter element
5. Install the cowling.
NOTE :
If the engine overheats, see page 6-24
for further instructions.
1
ZAUM0275
1. Screws
EAUM0071
Cleaning the air filter
element
The air filter element should be cleaned
at the intervals specified in the periodic
maintenance and lubrication chart.
Clean the air filter element more
frequently if you are riding in unusually
wet or dusty areas.
1. Remove the air filter case cover
by removing the screws.2. Pull the air filter element out, clean
it with solvent, and then squeeze
the remaining solvent out.
EW000075
Use only a dedicated parts cleaning
solvent. To avoid the risk of fire or
explosion, do not use gasoline or
solvents with a low flash point.
EC000089
To avoid damaging the foam material,
handle it gently and carefully, and do
not twist or wring it.
WARNING
CAUTION:
6-9
Page 52 of 84
PERIODIC MAINTENANCE AND MINOR REPAIR
6
1
4 32
ZAUM0156
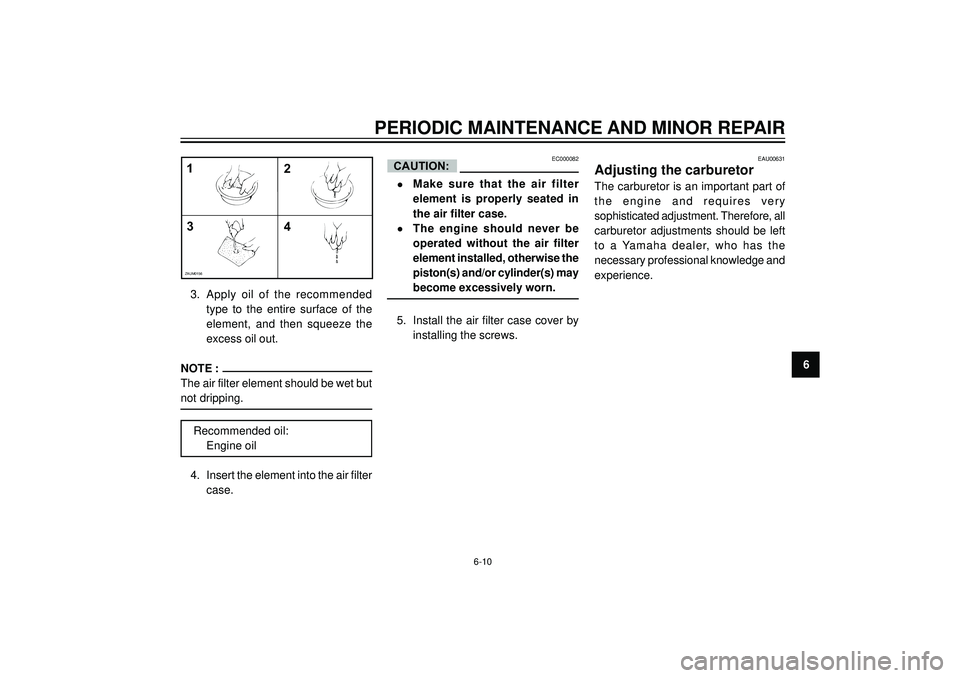
3. Apply oil of the recommended
type to the entire surface of the
element, and then squeeze the
excess oil out.
NOTE :
The air filter element should be wet but
not dripping.
Recommended oil:
Engine oil
4. Insert the element into the air filter
case.
CAUTION:EC000082
•Make sure that the air filter
element is properly seated in
the air filter case.
•The engine should never be
operated without the air filter
element installed, otherwise the
piston(s) and/or cylinder(s) may
become excessively worn.
5. Install the air filter case cover by
installing the screws.
6-10
EAU00631
Adjusting the carburetor
The carburetor is an important part of
the engine and requires very
sophisticated adjustment. Therefore, all
carburetor adjustments should be left
to a Yamaha dealer, who has the
necessary professional knowledge and
experience.
Page 57 of 84
PERIODIC MAINTENANCE AND MINOR REPAIR
6Observe these precautions:
•When checking the fluid level,
make sure that the top of the
master cylinder is level by turning
the handlebars.
•Use only the recommended
quality brake fluid, otherwise the
rubber seals may deteriorate,
causing leakage and poor braking
performance.
Recommended brake fluid:
DOT 4
NOTE :
If DOT 4 is not available, DOT 3 can be
used.
•Refill with the same type of brake
fluid. Mixing fluids may result in a
harmful chemical reaction and
lead to poor braking performance.
•Be careful that water does not
enter the master cylinder when
refilling. Water will significantly
lower the boiling point of the fluid
and may result in vapor lock.
•Brake fluid may deteriorate
painted surfaces or plastic parts.
Always clean up spilled fluid
immediately.
•As the brake pads wear, it is nor-
mal for the brake fluid level to
gradually go down. However, if the
brake fluid level goes down
suddenly, have a Yamaha dealer
check the cause.
EAUM0008*
Changing the brake fluid
Have a Yamaha dealer change the
brake fluid at the intervals specified in
the periodic maintenance and
lubrication chart. In addition, have the
brake hoses replaced every four years
or whenever there are damaged or
leaking.
6-15
EAU00774
Adjusting the Autolube pump
The Autolube pump is a vital and
sophisticated component of the engine,
which must be adjusted by a Yamaha
dealer at the intervals specified in the
periodic maintenance and lubrication
chart.
Page 58 of 84
PERIODIC MAINTENANCE AND MINOR REPAIR
6
ZAUM0061
EAU03118
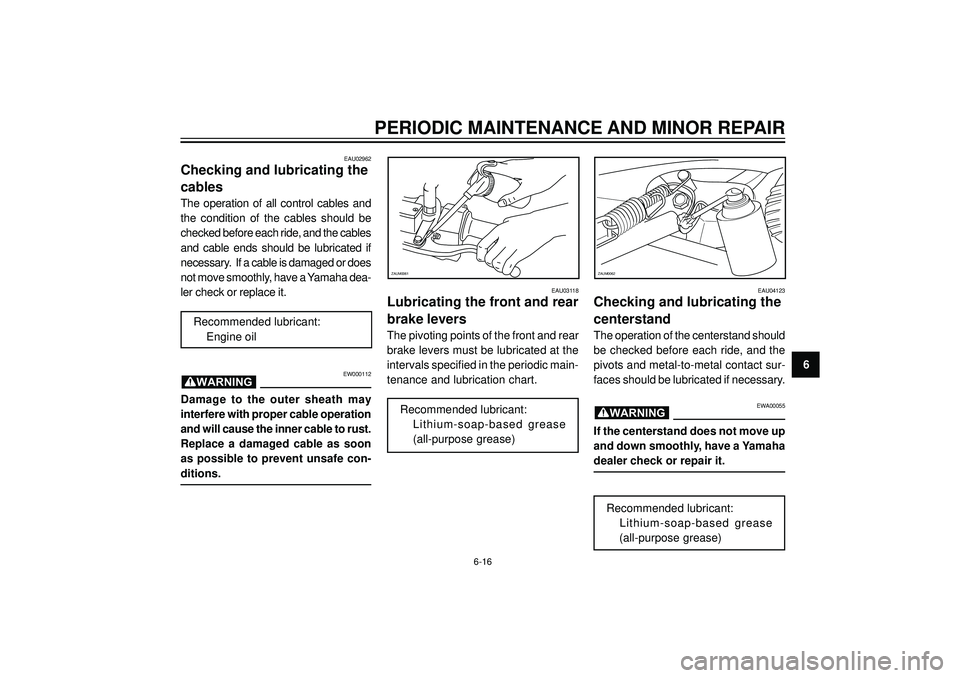
Lubricating the front and rear
brake levers
The pivoting points of the front and rear
brake levers must be lubricated at the
intervals specified in the periodic main-
tenance and lubrication chart.
Recommended lubricant:
Lithium-soap-based grease
(all-purpose grease)
ZAUM0062
EAU04123
Checking and lubricating the
centerstand
The operation of the centerstand should
be checked before each ride, and the
pivots and metal-to-metal contact sur-
faces should be lubricated if necessary.
EWA00055
If the centerstand does not move up
and down smoothly, have a Yamaha
dealer check or repair it.
Recommended lubricant:
Lithium-soap-based grease
(all-purpose grease)
WARNING
6-16
EAU02962
Checking and lubricating the
cables
The operation of all control cables and
the condition of the cables should be
checked before each ride, and the cables
and cable ends should be lubricated if
necessary. If a cable is damaged or does
not move smoothly, have a Yamaha dea-
ler check or replace it.
Recommended lubricant:
Engine oil
EW000112
Damage to the outer sheath may
interfere with proper cable operation
and will cause the inner cable to rust.
Replace a damaged cable as soon
as possible to prevent unsafe con-
ditions.
WARNING
Page 59 of 84
PERIODIC MAINTENANCE AND MINOR REPAIR
6
EAU02939
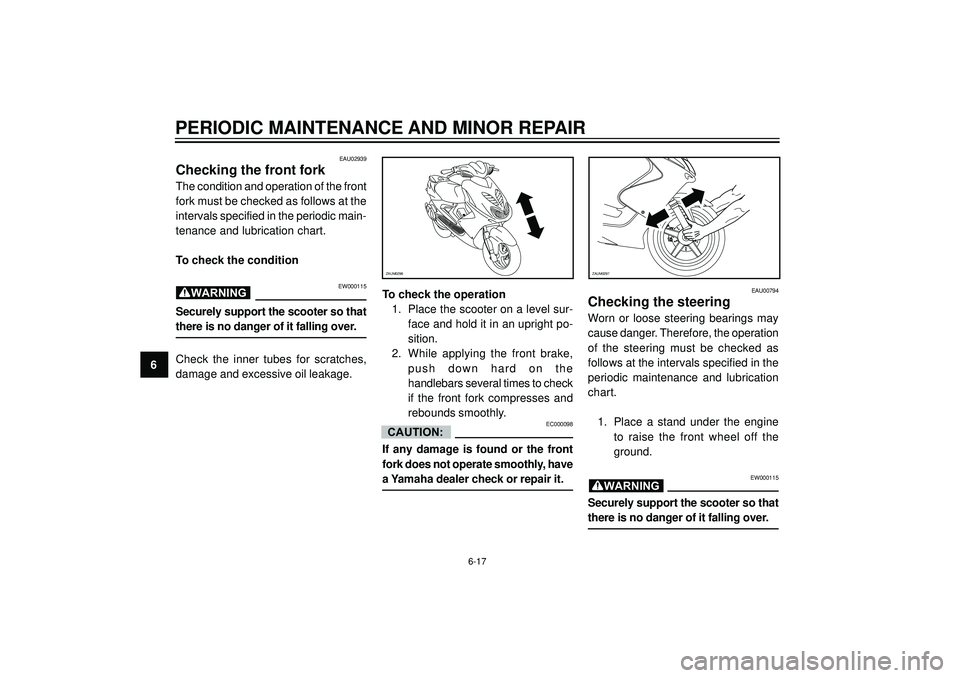
Checking the front fork
The condition and operation of the front
fork must be checked as follows at the
intervals specified in the periodic main-
tenance and lubrication chart.
To check the condition
EW000115
Securely support the scooter so that
there is no danger of it falling over.
Check the inner tubes for scratches,
damage and excessive oil leakage.
WARNINGTo check the operation
1. Place the scooter on a level sur-
face and hold it in an upright po-
sition.
2. While applying the front brake,
push down hard on the
handlebars several times to check
if the front fork compresses and
rebounds smoothly.
EC000098
If any damage is found or the front
fork does not operate smoothly, have
a Yamaha dealer check or repair it.
CAUTION:
EAU00794
Checking the steering
Worn or loose steering bearings may
cause danger. Therefore, the operation
of the steering must be checked as
follows at the intervals specified in the
periodic maintenance and lubrication
chart.
1. Place a stand under the engine
to raise the front wheel off the
ground.
EW000115
Securely support the scooter so that
there is no danger of it falling over.
WARNING
6-17
ZAUM0296ZAUM0297
Page 65 of 84

PERIODIC MAINTENANCE AND MINOR REPAIR
6
EAU03363
Troubleshooting charts
Starting problems or poor engine performance
EW000125
Keep away open flames and do not smoke while checking or working on the fuel system.
WARNING
Check the fuel level in
the fuel tank.
1. FuelThere is enough fuel.
There is no fuel.Check the compression.
Supply fuel.
Operate the electric starter.
2. CompressionThere is compression.
There is no compression.Check the ignition.
Have a Yamaha dealer
check the vehicle.
Remove the spark plugs
and check the electrodes.
3. IgnitionWet
DryWipe off with a dry cloth and correct the
spark plug gaps, or replace the spark plugs.
Have a Yamaha dealer check the vehicle.The engine does not start.
Check the battery.Open the throttle halfway and operate
the electric starter.
Operate the electric starter.
4. BatteryThe engine turns over
quickly.
The engine turns over
slowly.The battery is good.
Check the electrolyte and battery
lead connections, and charge the
battery if necessary.The engine does not start.
Have a Yamaha dealer
check the vehicle.
The engine does not start.
Check the compressoin.
6-23
Page 66 of 84
PERIODIC MAINTENANCE AND MINOR REPAIR
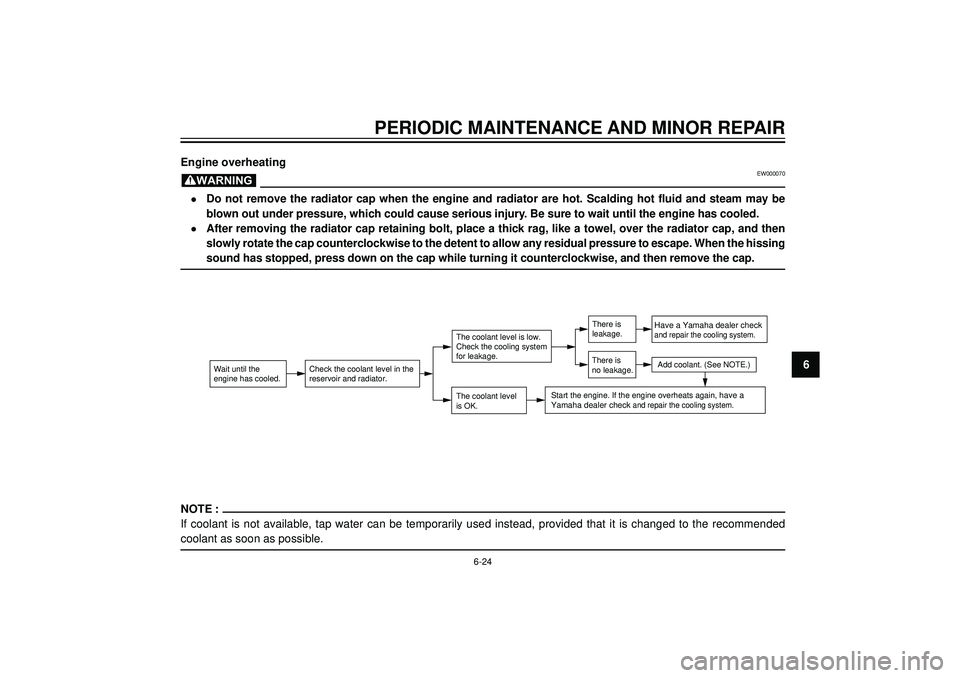
6 Engine overheating
EW000070
•Do not remove the radiator cap when the engine and radiator are hot. Scalding hot fluid and steam may be
blown out under pressure, which could cause serious injury. Be sure to wait until the engine has cooled.
•After removing the radiator cap retaining bolt, place a thick rag, like a towel, over the radiator cap, and then
slowly rotate the cap counterclockwise to the detent to allow any residual pressure to escape. When the hissing
sound has stopped, press down on the cap while turning it counterclockwise, and then remove the cap.
NOTE :
If coolant is not available, tap water can be temporarily used instead, provided that it is changed to the recommended
coolant as soon as possible.
WARNING
Wait until the
engine has cooled.Check the coolant level in the
reservoir and radiator.
The coolant level
is OK.
The coolant level is low.
Check the cooling system
for leakage.
Have a Yamaha dealer checkand repair the cooling system.
Add coolant. (See NOTE.)
Start the engine. If the engine overheats again, have a
Yamaha dealer check and repair the cooling system.
There is
leakage.
There is
no leakage.
6-24
Page 69 of 84
SCOOTER CARE AND STORAGE
7
Care
While the open design of a scooter
reveals the attractiveness of the
technology, it also makes it more
vulnerable. Rust and corrosion can
develop even if high-quality
components are used. A rusty exhaust
pipe may go unnoticed on a car,
however, it detracts from the overall
appearance of a scooter. Frequent and
proper care does not only comply with
the terms of the warranty, but it will also
keep your scooter looking good, extend
its life and optimize its performance.Before cleaning
1. Cover the muffler outlet with a
plastic bag after the engine has
cooled down.
2. Make sure that all caps and covers
as well as all electrical couplers
and connectors, including the
spark plug cap, are tightly
installed.
3. Remove extremely stubborn dirt,
like oil burnt onto the crankcase,
with a degreasing agent and a
brush, but never apply such
products onto seals, gaskets and
wheel axles. Always rinse the dirt
and degreaser off with water.CleaningECA00011
•Avoid using strong acidic wheel
cleaners, especially on spoked
wheels. If such products are
used on hard-to-remove dirt, do
not leave the cleaner on the
affected area any longer than
instructed. Also, thoroughly
rinse the area off with water,
immediately dry it, and then
apply a corrosion protection
spray.
•Improper cleaning can damage
windshields, cowlings, panels
and other plastic parts. Use
only a soft, clean cloth or
sponge with mild detergent and
water to clean plastic.
CAUTION:
7-1
Page 70 of 84
SCOOTER CARE AND STORAGE
7
•Do not use any harsh chemical
products on plastic parts. Be
sure to avoid using cloths or
sponges which have been in
contact with strong or abrasive
cleaning products, solvent or
thinner, fuel (gasoline), rust
removers or inhibitors, brake
fluid, antifreeze or electrolyte.
•Do not use high-pressure
washers or steam-jet cleaners
since they cause water
seepage and deterioration in
the following areas: seals (of
wheel and swingarm bearings,
fork and brakes), electric
components (couplers,
connectors, instruments,
switches and lights), breather
hoses and vents.
•For scooters equipped with a
windshield: Do not use strong
cleaners or hard sponges as
they will cause dulling or
scratching. Some cleaning
compounds for plastic may
leave scratches on the
windshield. Test the product on
a small hidden part of the
windshield to make sure that it
does not leave any marks. If the
windshield is scratched, use a
quality plastic polishing
compound after washing.
After normal use
Remove dirt with warm water, a mild
detergent, and a soft, clean sponge,
and then rinse thoroughly with clean
water. Use a toothbrush or bottlebrush
for hard-to-reach areas. Stubborn dirt
and insects will come off more easily if
the area is covered with a wet cloth for
a few minutes before cleaning.
After riding in the rain, near the sea
or on salt-sprayed roads
Since sea salt or salt sprayed on the
roads during winter are extremely cor-
rosive in combination with water, carry
out the following steps after each ride
in the rain, near the sea or on salt-
sprayed roads.
NOTE :
Salt sprayed on roads in the winter may
remain well into spring.
1. Clean the scooter with cold water
and a mild detergent after the
engine has cooled down.
ECA00012
Do not use warm water since it
increases the corrosive action of the
salt.
2. Apply a corrosion protection spray
on all metal, including chrome-
and nickel-plated, surfaces to
prevent corrosion.
CAUTION:
7-2