transmission oil YAMAHA BANSHEE 350 2004 Owners Manual
[x] Cancel search | Manufacturer: YAMAHA, Model Year: 2004, Model line: BANSHEE 350, Model: YAMAHA BANSHEE 350 2004Pages: 396, PDF Size: 3.55 MB
Page 12 of 396

LOCATION OF THE WARNING AND
SPECIFICATION LABELS .......................1-1
SAFETY INFORMATION .........................2-1
DESCRIPTION AND MACHINE
IDENTIFICATION.....................................3-1
Identification number records ...............3-3
Key identification number .....................3-5
Vehicle identification number ...............3-7
Model label ...........................................3-9
CONTROL FUNCTIONS .........................4-1
Main switch ...........................................4-1
Handlebar switches ..............................4-3
Throttle lever ........................................4-5
Throttle OverRide System ....................4-7
Speed limiter ........................................4-9
Clutch lever ........................................4-11
4
3
2
1Front brake lever ................................4-11
Brake pedal ........................................4-13
Parking brake .....................................4-13
Shift pedal ..........................................4-17
Kick starter .........................................4-17
Fuel tank cap ......................................4-19
Fuel cock ............................................4-19
Starter (choke) ....................................4-21
Seat ....................................................4-23
Front shock absorber adjustment .......4-25
Rear shock absorber adjustment .......4-29
PRE-OPERATION CHECKS ...................5-1
Front and rear brakes ...........................5-5
Fuel ....................................................5-11
Engine mixing oil ................................5-15
Transmission oil .................................5-17
Chain ..................................................5-21
Throttle lever ......................................5-21
5
EBU00015
CONTENTS
Page 13 of 396

Fittings and fasteners .........................5-21
Lights ..................................................5-23
Switches .............................................5-23
Tires ...................................................5-25
How to measure tire pressure ............5-29
Tire wear limit .....................................5-31
OPERATION ............................................6-1
Starting a cold engine ...........................6-3
Starting a warm engine ........................6-9
Warming up ..........................................6-9
Shifting ...............................................6-11
To start out and accelerate .................6-15
To decelerate .....................................6-19
Engine break-in ..................................6-21
Parking ...............................................6-25
Parking on a slope ..............................6-27
Accessories and loading ....................6-29
6
Riding Your ATV ......................................7-1
Getting to know your ATV ....................7-3
Ride with care and good
judgement ...........................................7-5
Be careful where you ride ...................7-27
Turning your ATV ...............................7-41
Climbing uphill ....................................7-45
Riding downhill ...................................7-57
Crossing a slope .................................7-61
Crossing through shallow water .........7-65
Riding over rough terrain ....................7-69
Sliding and skidding ...........................7-71
What to do if ... ..................................7-75
What to do ... .....................................7-75
PERIODIC MAINTENANCE AND
ADJUSTMENT .........................................8-1
Owner’s manual and tool kit .................8-3
Periodic maintenance/Lubrication ........8-7
Transmission oil .................................8-17
8
7
Page 96 of 396

5-1
EBU00113
PRE-OPERATION CHECKS
Before using this machine, check the following points:
ITEM ROUTINE PAGE
Brakes9Check operation, free play, fluid level and fluid leakage. 5-5–5-9
9Fill with DOT 4 brake fluid if necessary. 8-73–8-83
Clutch9Check operation, condition and lever free play. 8-91
Parking brake9Check operation, condition and free play. 8-85–8-87
Fuel9Check fuel level.
9Fill with fuel if necessary.5-11–5-13
Transmission oil9Check oil level.
9Fill with oil if necessary.5-17, 8-17–8-23
Coolant reservoir 9Check coolant level.
9Fill with coolant if necessary.8-23–8-37
Drive chain9Check chain slack and condition.
9Adjust if necessary.5-21, 8-91–8-97
Throttle9Check for proper throttle cable operation. 5-21, 8-71
Wheels and tires9Check tire pressure, wear and damage. 5-25–5-31, 8-105
Fittings and Fasteners9Check all fittings and fasteners. 5-21
Lights and switches9Check for proper operation. 5-23, 8-107–8-111
Page 112 of 396

5-17
EBU13080
Transmission oil
Make sure the transmission oil is at the specified
level. Add oil as necessary. (See pages 8-17–
8-23.)
Recommended oil:
SAE 10W30
Recommended oil classification:
API Service SE, SF, SG type or higher
Oil quantity:
Total amount:
1.7 L
Periodic oil change:
1.5 L
Page 114 of 396

5-19
cC
8In order to prevent clutch slippage (since
the transmission oil also lubricates the
clutch), do not mix any chemical additives.
Do not use oils with a diesel specification
of “CD” or oils of a higher quality than
specified. In addition, do not use oils
labeled “ENERGY CONSERVING
II” or
higher.
8Make sure that no foreign material enters
the crankcase.
Page 252 of 396

8-7
EBU00262
PERIODIC MAINTENANCE/LUBRICATION
INITIAL EVERY
ITEM ROUTINE 1 3 6 6 1
month months months months year
Transmission9Replace oil.2222
9Check coolant leakage.
Cooling system9Repair if necessary.22222
9Replace coolant every 24 months.
9Check condition.
Spark plug9Adjust gap and clean.22222
9Replace if necessary.
Air filter element9Clean. Every 20–40 hours.
9Replace if necessary. (More often in wet or dusty areas)
* Carburetor9Check idle speed / starter operation.
2222
9Adjust if necessary.
* Crankcase breather9Check breather hose for cracks or damage.
222
system9Replace if necessary.
9Check for leakage.
* Exhaust system9Retighten if necessary.222
9Replace gasket(s) if necessary.
* Fuel line9Check fuel hose for cracks or damage.
222
9Replace if necessary.
Throttle operation9Inspect and adjust free play if necessary.22222
* Front and rear9Check operation/fluid leakage/see NOTE Page 8-9.
22222
brake operation9Correct if necessary.
* Front and rear9Check pad wear.
222
brake pads9Replace if necessary.
Page 256 of 396

8-11
INITIAL CHAQUE
DESCRIPTION VÉRIFICATION 1 3 6 6 1
mois mois mois mois an
*Embrayage
9Examiner le jeu et le fonctionnement.
2
2229Changer si nécessaire.
9Contrôler la flèche et l’alignement de la chaîne.
Chaîne de 9Régrer si nécessaire.
transmission9Nettoyer et graisser.22229Changer si nécessaire.
*Guide-chaîne et
rouleau
9Contrôler l’usure et changer si nécessaire.222
*Système de direction
9Examiner le jeu, nettoyer et lubrifier.22222
*Suspension avant et
arrière
9Examiner et lubrifier.**22222
Pneus
9Examiner la pression d’air, le voile de roue, et
22222
l’usure de pneu.
*Roues
9Examiner les roulements.
222229Changer les roulements si nécessaire.
Câble d’accélération
9Contrôler le cheminement et le connexion.
et de commande9Lubrifier.22222
Ecrous et boulons
extérieur
9Resserrer.22222
Cadre
9Nettoyer et examiner.2222
Equipement
d’éclairage
9Examiner.22222
* Il est recomandé de confier ces opérations au concessionnaire Yamaha.
** Graisse à base de savon au lithium
Page 262 of 396

8-17
EBU01098
Transmission oil
Transmission oil measurement
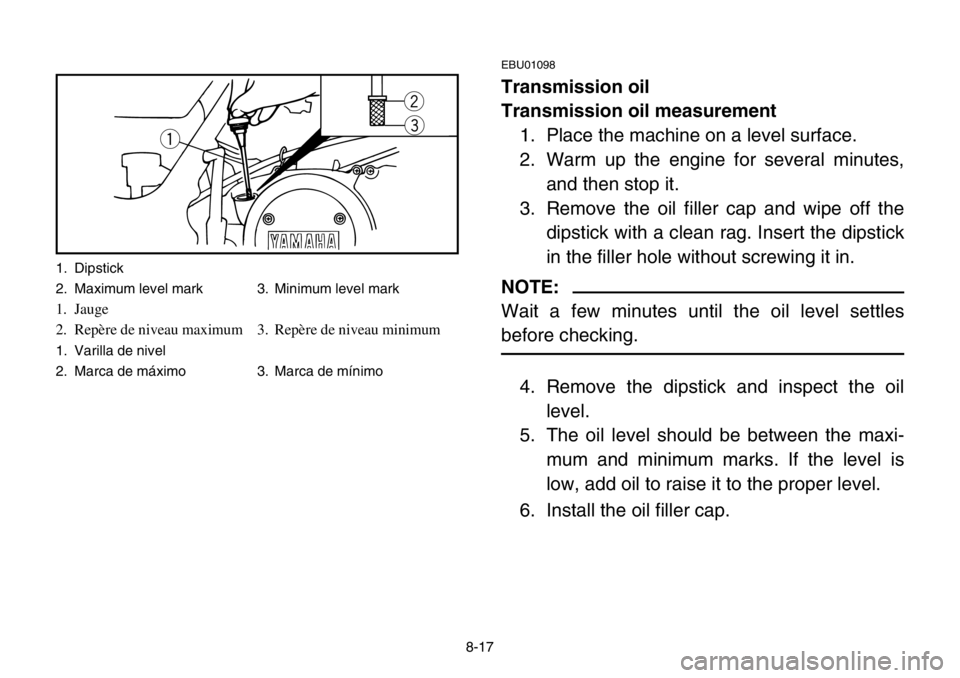
1. Place the machine on a level surface.
2. Warm up the engine for several minutes,
and then stop it.
3. Remove the oil filler cap and wipe off the
dipstick with a clean rag. Insert the dipstick
in the filler hole without screwing it in.
NOTE:
Wait a few minutes until the oil level settles
before checking.
4. Remove the dipstick and inspect the oil
level.
5. The oil level should be between the maxi-
mum and minimum marks. If the level is
low, add oil to raise it to the proper level.
6. Install the oil filler cap.
q
w
e
1. Dipstick
2. Maximum level mark 3. Minimum level mark
1. Jauge
2. Repère de niveau maximum 3. Repère de niveau minimum
1. Varilla de nivel
2. Marca de máximo 3. Marca de mínimo
Page 264 of 396

8-19
Transmission oil replacement
1. Place the machine on a level surface.
2. Warm up the engine for several minutes
and then stop it.
3. Place a container under the engine to col-
lect the used oil.
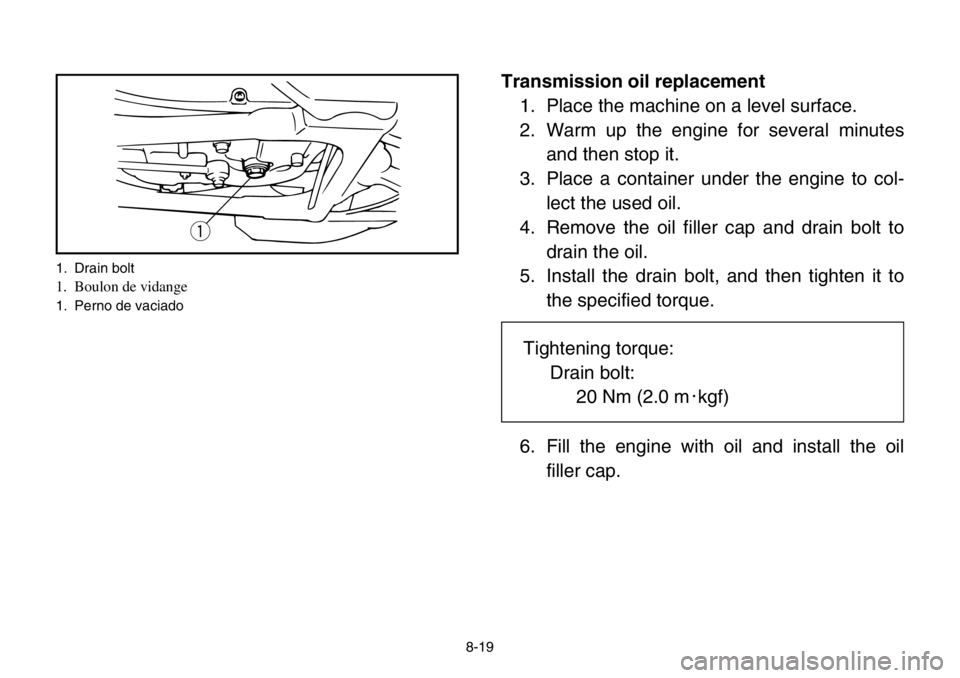
4. Remove the oil filler cap and drain bolt to
drain the oil.
5. Install the drain bolt, and then tighten it to
the specified torque.
6. Fill the engine with oil and install the oil
filler cap.
q
1. Drain bolt
1. Boulon de vidange
1. Perno de vaciado
Tightening torque:
Drain bolt:
20 Nm (2.0 m0kgf)
Page 341 of 396

8-96
FBU00805
Lubrification de la chaîne de transmission
Il faut nettoyer et lubrifier la chaîne de transmis-
sion aux fréquences spécifiées dans le tableau
des entretiens et graissages périodiques, sinon
elle s’usera rapidement, surtout lors de la
conduite dans les régions humides ou poussié-
reuses. Entretenir la chaîne de transmission
comme suit.
fF
Il faut lubrifier la chaîne de transmission
après avoir lavé la moto ou après avoir roulé
sous la pluie.
1. Laver la chaîne à l’aide de pétrole et d’une
petite brosse à poils doux.
fF
Ne pas nettoyer la chaîne de transmission à la
vapeur, au jet à forte pression ou à l’aide de
dissolvants inappropriés, car cela endomma-
gerait ses joints toriques.
2. Essuyer la chaîne.
SBU00805
Lubricación de la cadena de transmisión
La cadena de transmisión debe limpiarse y lubri-
carse a los intervalos especificados para el
mantenimiento periódico y en la gráfica de lubri-
cación, de lo contrario se desgastaría con rapi-
dez. especialmente cuando se circula por zonas
polvorientas o mojadas. Realice el servicio de la
cadena de transmisión de la forma siguiente.
yY
La cadena de transmisión debe lubricarse
después de haber lavado el ATV o de haber
circulado bajo la lluvia.
1. Limpie la cadena de transmisión con que-
roseno y un cepillo blando pequeño.
yY
Para evitar daños en las juntas tóricas, no
limpie la cadena de transmisión con limpia-
dores al vapor, lavadores de alta presión ni
solventes inadecuados.
2. Frote la cadena de transmisión para secarla.