stop start YAMAHA BANSHEE 350 2006 Owners Manual
[x] Cancel search | Manufacturer: YAMAHA, Model Year: 2006, Model line: BANSHEE 350, Model: YAMAHA BANSHEE 350 2006Pages: 400, PDF Size: 3.59 MB
Page 49 of 400
3-2
FBU00032
DESCRIPTION ET
IDENTIFICATION DU
VÃHICULE
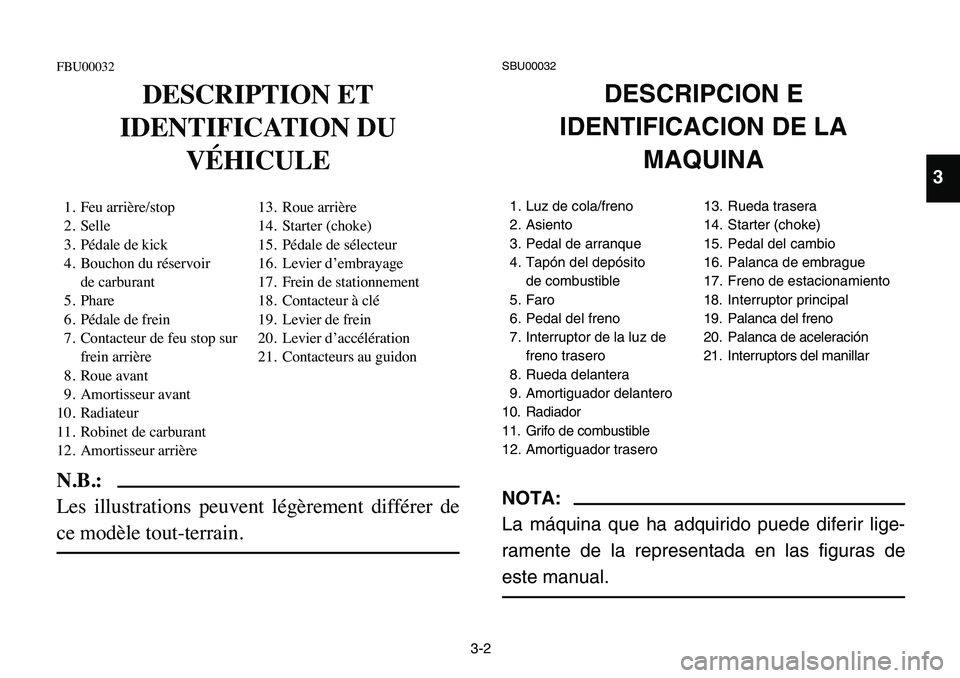
1. Feu arriÃĻre/stop 13. Roue arriÃĻre
2. Selle 14. Starter (choke)
3. PÃĐdale de kick 15. PÃĐdale de sÃĐlecteur
4. Bouchon du rÃĐservoir 16. Levier dâembrayage
de carburant 17. Frein de stationnement
5. Phare 18. Contacteur à clÃĐ
6. PÃĐdale de frein 19. Levier de frein
7. Contacteur de feu stop sur 20. Levier dâaccÃĐlÃĐration
frein arriÃĻre 21. Contacteurs au guidon
8. Roue avant
9. Amortisseur avant
10. Radiateur
11. Robinet de carburant
12. Amortisseur arriÃĻre
N.B.:
Les illustrations peuvent lÃĐgÃĻrement diffÃĐrer de
ce modÃĻle tout-terrain.
SBU00032
DESCRIPCION E
IDENTIFICACION DE LA
MAQUINA
1. Luz de cola/freno 13. Rueda trasera
2. Asiento 14. Starter (choke)
3. Pedal de arranque 15. Pedal del cambio
4. TapÃģn del depÃģsito 16. Palanca de embrague
de combustible 17. Freno de estacionamiento
5. Faro 18. Interruptor principal
6. Pedal del freno 19.Palanca del freno
7. Interruptor de la luz de 20.Palanca de aceleraciÃģn
freno trasero 21.Interruptors del manillar
8. Rueda delantera
9. Amortiguador delantero
10. Radiador
11. Grifo de combustible
12. Amortiguador trasero
NOTA:
La mÃĄquina que ha adquirido puede diferir lige-
ramente de la representada en las figuras de
este manual.
3
Page 60 of 400
4-3
EBU00053
Handlebar switches
EBU11580
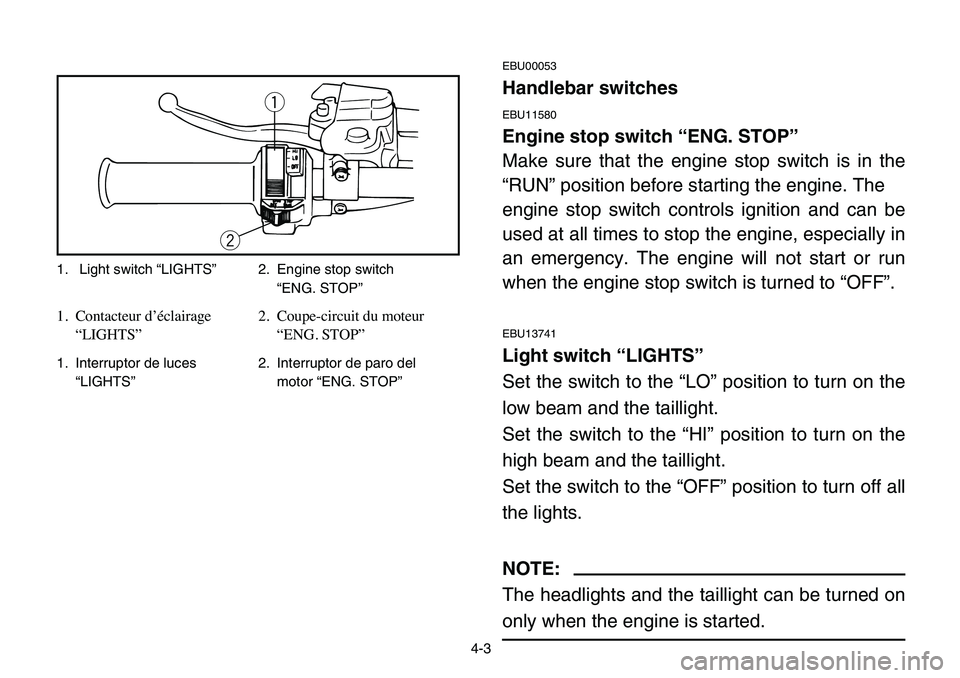
Engine stop switch âENG. STOPâ
Make sure that the engine stop switch is in the
âRUNâ position before starting the engine. The
engine stop switch controls ignition and can be
used at all times to stop the engine, especially in
an emergency. The engine will not start or run
when the engine stop switch is turned to âOFFâ.
EBU13741
Light switch âLIGHTSâ
Set the switch to the âLOâ position to turn on the
low beam and the taillight.
Set the switch to the âHIâ position to turn on the
high beam and the taillight.
Set the switch to the âOFFâ position to turn off all
the lights.
NOTE:
The headlights and the taillight can be turned on
only when the engine is started.
q
w
1. Light switch
Page 130 of 400
6-3
EBU00512
Starting a cold engine
w
Always make sure all control cables work
smoothly before you begin riding in cold
weather. If the control cables are frozen or
do not work smoothly, you could be unable
to control the ATV, which could lead to an
accident or collision.
1. Set the parking brake.
2. Turn the fuel cock to âONâ.
3. Turn the main switch to âONâ and the engine
stop switch to âRUNâ.
4. Shift the transmission into neutral.
5. Use the starter (choke) in reference to the
figure:
Page 138 of 400
6-11
EBU01981
Shifting
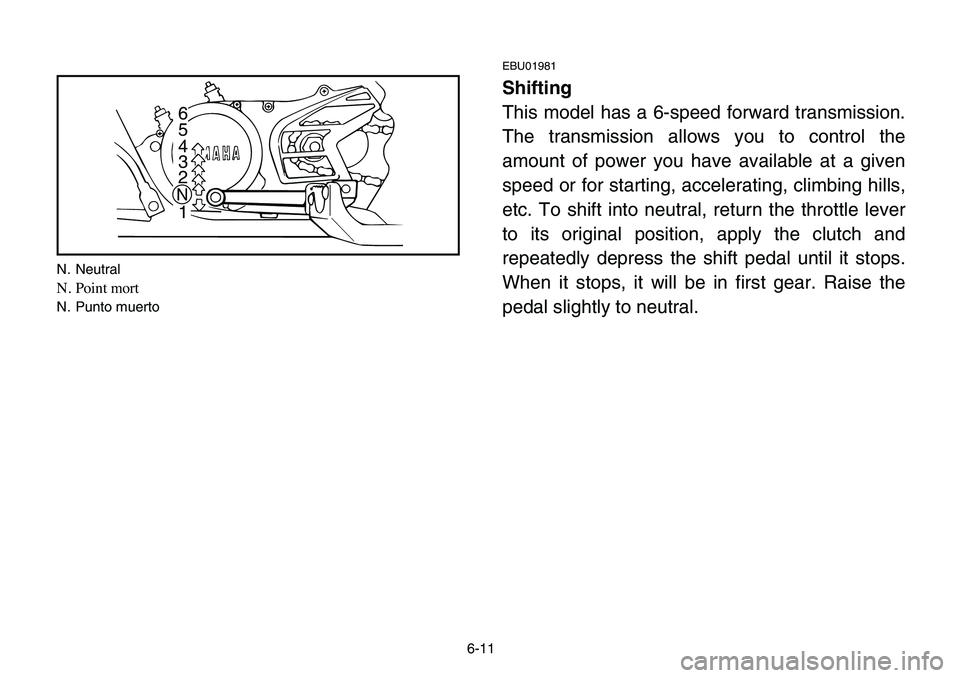
This model has a 6-speed forward transmission.
The transmission allows you to control the
amount of power you have available at a given
speed or for starting, accelerating, climbing hills,
etc. To shift into neutral, return the throttle lever
to its original position, apply the clutch and
repeatedly depress the shift pedal until it stops.
When it stops, it will be in first gear. Raise the
pedal slightly to neutral.
1 2 3 4 5 6
N
N. Neutral
N. Point mort
N. Punto muerto
Page 218 of 400
7-53
If your ATV has stalled or stopped and you
believe you can continue up the hill, restart care-
fully to make sure you do not lift the front wheels
which could cause you to lose control. If you are
unable to continue up the hill, dismount the ATV
on the uphill side. Physically turn the ATV
around and then descend the hill.
If you start to roll backwards, DO NOT use the
rear brake to stop or try to put the ATV in gear.
The ATV could easily tip over backwards.
Instead, apply the front brake gradually, or dis-
mount the ATV immediately on the uphill side.
Page 242 of 400
7-77
8If your ATV starts to slide sideways:
Steer in the direction of the slide if you have
the room.
Applying the brakes or accelerating is not rec-
ommended until you have corrected the slide.
(See pages 7-71â7-73.)
8If your ATV canât make it up a hill you are try-
ing to climb:
Turn the ATV around if you still have forward
speed. If not, stop, dismount on the uphill side
of the ATV and physically turn the ATV
around. If the ATV starts to slip backwards
DO NOT USE THE REAR BRAKE - the ATV
may tip over on top of you. Dismount the ATV
on the uphill side. (See pages 7-45â7-55.)
Page 268 of 400
q
w
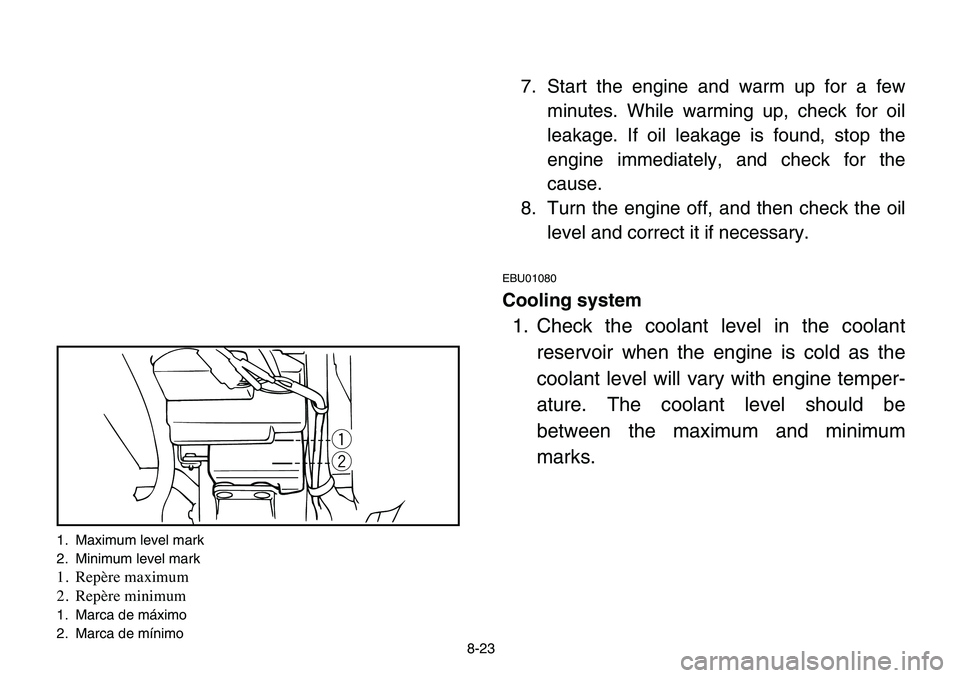
1. Maximum level mark
2. Minimum level mark
1. RepÃĻre maximum
2. RepÃĻre minimum
1. Marca de mÃĄximo
2. Marca de mÃnimo
8-23
7. Start the engine and warm up for a few
minutes. While warming up, check for oil
leakage. If oil leakage is found, stop the
engine immediately, and check for the
cause.
8. Turn the engine off, and then check the oil
level and correct it if necessary.
EBU01080
Cooling system
1. Check the coolant level in the coolant
reservoir when the engine is cold as the
coolant level will vary with engine temper-
ature. The coolant level should be
between the maximum and minimum
marks.
Page 374 of 400
9-5
7. Clean the seat with a vinyl upholstery
cleaner to keep the cover pliable and
glossy.
8. Automotive type wax may be applied to all
painted and chrome plated surfaces.
Avoid combination cleaner-waxes. Many
contain abrasives which may mar the paint
or protective finish.
When finished, start the engine and let it
idle for several minutes.
w
Wet brakes may have reduced stopping abili-
ty, increasing the chance of an accident.
Test the brakes after washing. Apply the
brakes several times at slow speeds to let
friction dry out the linings.