oil level YAMAHA BEAR TRACKER 250 2003 Manuale de Empleo (in Spanish)
[x] Cancel search | Manufacturer: YAMAHA, Model Year: 2003, Model line: BEAR TRACKER 250, Model: YAMAHA BEAR TRACKER 250 2003Pages: 378, tamaño PDF: 13.9 MB
Page 17 of 378
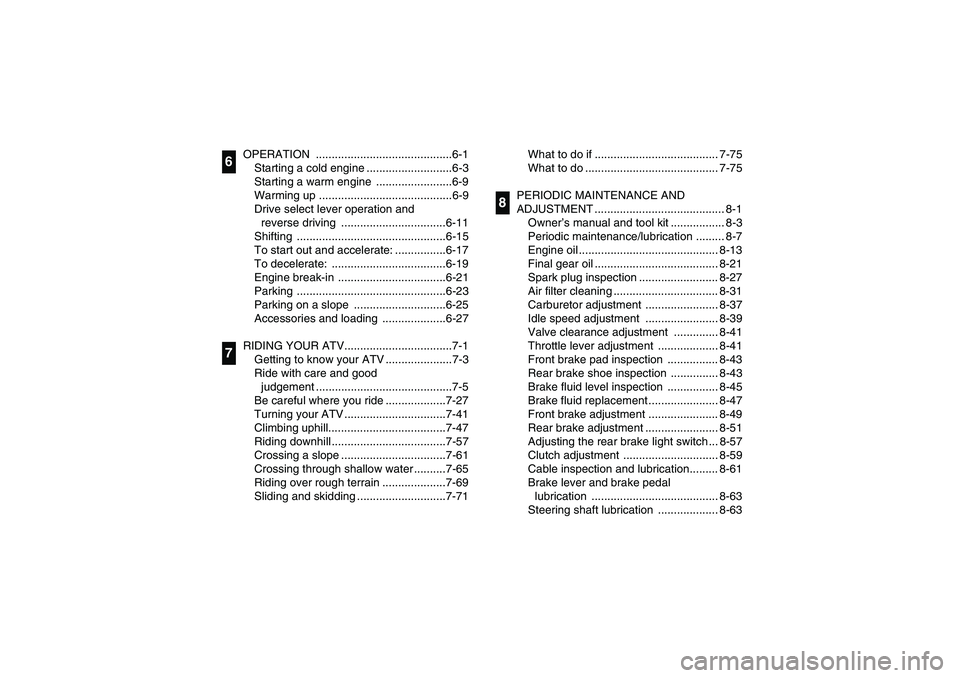
OPERATION ...........................................6-1
Starting a cold engine ...........................6-3
Starting a warm engine ........................6-9
Warming up ..........................................6-9
Drive select lever operation and
reverse driving .................................6-11
Shifting ...............................................6-15
To start out and accelerate: ................6-17
To decelerate: ....................................6-19
Engine break-in ..................................6-21
Parking ...............................................6-23
Parking on a slope .............................6-25
Accessories and loading ....................6-27
RIDING YOUR ATV..................................7-1
Getting to know your ATV .....................7-3
Ride with care and good
judgement ...........................................7-5
Be careful where you ride ...................7-27
Turning your ATV ................................7-41
Climbing uphill.....................................7-47
Riding downhill ....................................7-57
Crossing a slope .................................7-61
Crossing through shallow water ..........7-65
Riding over rough terrain ....................7-69
Sliding and skidding ............................7-71
67
What to do if ....................................... 7-75
What to do .......................................... 7-75
PERIODIC MAINTENANCE AND
ADJUSTMENT ......................................... 8-1
Owner’s manual and tool kit ................. 8-3
Periodic maintenance/lubrication ......... 8-7
Engine oil ............................................ 8-13
Final gear oil ....................................... 8-21
Spark plug inspection ......................... 8-27
Air filter cleaning ................................. 8-31
Carburetor adjustment ....................... 8-37
Idle speed adjustment ....................... 8-39
Valve clearance adjustment .............. 8-41
Throttle lever adjustment ................... 8-41
Front brake pad inspection ................ 8-43
Rear brake shoe inspection ............... 8-43
Brake fluid level inspection ................ 8-45
Brake fluid replacement ...................... 8-47
Front brake adjustment ...................... 8-49
Rear brake adjustment ....................... 8-51
Adjusting the rear brake light switch ... 8-57
Clutch adjustment .............................. 8-59
Cable inspection and lubrication......... 8-61
Brake lever and brake pedal
lubrication ........................................ 8-63
Steering shaft lubrication ................... 8-63
8
U4XE64.book Page 2 Thursday, May 30, 2002 1:49 PM
Page 110 of 378
5-1
EBU00113
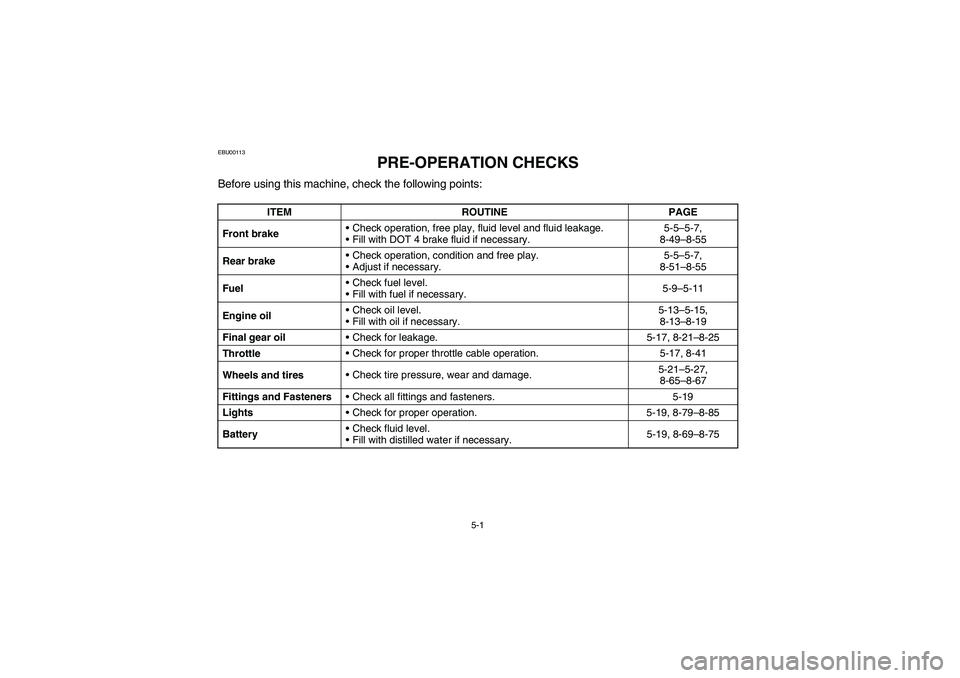
PRE-OPERATION CHECKS
Before using this machine, check the following points:
ITEM ROUTINE PAGE
Front brakeCheck operation, free play, fluid level and fluid leakage.
Fill with DOT 4 brake fluid if necessary.5-5–5-7,
8-49–8-55
Rear brakeCheck operation, condition and free play.
Adjust if necessary.5-5–5-7,
8-51–8-55
FuelCheck fuel level.
Fill with fuel if necessary.5-9–5-11
Engine oilCheck oil level.
Fill with oil if necessary.5-13–5-15,
8-13–8-19
Final gear oilCheck for leakage. 5-17, 8-21–8-25
ThrottleCheck for proper throttle cable operation. 5-17, 8-41
Wheels and tiresCheck tire pressure, wear and damage.5-21–5-27,
8-65–8-67
Fittings and FastenersCheck all fittings and fasteners. 5-19
LightsCheck for proper operation. 5-19, 8-79–8-85
BatteryCheck fluid level.
Fill with distilled water if necessary.5-19, 8-69–8-75
U4XE64.book Page 1 Thursday, May 30, 2002 1:49 PM
Page 122 of 378
5-13
EBU01180
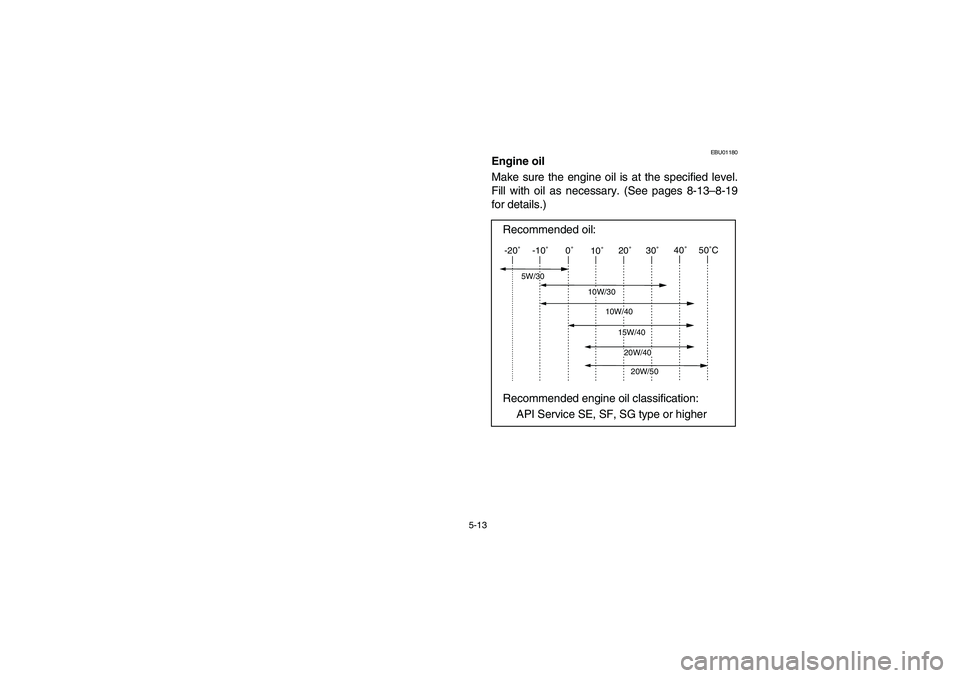
Engine oil
Make sure the engine oil is at the specified level.
Fill with oil as necessary. (See pages 8-13–8-19
for details.)
Recommended oil:
Recommended engine oil classification:
API Service SE, SF, SG type or higher
-20˚ -10˚ 0˚
10˚20˚ 30˚40˚50˚C
10W/30
15W/4020W/4020W/50
10W/40
5W/30
U4XE64.book Page 13 Thursday, May 30, 2002 1:49 PM
Page 126 of 378
5-17
EBU00493
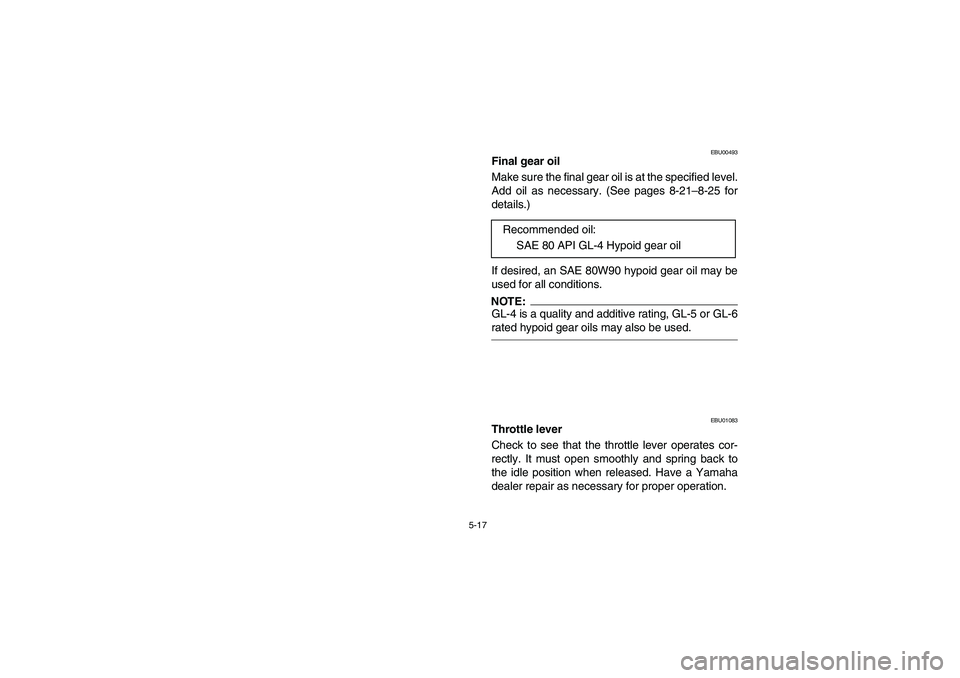
Final gear oil
Make sure the final gear oil is at the specified level.
Add oil as necessary. (See pages 8-21–8-25 for
details.)
If desired, an SAE 80W90 hypoid gear oil may be
used for all conditions.NOTE:GL-4 is a quality and additive rating, GL-5 or GL-6
rated hypoid gear oils may also be used.
EBU01083
Throttle lever
Check to see that the throttle lever operates cor-
rectly. It must open smoothly and spring back to
the idle position when released. Have a Yamaha
dealer repair as necessary for proper operation.Recommended oil:
SAE 80 API GL-4 Hypoid gear oil
U4XE64.book Page 17 Thursday, May 30, 2002 1:49 PM
Page 260 of 378
8-7
EBU00262
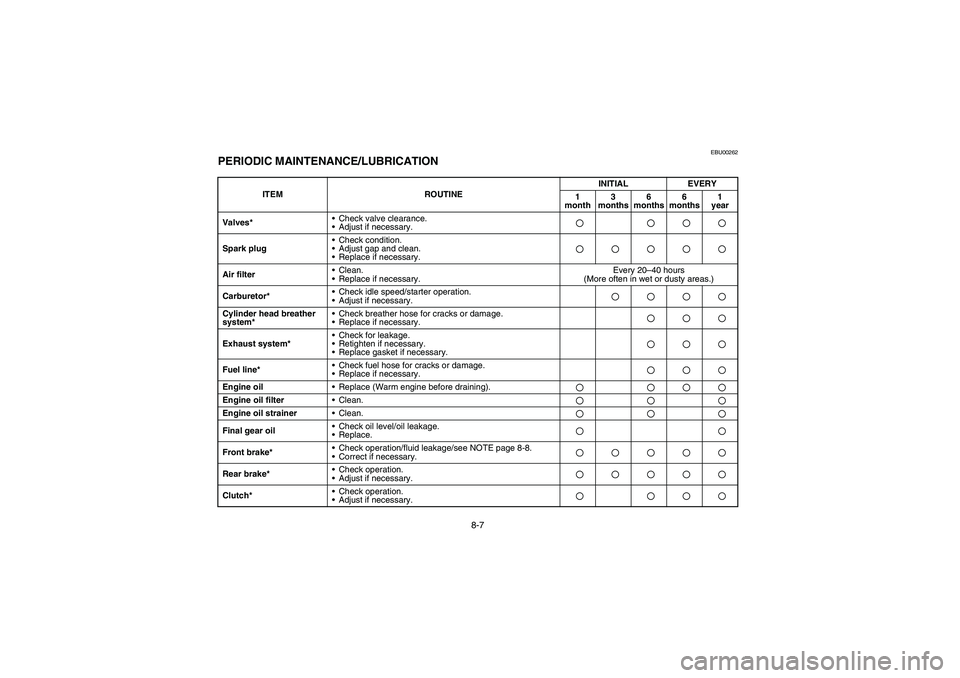
PERIODIC MAINTENANCE/LUBRICATION
ITEM ROUTINEINITIAL EVERY
1
month3
months6
months6
months1
year
Valves*•Check valve clearance.
•Adjust if necessary.
Spark plug•Check condition.
•Adjust gap and clean.
•Replace if necessary.Air filter•Clean.
•Replace if necessary.Every 20–40 hours
(More often in wet or dusty areas.)
Carburetor*•Check idle speed/starter operation.
•Adjust if necessary.Cylinder head breather
system*•Check breather hose for cracks or damage.
•Replace if necessary.Exhaust system*•Check for leakage.
•Retighten if necessary.
•Replace gasket if necessary.Fuel line*•Check fuel hose for cracks or damage.
•Replace if necessary.Engine oil
•Replace (Warm engine before draining).Engine oil filter
•Clean.Engine oil strainer
•Clean.Final gear oil•Check oil level/oil leakage.
•Replace.Front brake*•Check operation/fluid leakage/see NOTE page 8-8.
•Correct if necessary.Rear brake*•Check operation.
•Adjust if necessary.Clutch*•Check operation.
•Adjust if necessary.U4XE64.book Page 7 Thursday, May 30, 2002 1:49 PM
Page 261 of 378
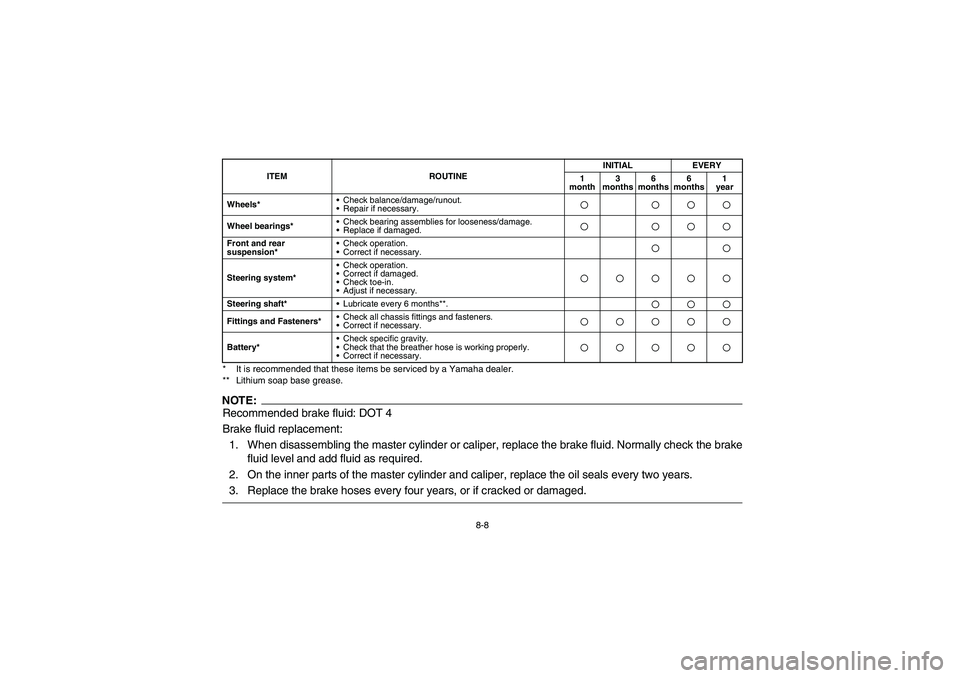
8-8 * It is recommended that these items be serviced by a Yamaha dealer.
** Lithium soap base grease.
NOTE:Recommended brake fluid: DOT 4
Brake fluid replacement:
1. When disassembling the master cylinder or caliper, replace the brake fluid. Normally check the brake
fluid level and add fluid as required.
2. On the inner parts of the master cylinder and caliper, replace the oil seals every two years.
3. Replace the brake hoses every four years, or if cracked or damaged.Wheels*•Check balance/damage/runout.
•Repair if necessary.Wheel bearings*•Check bearing assemblies for looseness/damage.
•Replace if damaged.Front and rear
suspension*•Check operation.
•Correct if necessary.Steering system*•Check operation.
•Correct if damaged.
•Check toe-in.
•Adjust if necessary.Steering shaft*
•Lubricate every 6 months**.Fittings and Fasteners*•Check all chassis fittings and fasteners.
•Correct if necessary.Battery*•Check specific gravity.
•Check that the breather hose is working properly.
•Correct if necessary.
ITEM ROUTINEINITIAL EVERY
1
month3
months6
months6
months1
year
U4XE64.book Page 8 Thursday, May 30, 2002 1:49 PM
Page 266 of 378
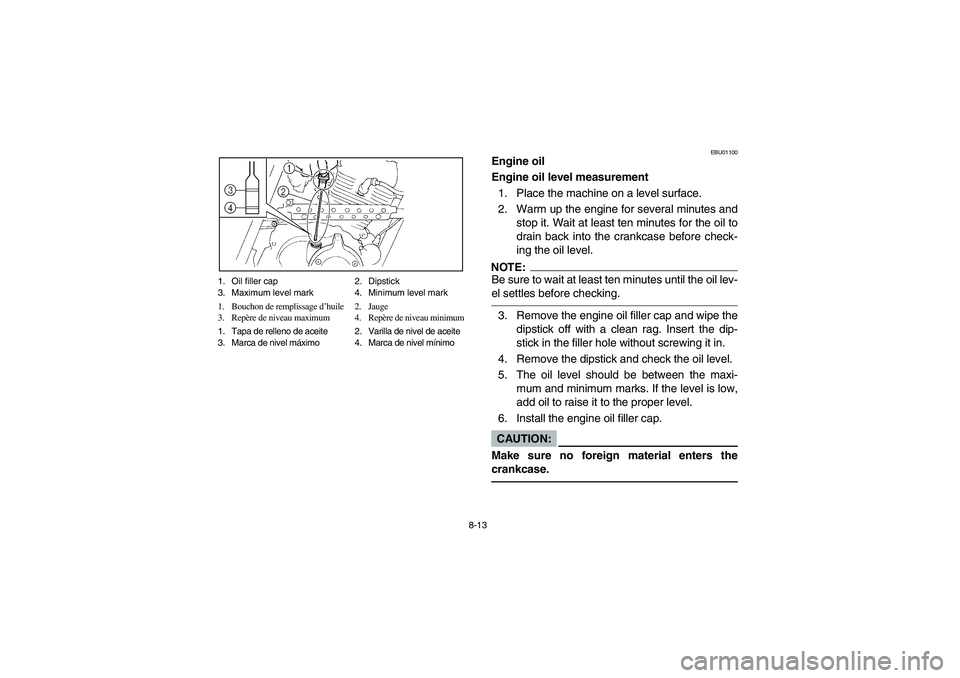
8-13 1. Oil filler cap 2. Dipstick
3. Maximum level mark 4. Minimum level mark
1. Bouchon de remplissage d’huile 2. Jauge
3. Repère de niveau maximum 4. Repère de niveau minimum
1. Tapa de relleno de aceite 2. Varilla de nivel de aceite
3. Marca de nivel máximo 4. Marca de nivel mínimo
EBU01100
Engine oil
Engine oil level measurement
1. Place the machine on a level surface.
2. Warm up the engine for several minutes and
stop it. Wait at least ten minutes for the oil to
drain back into the crankcase before check-
ing the oil level.NOTE:_ Be sure to wait at least ten minutes until the oil lev-
el settles before checking. _3. Remove the engine oil filler cap and wipe the
dipstick off with a clean rag. Insert the dip-
stick in the filler hole without screwing it in.
4. Remove the dipstick and check the oil level.
5. The oil level should be between the maxi-
mum and minimum marks. If the level is low,
add oil to raise it to the proper level.
6. Install the engine oil filler cap.CAUTION:_ Make sure no foreign material enters the
crankcase. _
U4XE64.book Page 13 Thursday, May 30, 2002 1:49 PM
Page 268 of 378
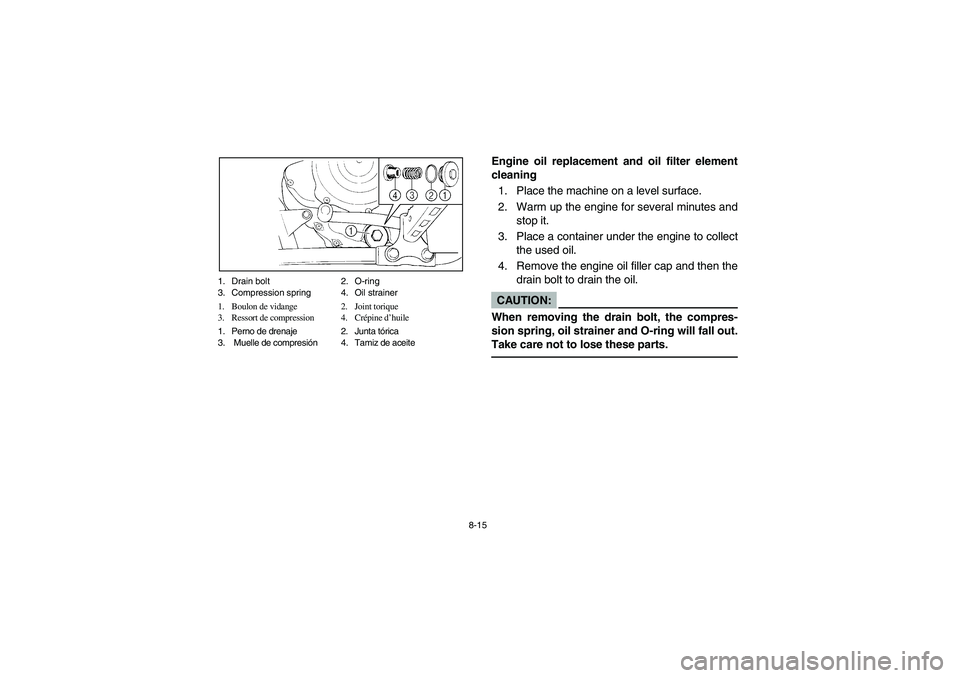
8-15 1. Drain bolt 2. O-ring
3. Compression spring 4. Oil strainer
1. Boulon de vidange 2. Joint torique
3. Ressort de compression 4. Crépine d’huile
1. Perno de drenaje 2. Junta tórica
3. Muelle de compresión 4. Tamiz de aceite
Engine oil replacement and oil filter element
cleaning
1. Place the machine on a level surface.
2. Warm up the engine for several minutes and
stop it.
3. Place a container under the engine to collect
the used oil.
4. Remove the engine oil filler cap and then the
drain bolt to drain the oil.CAUTION:_ When removing the drain bolt, the compres-
sion spring, oil strainer and O-ring will fall out.
Take care not to lose these parts. _
U4XE64.book Page 15 Thursday, May 30, 2002 1:49 PM
Page 274 of 378
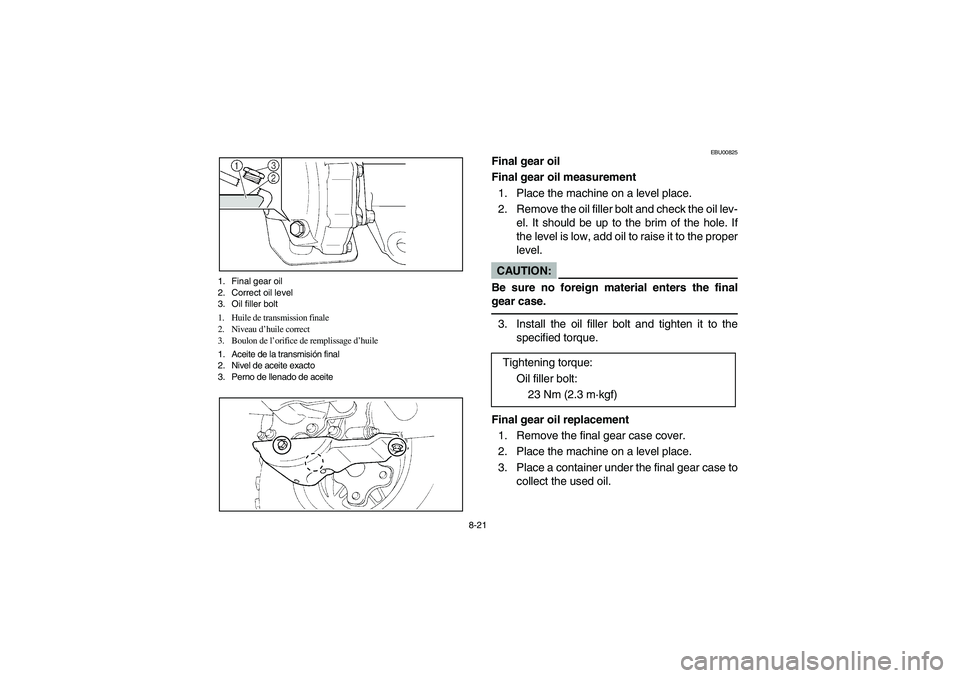
8-21 1. Final gear oil
2. Correct oil level
3. Oil filler bolt
1. Huile de transmission finale
2. Niveau d’huile correct
3. Boulon de l’orifice de remplissage d’huile
1. Aceite de la transmisión final
2. Nivel de aceite exacto
3. Perno de llenado de aceite
EBU00825
Final gear oil
Final gear oil measurement
1. Place the machine on a level place.
2. Remove the oil filler bolt and check the oil lev-
el. It should be up to the brim of the hole. If
the level is low, add oil to raise it to the proper
level.CAUTION:
Be sure no foreign material enters the final
gear case. 3. Install the oil filler bolt and tighten it to the
specified torque.
Final gear oil replacement
1. Remove the final gear case cover.
2. Place the machine on a level place.
3. Place a container under the final gear case to
collect the used oil. Tightening torque:
Oil filler bolt:
23 Nm (2.3 m·kgf)
U4XE64.book Page 21 Thursday, May 30, 2002 1:49 PM
Page 298 of 378
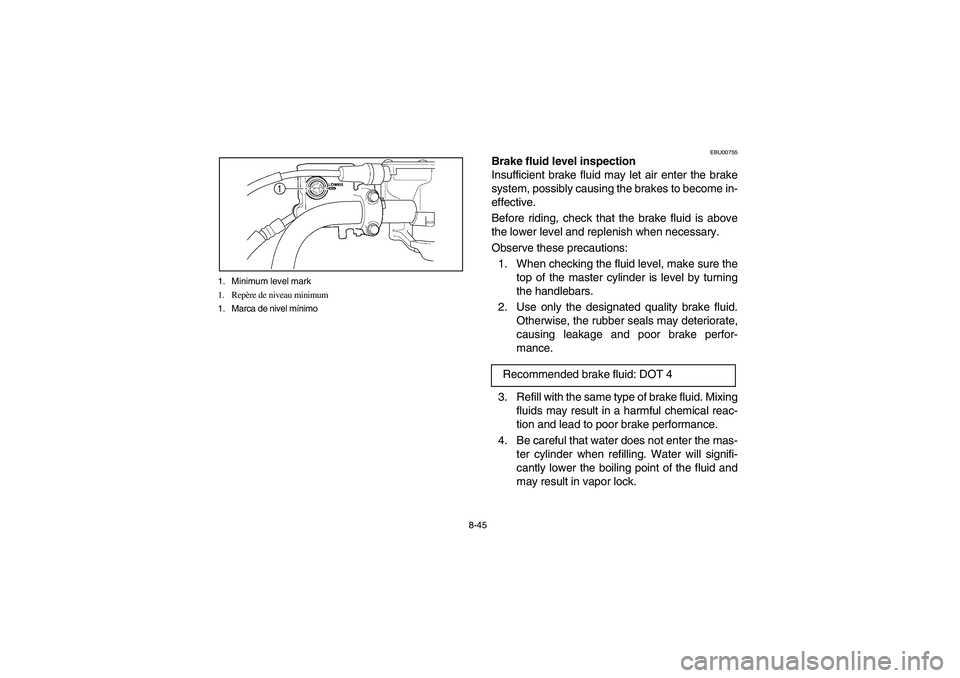
8-45 1. Minimum level mark
1. Repère de niveau minimum
1. Marca de nivel mínimo
EBU00755
Brake fluid level inspection
Insufficient brake fluid may let air enter the brake
system, possibly causing the brakes to become in-
effective.
Before riding, check that the brake fluid is above
the lower level and replenish when necessary.
Observe these precautions:
1. When checking the fluid level, make sure the
top of the master cylinder is level by turning
the handlebars.
2. Use only the designated quality brake fluid.
Otherwise, the rubber seals may deteriorate,
causing leakage and poor brake perfor-
mance.
3. Refill with the same type of brake fluid. Mixing
fluids may result in a harmful chemical reac-
tion and lead to poor brake performance.
4. Be careful that water does not enter the mas-
ter cylinder when refilling. Water will signifi-
cantly lower the boiling point of the fluid and
may result in vapor lock. Recommended brake fluid: DOT 4
U4XE64.book Page 45 Thursday, May 30, 2002 1:49 PM