checking oil YAMAHA BIG BEAR PRO 400 2003 Owners Manual
[x] Cancel search | Manufacturer: YAMAHA, Model Year: 2003, Model line: BIG BEAR PRO 400, Model: YAMAHA BIG BEAR PRO 400 2003Pages: 388, PDF Size: 16.15 MB
Page 16 of 388

EBU00015
1-CONTENTS
LOCATION OF THE WARNING AND
SPECIFICATION LABELS ....................... 1-1
SAFETY INFORMATION ......................... 2-1
DESCRIPTION AND
MACHINE IDENTIFICATION ................... 3-1
Identification number records ............... 3-3
Key identification number ..................... 3-5
Vehicle identification number ............... 3-7
Model label ........................................... 3-9
CONTROL FUNCTIONS ......................... 4-1
Main switch........................................... 4-1
Indicator and warning lights.................. 4-3
Oil temperature warning light
checking method ................................ 4-5
Speedometer ........................................ 4-9
Fuel gauge ......................................... 4-11
Handlebar switches ............................ 4-13
Throttle lever ...................................... 4-17
Speed limiter ...................................... 4-19
Front brake lever ................................ 4-21
Rear brake pedal and lever ................ 4-23
1234
Parking brake ..................................... 4-25
Shift pedal .......................................... 4-27
Drive select lever ............................... 4-27
Recoil starter ...................................... 4-29
Fuel tank cap ..................................... 4-29
Fuel cock............................................ 4-31
Starter (choke) “”.................... 4-33
Seat.................................................... 4-35
Storage box........................................ 4-37
Front carrier ....................................... 4-37
Rear carrier ........................................ 4-37
Front shock absorber adjustment ...... 4-39
Rear shock absorber adjustment ....... 4-41
Auxiliary DC jack ................................ 4-43
PRE-OPERATION CHECKS ................... 5-1
Front and rear brakes .......................... 5-5
Fuel ...................................................... 5-9
Engine oil/Transfer gear oil ................ 5-13
Final gear oil/Differential gear oil ....... 5-17
Throttle lever ...................................... 5-17
Fittings and Fasteners ....................... 5-19
Lights ................................................. 5-19
Switches............................................. 5-19
5
EE.book Page 1 Monday, June 18, 2001 10:18 AM
Page 66 of 388

4-5
EBU00733
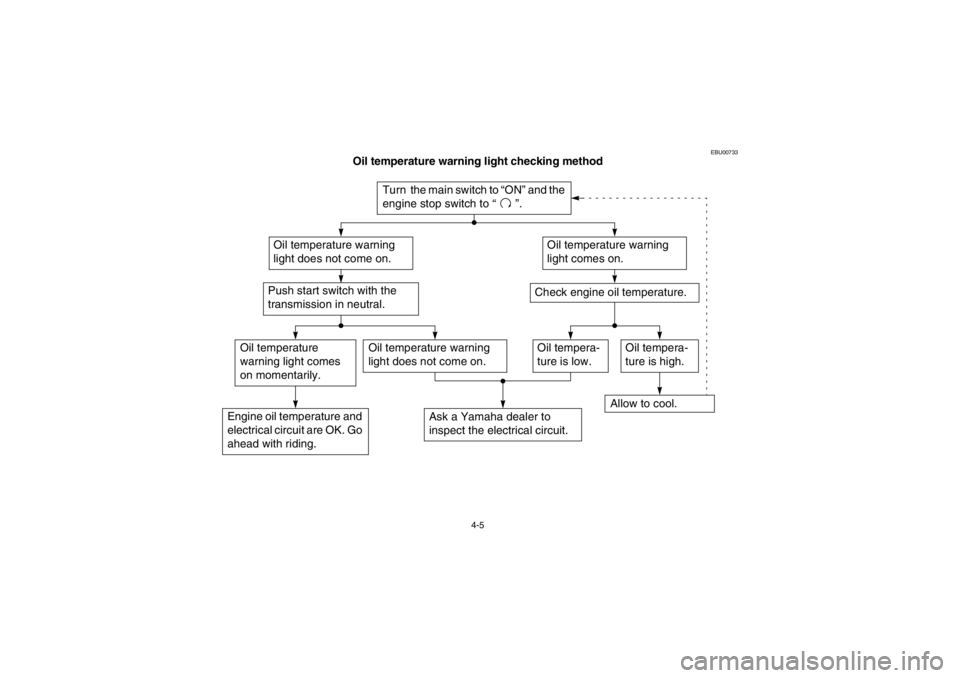
Oil temperature warning light checking method
ACB-10E
Turn the main switch to “ON” and the
engine stop switch to “”.
Oil temperature warning
light does not come on.
Oil temperature warning
light comes on.
Check engine oil temperature.
Oil temperature warning
light does not come on.
Engine oil temperature and
electrical circuit are OK. Go
ahead with riding.
Push start switch with the
transmission in neutral.
Ask a Yamaha dealer to
inspect the electrical circuit.
Oil tempera-
ture is low.
Allow to cool.
Oil tempera-
ture is high.
Oil temperature
warning light comes
on momentarily.
EE.book Page 5 Monday, June 18, 2001 10:18 AM
Page 266 of 388

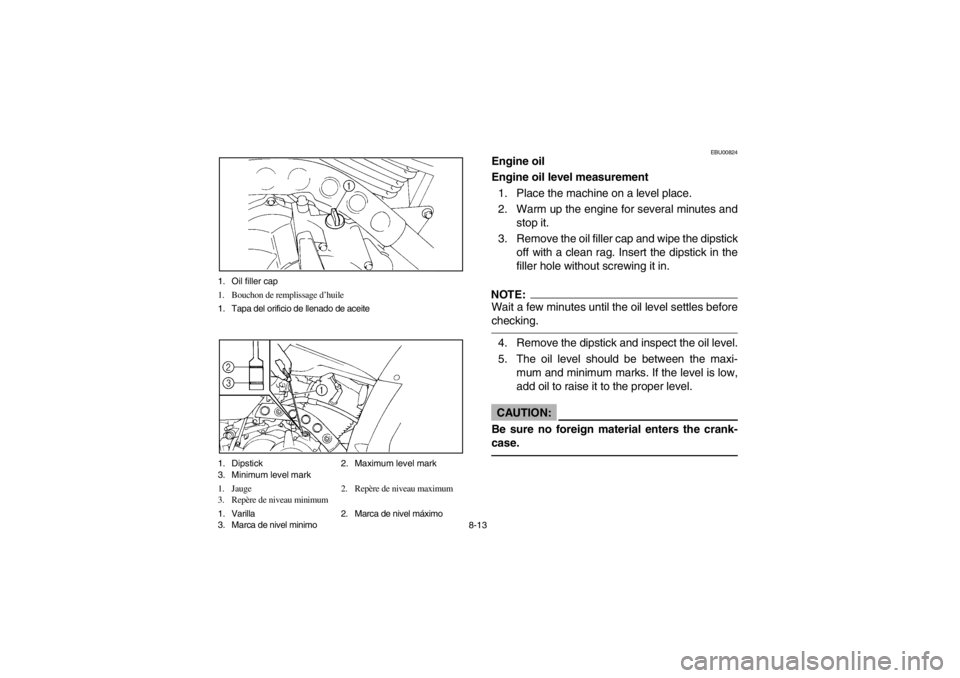
8-13 1. Oil filler cap
1. Bouchon de remplissage d’huile
1. Tapa del orificio de llenado de aceite
1. Dipstick 2. Maximum level mark
3. Minimum level mark
1. Jauge 2. Repère de niveau maximum
3. Repère de niveau minimum
1. Varilla 2. Marca de nivel máximo
3. Marca de nivel minimo
EBU00824
Engine oil
Engine oil level measurement
1. Place the machine on a level place.
2. Warm up the engine for several minutes and
stop it.
3. Remove the oil filler cap and wipe the dipstick
off with a clean rag. Insert the dipstick in the
filler hole without screwing it in.NOTE:_ Wait a few minutes until the oil level settles before
checking. _4. Remove the dipstick and inspect the oil level.
5. The oil level should be between the maxi-
mum and minimum marks. If the level is low,
add oil to raise it to the proper level.CAUTION:_ Be sure no foreign material enters the crank-
case. _
EE.book Page 13 Monday, June 18, 2001 10:18 AM
Page 274 of 388

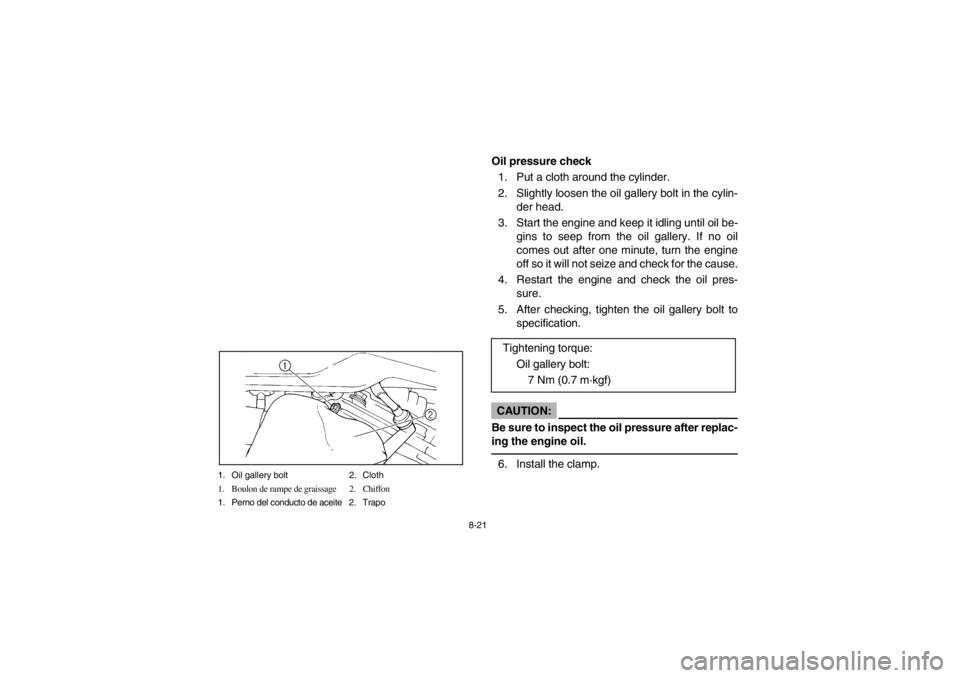
8-21 1. Oil gallery bolt 2. Cloth
1. Boulon de rampe de graissage 2. Chiffon
1. Perno del conducto de aceite 2. Trapo
Oil pressure check
1. Put a cloth around the cylinder.
2. Slightly loosen the oil gallery bolt in the cylin-
der head.
3. Start the engine and keep it idling until oil be-
gins to seep from the oil gallery. If no oil
comes out after one minute, turn the engine
off so it will not seize and check for the cause.
4. Restart the engine and check the oil pres-
sure.
5. After checking, tighten the oil gallery bolt to
specification.CAUTION:_ Be sure to inspect the oil pressure after replac-
ing the engine oil. _6. Install the clamp.Tightening torque:
Oil gallery bolt:
7 Nm (0.7 m·kgf)
EE.book Page 21 Monday, June 18, 2001 10:18 AM