fuel YAMAHA BLASTER 200 2005 User Guide
[x] Cancel search | Manufacturer: YAMAHA, Model Year: 2005, Model line: BLASTER 200, Model: YAMAHA BLASTER 200 2005Pages: 388, PDF Size: 7.57 MB
Page 154 of 388

6-25
EBU00212
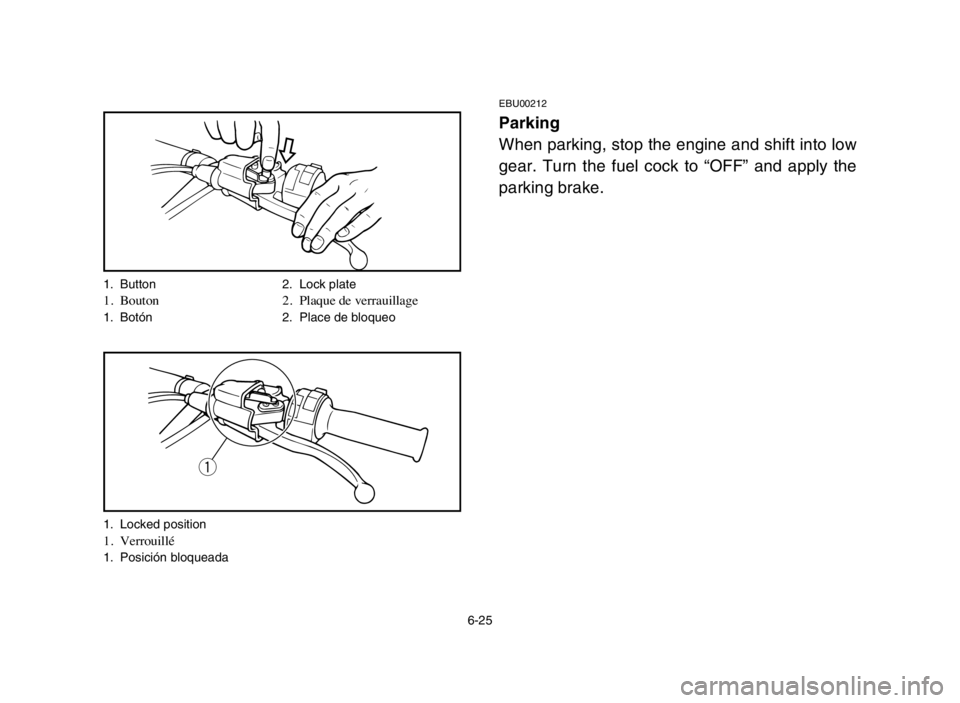
Parking
When parking, stop the engine and shift into low
gear. Turn the fuel cock to “OFF” and apply the
parking brake.
1. Button 2. Lock plate1. Bouton 2. Plaque de verrauillage1. Botón 2. Place de bloqueo
1. Locked position
1. Verrouillé1. Posición bloqueada
q
5VM-9-62-03 2/19/04 11:39 AM Page 26
Page 256 of 388

8-7INITIAL EVERY
month 1 3 6 6 12
ITEM ROUTINEWhichever
km 320 1200 2400 2400 4800 comes first
(mi) (200) (750) (1500) (1500) (3000)
hours 20 75 150 150 300
Transmission9Replace oil.2 222
9Check condition.
Spark plug9Adjust gap and clean.22222
9Replace if necessary.
Air filter element9Clean. Every 20–40 hours.
9Replace if necessary. (More often in wet or dusty areas)
* Carburetor9Check idle speed / starter operation.
2222
9Adjust if necessary.
* Crankcase breather9Check breather hose for cracks or damage.
222
system9Replace if necessary.
9Check for leakage.
* Exhaust system9Tighten if necessary.222
9Replace gasket if necessary.
* Fuel line9Check fuel hose for cracks or damage.
222
9Replace if necessary.
Throttle operation9Inspect and adjust free play if necessary.22222
* Front and rear9Check operation/fluid leakage.
22222
brake operation9Correct if necessary.
EBU02621
PERIODIC MAINTENANCE/LUBRICATION
NOTE:8For vehicles not equipped with an odometer or an hour meter, follow the month maintenance intervals.
8For vehicles equipped with an odometer or an hour meter, follow the km (mi) or hours maintenance intervals. However, keep in mind that if
the vehicle isn’t used for a long period of time, the month maintenance intervals should be followed.
5VM-9-62-05 3/12/04 4:15 PM Page 8
Page 288 of 388

8-39
EBU12831
Carburetor settings
In extremely cold weather, it is necessary to
change the carburetor settings to maintain opti-
mum engine performance and to prevent engine
damage.
w
8Improperly servicing or adjusting the car-
buretor could cause malfunction with the
possibility of an accident or the carburetor
could leak fuel, which would be a fire haz-
ard.
8Carburetor adjustments should only be
performed by a Yamaha dealer. Do not
attempt to perform these procedures
unless you have mechanical knowledge
and the necessary tools.
8Do not perform this procedure while the
engine is hot. Place a rag under the carbu-
retor to catch any fuel. Wipe up any spilled
fuel completely.
8After servicing the carburetor, always
check throttle operation before operating
the ATV to make sure it is working correct-
ly.
5VM-9-62-05 3/12/04 4:15 PM Page 40
Page 292 of 388

8-43
Changing the carburetor settings
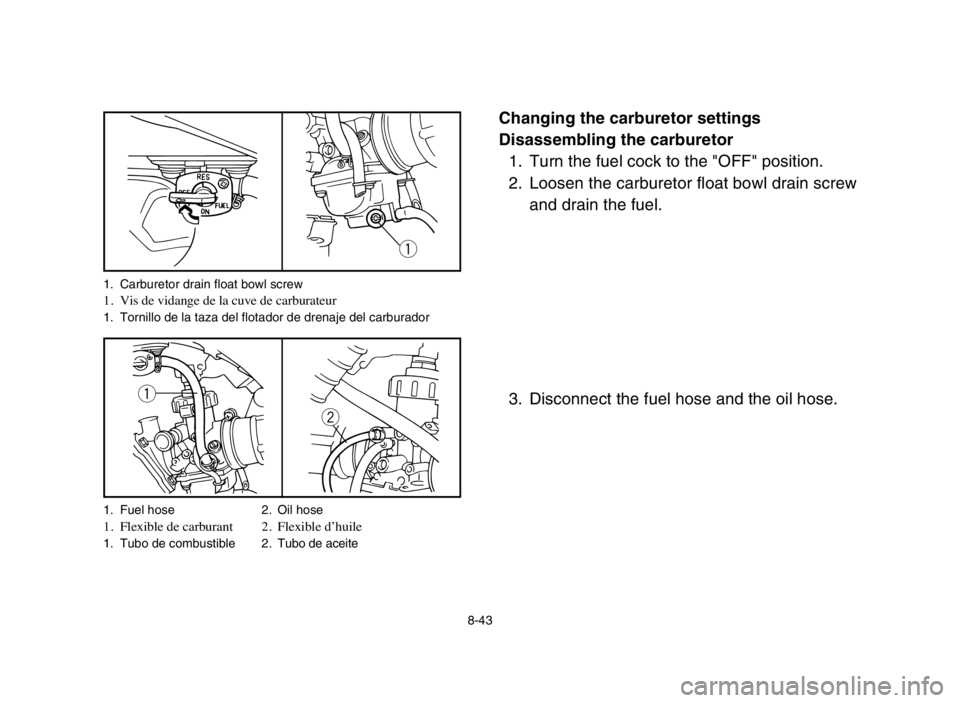
Disassembling the carburetor
1. Turn the fuel cock to the "OFF" position.
2. Loosen the carburetor float bowl drain screw
and drain the fuel.
3. Disconnect the fuel hose and the oil hose.
q
q
w
1. Carburetor drain float bowl screw1. Vis de vidange de la cuve de carburateur1. Tornillo de la taza del flotador de drenaje del carburador
1. Fuel hose 2. Oil hose
1. Flexible de carburant 2. Flexible d’huile1. Tubo de combustible 2.Tubo de aceite
5VM-9-62-05 3/12/04 4:15 PM Page 44
Page 298 of 388

8-49
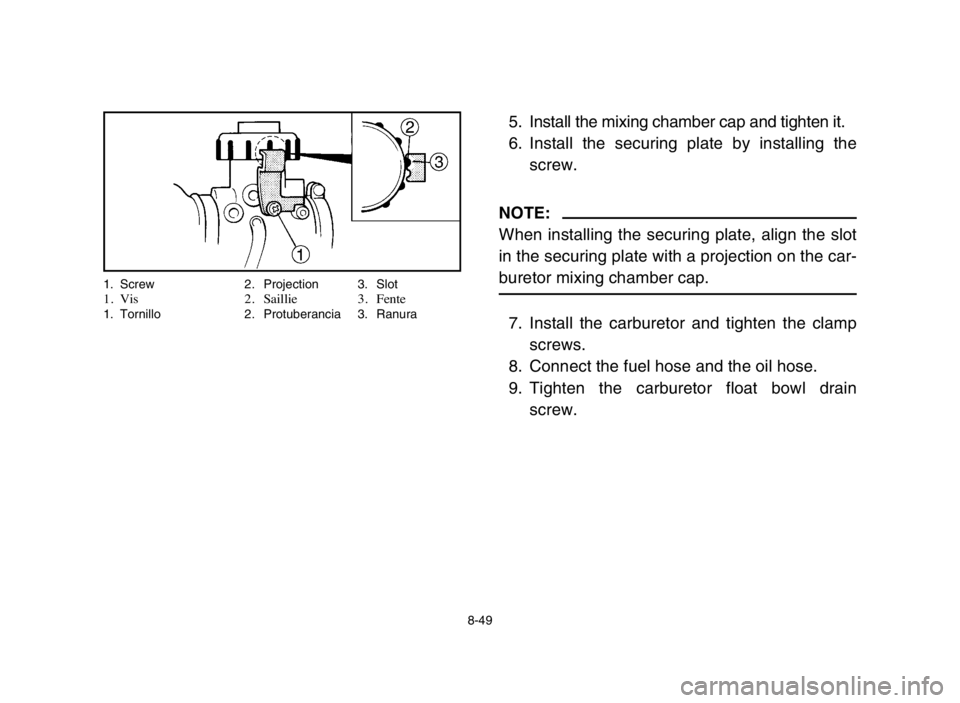
5. Install the mixing chamber cap and tighten it.
6. Install the securing plate by installing the
screw.
NOTE:
When installing the securing plate, align the slot
in the securing plate with a projection on the car-
buretor mixing chamber cap.
7. Install the carburetor and tighten the clamp
screws.
8. Connect the fuel hose and the oil hose.
9. Tighten the carburetor float bowl drain
screw.
1. Screw 2. Projection 3. Slot1. Vis 2. Saillie 3. Fente1. Tornillo 2. Protuberancia 3. Ranura
5VM-9-62-05 3/12/04 4:15 PM Page 50
Page 350 of 388

8-101
EBU00413
Troubleshooting
Although Yamaha machines receive a rigid
inspection before shipment from the factory,
trouble may occur during operation.
Any problem in the fuel, compression, or ignition
systems can cause poor starting and loss of
power. The troubleshooting chart describes a
quick, easy procedure for making checks. If
your machine requires any repair, take it to a
Yamaha dealer.
The skilled technicians at a Yamaha dealership
have the tools, experience, and know-how to
properly service your machine. Use only gen-
uine Yamaha parts on your machine. Imitation
parts may look like Yamaha parts, but they are
often inferior. Consequently, they have a short-
er service life and can lead to expensive repair
bills.
5VM-9-62-05 3/12/04 4:15 PM Page 102
Page 352 of 388

8-103
w
Do not smoke when checking the fuel sys-
tem. Fuel can ignite or explode, causing
severe injury or property damage. Make sure
there are no open flames or sparks in the
area, including pilot lights from water
heaters or furnaces.
5VM-9-62-05 3/12/04 4:15 PM Page 104
Page 354 of 388

8-105
EBU00440
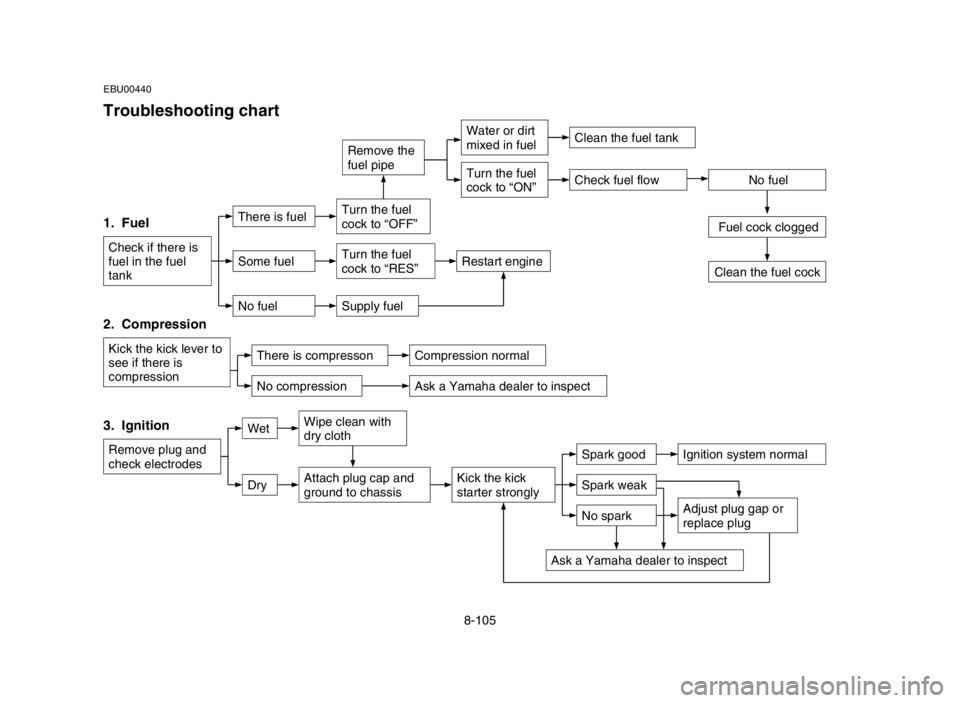
Troubleshooting chart
Check fuel flow
1. Fuel
Check if there is
fuel in the fuel
tank
2. Compression
Kick the kick lever to
see if there is
compression
3. Ignition
Remove plug and
check electrodes
WetWipe clean with
dry cloth
DryAttach plug cap and
ground to chassisKick the kick
starter stronglySpark weak
Spark goodIgnition system normal
No spark
Ask a Yamaha dealer to inspect
Adjust plug gap or
replace plug
There is compressonCompression normal
Ask a Yamaha dealer to inspectNo compression
There is fuelTurn the fuel
cock to “OFF”
Remove the
fuel pipe
Water or dirt
mixed in fuel
No fuel
Fuel cock clogged
Some fuelTurn the fuel
cock to “RES”Restart engine
No fuelSupply fuel
Clean the fuel tank
Turn the fuel
cock to “ON”
Clean the fuel cock
5VM-9-62-05 3/12/04 4:15 PM Page 106
Page 364 of 388

9-7
EBU00528
B. STORAGE
Long term storage (60 days or more) of your
machine will require some preventive proce-
dures to guard against deterioration. After thor-
oughly cleaning the machine, prepare for stor-
age as follows:
1. Fill the fuel tank with fresh fuel and add fuel
stabilizer (if available).
NOTE:
Use of fuel stabilizer eliminates the need to
drain the fuel system. Consult a Yamaha dealer
if the fuel system is to be drained instead.
2. Remove the spark plug, pour about one
tablespoon of SAE 10W30 or 20W40 motor
oil in the spark plug hole and reinstall the
spark plug. Ground the spark plug wire and
turn the engine over several times to coat
the cylinder wall with oil.
3. Clean the drive chain thoroughly and lubri-
cate it. (See page 8-77.)
5VM-9-62-06 2/18/04 1:20 PM Page 8
Page 368 of 388

10-1
Model YFS200
Dimensions:
Overall length 1,735 mm
Overall width 1,035 mm
Overall height 1,040 mm
Seat height 740 mm
Wheelbase 1,100 mm
Ground clearance 120 mm
Minimum turning radius 3,000 mm
Basic weight:
With oil and full fuel tank 155 kg
Engine:
Engine type Air-cooled 2-stroke
Cylinder arrangement Forward-inclined single cylinder
Displacement 195 cm
3
Bore × stroke 66 ×57 mm
Compression ratio 6.6 : 1
Starting system Kick starter
Lubrication system Separate lubrication (Yamaha Autolube)
EBU00428
SPECIFICATIONS
5VM-9-62-06 2/18/04 1:20 PM Page 12