light YAMAHA BREEZE 2004 Notices Demploi (in French)
[x] Cancel search | Manufacturer: YAMAHA, Model Year: 2004, Model line: BREEZE, Model: YAMAHA BREEZE 2004Pages: 350, PDF Size: 5.26 MB
Page 81 of 350

5-1
EBU00113
PRE-OPERATION CHECKS
Before using this machine, check the following points:
ITEM ROUTINE PAGE
Brakes• Check operation, condition and free play. 5-5 – 5-7,
• Adjust if necessary. 8-45 – 8-55
Fuel • Check fuel level.
• Fill with fuel if necessary.5-7 – 5-11
Engine oil and• Check oil level. 5-11 – 5-15,
transmission oil• Fill with oil if necessary. 8-13 – 8-25
Drive chain• Check chain slack and condition.
5-15, 8-57 – 8-63
• Adjust if necessary.
Throttle• Check for proper throttle cable operation. 5-15
Wheels and tires• Check tire pressure, wear and damage. 5-19 – 5-25, 8-71
Fittings and fasteners• Check all fittings and fasteners. 5-15
Battery• Check fluid level.
5-17, 8-73 – 8-79
• Fill with distilled water if necessary.
Lights and switches• Check for proper operation. 5-17, 8-83 – 8-87
5VJ-9-61-05 3/17/03 4:50 PM Page 2
Page 97 of 350

5-17
EBU01162
Fittings and fasteners
Always check the tightness of chassis fittings
and fasteners before a ride. Take the machine
to a Yamaha dealer or refer to the Service
Manual for correct tightening torque.
EBU00803
Lights
Check the headlight and tail/brake light to make
sure they are in working condition. Repair as
necessary for proper operation.
EBU11700
Switches
Check the operation of all switches. Have a
Yamaha dealer repair as necessary for proper
operation.
EBU00499
Battery
Check fluid level and fill if necessary. Use only
distilled water if refilling is necessary. (See
pages 8-73–8-79.)
5VJ-9-61-05 3/17/03 4:50 PM Page 18
Page 111 of 350
6-5
NOTE:
8The engine can be started only when the
drive select lever is in neutral.
8When the drive select lever is in neutral, the
neutral indicator light should come on. If the
light does not come on, ask a Yamaha dealer
to inspect it.
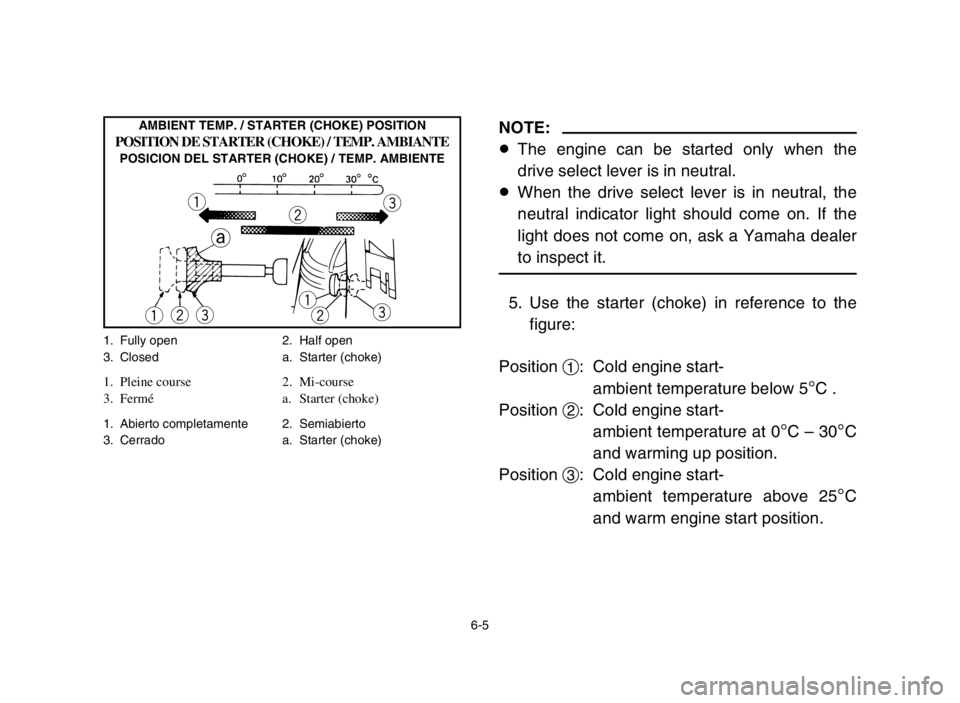
5. Use the starter (choke) in reference to the
figure:
Position 1: Cold engine start-
ambient temperature below 5
°C .
Position 2: Cold engine start-
ambient temperature at 0
°C – 30°C
and warming up position.
Position 3: Cold engine start-
ambient temperature above 25
°C
and warm engine start position.
1. Fully open 2. Half open
3. Closed a. Starter (choke)
1. Pleine course 2. Mi-course
3. Fermé a. Starter (choke)
1. Abierto completamente 2. Semiabierto
3. Cerrado a. Starter (choke)
q
we
w
qe
w q
e
a
AMBIENT TEMP. / STARTER (CHOKE) POSITIONPOSITION DE STARTER (CHOKE) / TEMP. AMBIANTEPOSICION DEL STARTER (CHOKE) / TEMP. AMBIENTE
5VJ-9-61-06 3/17/03 4:51 PM Page 6
Page 117 of 350

6-11
EBU00180
Starting a warm engine
To start a warm engine, refer to the “Starting a
cold engine” section. The starter (choke) should
not be used. The throttle should be opened
slightly.
EBU00182
Warming up
To get maximum engine life, always warm up
the engine before starting off. Never accelerate
hard with a cold engine! To see whether or not
the engine is warm, check if it responds to the
throttle normally with the starter (choke) turned
off.
5VJ-9-61-06 3/17/03 4:51 PM Page 12
Page 121 of 350

6-15
Shifting: reverse
1. Bring the machine to a complete stop and
return the throttle lever to the closed posi-
tion.
2. Apply the parking brake.
3. Shift the gear from neutral to reverse and
vice versa by moving the drive select lever
along the shift guide.
NOTE:
When in reverse, the reverse indicator light
should be on. If the light does not come on, ask
a Yamaha dealer to inspect the machine.
4. Check behind for people or obstacles, then
release the parking brake.
5. Open the throttle lever gradually and contin-
ue to watch to the rear while backing.
5VJ-9-61-06 3/17/03 4:51 PM Page 16
Page 185 of 350
7-43
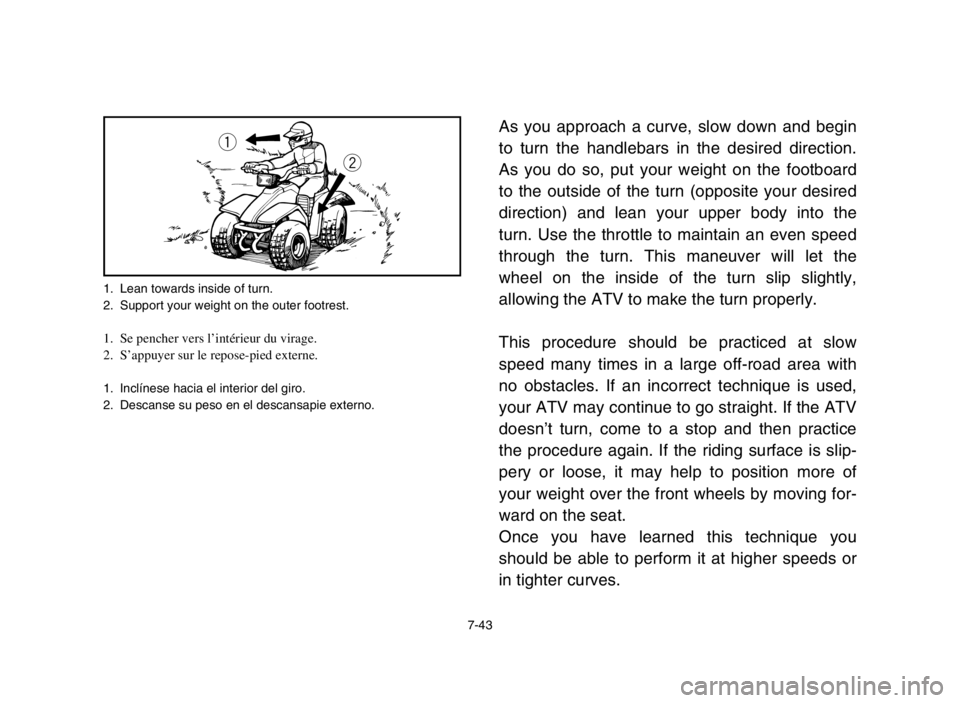
As you approach a curve, slow down and begin
to turn the handlebars in the desired direction.
As you do so, put your weight on the footboard
to the outside of the turn (opposite your desired
direction) and lean your upper body into the
turn. Use the throttle to maintain an even speed
through the turn. This maneuver will let the
wheel on the inside of the turn slip slightly,
allowing the ATV to make the turn properly.
This procedure should be practiced at slow
speed many times in a large off-road area with
no obstacles. If an incorrect technique is used,
your ATV may continue to go straight. If the ATV
doesn’t turn, come to a stop and then practice
the procedure again. If the riding surface is slip-
pery or loose, it may help to position more of
your weight over the front wheels by moving for-
ward on the seat.
Once you have learned this technique you
should be able to perform it at higher speeds or
in tighter curves.
1. Lean towards inside of turn.
2. Support your weight on the outer footrest.
1. Se pencher vers l’intérieur du virage.
2. S’appuyer sur le repose-pied externe.
1. Inclínese hacia el interior del giro.
2. Descanse su peso en el descansapie externo.
q
w
5VJ-9-61-07 3/14/03 11:53 PM Page 44
Page 203 of 350

7-61
CROSSING A SLOPE
Traversing a sloping surface on your ATV
requires you to properly position your weight to
maintain proper balance. Be sure that you have
learned the basic riding skills on flat ground
before attempting to cross a sloping surface.
Avoid slopes with slippery surfaces or rough ter-
rain that may upset your balance.
As you travel across a slope, lean your body in
the uphill direction. It may be necessary to cor-
rect the steering when riding on loose surfaces
by pointing the front wheels slightly uphill. When
riding on slopes be sure not to make sharp turns
either up or down hill.
5VJ-9-61-07 3/14/03 11:53 PM Page 62
Page 261 of 350
8-39
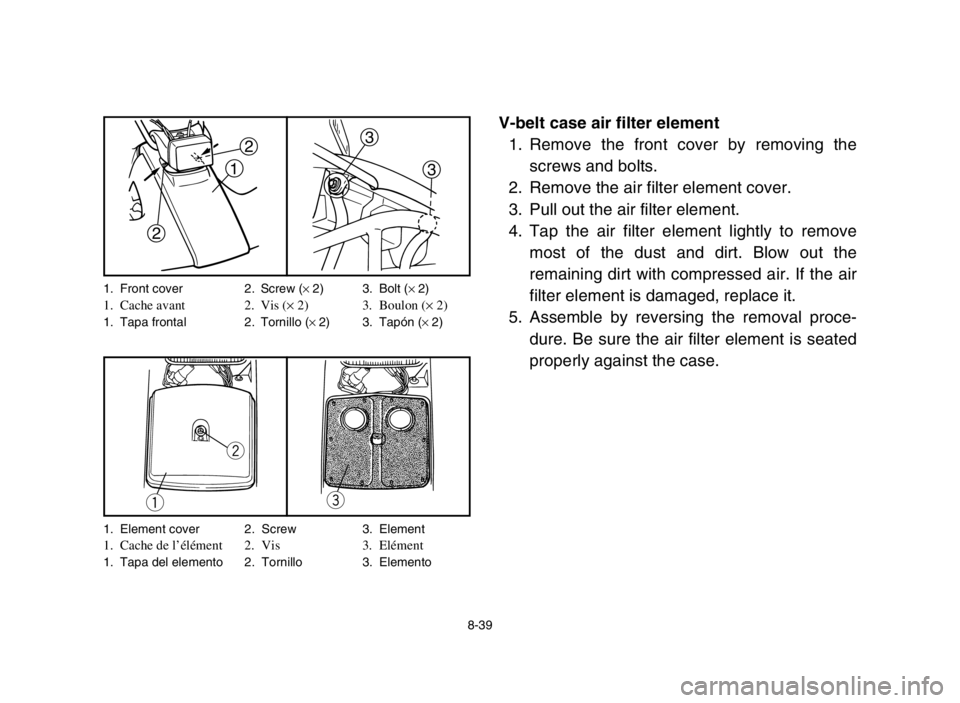
V-belt case air filter element
1. Remove the front cover by removing the
screws and bolts.
2. Remove the air filter element cover.
3. Pull out the air filter element.
4. Tap the air filter element lightly to remove
most of the dust and dirt. Blow out the
remaining dirt with compressed air. If the air
filter element is damaged, replace it.
5. Assemble by reversing the removal proce-
dure. Be sure the air filter element is seated
properly against the case.
2
21
3 3
w
qe
1. Front cover 2. Screw (× 2) 3. Bolt (× 2)1. Cache avant 2. Vis (×2) 3. Boulon (×2)1. Tapa frontal 2. Tornillo (× 2) 3. Tapón (× 2)
1. Element cover 2. Screw 3. Element
1. Cache de l’élément 2. Vis 3. Elément1. Tapa del elemento 2. Tornillo 3. Elemento
5VJ-9-61-08 3/17/03 4:52 PM Page 8-40
Page 305 of 350
8-83
EBU01179
Replacing the headlight bulb
If the headlight bulb burns out, replace the bulb
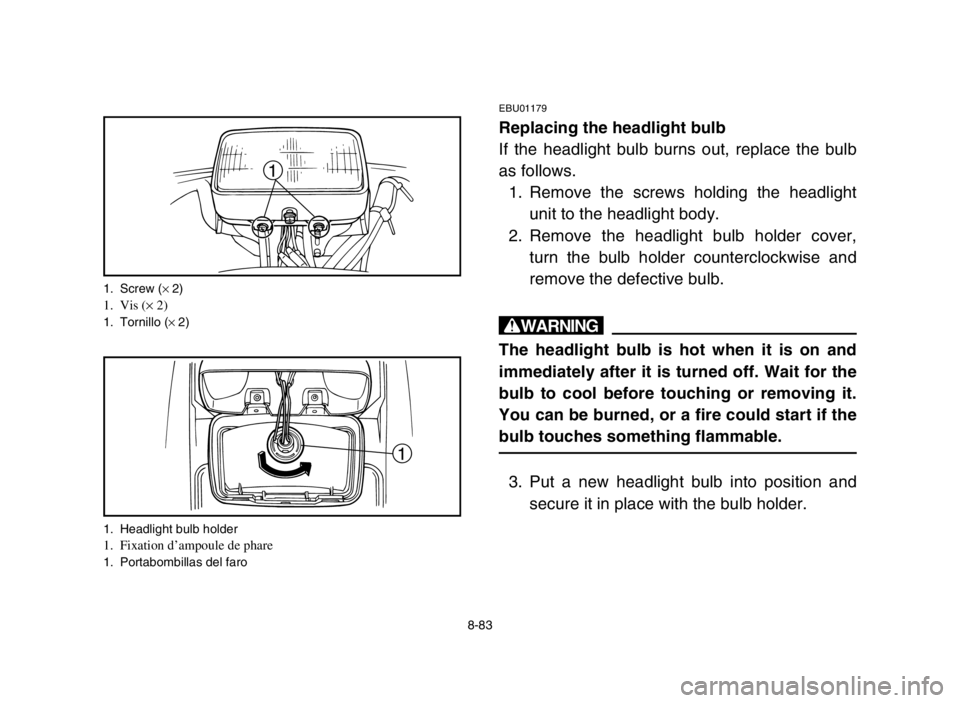
as follows.
1. Remove the screws holding the headlight
unit to the headlight body.
2. Remove the headlight bulb holder cover,
turn the bulb holder counterclockwise and
remove the defective bulb.
w
The headlight bulb is hot when it is on and
immediately after it is turned off. Wait for the
bulb to cool before touching or removing it.
You can be burned, or a fire could start if the
bulb touches something flammable.
3. Put a new headlight bulb into position and
secure it in place with the bulb holder.
1
1
1. Screw (× 2)1. Vis (× 2)1. Tornillo (×2)
1. Headlight bulb holder
1. Fixation d’ampoule de phare1. Portabombillas del faro
5VJ-9-61-08 3/17/03 4:52 PM Page 8-84
Page 307 of 350
8-85
4. Install the headlight bulb holder cover.
cC
Make sure the bulb holder cover is securely
fitted over the bulb holder and seated
against the reflector.
5. Install the headlight unit assembly by
installing the screws.
6. Adjust the headlight beam if necessary.
5VJ-9-61-08 3/17/03 4:52 PM Page 8-86