fuel YAMAHA CYGNUS 125 2000 Owners Manual
[x] Cancel search | Manufacturer: YAMAHA, Model Year: 2000, Model line: CYGNUS 125, Model: YAMAHA CYGNUS 125 2000Pages: 76, PDF Size: 1.3 MB
Page 6 of 76
1
2
3
4
5
6
7
8
9
EAU10210
TABLE OF CONTENTSSAFETY INFORMATION....... 1-1
Further safe-riding points ..... 1-4
DESCRIPTION ....................... 2-1
Left view ............................... 2-1
Right view ............................. 2-2
Controls and instruments ..... 2-3
INSTRUMENT AND CONTROL
FUNCTIONS........................... 3-1
Main switch/steering lock ..... 3-1
Indicator lights ...................... 3-2
Speedometer unit................. 3-3
Fuel gauge ............................ 3-3
Handlebar switches .............. 3-3
Front brake lever .................. 3-4
Rear brake lever ................... 3-4
Fuel tank cap ........................ 3-5
Fuel...................................... 3-6
Catalytic converter ............... 3-6
Kickstarter............................ 3-7
Seat ......................................3-7
Helmet holder ....................... 3-8
Storage compartment ........... 3-8
Luggage hook ....................... 3-9
Sidestand ...........................3-10Sidestand switch operation
check...............................3-10
PRE-OPERATION CHECKS . 4-1
Pre-operation check list ........ 4-2
OPERATION AND IMPORTANT
RIDING POINTS.................... 5-1
Starting a cold engine ........... 5-1
Starting off ............................ 5-2
Acceleration and
deceleration....................... 5-2
Braking ................................. 5-2
Tips for reducing fuel consump-
tion..................................... 5-3
Engine break-in .................... 5-3
Parking ................................. 5-4
PERIODIC MAINTENANCE
AND MINOR REPAIR ............ 6-1
Owner’s tool kit ..................... 6-1
Periodic maintenance and
lubrication chart ................. 6-3
Removing and installing
panels ................................ 6-6
Checking the spark plug ....... 6-7Engine oil and oil strainer ...... 6-8
Final transmission oil..........6-10
Air filter and V-belt case air filter
elements..........................6-11
Adjusting the carburetor..... 6-13
Adjusting the throttle cable free
play ..................................6-14
Adjusting the valve
clearance.........................6-14
Tires...................................6-15
Cast wheels.......................6-17
Checking the front brake lever
free play...........................6-17
Adjusting the rear brake lever
free play...........................6-18
Checking the front brake pads
and rear brake shoes ......6-18
Checking the brake fluid
level .................................6-19
Changing the brake fluid .....6-20
Checking and lubricating the
cables..............................6-20
Checking and lubricating the
throttle grip and cable ......6-21
Lubricating the front and rear
brake levers.....................6-21
5ML-F8199-E0ch0.pmd2003/12/12, 16:02 5
Page 11 of 76
1-4
1
2
3
4
5
6
7
8
9
Q QQ Q
Q SAFETY INFORMATION
tric failure could result, which could
cause a dangerous loss of lights or
engine power.
Gasoline and exhaust gas
8GASOLINE IS HIGHLY FLAM-
MABLE:
9Always turn the engine off
when refueling.
9Take care not to spill any
gasoline on the engine or
exhaust system when refueling.
9Never refuel while smoking or
in the vicinity of an open flame.
8Never start the engine or let it run
for any length of time in a closed
area. The exhaust fumes are poi-
sonous and may cause loss of con-
sciousness and death within a
short time. Always operate your
scooter in an area that has adequate
ventilation.
8Always turn the engine off before
leaving the scooter unattended and
remove the key from the main
switch. When parking the scooter,
note the following:
9The engine and exhaustsystem may be hot, therefore,
park the scooter in a place
where pedestrians or children
are not likely to touch these hot
areas.
9Do not park the scooter on a
slope or soft ground, otherwise
it may fall over.
9Do not park the scooter near a
flammable source (e.g., a
kerosene heater, or near an
open flame), otherwise it could
catch fire.
8If you should swallow any gasoline,
inhale a lot of gasoline vapor, or
allow gasoline to get into your eyes,
see your doctor immediately. If any
gasoline spills on your skin or cloth-
ing, immediately wash the affected
area with soap and water and
change your clothes.
EAU10371
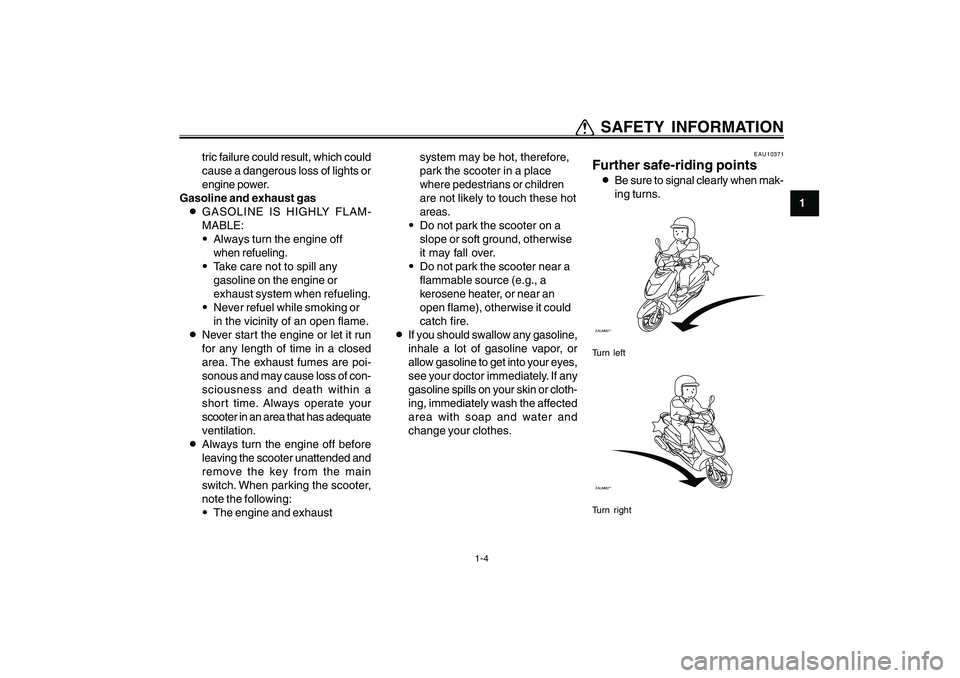
Further safe-riding points8Be sure to signal clearly when mak-
ing turns.ZAUM00**Turn leftZAUM00**Turn right
5ML-F8199-E0ch1re.pmd2003/12/12, 16:02 4
Page 14 of 76
2-1
1
2
3
4
5
6
7
8
9
DESCRIPTION
EAU10410
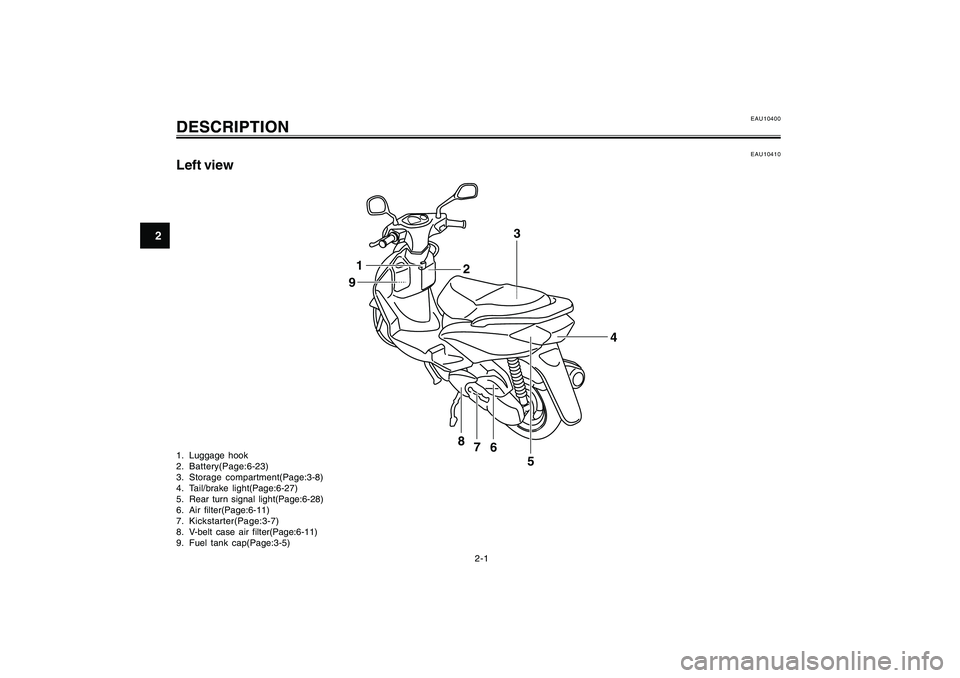
Left view
EAU10400
DESCRIPTION1. Luggage hook
2. Battery(Page:6-23)
3. Storage compartment(Page:3-8)
4. Tail/brake light(Page:6-27)
5. Rear turn signal light(Page:6-28)
6. Air filter(Page:6-11)
7. Kickstarter(Page:3-7)
8. V-belt case air filter(Page:6-11)
9. Fuel tank cap(Page:3-5)
1
23
4
5 6 7 8 9
5ML-F8199-E0ch2re.pmd2003/12/12, 16:02 1
Page 16 of 76
2-3
1
2
3
4
5
6
7
8
9
DESCRIPTION
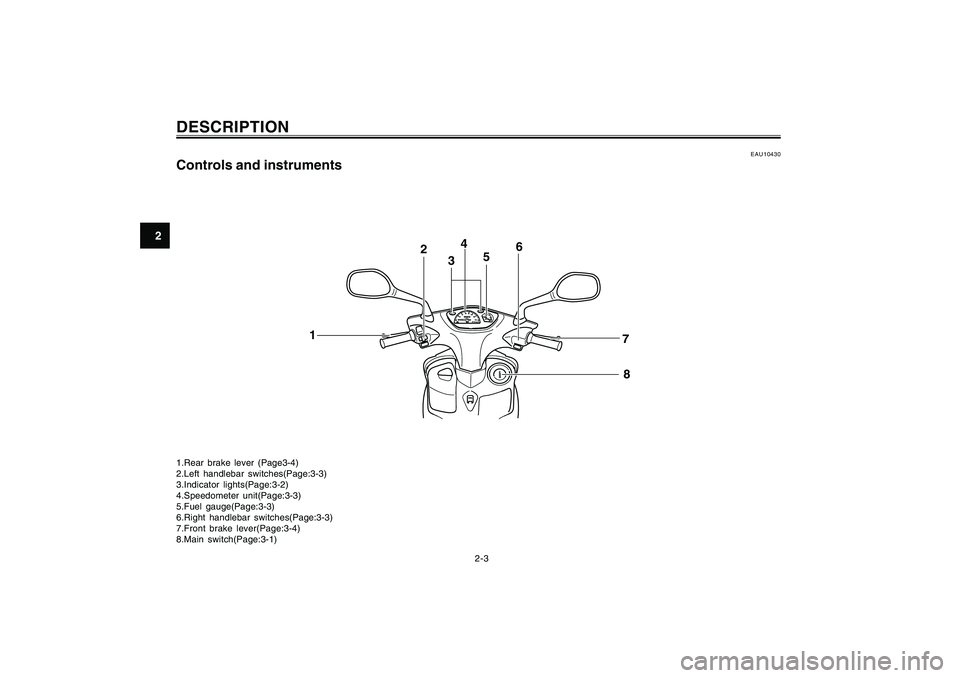
EAU10430
Controls and instruments1.Rear brake lever (Page3-4)
2.Left handlebar switches(Page:3-3)
3.Indicator lights(Page:3-2)
4.Speedometer unit(Page:3-3)
5.Fuel gauge(Page:3-3)
6.Right handlebar switches(Page:3-3)
7.Front brake lever(Page:3-4)
8.Main switch(Page:3-1)
12
34
56
7
8
5ML-F8199-E0ch2re.pmd2003/12/12, 16:02 3
Page 19 of 76
3-3
1
2
3
4
5
6
7
8
9
INSTRUMENT AND CONTROL FUNCTIONS
EAU11620
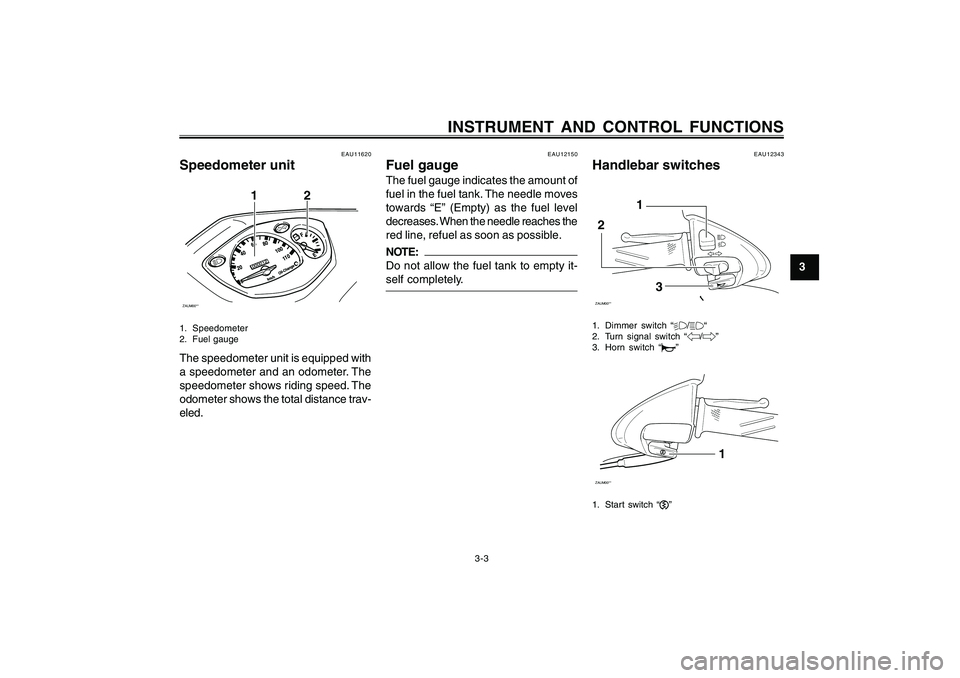
Speedometer unitZAUM00**
12
1. Speedometer
2. Fuel gaugeThe speedometer unit is equipped with
a speedometer and an odometer. The
speedometer shows riding speed. The
odometer shows the total distance trav-
eled.
EAU12150
Fuel gaugeThe fuel gauge indicates the amount of
fuel in the fuel tank. The needle moves
towards “E” (Empty) as the fuel level
decreases. When the needle reaches the
red line, refuel as soon as possible.NOTE:
Do not allow the fuel tank to empty it-
self completely.
EAU12343
Handlebar switchesZAUM00**
1
2
3
1. Dimmer switch “%/&“
2. Turn signal switch “4/6”
3. Horn switch “*”ZAUM00**
1
1. Start switch “,”
5ML-F8199-E0ch3re.pmd2003/12/12, 16:03 3
Page 21 of 76
3-5
1
2
3
4
5
6
7
8
9
INSTRUMENT AND CONTROL FUNCTIONS
EAUT1382
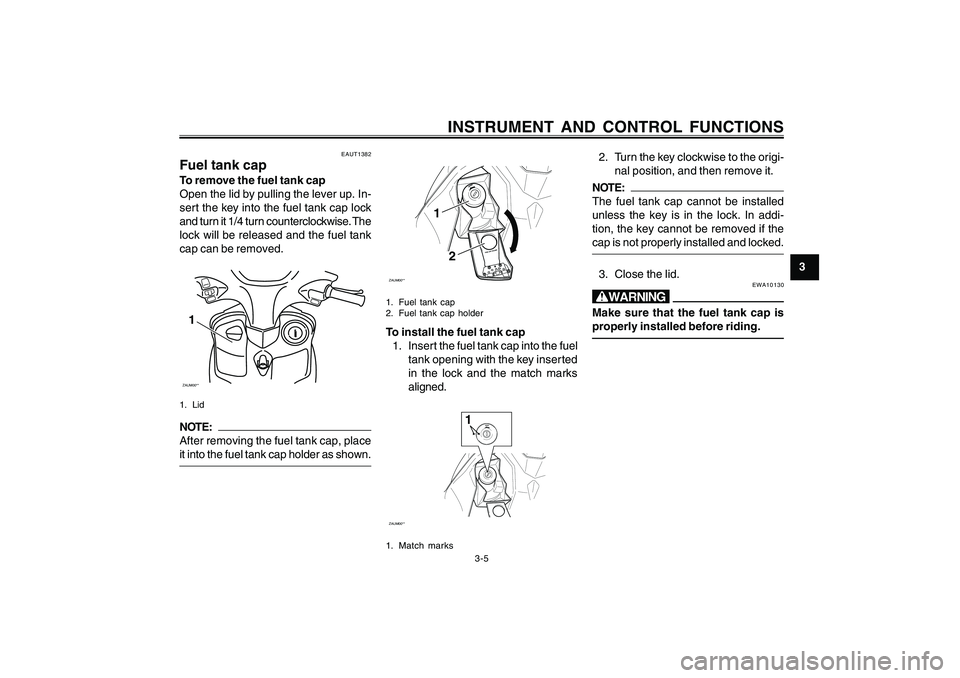
Fuel tank capTo remove the fuel tank cap
Open the lid by pulling the lever up. In-
sert the key into the fuel tank cap lock
and turn it 1/4 turn counterclockwise. The
lock will be released and the fuel tank
cap can be removed.ZAUM00**11. LidNOTE:
After removing the fuel tank cap, place
it into the fuel tank cap holder as shown.
ZAUM00**
1
2
1. Fuel tank cap
2. Fuel tank cap holderTo install the fuel tank cap
1. Insert the fuel tank cap into the fuel
tank opening with the key inserted
in the lock and the match marks
aligned.ZAUM00**
1
1. Match marks
2. Turn the key clockwise to the origi-
nal position, and then remove it.NOTE:
The fuel tank cap cannot be installed
unless the key is in the lock. In addi-
tion, the key cannot be removed if the
cap is not properly installed and locked.3. Close the lid.
EWA10130
wMake sure that the fuel tank cap is
properly installed before riding.
5ML-F8199-E0ch3re.pmd2003/12/12, 16:03 5
Page 22 of 76
3-6
1
2
3
4
5
6
7
8
9
INSTRUMENT AND CONTROL FUNCTIONS
EAU13210
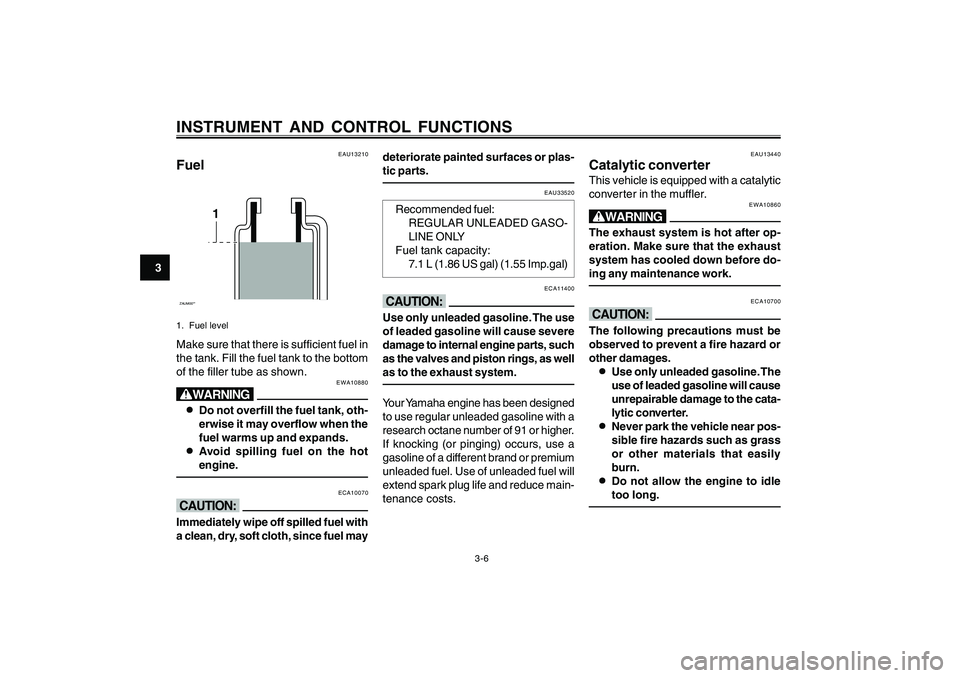
FuelZAUM00**
1
1. Fuel levelMake sure that there is sufficient fuel in
the tank. Fill the fuel tank to the bottom
of the filler tube as shown.
EWA10880
w8 88 8
8Do not overfill the fuel tank, oth-
erwise it may overflow when the
fuel warms up and expands.
8 88 8
8Avoid spilling fuel on the hot
engine.
ECA10070
cCImmediately wipe off spilled fuel with
a clean, dry, soft cloth, since fuel maydeteriorate painted surfaces or plas-
tic parts.
EAU33520
Recommended fuel:
REGULAR UNLEADED GASO-
LINE ONLY
Fuel tank capacity:
7.1 L (1.86 US gal) (1.55 Imp.gal)
ECA11400
cCUse only unleaded gasoline. The use
of leaded gasoline will cause severe
damage to internal engine parts, such
as the valves and piston rings, as well
as to the exhaust system.Your Yamaha engine has been designed
to use regular unleaded gasoline with a
research octane number of 91 or higher.
If knocking (or pinging) occurs, use a
gasoline of a different brand or premium
unleaded fuel. Use of unleaded fuel will
extend spark plug life and reduce main-
tenance costs.
EAU13440
Catalytic converterThis vehicle is equipped with a catalytic
converter in the muffler.
EWA10860
wThe exhaust system is hot after op-
eration. Make sure that the exhaust
system has cooled down before do-
ing any maintenance work.
ECA10700
cCThe following precautions must be
observed to prevent a fire hazard or
other damages.
8 88 8
8Use only unleaded gasoline. The
use of leaded gasoline will cause
unrepairable damage to the cata-
lytic converter.
8 88 8
8Never park the vehicle near pos-
sible fire hazards such as grass
or other materials that easily
burn.
8 88 8
8Do not allow the engine to idle
too long.
5ML-F8199-E0ch3re.pmd2003/12/12, 16:03 6
Page 29 of 76
4-2
1
2
3
4
5
6
7
8
9
PRE-OPERATION CHECKS
EAU15602
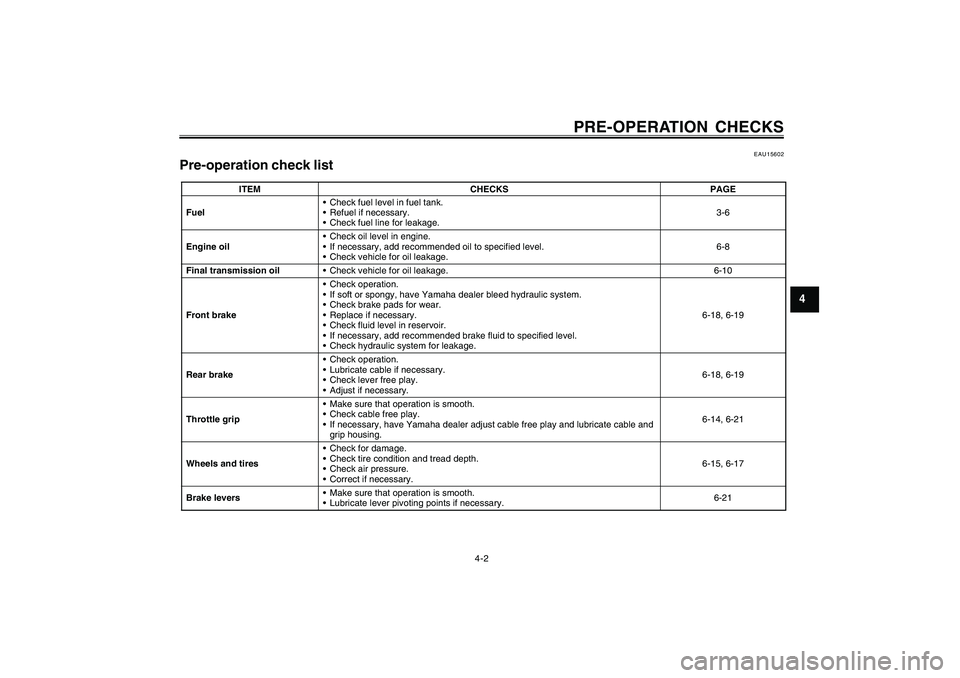
Pre-operation check list
ITEM CHECKS PAGE
Fuel Check fuel level in fuel tank.
Refuel if necessary.
Check fuel line for leakage.3-6
Engine oil Check oil level in engine.
If necessary, add recommended oil to specified level.
Check vehicle for oil leakage.6-8
Final transmission oil Check vehicle for oil leakage. 6-10
Front brake Check operation.
If soft or spongy, have Yamaha dealer bleed hydraulic system.
Check brake pads for wear.
Replace if necessary.
Check fluid level in reservoir.
If necessary, add recommended brake fluid to specified level.
Check hydraulic system for leakage.6-18, 6-19
Rear brake Check operation.
Lubricate cable if necessary.
Check lever free play.
Adjust if necessary.6-18, 6-19
Throttle grip Make sure that operation is smooth.
Check cable free play.
If necessary, have Yamaha dealer adjust cable free play and lubricate cable and
grip housing.6-14, 6-21
Wheels and tires Check for damage.
Check tire condition and tread depth.
Check air pressure.
Correct if necessary.6-15, 6-17
Brake levers Make sure that operation is smooth.
Lubricate lever pivoting points if necessary.6-21
5ML-F8199-E0ch4.pmd2003/12/12, 16:03 2
Page 33 of 76
5-3
1
2
3
4
5
6
7
8
9
OPERATION AND IMPORTANT RIDING POINTS
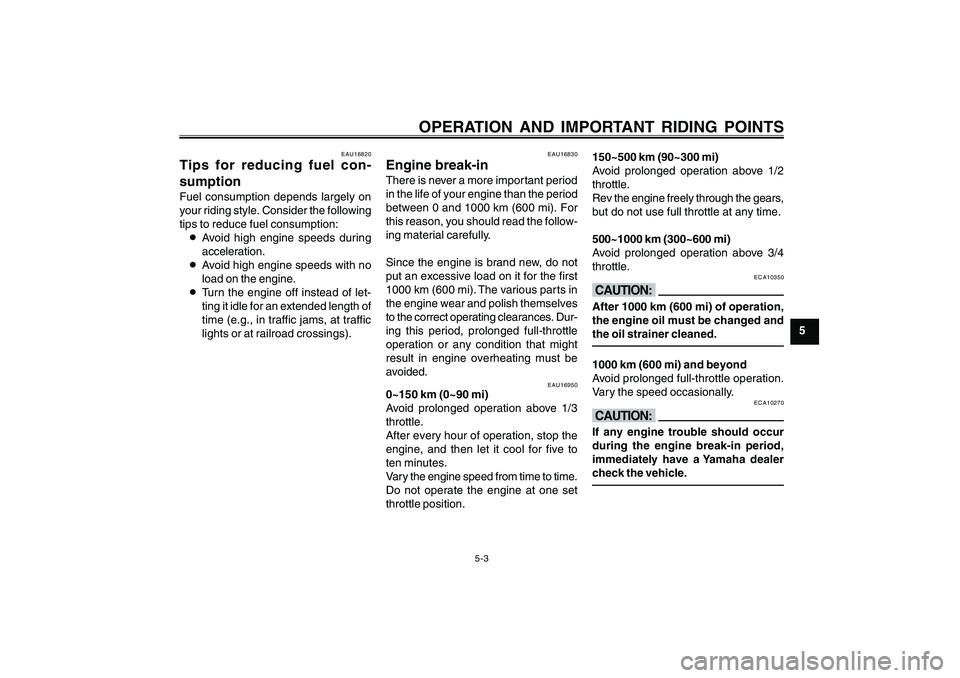
EAU16830
Engine break-inThere is never a more important period
in the life of your engine than the period
between 0 and 1000 km (600 mi). For
this reason, you should read the follow-
ing material carefully.
Since the engine is brand new, do not
put an excessive load on it for the first
1000 km (600 mi). The various parts in
the engine wear and polish themselves
to the correct operating clearances. Dur-
ing this period, prolonged full-throttle
operation or any condition that might
result in engine overheating must be
avoided.
EAU16820
Tips for reducing fuel con-
sumptionFuel consumption depends largely on
your riding style. Consider the following
tips to reduce fuel consumption:
8Avoid high engine speeds during
acceleration.
8Avoid high engine speeds with no
load on the engine.
8Turn the engine off instead of let-
ting it idle for an extended length of
time (e.g., in traffic jams, at traffic
lights or at railroad crossings).
EAU16950
0~150 km (0~90 mi)
Avoid prolonged operation above 1/3
throttle.
After every hour of operation, stop the
engine, and then let it cool for five to
ten minutes.
Vary the engine speed from time to time.
Do not operate the engine at one set
throttle position.150~500 km (90~300 mi)
Avoid prolonged operation above 1/2
throttle.
Rev the engine freely through the gears,
but do not use full throttle at any time.
500~1000 km (300~600 mi)
Avoid prolonged operation above 3/4
throttle.
ECA10350
cCAfter 1000 km (600 mi) of operation,
the engine oil must be changed and
the oil strainer cleaned.1000 km (600 mi) and beyond
Avoid prolonged full-throttle operation.
Vary the speed occasionally.
ECA10270
cCIf any engine trouble should occur
during the engine break-in period,
immediately have a Yamaha dealer
check the vehicle.
5ML-F8199-E0ch5re.pmd2003/12/12, 16:03 3
Page 37 of 76
6-3
1
2
3
4
5
6
7
8
9
PERIODIC MAINTENANCE AND MINOR REPAIR
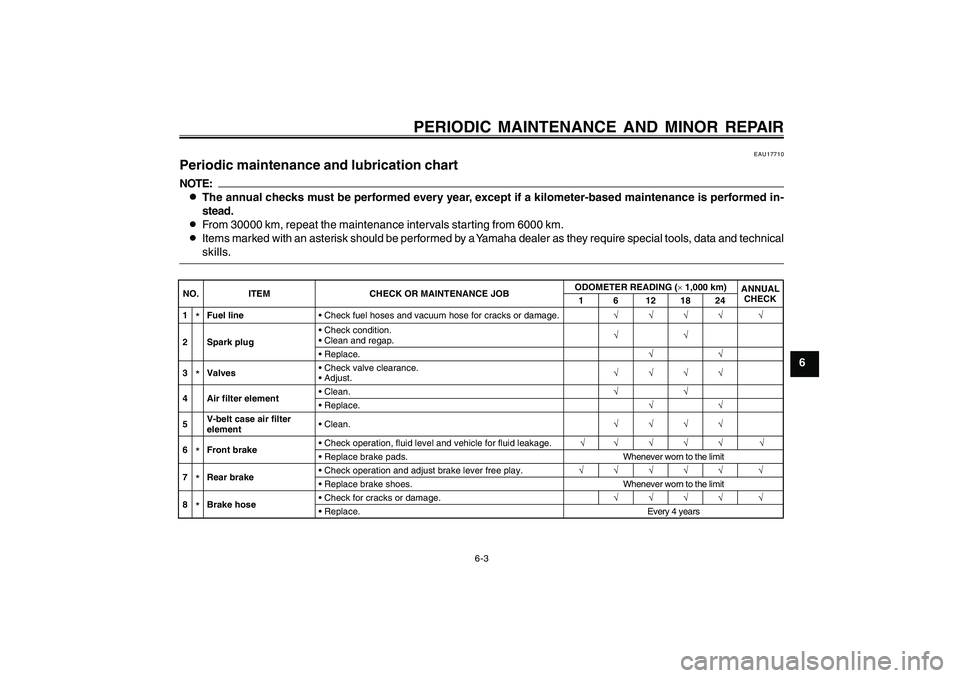
EAU17710
Periodic maintenance and lubrication chartNOTE:
8 88 8
8The annual checks must be performed every year, except if a kilometer-based maintenance is performed in-
stead.
8From 30000 km, repeat the maintenance intervals starting from 6000 km.
8Items marked with an asterisk should be performed by a Yamaha dealer as they require special tools, data and technical
skills.NO. ITEM CHECK OR MAINTENANCE JOBODOMETER READING (�u1,000 km)
ANNUAL
CHECK
1 6 12 18 24
1
*Fuel line Check fuel hoses and vacuum hose for cracks or damage.�—�—�—�— �—
2 Spark plug Check condition.
Clean and regap.�—�—
Replace.�—�—
3*Valves Check valve clearance.
Adjust.�—�—�—�—
4 Air filter element Clean.�—�—
Replace.�—�—
5V-belt case air filter
element Clean.�—�—�—�—
6*Front brake Check operation, fluid level and vehicle for fluid leakage.�—�—�—�—�— �—
Replace brake pads. Whenever worn to the limit
7*Rear brake Check operation and adjust brake lever free play.�—�—�—�—�— �—
Replace brake shoes. Whenever worn to the limit
8*Brake hose Check for cracks or damage.�—�—�—�— �—
Replace. Every 4 years
5ML-F8199-E0ch6re.pmd2003/12/12, 16:04 3