key YAMAHA CYGNUS 125 2000 Owners Manual
[x] Cancel search | Manufacturer: YAMAHA, Model Year: 2000, Model line: CYGNUS 125, Model: YAMAHA CYGNUS 125 2000Pages: 76, PDF Size: 1.3 MB
Page 4 of 76
1
2
3
4
5
6
7
8
9
EAU10120
IMPORTANT MANUAL INFORMATION
EAU34110
Particularly important information is distinguished in this manual by the following notations:
The Safety Alert Symbol means ATTENTION! BECOME ALERT! YOUR SAFETY IS INVOLVED!
Failure to follow WARNING instructions
could result in se
vere injur
y or death to the scooter
operator, a bystander, or a person inspecting or repairing the scooter.
A CAUTION indicates special precautions that must be taken to avoid damage to the scooter.
A NOTE provides key information to make procedures easier or clearer.
NOTE:
8This manual should be considered a permanent part of this scooter and should remain with it even if the scooter is
subsequently sold.
8Yamaha continually seeks advancements in product design and quality. Therefore, while this manual contains the most
current product information available at the time of printing, there may be minor discrepancies between your scooter and
this manual. If you have any questions concerning this manual, please consult your Yamaha dealer.
EWA12410
wPLEASE READ THIS MANUAL CAREFULLY AND COMPLETELY BEFORE OPERATING THIS SCOOTER.
w
cCNOTE:Q QQ Q
Q
5ML-F8199-E0ch0.pmd2003/12/12, 16:02 3
Page 11 of 76
1-4
1
2
3
4
5
6
7
8
9
Q QQ Q
Q SAFETY INFORMATION
tric failure could result, which could
cause a dangerous loss of lights or
engine power.
Gasoline and exhaust gas
8GASOLINE IS HIGHLY FLAM-
MABLE:
9Always turn the engine off
when refueling.
9Take care not to spill any
gasoline on the engine or
exhaust system when refueling.
9Never refuel while smoking or
in the vicinity of an open flame.
8Never start the engine or let it run
for any length of time in a closed
area. The exhaust fumes are poi-
sonous and may cause loss of con-
sciousness and death within a
short time. Always operate your
scooter in an area that has adequate
ventilation.
8Always turn the engine off before
leaving the scooter unattended and
remove the key from the main
switch. When parking the scooter,
note the following:
9The engine and exhaustsystem may be hot, therefore,
park the scooter in a place
where pedestrians or children
are not likely to touch these hot
areas.
9Do not park the scooter on a
slope or soft ground, otherwise
it may fall over.
9Do not park the scooter near a
flammable source (e.g., a
kerosene heater, or near an
open flame), otherwise it could
catch fire.
8If you should swallow any gasoline,
inhale a lot of gasoline vapor, or
allow gasoline to get into your eyes,
see your doctor immediately. If any
gasoline spills on your skin or cloth-
ing, immediately wash the affected
area with soap and water and
change your clothes.
EAU10371
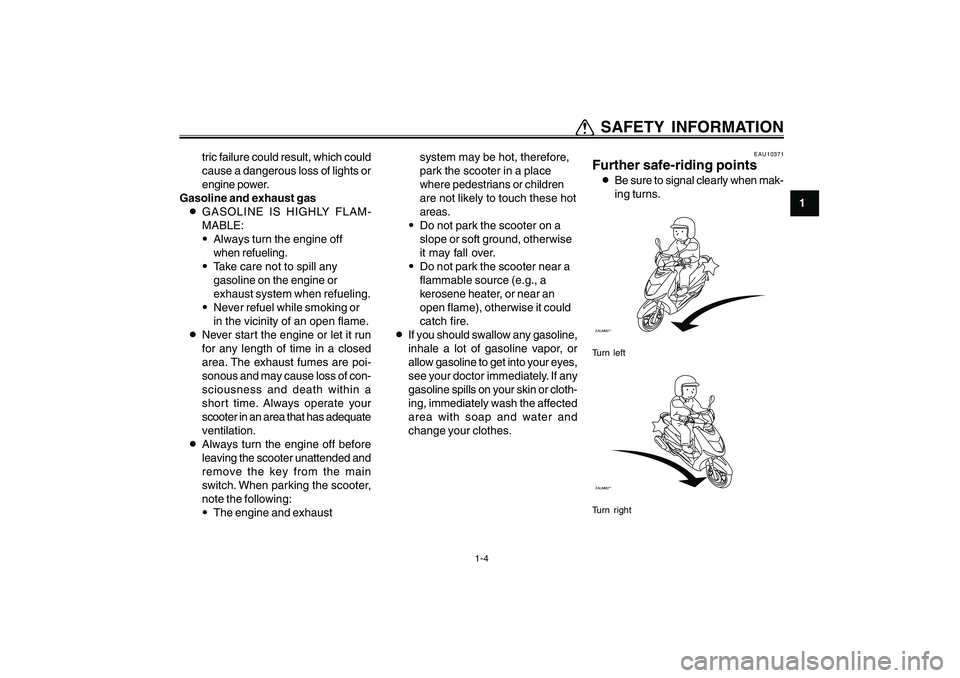
Further safe-riding points8Be sure to signal clearly when mak-
ing turns.ZAUM00**Turn leftZAUM00**Turn right
5ML-F8199-E0ch1re.pmd2003/12/12, 16:02 4
Page 17 of 76
3-1
1
2
3
4
5
6
7
8
9
INSTRUMENT AND CONTROL FUNCTIONS
EAU10460
Main switch/steering lockZAUM00**
OFFON
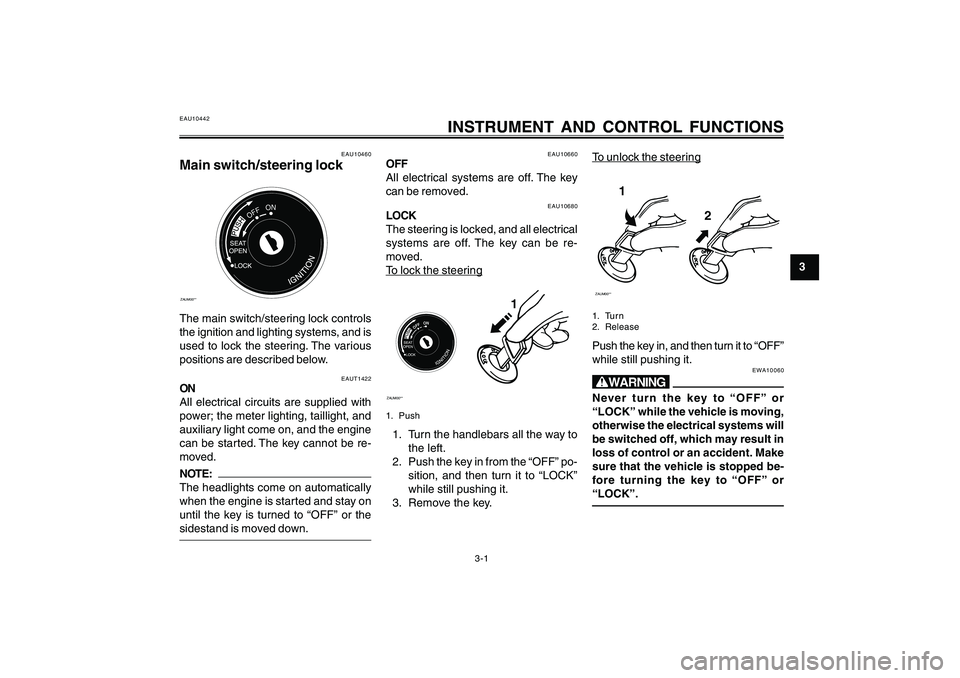
The main switch/steering lock controls
the ignition and lighting systems, and is
used to lock the steering. The various
positions are described below.
EAU10660
OFF
All electrical systems are off. The key
can be removed.
EAU10442
INSTRUMENT AND CONTROL FUNCTIONS
EAUT1422
ON
All electrical circuits are supplied with
power; the meter lighting, taillight, and
auxiliary light come on, and the engine
can be started. The key cannot be re-
moved.NOTE:
The headlights come on automatically
when the engine is started and stay on
until the key is turned to “OFF” or the
sidestand is moved down.
EAU10680
LOCK
The steering is locked, and all electrical
systems are off. The key can be re-
moved.To loc
k the steer
ing
ZAUM00**
OFFON
1
1. Push1. Turn the handlebars all the way to
the left.
2. Push the key in from the “OFF” po-
sition, and then turn it to “LOCK”
while still pushing it.
3. Remove the key.
To unloc
k the steer
ing
1
2
ZAUM00**1. Tur n
2. ReleasePush the key in, and then turn it to “OFF”
while still pushing it.
EWA10060
wNever turn the key to “OFF” or
“LOCK” while the vehicle is moving,
otherwise the electrical systems will
be switched off, which may result in
loss of control or an accident. Make
sure that the vehicle is stopped be-
fore turning the key to “OFF” or
“LOCK”.
5ML-F8199-E0ch3re.pmd2003/12/12, 16:03 1
Page 21 of 76
3-5
1
2
3
4
5
6
7
8
9
INSTRUMENT AND CONTROL FUNCTIONS
EAUT1382
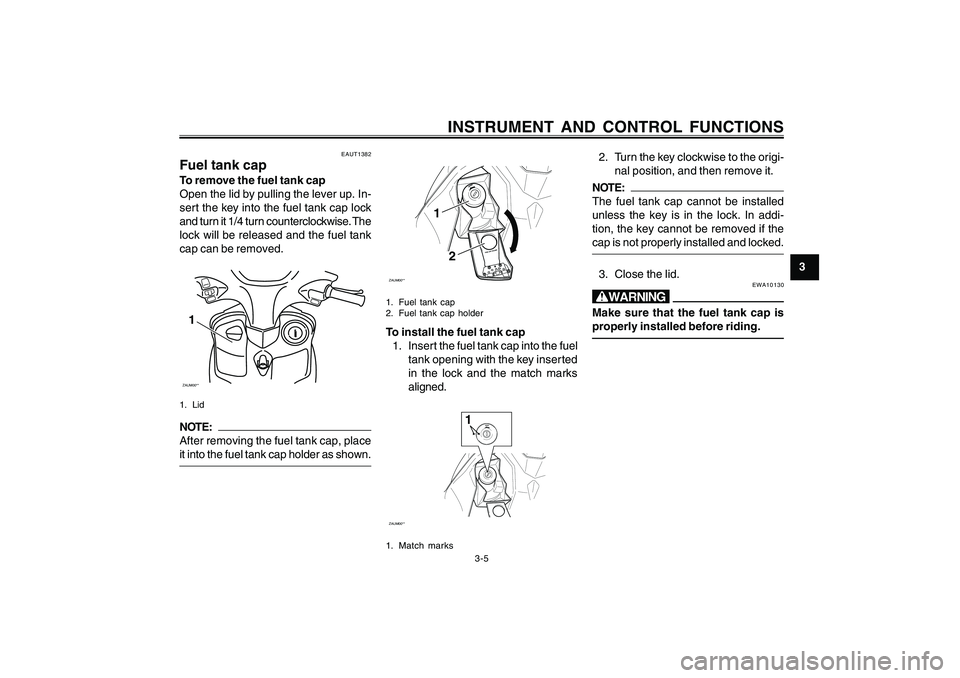
Fuel tank capTo remove the fuel tank cap
Open the lid by pulling the lever up. In-
sert the key into the fuel tank cap lock
and turn it 1/4 turn counterclockwise. The
lock will be released and the fuel tank
cap can be removed.ZAUM00**11. LidNOTE:
After removing the fuel tank cap, place
it into the fuel tank cap holder as shown.
ZAUM00**
1
2
1. Fuel tank cap
2. Fuel tank cap holderTo install the fuel tank cap
1. Insert the fuel tank cap into the fuel
tank opening with the key inserted
in the lock and the match marks
aligned.ZAUM00**
1
1. Match marks
2. Turn the key clockwise to the origi-
nal position, and then remove it.NOTE:
The fuel tank cap cannot be installed
unless the key is in the lock. In addi-
tion, the key cannot be removed if the
cap is not properly installed and locked.3. Close the lid.
EWA10130
wMake sure that the fuel tank cap is
properly installed before riding.
5ML-F8199-E0ch3re.pmd2003/12/12, 16:03 5
Page 23 of 76
3-7
1
2
3
4
5
6
7
8
9
INSTRUMENT AND CONTROL FUNCTIONS
EAU13680
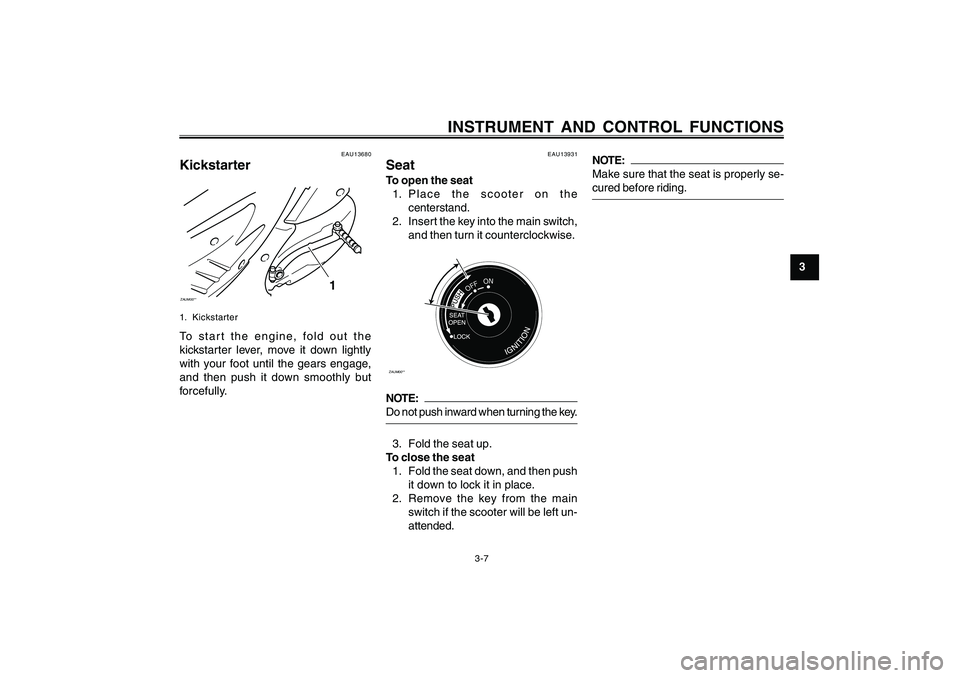
KickstarterZAUM00**
1
1. KickstarterTo start the engine, fold out the
kickstarter lever, move it down lightly
with your foot until the gears engage,
and then push it down smoothly but
forcefully.
EAU13931
SeatTo open the seat
1. Place the scooter on the
centerstand.
2. Insert the key into the main switch,
and then turn it counterclockwise.ZAUM00**
OFFON
NOTE:
Do not push inward when turning the key.3. Fold the seat up.
To close the seat
1. Fold the seat down, and then push
it down to lock it in place.
2. Remove the key from the main
switch if the scooter will be left un-
attended.
NOTE:
Make sure that the seat is properly se-
cured before riding.
5ML-F8199-E0ch3re.pmd2003/12/12, 16:03 7
Page 27 of 76
3-11
1
2
3
4
5
6
7
8
9
INSTRUMENT AND CONTROL FUNCTIONS
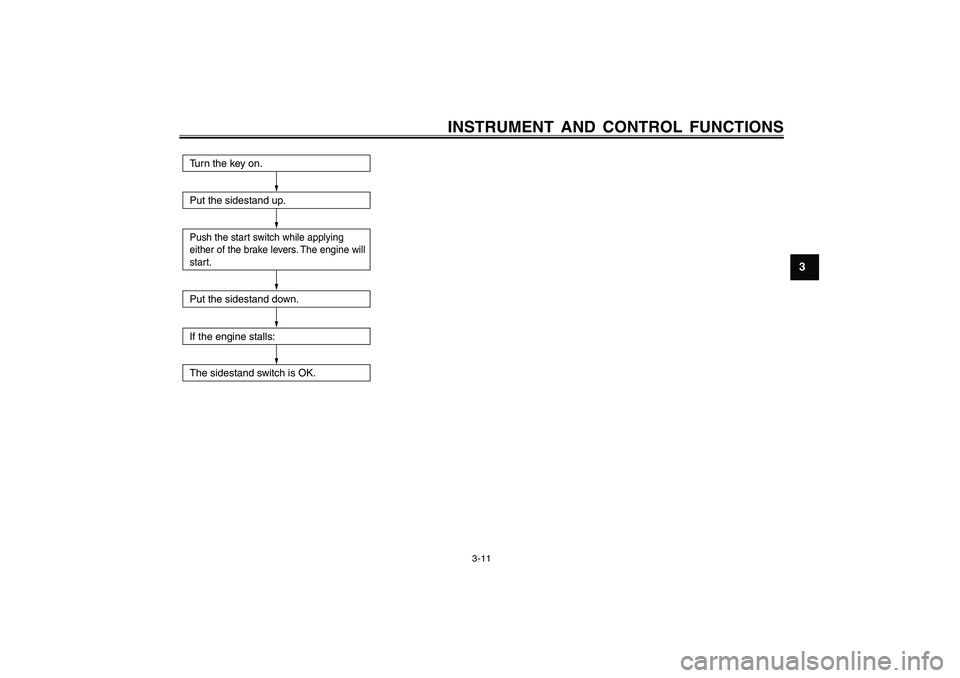
Turn the key on.
Put the sidestand up.Push the start switch while applying
either of the brake levers. The engine will
start.Put the sidestand down.
If the engine stalls:
The sidestand switch is OK.
5ML-F8199-E0ch3re.pmd2003/12/12, 16:03 11
Page 31 of 76
5-1
1
2
3
4
5
6
7
8
9
OPERATION AND IMPORTANT RIDING POINTS
EAU15980
EWA10870
w8 88 8
8Become thoroughly familiar with
all operating controls and their
functions before riding. Consult
a Yamaha dealer regarding any
control or function that you do
not thoroughly understand.
8 88 8
8Never start the engine or operate
it in a closed area for any length
of time. Exhaust fumes are poi-
sonous, and inhaling them can
cause loss of consciousness and
death within a short time. Always
make sure that there is adequate
ventilation.
8 88 8
8For safety, always start the engine
with the centerstand down.EAU15940
OPERATION AND IMPORTANT RIDING POINTS
EAUT1100
Starting a cold engine
ECA10250
cCSee page 5-3 for engine break-in in-
structions prior to operating the ve-
hicle for the first time.1. Turn the key to “ON”.
2. Close the throttle grip completely.
3. Start the engine by pushing the
star t switch or by kicking the
kickstarter, while applying the front
or rear brake.NOTE:
If the engine fails to start by pushing
the start switch, release the switch, wait
a few seconds, and then try again. Each
starting attempt should be as short as
possible to preserve the battery. Do not
crank the engine more than 5 seconds
on any one attempt. If the engine does
not start with the starter motor, try us-
ing the kickstarter.
ECA11040
cCFor maximum engine life, never ac-
celerate hard when the engine is cold!
5ML-F8199-E0ch5re.pmd2003/12/12, 16:03 1
Page 34 of 76
5-4
1
2
3
4
5
6
7
8
9
OPERATION AND IMPORTANT RIDING POINTS
EAU17211
ParkingWhen parking, stop the engine, and then
remove the key from the main switch.
EWA10310
w8 88 8
8Since the engine and exhaust
system can become very hot,
park in a place where pedestri-
ans or children are not likely to
touch them.
8 88 8
8Do not park on a slope or on soft
ground, otherwise the vehicle
may overturn.
ECA10380
cCNever park in an area where there are
fire hazards such as grass or other
flammable materials.
5ML-F8199-E0ch5re.pmd2003/12/12, 16:03 4
Page 59 of 76

6-25
1
2
3
4
5
6
7
8
9
PERIODIC MAINTENANCE AND MINOR REPAIR
ZAUM00**
1
1. BatteryTo install the battery
1. Connect the battery couplers, and
then place the battery in the origi-
nal position.
2. Install the battery holder bracket by
installing the bolt.
3. Install the panel by installing the
screw.
4. Fully charge the battery before in-
stallation.
EAUT1431
Replacing the fusesThe main fuse box is located behind
panel B. (See page 6-6.)ZAUM00**
1
1. Main fuseThe fuse block, which contains the fuses
for the individual circuits, is located in
the storage compartment. (See page 3-
8.)
ZAUM00**
1
2
3
4
5
6
1. Lid
2. Fuse box
3. Carburetor heater fuse
4. Ignition fuse
5. Headlight fuse
6. Signaling system fuseIf a fuse is blown, replace it as follows.
1. Turn the key to “OFF” and turn off
the electrical circuit in question.
2. Remove the blown fuse, and then
install a new fuse of the specified
amperage.
5ML-F8199-E0ch6re.pmd2003/12/12, 16:04 25
Page 60 of 76

6-26
1
2
3
4
5
6
7
8
9
PERIODIC MAINTENANCE AND MINOR REPAIR
Specified fuses:
Main fuse:
30 A
Headlight fuse:
15 A
Signaling system fuse:
15 A
Ignition fuse:
7.5 A
Carburetor heater fuse:
7.5 A
ECA10640
cCDo not use a fuse of a higher amper-
age rating than recommended to
avoid causing extensive damage to
the electrical system and possibly a
fire.3. Turn the key to “ON” and turn on
the electrical circuit in question to
check if the device operates.
4. If the fuse immediately blows again,
have a Yamaha dealer check the
electrical system.
EAU23710
Replacing a headlight bulbThis model is equipped with quartz bulb
headlights. If a headlight bulb burns out,
replace it as follows.
1. Place the vehicle on the
centerstand.
2. Remove panel B. (See page 6-6.)
3. Disconnect the headlight coupler,
and then remove the bulb cover.ZAUM00**
1
1. Bulb cover4. Unhook the headlight bulb holder,
and then remove the defective bulb.
ZAUM00**
1
1. Headlight bulb holder
EWA10790
wHeadlight bulbs get very hot. There-
fore, keep flammable products away
from a lit headlight bulb, and do not
touch the bulb until it has cooled
down.5. Place a new headlight bulb into po-
sition, and then secure it with the
bulb holder.
ECA10660
cCDo not touch the glass part of the
headlight bulb to keep it free from oil,
otherwise the transparency of the
glass, the luminosity of the bulb, and
5ML-F8199-E0ch6re.pmd2003/12/12, 16:04 26