oil YAMAHA CYGNUS L 2012 User Guide
[x] Cancel search | Manufacturer: YAMAHA, Model Year: 2012, Model line: CYGNUS L, Model: YAMAHA CYGNUS L 2012Pages: 76, PDF Size: 1.56 MB
Page 49 of 76
PERIODIC MAINTENANCE AND ADJUSTMENT
6-14
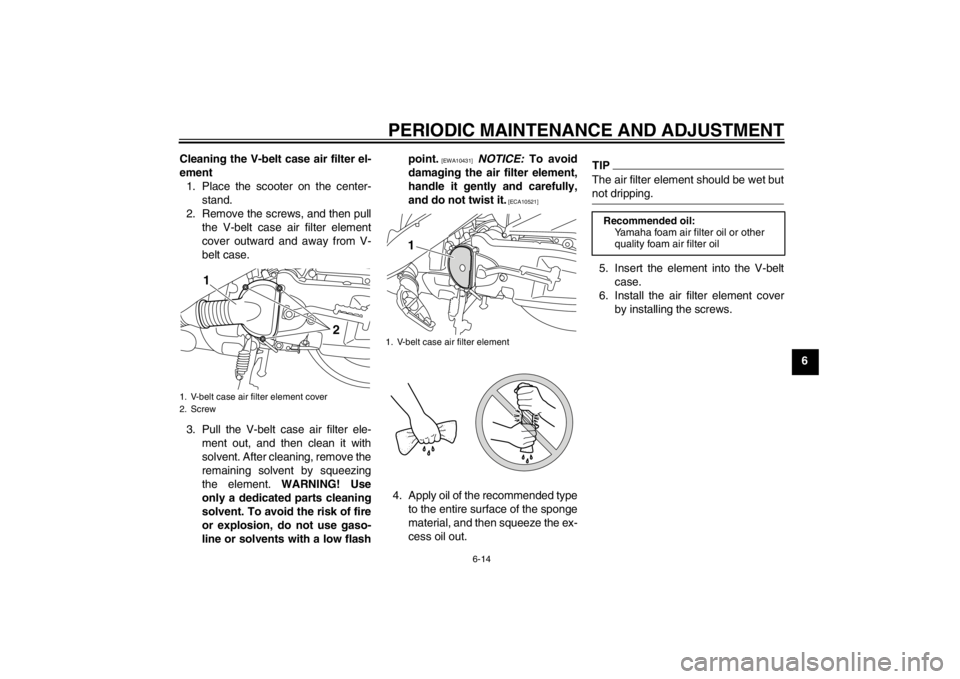
6 Cleaning the V-belt case air filter el-
ement
1. Place the scooter on the center-
stand.
2. Remove the screws, and then pull
the V-belt case air filter element
cover outward and away from V-
belt case.
3. Pull the V-belt case air filter ele-
ment out, and then clean it with
solvent. After cleaning, remove the
remaining solvent by squeezing
the element. WARNING! Use
only a dedicated parts cleaning
solvent. To avoid the risk of fire
or explosion, do not use gaso-
line or solvents with a low flashpoint.
[EWA10431]
NOTICE: To avoid
damaging the air filter element,
handle it gently and carefully,
and do not twist it.
[ECA10521]
4. Apply oil of the recommended type
to the entire surface of the sponge
material, and then squeeze the ex-
cess oil out.
TIPThe air filter element should be wet but
not dripping.5. Insert the element into the V-belt
case.
6. Install the air filter element cover
by installing the screws.
1. V-belt case air filter element cover
2. Screw
1
2
1. V-belt case air filter element
1
Recommended oil:
Yamaha foam air filter oil or other
quality foam air filter oil
U1RSE0E0.book Page 14 Tuesday, October 18, 2011 8:56 AM
Page 55 of 76

PERIODIC MAINTENANCE AND ADJUSTMENT
6-20
6
EAU37002
Checking the brake fluid level Before riding, check that the brake fluid
is above the minimum level mark.
Check the brake fluid level with the top
of the reservoir level. Replenish the
brake fluid if necessary.
WARNING
EWA15980
Improper maintenance can result in
loss of braking ability. Observe
these precautions:
●
Insufficient brake fluid may al-
low air to enter the brake sys-
tem, reducing braking
performance.
●
Clean the filler cap before re-
moving. Use only DOT 3 or DOT
4 brake fluid from a sealed con-
tainer.
●
Use only the specified brake flu-
id; otherwise, the rubber seals
may deteriorate, causing leak-
age.
●
Refill with the same type of
brake fluid. Adding a brake fluid
other than DOT 3 or DOT 4 may
result in a harmful chemical re-
action.
●
Be careful that water does not
enter the brake fluid reservoir
when refilling. Water will signifi-
cantly lower the boiling point of
the fluid and may result in vapor
lock.
NOTICE
ECA17640
Brake fluid may damage painted sur-
faces or plastic parts. Always clean
up spilled fluid immediately.
As the brake pads wear, it is normal for
the brake fluid level to gradually go
down. A low brake fluid level may indi-
cate worn brake pads and/or brake sys-
tem leakage; therefore, be sure to
check the brake pads for wear and the
brake system for leakage. If the brake
fluid level goes down suddenly, have a
Yamaha dealer check the cause before
further riding.
1. Minimum level markSpecified brake fluid:
DOT 3 or DOT 4
1
U1RSE0E0.book Page 20 Tuesday, October 18, 2011 8:56 AM
Page 56 of 76

PERIODIC MAINTENANCE AND ADJUSTMENT
6-21
6
EAU22721
Changing the brake fluid Have a Yamaha dealer change the
brake fluid at the intervals specified in
the TIP after the periodic maintenance
and lubrication chart. In addition, have
the oil seals of the brake master cylin-
der and caliper as well as the brake
hose replaced at the intervals listed be-
low or whenever they are damaged or
leaking.●
Oil seals: Replace every two
years.
●
Brake hose: Replace every four
years.
EAU23095
Checking and lubricating the
cables The operation of all control cables and
the condition of the cables should be
checked before each ride, and the ca-
bles and cable ends should be lubricat-
ed if necessary. If a cable is damaged
or does not move smoothly, have a
Yamaha dealer check or replace it.
WARNING! Damage to the outer
housing of cables may result in in-
ternal rusting and cause interfer-
ence with cable movement. Replace
damaged cables as soon as possi-
ble to prevent unsafe conditions.[EWA10711]EAU23114
Checking and lubricating the
throttle grip and cable The operation of the throttle grip should
be checked before each ride. In addi-
tion, the cable should be lubricated by a
Yamaha dealer at the intervals speci-
fied in the periodic maintenance chart.
The throttle cable is equipped with a
rubber cover. Make sure that the cover
is securely installed. Even though the
cover is installed correctly, it does not
completely protect the cable from water
entry. Therefore, use care not to pour
water directly onto the cover or cable
when washing the vehicle. If the cable
or cover becomes dirty, wipe clean with
a moist cloth.
Recommended lubricant:
Yamaha Chain and Cable Lube or
engine oil
U1RSE0E0.book Page 21 Tuesday, October 18, 2011 8:56 AM
Page 58 of 76

PERIODIC MAINTENANCE AND ADJUSTMENT
6-23
6
EAU51950
Checking the front fork The condition and operation of the front
fork must be checked as follows at the
intervals specified in the periodic main-
tenance and lubrication chart.
To check the condition
Check the front fork for damage and ex-
cessive oil leakage.
To check the operation
1. Place the vehicle on a level sur-
face and hold it in an upright posi-
tion. WARNING! To avoid injury,
securely support the vehicle so
there is no danger of it falling
over.
[EWA10751]
2. While applying the front brake,
push down hard on the handlebars
several times to check if the front
fork compresses and rebounds
smoothly.
NOTICE
ECA10590
If any damage is found or the front
fork does not operate smoothly,
have a Yamaha dealer check or re-
pair it.
Recommended lubricant:
Lithium-soap-based grease
U1RSE0E0.book Page 23 Tuesday, October 18, 2011 8:56 AM
Page 61 of 76
PERIODIC MAINTENANCE AND ADJUSTMENT
6-26
6
EAU23503
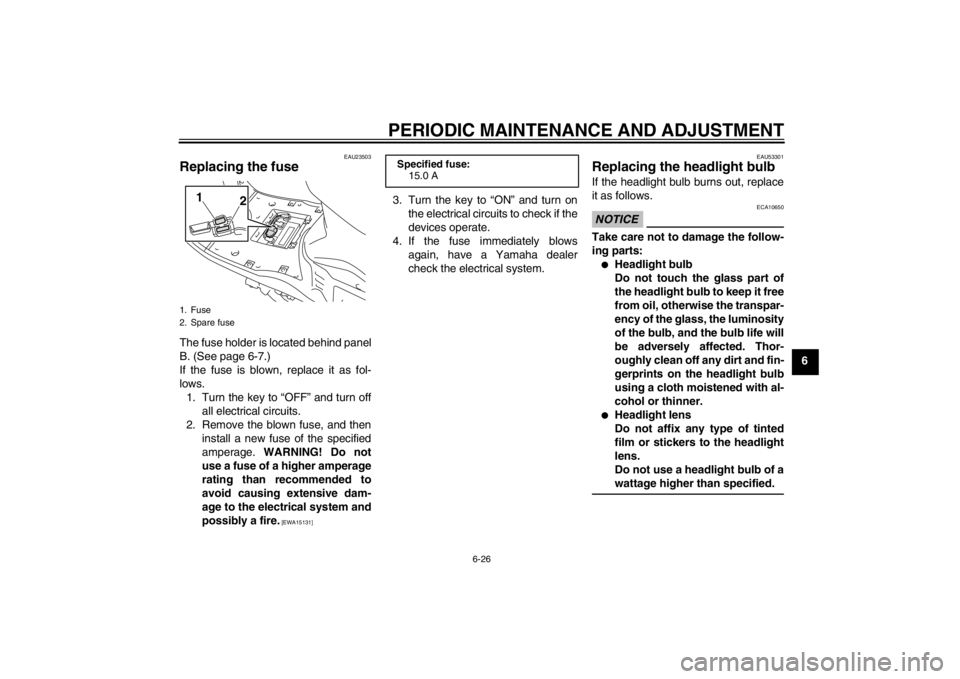
Replacing the fuse The fuse holder is located behind panel
B. (See page 6-7.)
If the fuse is blown, replace it as fol-
lows.
1. Turn the key to “OFF” and turn off
all electrical circuits.
2. Remove the blown fuse, and then
install a new fuse of the specified
amperage. WARNING! Do not
use a fuse of a higher amperage
rating than recommended to
avoid causing extensive dam-
age to the electrical system and
possibly a fire.
[EWA15131]
3. Turn the key to “ON” and turn on
the electrical circuits to check if the
devices operate.
4. If the fuse immediately blows
again, have a Yamaha dealer
check the electrical system.
EAU53301
Replacing the headlight bulb If the headlight bulb burns out, replace
it as follows.NOTICE
ECA10650
Take care not to damage the follow-
ing parts:●
Headlight bulb
Do not touch the glass part of
the headlight bulb to keep it free
from oil, otherwise the transpar-
ency of the glass, the luminosity
of the bulb, and the bulb life will
be adversely affected. Thor-
oughly clean off any dirt and fin-
gerprints on the headlight bulb
using a cloth moistened with al-
cohol or thinner.
●
Headlight lens
Do not affix any type of tinted
film or stickers to the headlight
lens.
Do not use a headlight bulb of a
wattage higher than specified.
1. Fuse
2. Spare fuse
1
2
Specified fuse:
15.0 A
U1RSE0E0.book Page 26 Tuesday, October 18, 2011 8:56 AM
Page 66 of 76
SCOOTER CARE AND STORAGE
7-1
7
EAU37833
Matte color caution NOTICE
ECA15192
Some models are equipped with
matte colored finished parts. Be
sure to consult a Yamaha dealer for
advice on what products to use be-
fore cleaning the vehicle. Using a
brush, harsh chemical products or
cleaning compounds when cleaning
these parts will scratch or damage
their surface. Wax also should not
be applied to any matte colored fin-
ished parts.
EAU26094
Care While the open design of a scooter re-
veals the attractiveness of the technol-
ogy, it also makes it more vulnerable.
Rust and corrosion can develop even if
high-quality components are used. A
rusty exhaust pipe may go unnoticed
on a car, however, it detracts from the
overall appearance of a scooter. Fre-
quent and proper care does not only
comply with the terms of the warranty,
but it will also keep your scooter looking
good, extend its life and optimize its
performance.
Before cleaning
1. Cover the muffler outlet with a
plastic bag after the engine has
cooled down.
2. Make sure that all caps and covers
as well as all electrical couplers
and connectors, including the
spark plug cap, are tightly in-
stalled.
3. Remove extremely stubborn dirt,
like oil burnt onto the crankcase,
with a degreasing agent and a
brush, but never apply such prod-ucts onto seals, gaskets and wheel
axles. Always rinse the dirt and de-
greaser off with water.
Cleaning
NOTICE
ECA10783
●
Avoid using strong acidic wheel
cleaners, especially on spoked
wheels. If such products are
used on hard-to-remove dirt, do
not leave the cleaner on the af-
fected area any longer than in-
structed. Also, thoroughly rinse
the area off with water, immedi-
ately dry it, and then apply a cor-
rosion protection spray.
●
Improper cleaning can damage
plastic parts (such as cowlings,
panels, windshields, headlight
lenses, meter lenses, etc.) and
the mufflers. Use only a soft,
clean cloth or sponge with wa-
ter to clean plastic. However, if
the plastic parts cannot be thor-
oughly cleaned with water, di-
luted mild detergent with water
may be used. Be sure to rinse
U1RSE0E0.book Page 1 Tuesday, October 18, 2011 8:56 AM
Page 68 of 76
SCOOTER CARE AND STORAGE
7-3
73. To prevent corrosion, it is recom-
mended to apply a corrosion pro-
tection spray on all metal,
including chrome- and nickel-plat-
ed, surfaces.
4. Use spray oil as a universal clean-
er to remove any remaining dirt.
5. Touch up minor paint damage
caused by stones, etc.
6. Wax all painted surfaces.
7. Let the scooter dry completely be-
fore storing or covering it.
WARNING
EWA10942
Contaminants on the brakes or tires
can cause loss of control.●
Make sure that there is no oil or
wax on the brakes or tires. If
necessary, clean the brake
discs and brake linings with a
regular brake disc cleaner or ac-
etone, and wash the tires with
warm water and a mild deter-
gent.
●
Before operating the scooter
test its braking performance
and cornering behavior.
NOTICE
ECA10800
●
Apply spray oil and wax spar-
ingly and make sure to wipe off
any excess.
●
Never apply oil or wax to any
rubber and plastic parts, but
treat them with a suitable care
product.
●
Avoid using abrasive polishing
compounds as they will wear
away the paint.
TIP●
Consult a Yamaha dealer for ad-
vice on what products to use.
●
Washing, rainy weather or humid
climates can cause the headlight
lens to fog. Turning the headlight
on for a short period of time will
help remove the moisture from the
lens.
EAU26303
Storage Short-term
Always store your scooter in a cool, dry
place and, if necessary, protect it
against dust with a porous cover. Be
sure the engine and the exhaust sys-
tem are cool before covering the scoot-
er.NOTICE
ECA10820
●
Storing the scooter in a poorly
ventilated room or covering it
with a tarp, while it is still wet,
will allow water and humidity to
seep in and cause rust.
●
To prevent corrosion, avoid
damp cellars, stables (because
of the presence of ammonia)
and areas where strong chemi-
cals are stored.
Long-term
Before storing your scooter for several
months:
1. Follow all the instructions in the
“Care” section of this chapter.
U1RSE0E0.book Page 3 Tuesday, October 18, 2011 8:56 AM
Page 69 of 76

SCOOTER CARE AND STORAGE
7-4
7 2. Drain the carburetor float chamber
by loosening the drain bolt; this will
prevent fuel deposits from building
up. Pour the drained fuel into the
fuel tank.
3. Fill up the fuel tank and add fuel
stabilizer (if available) to prevent
the fuel tank from rusting and the
fuel from deteriorating.
4. Perform the following steps to pro-
tect the cylinder, piston rings, etc.
from corrosion.
a. Remove the spark plug cap
and spark plug.
b. Pour a teaspoonful of engine oil
into the spark plug bore.
c. Install the spark plug cap onto
the spark plug, and then place
the spark plug on the cylinder
head so that the electrodes are
grounded. (This will limit spark-
ing during the next step.)
d. Turn the engine over several
times with the starter. (This will
coat the cylinder wall with oil.)
WARNING! To prevent dam-
age or injury from sparking,
make sure to ground thespark plug electrodes while
turning the engine over.
[EWA10951]
e. Remove the spark plug cap
from the spark plug, and then
install the spark plug and the
spark plug cap.
5. Lubricate all control cables and the
pivoting points of all levers and
pedals as well as of the side-
stand/centerstand.
6. Check and, if necessary, correct
the tire air pressure, and then lift
the scooter so that both of its
wheels are off the ground. Alterna-
tively, turn the wheels a little every
month in order to prevent the tires
from becoming degraded in one
spot.
7. Cover the muffler outlet with a
plastic bag to prevent moisture
from entering it.
8. Remove the battery and fully
charge it. Store it in a cool, dry
place and charge it once a month.
Do not store the battery in an ex-
cessively cold or warm place [less
than 0 °C (30 °F) or more than 30°C (90 °F)]. For more information
on storing the battery, see page
6-24.
TIPMake any necessary repairs before
storing the scooter.
U1RSE0E0.book Page 4 Tuesday, October 18, 2011 8:56 AM
Page 70 of 76
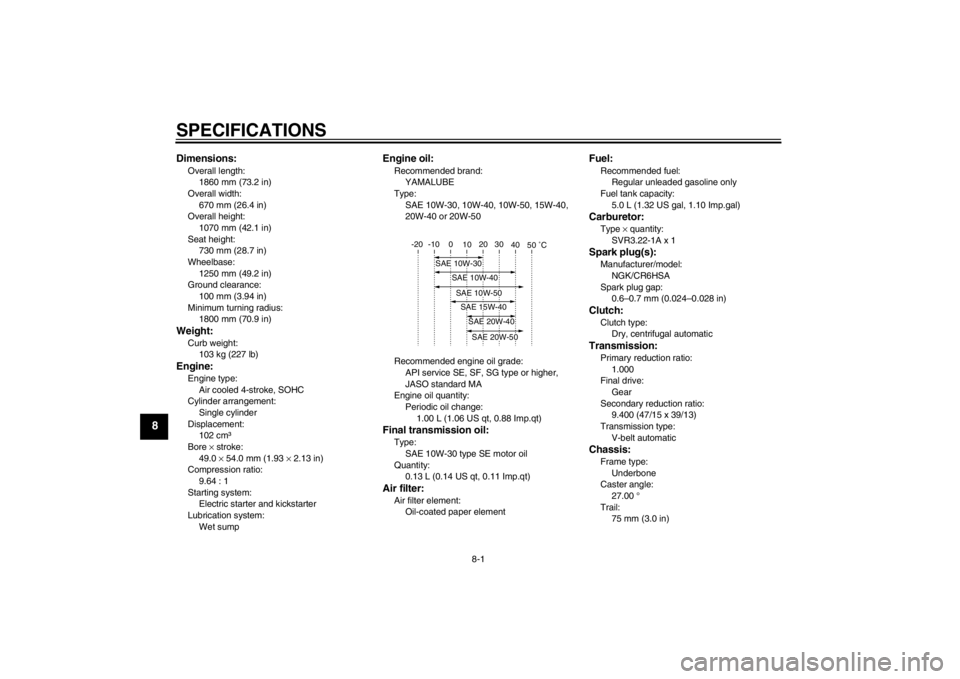
SPECIFICATIONS
8-1
8
Dimensions:Overall length:
1860 mm (73.2 in)
Overall width:
670 mm (26.4 in)
Overall height:
1070 mm (42.1 in)
Seat height:
730 mm (28.7 in)
Wheelbase:
1250 mm (49.2 in)
Ground clearance:
100 mm (3.94 in)
Minimum turning radius:
1800 mm (70.9 in)Weight:Curb weight:
103 kg (227 lb)Engine:Engine type:
Air cooled 4-stroke, SOHC
Cylinder arrangement:
Single cylinder
Displacement:
102 cm³
Bore × stroke:
49.0 × 54.0 mm (1.93 × 2.13 in)
Compression ratio:
9.64 : 1
Starting system:
Electric starter and kickstarter
Lubrication system:
Wet sump
Engine oil:Recommended brand:
YAMALUBE
Type:
SAE 10W-30, 10W-40, 10W-50, 15W-40,
20W-40 or 20W-50
Recommended engine oil grade:
API service SE, SF, SG type or higher,
JASO standard MA
Engine oil quantity:
Periodic oil change:
1.00 L (1.06 US qt, 0.88 Imp.qt)Final transmission oil:Type:
SAE 10W-30 type SE motor oil
Quantity:
0.13 L (0.14 US qt, 0.11 Imp.qt)Air filter:Air filter element:
Oil-coated paper element
Fuel:Recommended fuel:
Regular unleaded gasoline only
Fuel tank capacity:
5.0 L (1.32 US gal, 1.10 Imp.gal)Carburetor:Type × quantity:
SVR3.22-1A x 1Spark plug(s):Manufacturer/model:
NGK/CR6HSA
Spark plug gap:
0.6–0.7 mm (0.024–0.028 in)Clutch:Clutch type:
Dry, centrifugal automaticTransmission:Primary reduction ratio:
1.000
Final drive:
Gear
Secondary reduction ratio:
9.400 (47/15 x 39/13)
Transmission type:
V-belt automaticChassis:Frame type:
Underbone
Caster angle:
27.00 °
Trail:
75 mm (3.0 in)
-20 -10 0
10 20 30
40
50 ˚C
SAE 10W-30
SAE 15W-40SAE 20W-40SAE 20W-50
SAE 10W-40SAE 10W-50
U1RSE0E0.book Page 1 Tuesday, October 18, 2011 8:56 AM
Page 71 of 76

SPECIFICATIONS
8-2
8
Front tire:Type:
Tubeless
Size:
100/90-10 56J
Manufacturer/model:
CHENG SHIN/C-922-XRear tire:Type:
Tubeless
Size:
100/90-10 56J
Manufacturer/model:
CHENG SHIN/C-940-XLoading:Maximum load:
165 kg (364 lb)
(Total weight of rider, passenger, cargo and
accessories)Tire air pressure (measured on cold
tires):Loading condition:
0–75 kg (0–165 lb)
Front:
175 kPa (1.75 kgf/cm², 25 psi)
Rear:
250 kPa (2.50 kgf/cm², 36 psi)
Loading condition:
75–153 kg (165–337 lb)
Front:
175 kPa (1.75 kgf/cm², 25 psi)
Rear:
250 kPa (2.50 kgf/cm², 36 psi)
Front wheel:Wheel type:
Cast wheel
Rim size:
J10 x MT2.15Rear wheel:Wheel type:
Cast wheel
Rim size:
J10 x MT2.50Front brake:Type:
Single disc brake
Operation:
Right hand operation
Specified brake fluid:
DOT 3 or 4Rear brake:Type:
Drum brake
Operation:
Left hand operationFront suspension:Type:
Telescopic fork
Spring/shock absorber type:
Coil spring/oil damper
Wheel travel:
80.0 mm (3.15 in)Rear suspension:Type:
Unit swing
Spring/shock absorber type:
Coil spring/oil damperWheel travel:
63.0 mm (2.48 in)
Electrical system:Ignition system:
DC CDI
Charging system:
AC magnetoBattery:Model:
YTX7A-BS
Voltage, capacity:
12 V, 6.0 AhHeadlight:Bulb type:
IncandescenceBulb voltage, wattage × quantity:Headlight:
12 V, 35 W/35 W × 1
Tail/brake light:
12 V, 5.0 W/21.0 W × 1
Front turn signal light:
12 V, 10.0 W × 2
Rear turn signal light:
12 V, 16.0 W × 2
Auxiliary light:
12 V, 3.0 W × 1
Meter lighting:
12 V, 3.4 W × 2
High beam indicator light:
12 V, 1.7 W × 1
Turn signal indicator light:
12 V, 1.7 W × 1
Engine trouble warning light:
12 V, 3.4 W × 1
U1RSE0E0.book Page 2 Tuesday, October 18, 2011 8:56 AM