warning YAMAHA FJR1300AE 2016 Owner's Manual
[x] Cancel search | Manufacturer: YAMAHA, Model Year: 2016, Model line: FJR1300AE, Model: YAMAHA FJR1300AE 2016Pages: 122, PDF Size: 3.4 MB
Page 55 of 122
Instrument and control functions
3-41
3
justing function motor, the elec-
tronically adjustable suspension
system warning light may come
on.
• The suspension will still operate as normal, only the preload ad-
justing function cannot be used.
• To reset the electronically ad- justable suspension system
warning light, wait approximate-
ly 6 minutes and then turn the
key to “OFF” or immediately
turn the key to “OFF” and then
wait 6 minutes.
• If the electronically adjustable suspension system warning
light remains on, have a
Yamaha dealer check the sus- pension system.
To adjust the preload
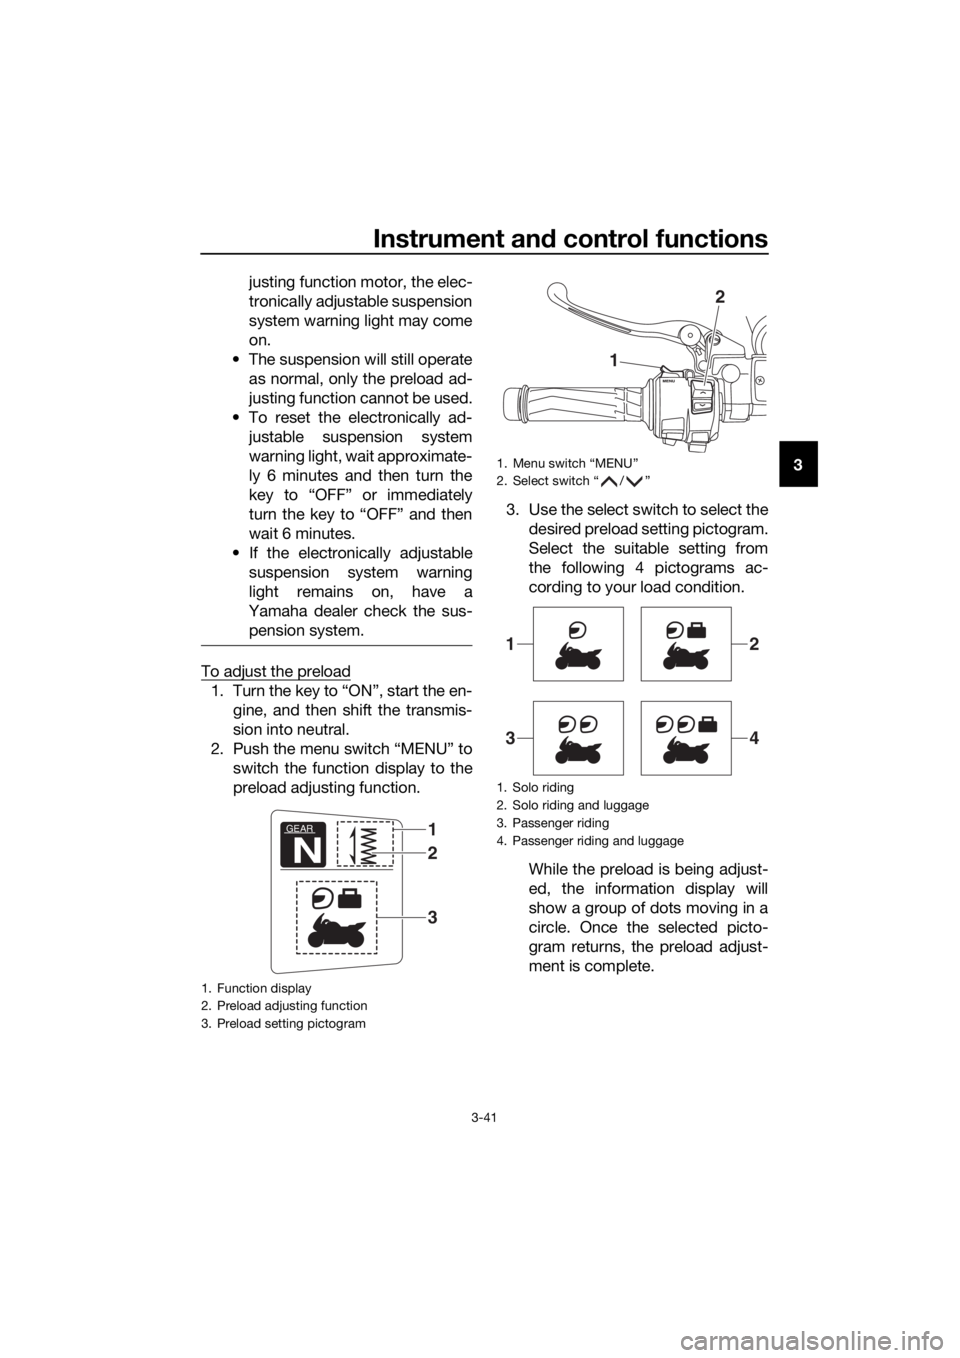
1. Turn the key to “ON”, start the en- gine, and then shift the transmis-
sion into neutral.
2. Push the menu switch “MENU” to switch the function display to the
preload adjusting function. 3. Use the select switch to select the
desired preload setting pictogram.
Select the suitable setting from
the following 4 pictograms ac-
cording to your load condition.
While the preload is being adjust-
ed, the information display will
show a group of dots moving in a
circle. Once the selected picto-
gram returns, the preload adjust-
ment is complete.
1. Function display
2. Preload adjusting function
3. Preload setting pictogram
GEAR
N
1
3
2
1. Menu switch “MENU”
2. Select switch “ / ”
1. Solo riding
2. Solo riding and luggage
3. Passenger riding
4. Passenger riding and luggage
1
2
12
34
UB96E0E0.book Page 41 Wednesday, November 4, 2015 5:01 PM
Page 58 of 122

Instrument and control functions
3-44
3
TIP
The damping force setting can be set to
7 levels (+3, +2, +1, 0, –1, –2 and –3).
“+3” is the hardest level and “–3” is the
softest level.
6. Push the menu switch “MENU”.
If the vehicle moves while you are ad-
justing the damping force, the informa-
tion display will change to the display
mode.
WARNING
EWA16421
The rear shock ab sorber assem bly
contains hi ghly pressurize d nitro gen
g as. Rea d an d un derstan d the fol-
lowin g information before han dlin g
the shock a bsor ber assem bly.
Do not tamper with or attempt
to open the cylin der assem bly.
Do not su bject the shock a b-
sor ber assem bly to an open
flame or other hig h heat source.
This may cause the unit to ex-
plo de due to excessive g as
pressure.
Do not deform or damag e the
cylin der in any way. Cylin der
d amag e will result in poor
d ampin g performance.
Do not d ispose of a damag ed or
worn-out shock a bsor ber as-
sem bly
yourself. Take the shock
a b sor ber assem bly to a Yamaha
d ealer for any service.
1. Damping force adjusting function
2. Damping force setting
3. Preload setting pictogram
GEAR
N
HARD
+3
GEAR
1
HARD+3
1
2
3
UB96E0E0.book Page 44 Wednesday, November 4, 2015 5:01 PM
Page 59 of 122
Instrument and control functions
3-45
3
EAU15306
Si destan d
The sidestand is located on the left
side of the frame. Raise the sidestand
or lower it with your foot while holding
the vehicle upright.
TIP
The built-in sidestand switch is part of
the ignition circuit cut-off system,
which cuts the ignition in certain situa-
tions. (See the following section for an
explanation of the ignition circuit cut-
off system.)
WARNING
EWA10242
The vehicle must not be ri dden with
the si destan d d own, or if the si de-
stan d cannot b e properly move d up
(or does not stay up), otherwise the
si destan d coul d contact the g round
an d d istract the operator, resultin g
in a possib le loss of control.
Yamaha’s ig nition circuit cut-off
system has been desi gne d to assist
the operator in fulfillin g the respon-
si bility of raising the sidestan d b e-
fore startin g off. Therefore, check
this system re gularly an d have a
Yamaha dealer repair it if it does not
function properly.
EAU63430
I g nition circuit cut-off system
The ignition circuit cut-off system
(comprising the sidestand switch,
clutch switch and neutral switch) has
the following functions.
It prevents starting when the
transmission is in gear and the
sidestand is up, but the clutch le-
ver is not pulled.
It prevents starting when the
transmission is in gear and the
clutch lever is pulled, but the side-
stand is still down.
It cuts the running engine when
the transmission is in gear and the
sidestand is moved down.
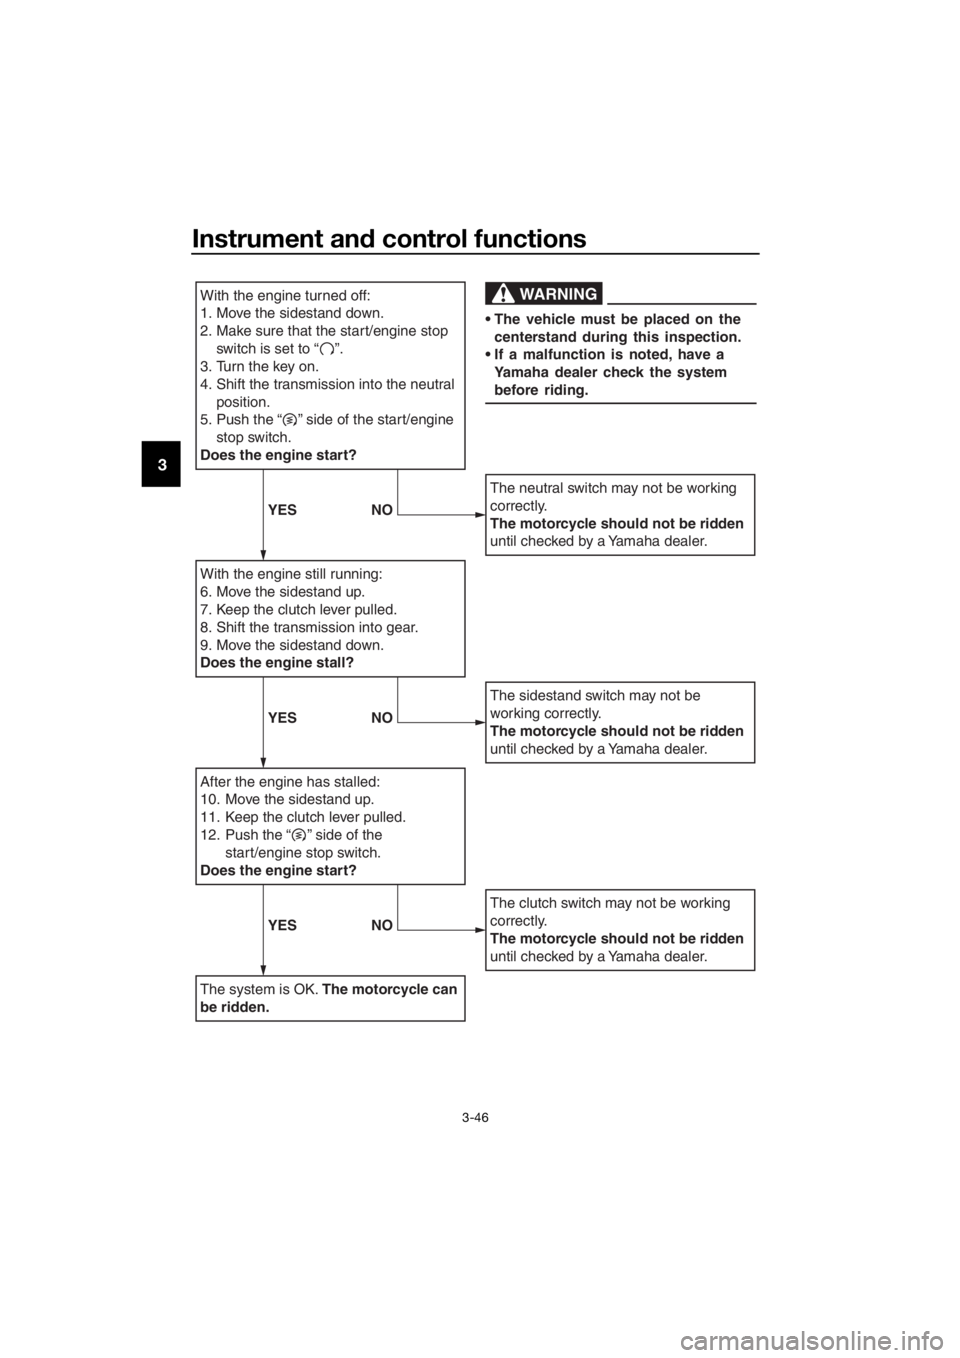
Periodically check the operation of the
ignition circuit cut-off system accord-
ing to the following procedure.
UB96E0E0.book Page 45 Wednesday, November 4, 2015 5:01 PM
Page 60 of 122
Instrument and control functions
3-46
3
With the engine turned off:
1. Move the sidestand down.
2.
Make sure that the start/engine stop
switch is set to “ ”.
3. Turn the key on.
4. Shift the transmission into the neutral position.
5.
Push the “ ” side of the start/engine
stop switch.
Does the engine start?
With the engine still running:
6. Move the sidestand up.
7. Keep the clutch lever pulled.
8. Shift the transmission into gear.
9. Move the sidestand down.
Does the engine stall?
After the engine has stalled:
10. Move the sidestand up.
11. Keep the clutch lever pulled.
12.
Push the “ ” side of the
start/engine stop switch.
Does the engine start?
The system is OK. The motorcycle can
be ridden.
The neutral switch may not be working
correctly.
The motorcycle should not be ridden
until checked by a Yamaha dealer.
The sidestand switch may not be
working correctly.
The motorcycle should not be ridden
until checked by a Yamaha dealer.
The clutch switch may not be working
correctly.
The motorcycle should not be ridden
until checked by a Yamaha dealer.
WARNING
The vehicle must be placed on the centerstand during this inspection.
If a malfunction is noted, have a Yamaha dealer check the system
before riding.
YES NO
YESNO
YESNO
UB96E0E0.book Page 46 Wednesday, November 4, 2015 5:01 PM
Page 61 of 122
Instrument and control functions
3-47
3
EAU39656
Auxiliary DC jack
WARNING
EWA14361
To prevent electrical shock or short-
circuiting , make sure that the cap is
installe d when the auxiliary DC jack
is not bein g use d.
NOTICE
ECA15432
The accessory connecte d to the
auxiliary DC jack shoul d not b e used
with the en gine turne d off, an d the
loa d must never exceed 30 W (2.5 A),
otherwise the fuse may blow or the
b attery may d ischarge.
This vehicle is equipped with an auxil-
iary DC jack in the accessory box.
A 12-V accessory connected to the
auxiliary jack can be used when the
key is in the “ON” position and should
only be used when the engine is run-
ning.
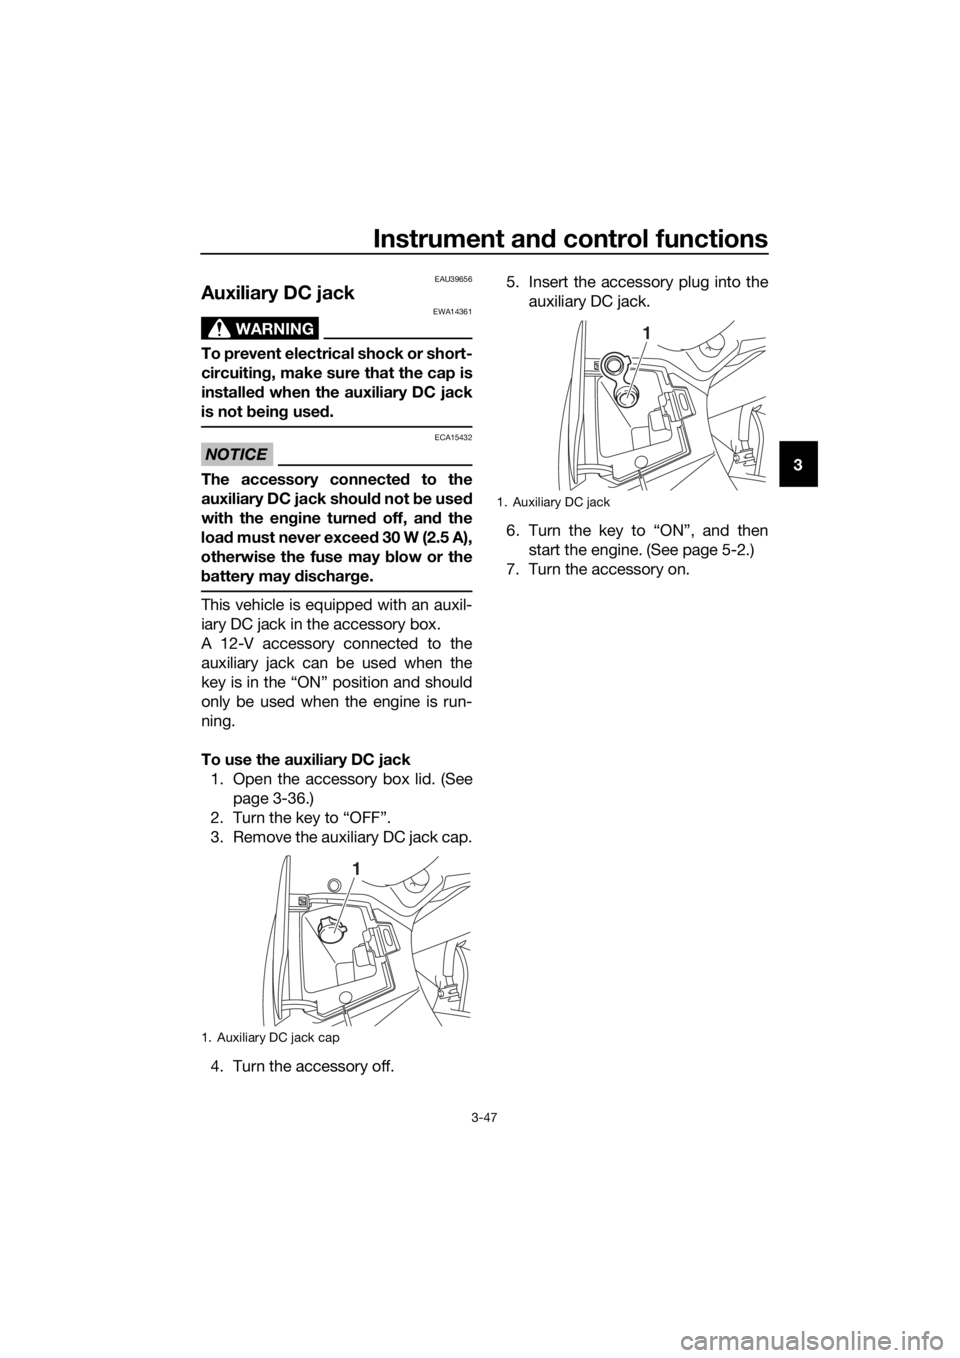
To use the auxiliary DC jack
1. Open the accessory box lid. (See page 3-36.)
2. Turn the key to “OFF”.
3. Remove the auxiliary DC jack cap.
4. Turn the accessory off. 5. Insert the accessory plug into the
auxiliary DC jack.
6. Turn the key to “ON”, and then start the engine. (See page 5-2.)
7. Turn the accessory on.
1. Auxiliary DC jack cap
1
1. Auxiliary DC jack
1
UB96E0E0.book Page 47 Wednesday, November 4, 2015 5:01 PM
Page 63 of 122
For your safety – pre-operation checks
4-1
4
EAU63440
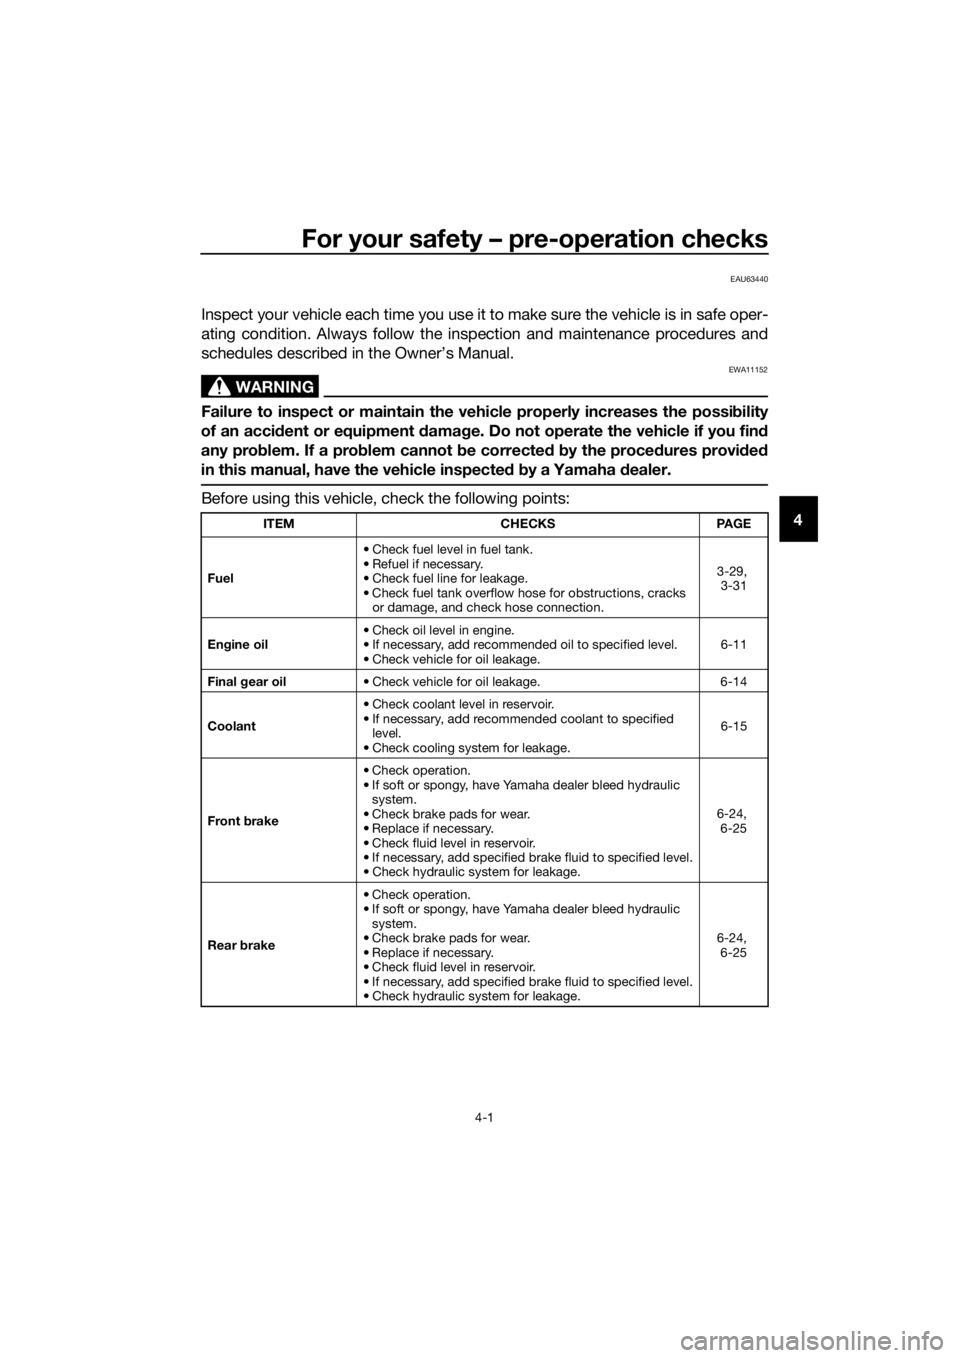
Inspect your vehicle each time you use it to make sure the vehicle is in safe oper-
ating condition. Always follow the inspection and maintenance procedures and
schedules described in the Owner’s Manual.
WARNING
EWA11152
Failure to inspect or maintain the vehicle properly increases the possibility
of an acci dent or equipment d amage. Do not operate the vehicle if you fin d
any prob lem. If a pro blem cannot be corrected b y the proce dures provi ded
in this manual, have the vehicle inspecte d b y a Yamaha d ealer.
Before using this vehicle, check the following points:
ITEM CHECKSPAGE
Fuel • Check fuel level in fuel tank.
• Refuel if necessary.
• Check fuel line for leakage.
• Check fuel tank overflow hose for obstructions, cracks
or damage, and check hose connection. 3-29,
3-31
En gine oil • Check oil level in engine.
• If necessary, add recommended oil to specified level.
• Check vehicle for oil leakage. 6-11
Final gear oil • Check vehicle for oil leakage. 6-14
Coolant • Check coolant level in reservoir.
• If necessary, add recommended coolant to specified
level.
• Check cooling system for leakage. 6-15
Front brake • Check operation.
• If soft or spongy, have Yamaha dealer bleed hydraulic
system.
• Check brake pads for wear.
• Replace if necessary.
• Check fluid level in reservoir.
• If necessary, add specified brake fluid to specified level.
• Check hydraulic system for leakage. 6-24,
6-25
Rear brake • Check operation.
• If soft or spongy, have Yamaha dealer bleed hydraulic
system.
• Check brake pads for wear.
• Replace if necessary.
• Check fluid level in reservoir.
• If necessary, add specified brake fluid to specified level.
• Check hydraulic system for leakage. 6-24,
6-25
UB96E0E0.book Page 1 Wednesday, November 4, 2015 5:01 PM
Page 65 of 122
Operation and important ri din g points
5-1
5
EAU15952
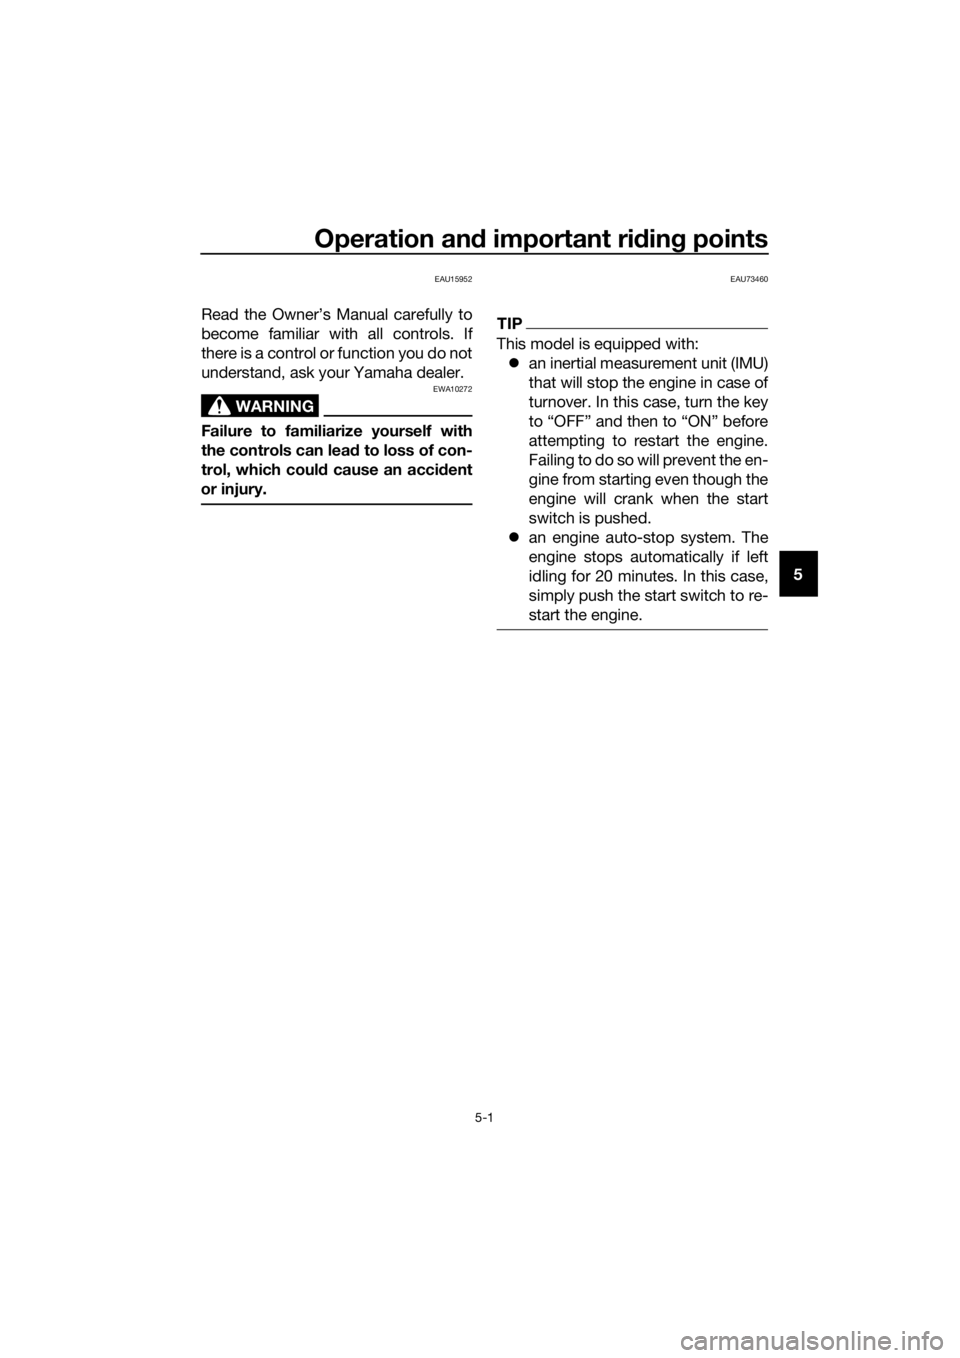
Read the Owner’s Manual carefully to
become familiar with all controls. If
there is a control or function you do not
understand, ask your Yamaha dealer.
WARNING
EWA10272
Failure to familiarize yourself with
the controls can lead to loss of con-
trol, which coul d cause an acci dent
or injury.
EAU73460
TIP
This model is equipped with: an inertial measurement unit (IMU)
that will stop the engine in case of
turnover. In this case, turn the key
to “OFF” and then to “ON” before
attempting to restart the engine.
Failing to do so will prevent the en-
gine from starting even though the
engine will crank when the start
switch is pushed.
an engine auto-stop system. The
engine stops automatically if left
idling for 20 minutes. In this case,
simply push the start switch to re-
start the engine.
UB96E0E0.book Page 1 Wednesday, November 4, 2015 5:01 PM
Page 66 of 122
Operation and important rid ing points
5-2
5
EAU58240
Startin g the en gine
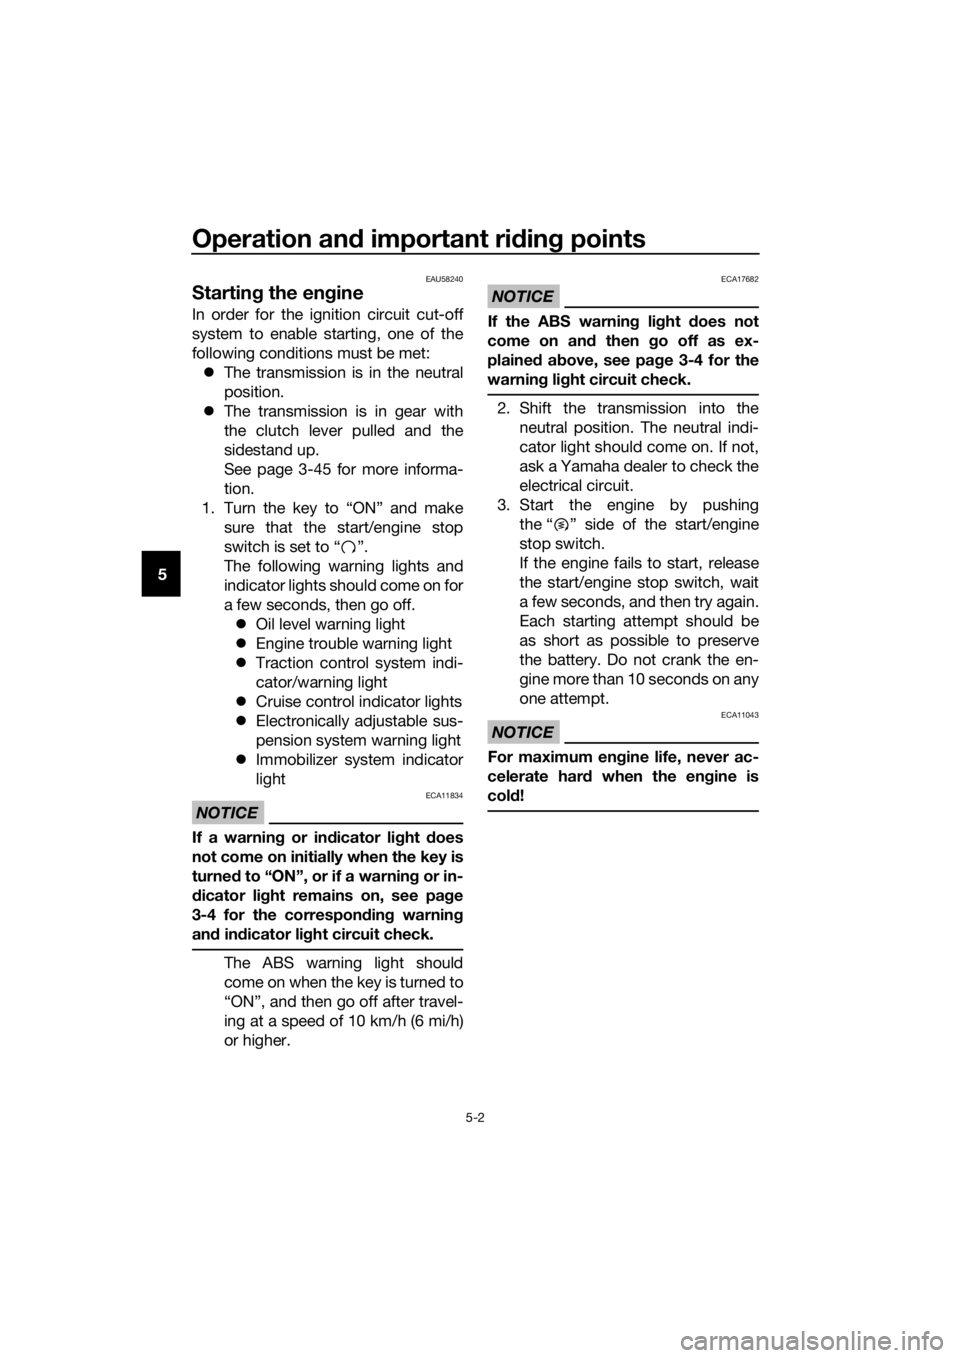
In order for the ignition circuit cut-off
system to enable starting, one of the
following conditions must be met:
The transmission is in the neutral
position.
The transmission is in gear with
the clutch lever pulled and the
sidestand up.
See page 3-45 for more informa-
tion.
1. Turn the key to “ON” and make sure that the start/engine stop
switch is set to “ ”.
The following warning lights and
indicator lights should come on for
a few seconds, then go off. Oil level warning light
Engine trouble warning light
Traction control system indi-
cator/warning light
Cruise control indicator lights
Electronically adjustable sus-
pension system warning light
Immobilizer system indicator
light
NOTICE
ECA11834
If a warnin g or in dicator li ght does
not come on initially when the key is
turne d to “ON”, or if a warnin g or in-
d icator li ght remains on, see pag e
3-4 for the correspon din g warnin g
an d in dicator li ght circuit check.
The ABS warning light should
come on when the key is turned to
“ON”, and then go off after travel-
ing at a speed of 10 km/h (6 mi/h)
or higher.
NOTICE
ECA17682
If the ABS warnin g li ght does not
come on an d then g o off as ex-
plained above, see pag e 3-4 for the
warnin g lig ht circuit check.
2. Shift the transmission into the
neutral position. The neutral indi-
cator light should come on. If not,
ask a Yamaha dealer to check the
electrical circuit.
3. Start the engine by pushing the “ ” side of the start/engine
stop switch.
If the engine fails to start, release
the start/engine stop switch, wait
a few seconds, and then try again.
Each starting attempt should be
as short as possible to preserve
the battery. Do not crank the en-
gine more than 10 seconds on any
one attempt.
NOTICE
ECA11043
For maximum eng ine life, never ac-
celerate har d when the en gine is
col d!
UB96E0E0.book Page 2 Wednesday, November 4, 2015 5:01 PM
Page 68 of 122
Operation and important rid ing points
5-4
5 clutch lever in, use the brakes to
slow the motorcycle, and continue
to downshift as necessary.
4. Once the motorcycle has stopped, the transmission can be
shifted into the neutral position.
The neutral indicator light should
come on and then the clutch lever
can be released.
WARNING
EWA17380
Improper brakin g can cause
loss of control or traction. Al-
ways use b oth brakes an d apply
them smoothly.
Make sure that the motorcycle
and the en gine have sufficiently
slowe d b efore shiftin g to a low-
er gear. En gag in g a lower gear
when the vehicle or en gine
speed is too hi gh coul d make
the rear wheel lose traction or
the en gine to over-rev. This
coul d cause loss of control, an
acci dent an d injury. It coul d also
cause en gine or drive train dam-
a g e.
EAU64150Recommen ded shift points
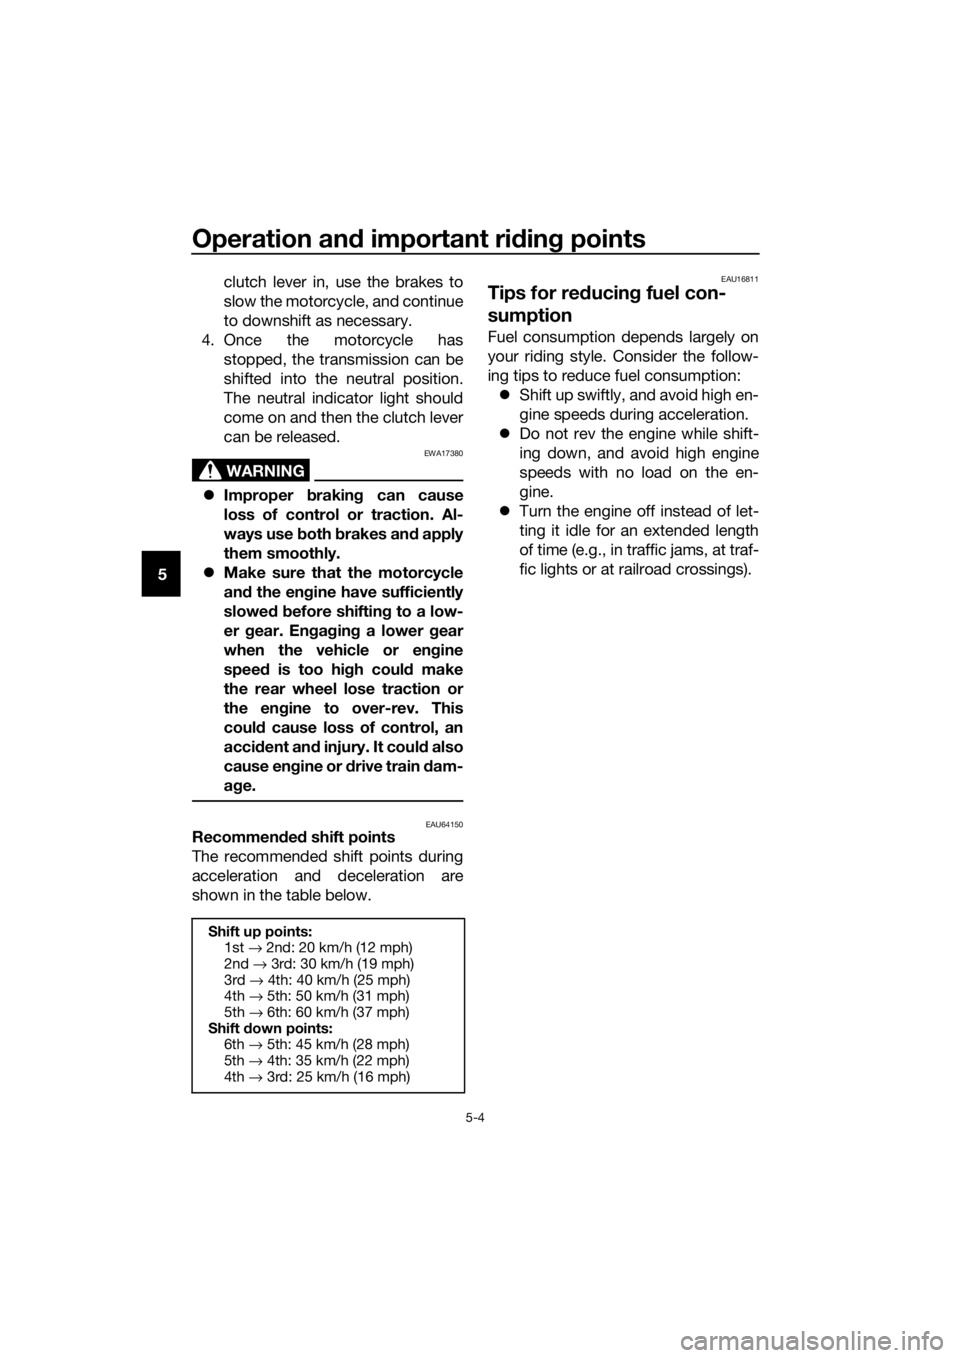
The recommended shift points during
acceleration and deceleration are
shown in the table below.
EAU16811
Tips for re ducin g fuel con-
sumption
Fuel consumption depends largely on
your riding style. Consider the follow-
ing tips to reduce fuel consumption:
Shift up swiftly, and avoid high en-
gine speeds during acceleration.
Do not rev the engine while shift-
ing down, and avoid high engine
speeds with no load on the en-
gine.
Turn the engine off instead of let-
ting it idle for an extended length
of time (e.g., in traffic jams, at traf-
fic lights or at railroad crossings).
Shift up points:
1st → 2nd: 20 km/h (12 mph)
2nd → 3rd: 30 km/h (19 mph)
3rd → 4th: 40 km/h (25 mph)
4th → 5th: 50 km/h (31 mph)
5th → 6th: 60 km/h (37 mph)
Shift down points:
6th → 5th: 45 km/h (28 mph)
5th → 4th: 35 km/h (22 mph)
4th → 3rd: 25 km/h (16 mph)
UB96E0E0.book Page 4 Wednesday, November 4, 2015 5:01 PM
Page 70 of 122

Operation and important rid ing points
5-6
5
EAU17214
Parkin g
When parking, stop the engine, and
then remove the key from the main
switch.
WARNING
EWA10312
Since the en gine an d exhaust
system can become very hot,
park in a place where pe destri-
ans or chil dren are not likely to
touch them an d b e burne d.
Do not park on a slope or on soft
groun d, otherwise the vehicle
may overturn, increasin g the
risk of a fuel leak an d fire.
Do not park near grass or other
flamma ble materials which
mi ght catch fire.
UB96E0E0.book Page 6 Wednesday, November 4, 2015 5:01 PM