sport mode YAMAHA FJR1300AE 2018 Owners Manual
[x] Cancel search | Manufacturer: YAMAHA, Model Year: 2018, Model line: FJR1300AE, Model: YAMAHA FJR1300AE 2018Pages: 122, PDF Size: 3.42 MB
Page 11 of 122

Safety information
1-5
1
operator and may limit control
ability, therefore, such accesso-
ries are not recommended.
Use caution when adding electri-
cal accessories. If electrical ac-
cessories exceed the capacity of
the motorcycle’s electrical sys-
tem, an electric failure could re-
sult, which could cause a
dangerous loss of lights or engine
power.
Aftermarket Tires an d Rims
The tires and rims that came with your
motorcycle were designed to match
the performance capabilities and to
provide the best combination of han-
dling, braking, and comfort. Other
tires, rims, sizes, and combinations
may not be appropriate. See page 6-20
for tire specifications and for informa-
tion on servicing and replacing your
tires.
Transportin g the Motorcycle
Be sure to observe following instruc-
tions before transporting the motorcy-
cle in another vehicle. Remove all loose items from the
motorcycle.
Check that the fuel cock (if
equipped) is in the off position and
that there are no fuel leaks.
Shift the transmission into gear
(for models with a manual trans-
mission).
Secure the motorcycle with tie-
downs or suitable straps that are
attached to solid parts of the mo-
torcycle, such as the frame or up-
per front fork triple clamp (and not,
for example, to rubber-mounted handlebars or turn signals, or
parts that could break). Choose
the location for the straps carefully
so the straps will not rub against
painted surfaces during transport.
The suspension should be com-
pressed somewhat by the tie-
downs, if possible, so that the mo-
torcycle will not bounce exces-
sively during transport.
UB96E1E0.book Page 5 Monday, July 10, 2017 10:57 AM
Page 25 of 122

Instrument and control functions
3-11
3
“F” (full) towards “E” (empty) as the fuel
level decreases. When the last seg-
ment starts flashing, refuel as soon as
possible.
When the key is turned to “ON”, all dis-
play segments come on once in order
to test the electrical circuit.
TIP
If a problem is detected in the fuel me-
ter electrical circuit, the fuel meter dis-
play segments will flash repeatedly.
Have a Yamaha dealer check the vehi-
cle.
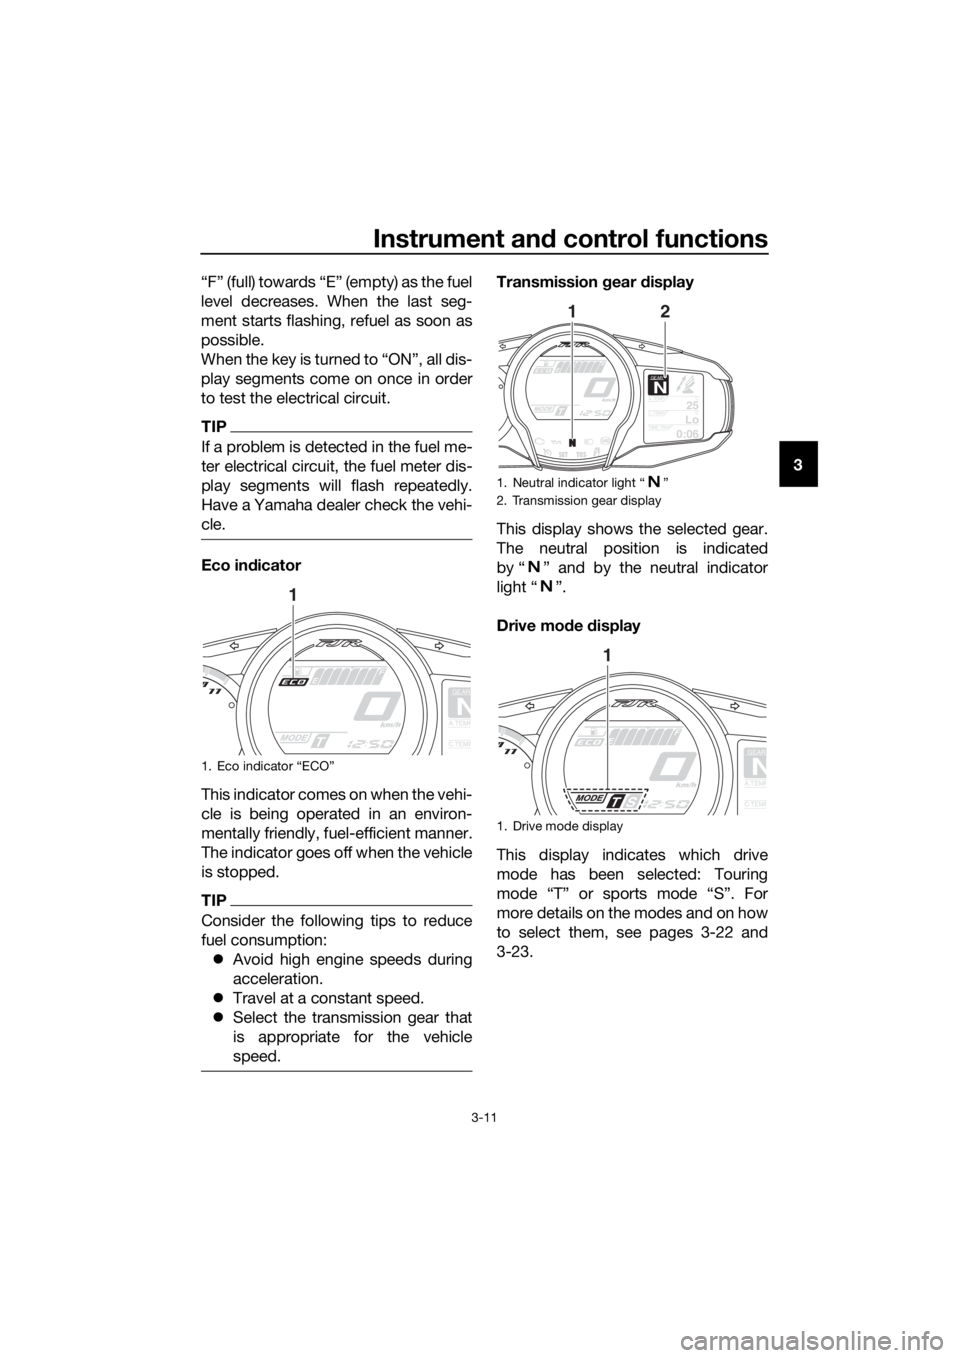
Eco in
dicator
This indicator comes on when the vehi-
cle is being operated in an environ-
mentally friendly, fuel-efficient manner.
The indicator goes off when the vehicle
is stopped.
TIP
Consider the following tips to reduce
fuel consumption: Avoid high engine speeds during
acceleration.
Travel at a constant speed.
Select the transmission gear that
is appropriate for the vehicle
speed.
Transmission gear display
This display shows the selected gear.
The neutral position is indicated
by “ ” and by the neutral indicator
light “ ”.
Drive mo de display
This display indicates which drive
mode has been selected: Touring
mode “T” or sports mode “S”. For
more details on the modes and on how
to select them, see pages 3-22 and
3-23.
1. Eco indicator “ECO”
GEAR
NA.TEMP
C.TEMP
1
1. Neutral indicator light “ ”
2. Transmission gear display
1. Drive mode display
GEARN25A.TEMP ˚C
LoC.TEMP˚C
0:06TIME TRIP
12
GEAR
NA.TEMP
C.TEMP
1
UB96E1E0.book Page 11 Monday, July 10, 2017 10:57 AM
Page 36 of 122

Instrument and control functions
3-22
3
EAU49433
D-mo de ( drive mo de)
D-mode is an electronically controlled
engine performance system with two
mode selections (touring mode “T” and
sports mode “S”).
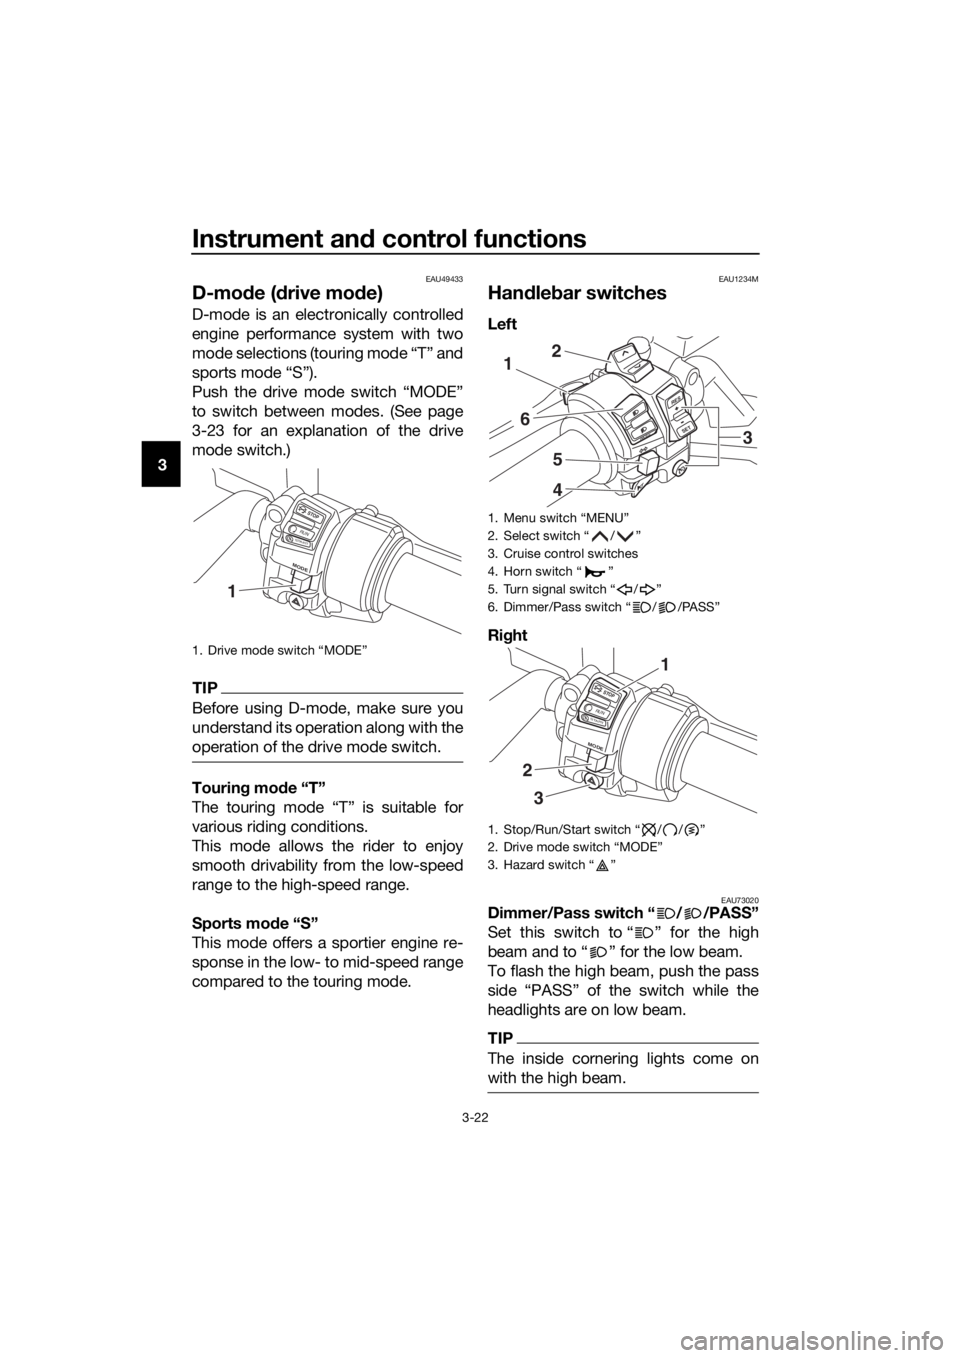
Push the drive mode switch “MODE”
to switch between modes. (See page
3-23 for an explanation of the drive
mode switch.)
TIP
Before using D-mode, make sure you
understand its operation along with the
operation of the drive mode switch.
Tourin g mo de “T”
The touring mode “T” is suitable for
various riding conditions.
This mode allows the rider to enjoy
smooth drivability from the low-speed
range to the high-speed range.
Sports mo de “S”
This mode offers a sportier engine re-
sponse in the low- to mid-speed range
compared to the touring mode.
EAU1234M
Han dle bar switches
Left
Ri ght
EAU73020Dimmer/Pass switch “ / /PASS”
Set this switch to “ ” for the high
beam and to “ ” for the low beam.
To flash the high beam, push the pass
side “PASS” of the switch while the
headlights are on low beam.
TIP
The inside cornering lights come on
with the high beam.
1. Drive mode switch “MODE”
STOP
M ODE
RUNSTART
1
1. Menu switch “MENU”
2. Select switch “ / ”
3. Cruise control switches
4. Horn switch “ ”
5. Turn signal switch “ / ”
6. Dimmer/Pass switch “ / /PASS”
1. Stop/Run/Start switch “ / / ”
2. Drive mode switch “MODE”
3. Hazard switch “ ”
RES
SETPA S S
1
6
5
4
2
3
STOP
MODE
RUNSTART
3
2
1
UB96E1E0.book Page 22 Monday, July 10, 2017 10:57 AM
Page 37 of 122

Instrument and control functions
3-23
3
EAU12461Turn si gnal switch “ / ”
To signal a right-hand turn, push this
switch to “ ”. To signal a left-hand
turn, push this switch to “ ”. When
released, the switch returns to the cen-
ter position. To cancel the turn signal
lights, push the switch in after it has re-
turned to the center position.
EAU12501Horn switch “ ”
Press this switch to sound the horn.
EAU54212Stop/Run/Start switch “ / / ”
To crank the engine with the starter,
set this switch to “ ”, and then push
the switch down towards “ ”. See
page 5-2 for starting instructions prior
to starting the engine.
Set this switch to “ ” to stop the en-
gine in case of an emergency, such as
when the vehicle overturns or when the
throttle cable is stuck.
EAU12735Hazar d switch “ ”
With the key in the “ON” or “ ” posi-
tion, use this switch to turn on the haz-
ard lights (simultaneous flashing of all
turn signal lights).
The hazard lights are used in case of an
emergency or to warn other drivers
when your vehicle is stopped where it
might be a traffic hazard.
NOTICE
ECA10062
Do not use the hazar d lig hts for an
exten ded len gth of time with the en-
g ine not runnin g, otherwise the bat-
tery may dischar ge.
EAU12781Cruise control switches
See page 3-6 for an explanation of the
cruise control system.
EAU54232Menu switch “MENU”
This switch is used to make setting
changes within the multi-function me-
ter unit. (See page 3-9.)
EAU54222Select switch “ / ”
This switch is used to make setting
changes within the multi-function me-
ter unit. (See page 3-9.)
EAU54691Drive mo de switch “MODE”
WARNING
EWA15341
Do not chan ge the D-mo de while the
vehicle is movin g.
Using this switch changes the drive
mode to touring mode “T” or sports
mode “S”.
The throttle grip must be completely
closed in order to change the drive mo-
de.
The selected mode is shown on the
drive mode display. (See page 3-11.)
The drive mode cannot be changed
while the cruise control system is oper-
ating.
UB96E1E0.book Page 23 Monday, July 10, 2017 10:57 AM