check engine light YAMAHA FJR1300AE 2020 Owners Manual
[x] Cancel search | Manufacturer: YAMAHA, Model Year: 2020, Model line: FJR1300AE, Model: YAMAHA FJR1300AE 2020Pages: 122, PDF Size: 3.93 MB
Page 5 of 122

Table of contents
Safety information............................1-1
Description........................................2-1
Left view ..........................................2-1
Right view........................................2-2
Controls and instruments ................2-3
Instrument and control functions....3-1
Immobilizer system .........................3-1
Main switch/steering lock ...............3-2
Indicator lights and warning
lights ............................................3-3
Cruise control system .....................3-6
Multi-function meter unit .................3-9
D-mode (drive mode) ....................3-21
Handlebar switches.......................3-22
Clutch lever ...................................3-23
Shift pedal .....................................3-24
Brake lever ....................................3-24
Brake pedal ...................................3-25
ABS ...............................................3-25
Traction control system.................3-26
Fuel tank cap.................................3-28
Fuel................................................3-28
Fuel tank overflow hose ................3-30
Catalytic converter ........................3-30
Seats .............................................3-31
Adjusting the rider seat height ......3-32
Storage compartments .................3-34
Accessory box...............................3-35
Adjusting the headlight beams......3-36
Handlebar position ........................3-37
Opening and closing the cowling
vents ..........................................3-37
Rear view mirrors ..........................3-39
Adjusting the front and rear
suspension.................................3-39
Auxiliary DC jack ..........................3-44
Sidestand ......................................3-45
Ignition circuit cut-off system........3-45
Cornering lights .............................3-47For your safety – pre-operation
checks............................................... 4-1
Operation and important riding
points................................................. 5-1
Engine break-in ............................... 5-1
Starting the engine.......................... 5-2
Shifting ............................................ 5-4
Tips for reducing fuel
consumption................................ 5-5
Parking ............................................ 5-6
Periodic maintenance and
adjustment........................................ 6-1
Tool kit ............................................ 6-2
Periodic maintenance charts .......... 6-3
Periodic maintenance chart for the
emission control system.............. 6-3
General maintenance and
lubrication chart........................... 6-4
Removing and installing panels ...... 6-7
Checking the spark plugs ............. 6-10
Canister......................................... 6-11
Engine oil and oil filter cartridge ... 6-11
Why Yamalube .............................. 6-14
Final gear oil.................................. 6-15
Coolant ......................................... 6-16
Cleaning the air filter element ....... 6-18
Checking the engine idling
speed......................................... 6-19
Checking the throttle grip free
play ............................................ 6-20
Valve clearance ............................. 6-20
Tires .............................................. 6-21
Cast wheels .................................. 6-23
Clutch lever ................................... 6-24
Checking the brake lever free
play ............................................ 6-24
Brake light switches ...................... 6-25
Checking the front and rear
brake pads................................. 6-25
Checking the brake and clutch
fluid levels .................................. 6-26
Changing the brake and clutch
fluids .......................................... 6-28
UB96E2E0.book Page 1 Wednesday, September 18, 2019 10:21 AM
Page 11 of 122

Safety information
1-5
1 operator and may limit control
ability, therefore, such accesso-
ries are not recommended.
Use caution when adding electri-
cal accessories. If electrical ac-
cessories exceed the capacity of
the motorcycle’s electrical sys-
tem, an electric failure could re-
sult, which could cause a
dangerous loss of lights or engine
power.
Aftermarket Tires and Rims
The tires and rims that came with your
motorcycle were designed to match
the performance capabilities and to
provide the best combination of han-
dling, braking, and comfort. Other
tires, rims, sizes, and combinations
may not be appropriate. See page 6-21
for tire specifications and for informa-
tion on servicing and replacing your
tires.
Transporting the Motorcycle
Be sure to observe following instruc-
tions before transporting the motorcy-
cle in another vehicle.
Remove all loose items from the
motorcycle.
Check that the fuel cock (if
equipped) is in the off position and
that there are no fuel leaks.
Shift the transmission into gear
(for models with a manual trans-
mission).
Secure the motorcycle with tie-
downs or suitable straps that are
attached to solid parts of the mo-
torcycle, such as the frame or up-
per front fork triple clamp (and not,
for example, to rubber-mountedhandlebars or turn signals, or
parts that could break). Choose
the location for the straps carefully
so the straps will not rub against
painted surfaces during transport.
The suspension should be com-
pressed somewhat by the tie-
downs, if possible, so that the mo-
torcycle will not bounce exces-
sively during transport.
UB96E2E0.book Page 5 Wednesday, September 18, 2019 10:21 AM
Page 18 of 122
Instrument and control functions
3-4
3
EAU11125Oil level warning light “ ”
This warning light comes on when the
engine oil level is low. To prevent en-
gine damage, replenish the engine oil
as soon as possible.
Even if the oil level is sufficient, the
warning light may flicker when riding
on a slope or during sudden accelera-
tion or deceleration, but this is not a
malfunction.
TIP
When the vehicle is turned on, this light
will come on for a few seconds and
then go off. If the light does not come
on, or if the light remains on after con-
firming that the oil level is correct (see
page 6-11), have a Yamaha dealer
check the vehicle.
EAU58402Cruise control indicator lights “ ”
and “SET”
These indicator lights come on when
the cruise control system is activated.
(See page 3-6.)
TIP
When the vehicle is turned on, these
lights should come on for a few sec-
onds and then go off. If the lights do
not come on, have a Yamaha dealer
check the vehicle.
EAU73172Engine trouble warning light “ ”
This warning light comes on if a prob-
lem is detected in the engine or other
vehicle control system. If this occurs,
have a Yamaha dealer check the on-
board diagnostic system.
TIP
When the vehicle is turned on, the light
will come on for a few seconds and
then go off. If the light does not come
on, or if the light remains on, have a
Yamaha dealer check the vehicle.
EAU69895ABS warning light “ ”
This warning light comes on when the
vehicle is first turned on, and goes off
after starting riding. If the warning light
comes on while riding, the anti-lock
brake system may not work correctly.
WARNING
EWA16043
If the ABS warning light does not
turn off after reaching 10 km/h (6
mi/h), or if the warning light comes
on while riding:
Use extra caution to avoid pos-
sible wheel lock during emer-
gency braking.
Have a Yamaha dealer check
the vehicle as soon as possible.
EAU86020Traction control system indicator
light “ ”
This indicator light will flash when trac-
tion control has engaged.
If the traction control system is turned
off, this indicator light will come on.
TIP
When the vehicle is turned on, the light
should come on for a few seconds and
then go off. If the light does not come
on, or if the light remains on, have a
Yamaha dealer check the vehicle.
ABS
UB96E2E0.book Page 4 Wednesday, September 18, 2019 10:21 AM
Page 19 of 122

Instrument and control functions
3-5
3
EAU55393Suspension system warning
light “ ”
This warning light comes on if a prob-
lem is detected in the electronically ad-
justable suspension system.
TIP
When the vehicle is turned on, the light
should come on for a few seconds and
then go off. If the light does not come
on, or if the light remains on, have a
Yamaha dealer check the vehicle.
EAU73121Immobilizer system indicator
light “ ”
When the main switch is turned off and
30 seconds have passed, the indicator
light will flash steadily to indicate the
immobilizer system is enabled. After 24
hours have passed, the indicator light
will stop flashing, however the immobi-
lizer system is still enabled.
TIP
When the vehicle is turned on, this light
should come on for a few seconds and
then go off. If the light does not come
on, or if the light remains on, have a
Yamaha dealer check the vehicle.
Transponder interference
If the immobilizer system indicator light
flashes in the pattern, slowly 5 times
then quickly 2 times, this could be
caused by transponder interference. If
this occurs, try the following.
1. Make sure there are no other im-
mobilizer keys close to the main
switch.
2. Use the code re-registering key to
start the engine.3. If the engine starts, turn it off, and
try starting the engine with the
standard keys.
4. If one or both of the standard keys
do not start the engine, take the
vehicle and all 3 keys to a Yamaha
dealer to have the standard keys
re-registered.
UB96E2E0.book Page 5 Wednesday, September 18, 2019 10:21 AM
Page 41 of 122
Instrument and control functions
3-27
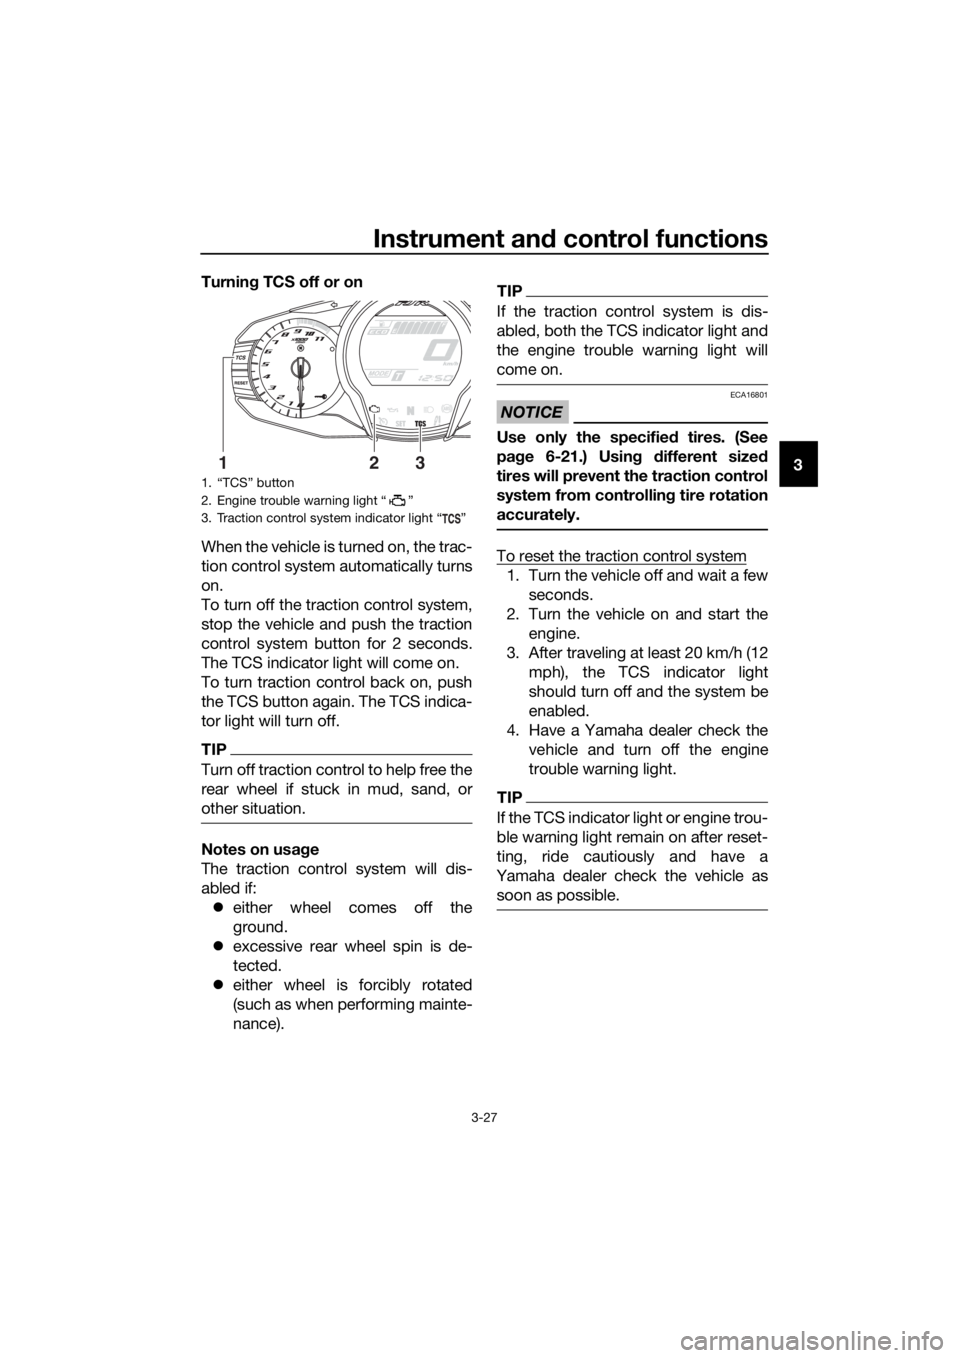
3 Turning TCS off or on
When the vehicle is turned on, the trac-
tion control system automatically turns
on.
To turn off the traction control system,
stop the vehicle and push the traction
control system button for 2 seconds.
The TCS indicator light will come on.
To turn traction control back on, push
the TCS button again. The TCS indica-
tor light will turn off.
TIP
Turn off traction control to help free the
rear wheel if stuck in mud, sand, or
other situation.
Notes on usage
The traction control system will dis-
abled if:
either wheel comes off the
ground.
excessive rear wheel spin is de-
tected.
either wheel is forcibly rotated
(such as when performing mainte-
nance).
TIP
If the traction control system is dis-
abled, both the TCS indicator light and
the engine trouble warning light will
come on.
NOTICE
ECA16801
Use only the specified tires. (See
page 6-21.) Using different sized
tires will prevent the traction control
system from controlling tire rotation
accurately.
To reset the traction control system
1. Turn the vehicle off and wait a few
seconds.
2. Turn the vehicle on and start the
engine.
3. After traveling at least 20 km/h (12
mph), the TCS indicator light
should turn off and the system be
enabled.
4. Have a Yamaha dealer check the
vehicle and turn off the engine
trouble warning light.
TIP
If the TCS indicator light or engine trou-
ble warning light remain on after reset-
ting, ride cautiously and have a
Yamaha dealer check the vehicle as
soon as possible.
1.
2. Engine trouble warning light Ž
3. Traction control system indicator light Ž
132
UB96E2E0.book Page 27 Wednesday, September 18, 2019 10:21 AM
Page 54 of 122
Instrument and control functions
3-40
3• The suspension will still operate
as normal, only the preload ad-
justing function cannot be used.
• To reset the suspension system
warning light, wait approximate-
ly 6 minutes and then turn the
main switch off or immediately
turn the main switch off and
then wait 6 minutes.
• If the suspension system warn-
ing light remains on, have a
Yamaha dealer check the vehi-
cle.
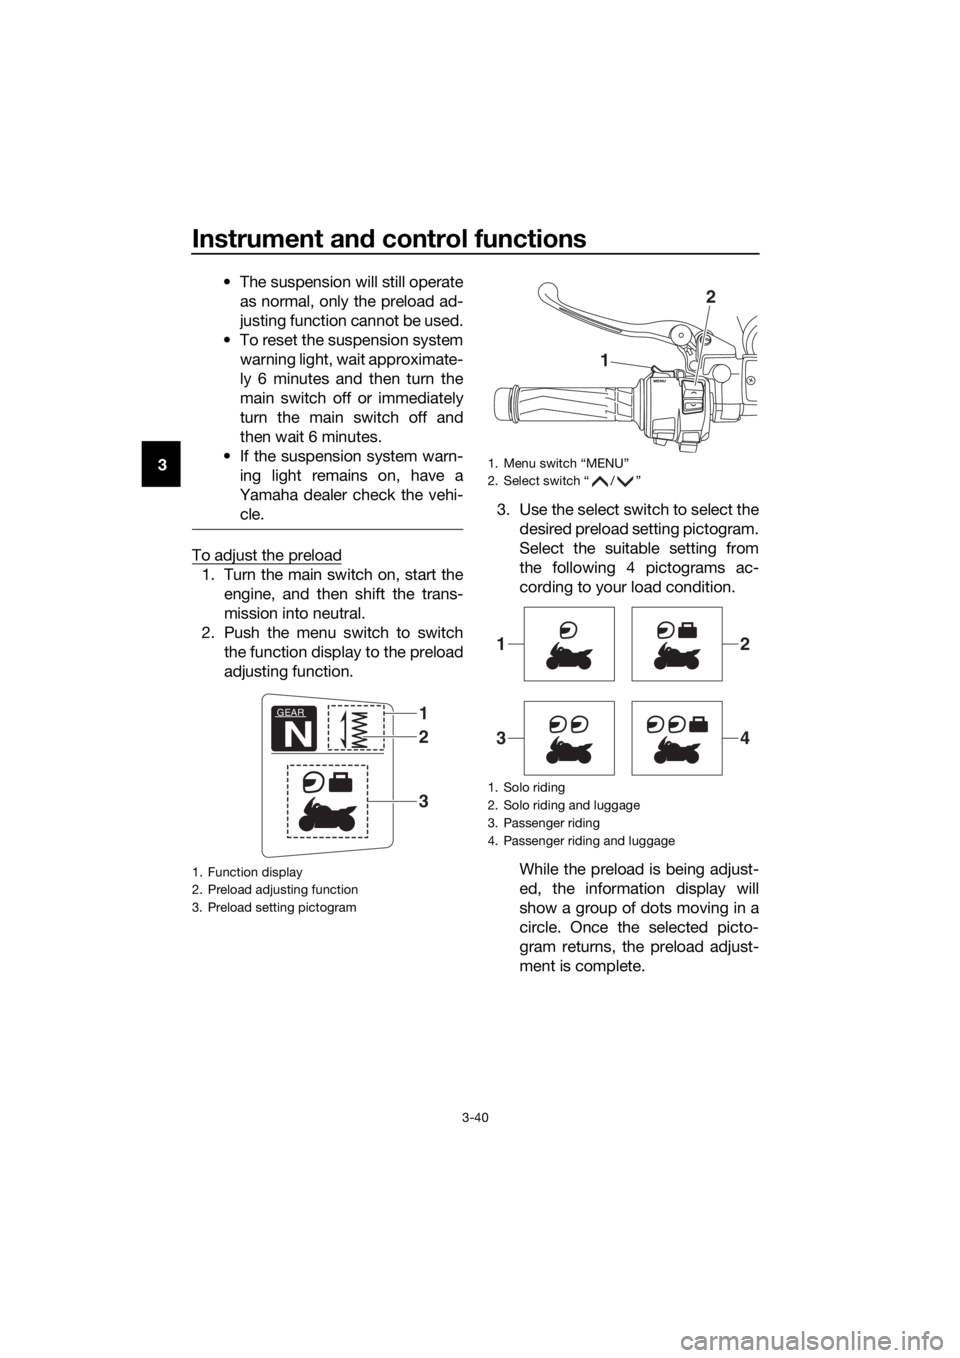
To adjust the preload
1. Turn the main switch on, start the
engine, and then shift the trans-
mission into neutral.
2. Push the menu switch to switch
the function display to the preload
adjusting function.3. Use the select switch to select the
desired preload setting pictogram.
Select the suitable setting from
the following 4 pictograms ac-
cording to your load condition.
While the preload is being adjust-
ed, the information display will
show a group of dots moving in a
circle. Once the selected picto-
gram returns, the preload adjust-
ment is complete.
1. Function display
2. Preload adjusting function
3. Preload setting pictogram
GEAR
N
1
3
2
1. Menu switch “MENU”
2. Select switch “ / ”
1. Solo riding
2. Solo riding and luggage
3. Passenger riding
4. Passenger riding and luggage
1
2
12
34
UB96E2E0.book Page 40 Wednesday, September 18, 2019 10:21 AM
Page 65 of 122
Operation and important riding points
5-2
5 If any engine trouble should oc-
cur during the engine break-in
period, immediately have a
Yamaha dealer check the vehi-
cle.
EAU86590
Starting the engine
The ignition circuit cut-off system will
enable starting when:
the transmission is in the neutral
position or
the transmission is in gear, the
sidestand is up, and the clutch le-
ver is pulled.
To start the engine
1. Turn the main switch on and set
the engine stop switch to the run
position.
2. Confirm the indicator and warning
light(s) come on for a few sec-
onds, and the go off. (See page
3-3.)
TIP
Do not start the engine if the en-
gine trouble warning light or the oil
level warning light remains on.
The ABS warning light should
come on and stay on until the ve-
hicle reaches a speed of 10 km/h
(6 mi/h).
NOTICE
ECA24110
If a warning or indicator light does
not work as described above, have a
Yamaha dealer check the vehicle.
3. Shift the transmission into the
neutral position.
4. Start the engine by pushing the
start switch.
5. Release the start switch when the
engine starts, or after 5 seconds.
Wait 10 seconds before pressing
the switch again to allow battery
voltage to restore.
UB96E2E0.book Page 2 Wednesday, September 18, 2019 10:21 AM
Page 79 of 122
Periodic maintenance and adjustment
6-10
6
EAU19653
Checking the spark plugs
The spark plugs are important engine
components, which should be
checked periodically, preferably by a
Yamaha dealer. Since heat and depos-
its will cause any spark plug to slowly
erode, they should be removed and
checked in accordance with the peri-
odic maintenance and lubrication
chart. In addition, the condition of the
spark plugs can reveal the condition of
the engine.
The porcelain insulator around the
center electrode of each spark plug
should be a medium-to-light tan (the
ideal color when the vehicle is ridden
normally), and all spark plugs installed
in the engine should have the same
color. If any spark plug shows a dis-
tinctly different color, the engine could
be operating improperly. Do not at-
tempt to diagnose such problems
yourself. Instead, have a Yamaha deal-
er check the vehicle.
If a spark plug shows signs of elec-
trode erosion and excessive carbon or
other deposits, it should be replaced.
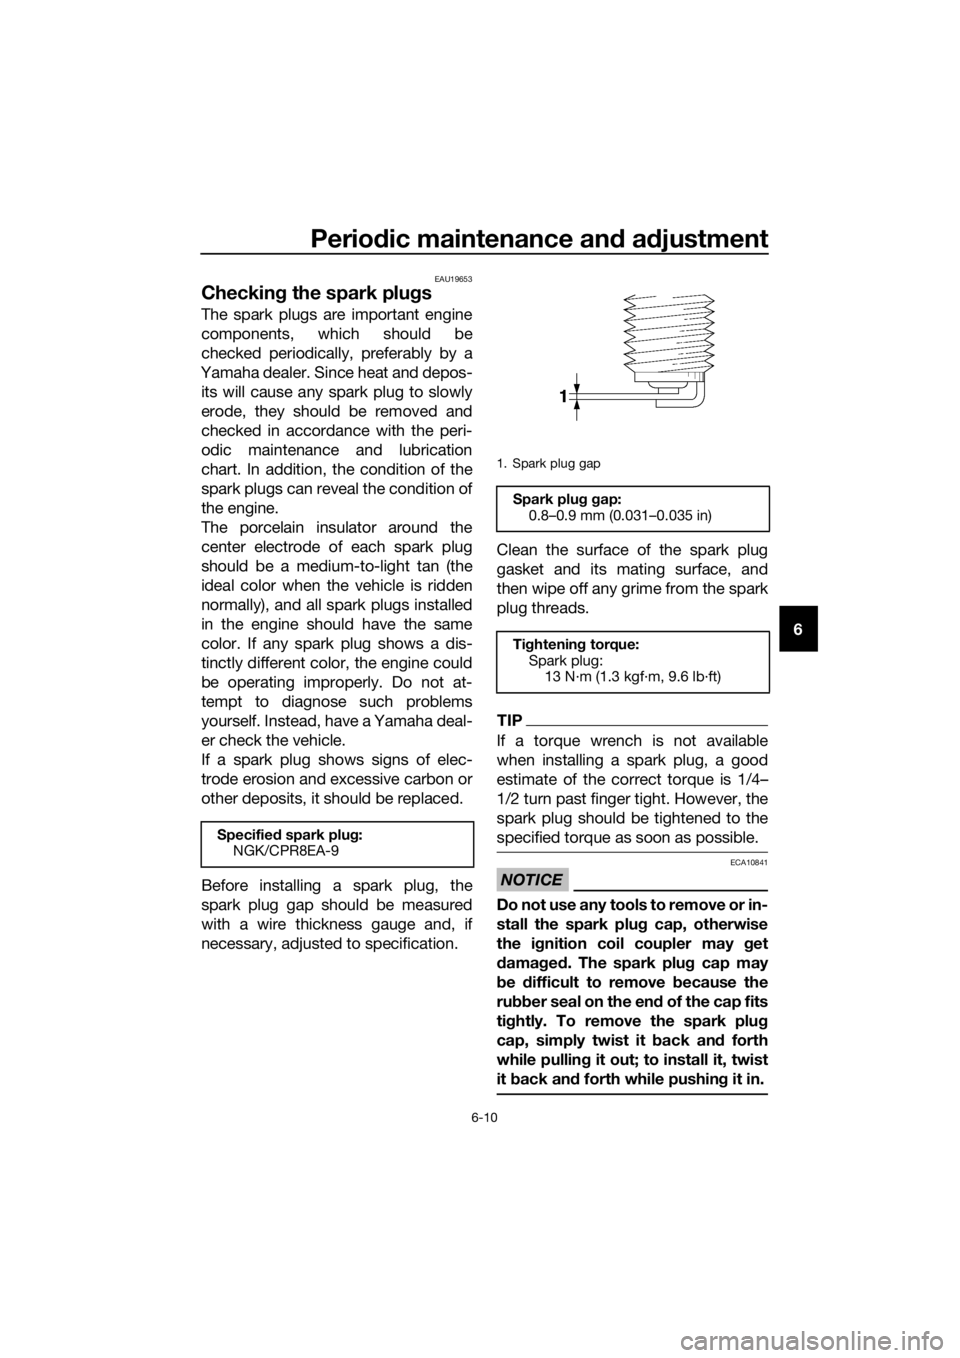
Before installing a spark plug, the
spark plug gap should be measured
with a wire thickness gauge and, if
necessary, adjusted to specification.Clean the surface of the spark plug
gasket and its mating surface, and
then wipe off any grime from the spark
plug threads.
TIP
If a torque wrench is not available
when installing a spark plug, a good
estimate of the correct torque is 1/4…
1/2 turn past finger tight. However, the
spark plug should be tightened to the
specified torque as soon as possible.
NOTICE
ECA10841
Do not use any tools to remove or in-
stall the spark plug cap, otherwise
the ignition coil coupler may get
damaged. The spark plug cap may
be difficult to remove because the
rubber seal on the end of the cap fits
tightly. To remove the spark plug
cap, simply twist it back and forth
while pulling it out; to install it, twist
it back and forth while pushing it in.
Specified spark plug:
NGK/CPR8EA-9
1. Spark plug gap
Spark plug gap:
0.8–0.9 mm (0.031–0.035 in)
Tightening torque:
Spark plug:
13 N·m (1.3 kgf·m, 9.6 lb·ft)
UB96E2E0.book Page 10 Wednesday, September 18, 2019 10:21 AM
Page 80 of 122
Periodic maintenance and adjustment
6-11
6
EAU82180
Canister
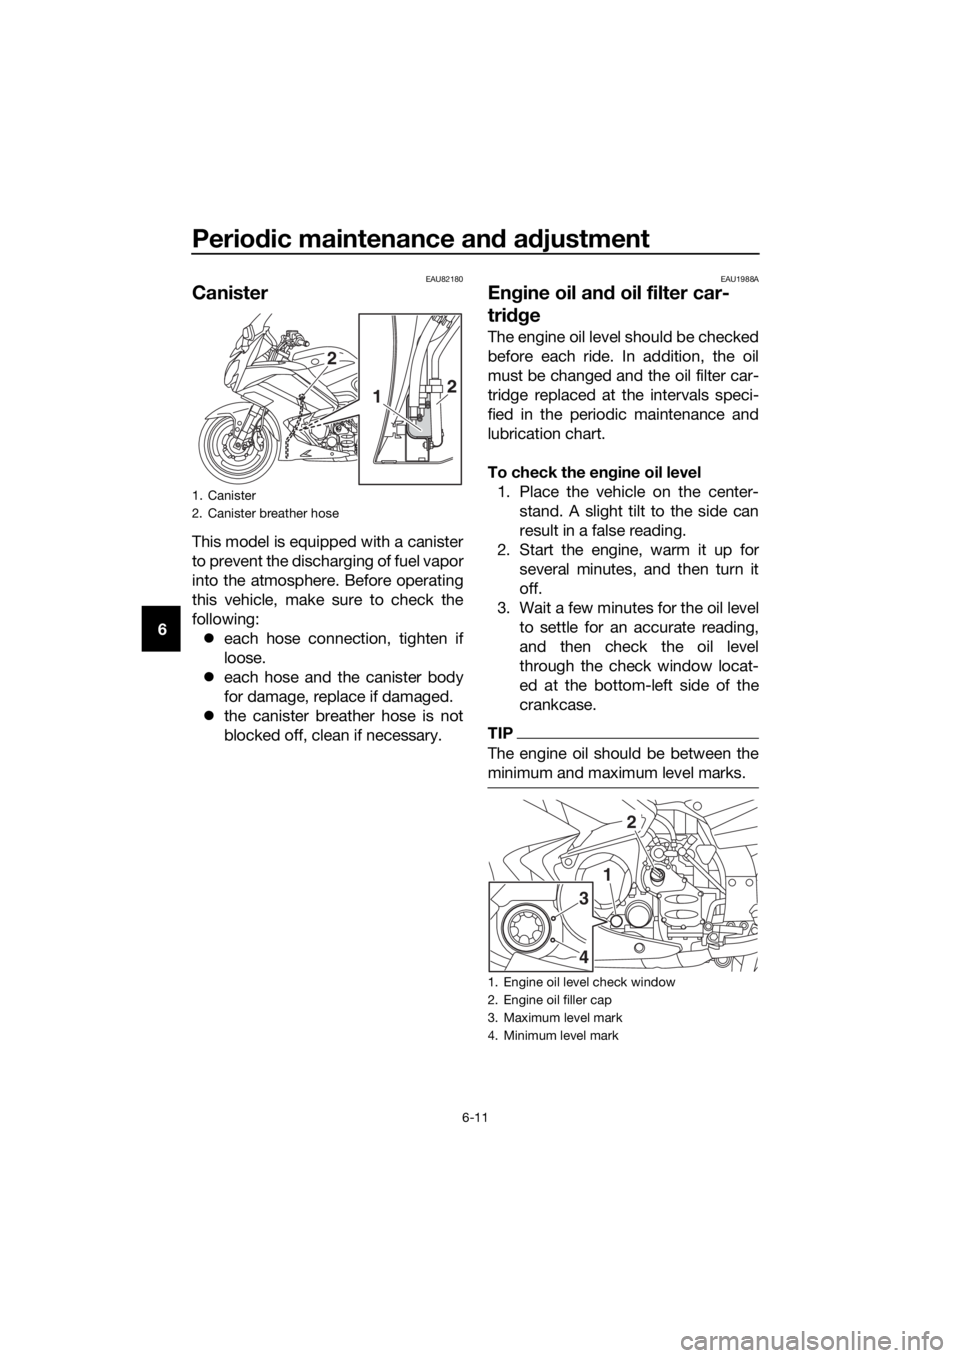
This model is equipped with a canister
to prevent the discharging of fuel vapor
into the atmosphere. Before operating
this vehicle, make sure to check the
following:
each hose connection, tighten if
loose.
each hose and the canister body
for damage, replace if damaged.
the canister breather hose is not
blocked off, clean if necessary.
EAU1988A
Engine oil and oil filter car-
tridge
The engine oil level should be checked
before each ride. In addition, the oil
must be changed and the oil filter car-
tridge replaced at the intervals speci-
fied in the periodic maintenance and
lubrication chart.
To check the engine oil level
1. Place the vehicle on the center-
stand. A slight tilt to the side can
result in a false reading.
2. Start the engine, warm it up for
several minutes, and then turn it
off.
3. Wait a few minutes for the oil level
to settle for an accurate reading,
and then check the oil level
through the check window locat-
ed at the bottom-left side of the
crankcase.
TIP
The engine oil should be between the
minimum and maximum level marks.
1. Canister
2. Canister breather hose
2121
2
1. Engine oil level check window
2. Engine oil filler cap
3. Maximum level mark
4. Minimum level mark
31
4
2
UB96E2E0.book Page 11 Wednesday, September 18, 2019 10:21 AM
Page 83 of 122
Periodic maintenance and adjustment
6-14
6 12. Start the engine, and then let it idle
for several minutes while checking
it for oil leakage. If oil is leaking,
immediately turn the engine off
and check for the cause.
TIP
After the engine is started, the engine
oil level warning light should go off if
the oil level is sufficient.
NOTICE
ECA10402
If the oil level warning light flickers
or remains on even if the oil level is
correct, immediately turn the engine
off and have a Yamaha dealer check
the vehicle.
13. Turn the engine off, and then
check the oil level and correct it if
necessary.
EAU85450
Why Yamalube
YAMALUBE oil is a Genuine YAMAHA
Part born of the engineers’ passion
and belief that engine oil is an impor-
tant liquid engine component. We form
teams of specialists in the fields of me-
chanical engineering, chemistry, elec-
tronics and track testing, and have
them develop the engine together with
the oil it will use. Yamalube oils take full
advantage of the base oil’s qualities
and blend in the ideal balance of addi-
tives to make sure the final oil clears
our performance standards. Thus,
Yamalube mineral, semisynthetic and
synthetic oils have their own distinct
characters and value. Yamaha’s expe-
rience gained over many years of re-
search and development into oil since
the 1960’s helps make Yamalube the
best choice for your Yamaha engine.
UB96E2E0.book Page 14 Wednesday, September 18, 2019 10:21 AM