ABS YAMAHA FJR1300AS 2013 Owners Manual
[x] Cancel search | Manufacturer: YAMAHA, Model Year: 2013, Model line: FJR1300AS, Model: YAMAHA FJR1300AS 2013Pages: 122, PDF Size: 3.34 MB
Page 6 of 122

TABLE OF CONTENTSSAFETY INFORMATION ..................1-1
DESCRIPTION ..................................2-1
Left view ..........................................2-1
Right view ........................................2-2
Controls and instruments.................2-3
INSTRUMENT AND CONTROL
FUNCTIONS .......................................3-1
Immobilizer system .........................3-1
Main switch/steering lock ................3-2
Indicator lights and warning lights ............................................3-4
Cruise control system .....................3-7
Multi-function meter unit ...............3-11
D-mode (drive mode) ....................3-24
Handlebar switches ......................3-25
YCC-S system ..............................3-27
Shift pedal .....................................3-28
Hand shift lever .............................3-28
Brake lever ...................................3-29
Brake pedal ..................................3-29
ABS ..............................................3-29
Traction control system ................3-30
Fuel tank cap ................................3-32
Fuel ...............................................3-33
Fuel tank breather/overflow
hose ..........................................3-34
Catalytic converters ......................3-34
Seats ............................................3-35
Adjusting the rider seat height ......3-36 Storage compartment ................... 3-38
Accessory box .............................. 3-39
Adjusting the headlight beams ..... 3-39
Handlebar position ....................... 3-40
Opening and closing the cowling
vents ......................................... 3-40
Rear view mirrors ......................... 3-41
Adjusting the front and rear suspension ................................ 3-42
Sidestand ..................................... 3-46
Ignition circuit cut-off system ........ 3-47
Auxiliary DC jack .......................... 3-49
FOR YOUR SAFETY –
PRE-OPERATION CHECKS ............. 4-1
OPERATION AND IMPORTANT
RIDING POINTS ................................. 5-1
Starting the engine ......................... 5-1
Shifting ........................................... 5-3
Tips for reducing fuel consumption ............................... 5-4
Engine break-in .............................. 5-4
Parking ........................................... 5-5
PERIODIC MAINTENANCE AND
ADJUSTMENT ................................... 6-1
Owner’s tool kit ............................... 6-2
Periodic maintenance chart for the emission control system ............. 6-3 General maintenance and
lubrication chart .......................... 6-4
Removing and installing panels ..... 6-8
Checking the spark plugs ............ 6-11
Engine oil and oil filter cartridge ... 6-12
Final gear oil ................................ 6-14
Coolant ........................................ 6-16
Air filter element ........................... 6-17
Checking the engine idling speed ........................................ 6-17
Checking the throttle grip free
play ........................................... 6-18
Valve clearance ........................... 6-18
Tires ............................................. 6-18
Cast wheels ................................. 6-21
YCC-S clutch ............................... 6-21
Checking the brake lever free play ........................................... 6-22
Brake light switches ..................... 6-22
Checking the front and rear brake pads .......................................... 6-23
Checking the brake and YCC-S clutch fluid levels ...................... 6-23
Changing the brake and YCC-S clutch fluids ............................... 6-25
Checking and lubricating the
cables ....................................... 6-25
Checking and lubricating the throttle grip and cable ............... 6-26
Checking and lubricating the brake and shift pedals ........................ 6-26U1MDE0E0.book Page 1 Friday, February 15, 2013 1:26 PM
Page 19 of 122
INSTRUMENT AND CONTROL FUNCTIONS
3-4
3
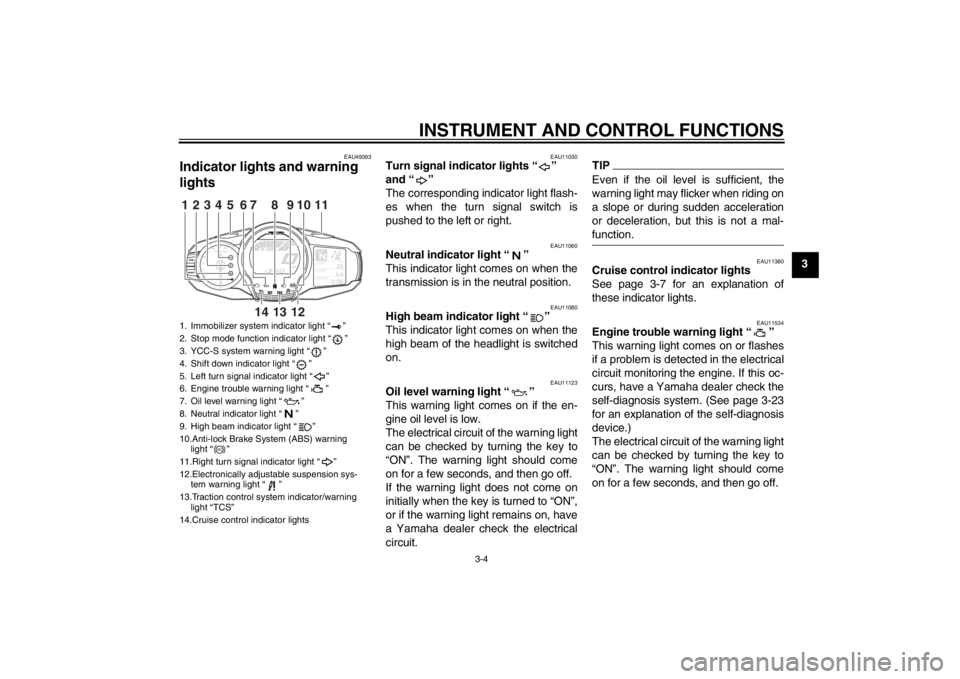
EAU49393
Indicator lights and warning
lights
EAU11030
Turn signal indicator lights “ ”
and “ ”
The corresponding indicator light flash-
es when the turn signal switch is
pushed to the left or right.
EAU11060
Neutral indicator light “ ”
This indicator light comes on when the
transmission is in the neutral position.
EAU11080
High beam indicator light “ ”
This indicator light comes on when the
high beam of the headlight is switched
on.
EAU11123
Oil level warning light “ ”
This warning light comes on if the en-
gine oil level is low.
The electrical circuit of the warning light
can be checked by turning the key to
“ON”. The warning light should come
on for a few seconds, and then go off.
If the warning light does not come on
initially when the key is turned to “ON”,
or if the warning light remains on, have
a Yamaha dealer check the electrical
circuit.
TIPEven if the oil level is sufficient, the
warning light may flicker when riding on
a slope or during sudden acceleration
or deceleration, but this is not a mal-
function.
EAU11380
Cruise control indicator lights
See page 3-7 for an explanation of
these indicator lights.
EAU11534
Engine trouble warning light “ ”
This warning light comes on or flashes
if a problem is detected in the electrical
circuit monitoring the engine. If this oc-
curs, have a Yamaha dealer check the
self-diagnosis system. (See page 3-23
for an explanation of the self-diagnosis
device.)
The electrical circuit of the warning light
can be checked by turning the key to
“ON”. The warning light should come
on for a few seconds, and then go off.
1. Immobilizer system indicator light “ ”
2. Stop mode function indicator light “ ”
3. YCC-S system warning light “ ”
4. Shift down indicator light “ ”
5. Left turn signal indicator light “ ”
6. Engine trouble warning light “ ”
7. Oil level warning light “ ”
8. Neutral indicator light “ ”
9. High beam indicator light “ ”
10.Anti-lock Brake System (ABS) warning light “ ”
11.Right turn signal indicator light “ ”
12.Electronically adjustable suspension sys- tem warning light “ ”
13.Traction control system indicator/warning light “TCS”
14.Cruise control indicator lights
GEARN
25
A.TEMP ˚C
Lo
C.TEMP˚C
0:06
TIME TRIP
1234
5
11
6
10
7
13
12
14
9
8
ABS
U1MDE0E0.book Page 4 Friday, February 15, 2013 1:26 PM
Page 20 of 122
INSTRUMENT AND CONTROL FUNCTIONS
3-5
3If the warning light does not come on
initially when the key is turned to “ON”,
or if the warning light remains on, have
a Yamaha dealer check the electrical
circuit.
EAU51661
ABS warning light “ ”
In normal operation, the ABS warning
light comes on when the key is turned
to “ON”, and goes off after traveling at a
speed of 10 km/h (6 mi/h) or higher.
If the ABS warning light:●
does not come on when the key is
turned to “ON”
●
comes on or flashes while riding
●
does not go off after traveling at a
speed of 10 km/h (6 mi/h) or higher
The ABS may not work correctly. If any
of the above occurs, have a Yamaha
dealer check the system as soon as
possible. (See page 3-29 for an expla-
nation of the ABS.)WARNING
EWA16040
If the ABS warning light does not go
off after traveling at a speed of 10
km/h (6 mi/h) or higher, or if the
warning light comes on or flashes while riding, the brake system re-
verts to conventional braking. If ei-
ther of the above occurs, or if the
warning light does not come on at
all, use extra caution to avoid possi-
ble wheel lock during emergency
braking. Have a Yamaha dealer
check the brake system and electri-
cal circuits as soon as possible.
TIPIf the start switch is pushed while the
engine is running, the ABS warning
light will come on, but this is not a mal-
function.
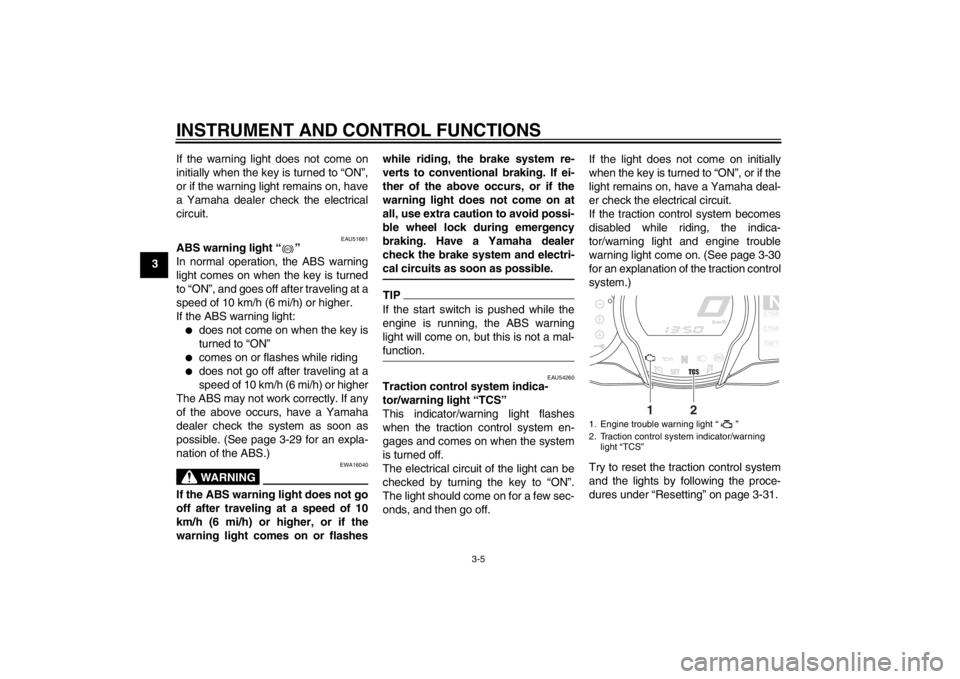
EAU54260
Traction control system indica-
tor/warning light “TCS”
This indicator/warning light flashes
when the traction control system en-
gages and comes on when the system
is turned off.
The electrical circuit of the light can be
checked by turning the key to “ON”.
The light should come on for a few sec-
onds, and then go off.
If the light does not come on initially
when the key is turned to “ON”, or if the
light remains on, have a Yamaha deal-
er check the electrical circuit.
If the traction control system becomes
disabled while riding, the indica-
tor/warning light and engine trouble
warning light come on. (See page 3-30
for an explanation of the traction control
system.)
Try to reset the traction control system
and the lights by following the proce-
dures under “Resetting” on page 3-31.
ABS
1. Engine trouble warning light “ ”
2. Traction control system indicator/warning
light “TCS”
NA.TEM
P
C.TEM
P
TIME T
R
2
1
U1MDE0E0.book Page 5 Friday, February 15, 2013 1:26 PM
Page 41 of 122
INSTRUMENT AND CONTROL FUNCTIONS
3-26
3
position. To cancel the turn signal
lights, push the switch in after it has re-
turned to the center position.
EAU12500
Horn switch “ ”
Press this switch to sound the horn.
EAU55370
Start/Engine stop switch “ / / ”
To crank the engine with the starter, set
this switch to “ ”, and then push
the “ ” side of the switch while apply-
ing the front or rear brake. See page
5-1 for starting instructions prior to
starting the engine.
Set this switch to “ ” to stop the en-
gine in case of an emergency, such as
when the vehicle has overturned or if
the throttle cable is stuck.
EAU42341
The engine trouble warning light and
ABS warning light may come on when
the key is turned to “ON” and the start
switch is pushed, but this does not indi-
cate a malfunction.
EAU12733
Hazard switch “ ”
With the key in the “ON” or “ ” posi-
tion, use this switch to turn on the haz-
ard lights (simultaneous flashing of all
turn signal lights).
The hazard lights are used in case of
an emergency or to warn other drivers
when your vehicle is stopped where it
might be a traffic hazard.NOTICE
ECA10061
Do not use the hazard lights for an
extended length of time with the en-
gine not running, otherwise the bat-
tery may discharge.
EAU12780
Cruise control switches
See page 3-7 for an explanation of the
cruise control system.
EAU54230
Menu switch “MENU”
This switch is used to perform selec-
tions in the function display and setting
mode display of the multi-function
meter unit.
See “Multi-function meter unit” on page
3-11 for detailed information.
EAU54220
Select switch “ / ”
This switch is used to perform selec-
tions in the function display and setting
mode display of the multi-function
meter unit.
See “Multi-function meter unit” on page
3-11 for detailed information.
EAU55461
Stop mode function switch “ ”
When this switch is pushed, the stop
mode function is activated and the stop
mode function indicator light comes on.
When the stop mode function is activat-
ed, the function works together with the
YCC-S system to automatically shift
down to 1st gear according to the vehi-
cle speed.
If this function is activated and the
transmission is in 2nd gear or higher
when the rider stops the vehicle, the
function will automatically shift down to
1st gear.
U1MDE0E0.book Page 26 Friday, February 15, 2013 1:26 PM
Page 44 of 122
INSTRUMENT AND CONTROL FUNCTIONS
3-29
3
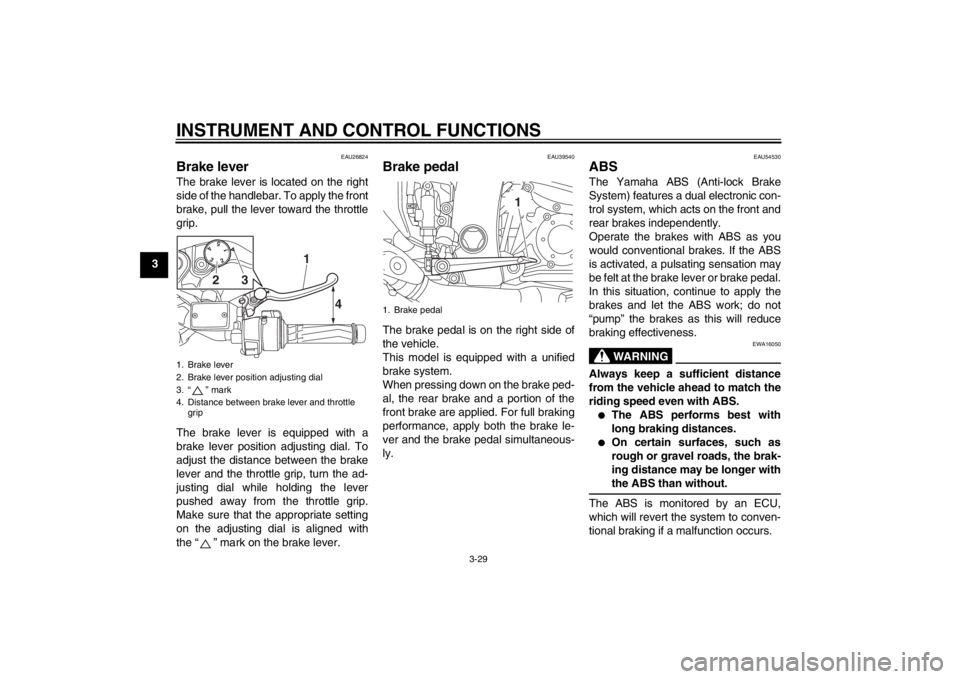
EAU26824
Brake lever The brake lever is located on the right
side of the handlebar. To apply the front
brake, pull the lever toward the throttle
grip.
The brake lever is equipped with a
brake lever position adjusting dial. To
adjust the distance between the brake
lever and the throttle grip, turn the ad-
justing dial while holding the lever
pushed away from the throttle grip.
Make sure that the appropriate setting
on the adjusting dial is aligned with
the “ ” mark on the brake lever.
EAU39540
Brake pedal The brake pedal is on the right side of
the vehicle.
This model is equipped with a unified
brake system.
When pressing down on the brake ped-
al, the rear brake and a portion of the
front brake are applied. For full braking
performance, apply both the brake le-
ver and the brake pedal simultaneous-
ly.
EAU54530
ABS The Yamaha ABS (Anti-lock Brake
System) features a dual electronic con-
trol system, which acts on the front and
rear brakes independently.
Operate the brakes with ABS as you
would conventional brakes. If the ABS
is activated, a pulsating sensation may
be felt at the brake lever or brake pedal.
In this situation, continue to apply the
brakes and let the ABS work; do not
“pump” the brakes as this will reduce
braking effectiveness.
WARNING
EWA16050
Always keep a sufficient distance
from the vehicle ahead to match the
riding speed even with ABS.●
The ABS performs best with
long braking distances.
●
On certain surfaces, such as
rough or gravel roads, the brak-
ing distance may be longer with
the ABS than without.
The ABS is monitored by an ECU,
which will revert the system to conven-
tional braking if a malfunction occurs.
1. Brake lever
2. Brake lever position adjusting dial
3. “ ” mark
4. Distance between brake lever and throttle grip
15
43
2
4
1
3
2
1. Brake pedal
1
U1MDE0E0.book Page 29 Friday, February 15, 2013 1:26 PM
Page 45 of 122
INSTRUMENT AND CONTROL FUNCTIONS
3-30
3
TIP●
The ABS performs a self-diagno-
sis test each time the vehicle first
starts off after the key is turned to
“ON” and the vehicle has traveled
at a speed of 10 km/h (6 mi/h) or
higher. During this test, a “clicking”
noise can be heard from under the
seat, and if the brake lever or
brake pedal is even slightly ap-
plied, a vibration can be felt at the
lever and pedal, but these do not
indicate a malfunction.
●
This ABS has a test mode which
allows the owner to experience the
pulsation at the brake lever or
brake pedal when the ABS is oper-
ating. However, special tools are
required, so please consult your
Yamaha dealer when performing this test.
NOTICE
ECA16830
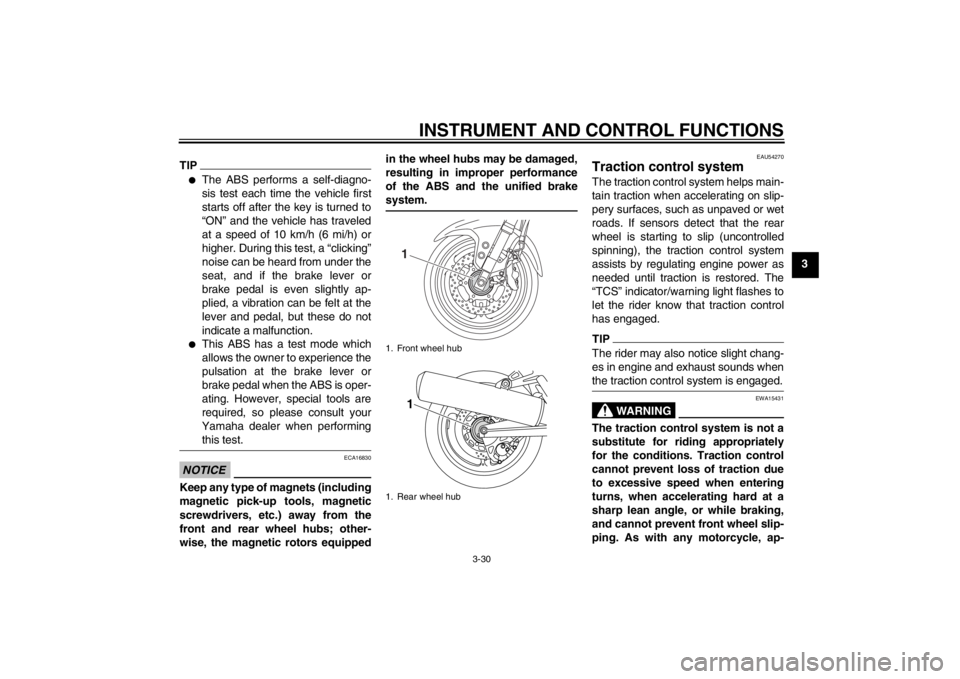
Keep any type of magnets (including
magnetic pick-up tools, magnetic
screwdrivers, etc.) away from the
front and rear wheel hubs; other-
wise, the magnetic rotors equipped in the wheel hubs may be damaged,
resulting in improper performance
of the ABS and the unified brake
system.
EAU54270
Traction control system The traction control system helps main-
tain traction when accelerating on slip-
pery surfaces, such as unpaved or wet
roads. If sensors detect that the rear
wheel is starting to slip (uncontrolled
spinning), the traction control system
assists by regulating engine power as
needed until traction is restored. The
“TCS” indicator/warning light flashes to
let the rider know that traction control
has engaged.TIPThe rider may also notice slight chang-
es in engine and exhaust sounds when
the traction control system is engaged.
WARNING
EWA15431
The traction control system is not a
substitute for riding appropriately
for the conditions. Traction control
cannot prevent loss of traction due
to excessive speed when entering
turns, when accelerating hard at a
sharp lean angle, or while braking,
and cannot prevent front wheel slip-
ping. As with any motorcycle, ap-
1. Front wheel hub
1. Rear wheel hub
11
U1MDE0E0.book Page 30 Friday, February 15, 2013 1:26 PM
Page 57 of 122
INSTRUMENT AND CONTROL FUNCTIONS
3-42
3
EAU55423
Adjusting the front and rear
suspension This model is equipped with an elec-
tronically adjustable suspension sys-
tem. The preload of the rear shock
absorber and the damping forces of
both the front fork and rear shock ab-
sorber can be adjusted.
WARNING
EWA12422
Be sure to stop the vehicle before
making any setting changes to the
multi-function meter unit. Changing
settings while riding can distract the
operator and increase the risk of an
accident.Preload
When riding with luggage or a passen-
ger, use the preload adjusting function
to adjust the suspension system to
match the load. There are 4 preload
settings.TIP●
The preload adjusting function will
appear only when the engine is
running.
●
Changing the preload setting will
also adjust the front and rear sus-
pension damping forces accord-
ingly. See “Damping force” on
page 3-44 for more information.
●
About cold temperature operation: When using the preload adjust- ing function, there should be no
weight on the vehicle.
When using the preload adjust- ing function at ambient tempera-
tures near or below 0 °C (32 °F),
to protect the preload adjusting
function motor, the electronically
adjustable suspension system
warning light may come on.
The suspension will still operate as normal, only the preload ad-
justing function cannot be used.
To reset the electronically ad- justable suspension system
warning light, wait approximate-
ly 6 minutes and then turn the
key to “OFF” or immediately turn
the key to “OFF” and then wait 6
minutes. If the electronically adjustable
suspension system warning
light remains on, have a
Yamaha dealer check the sus-
pension system.
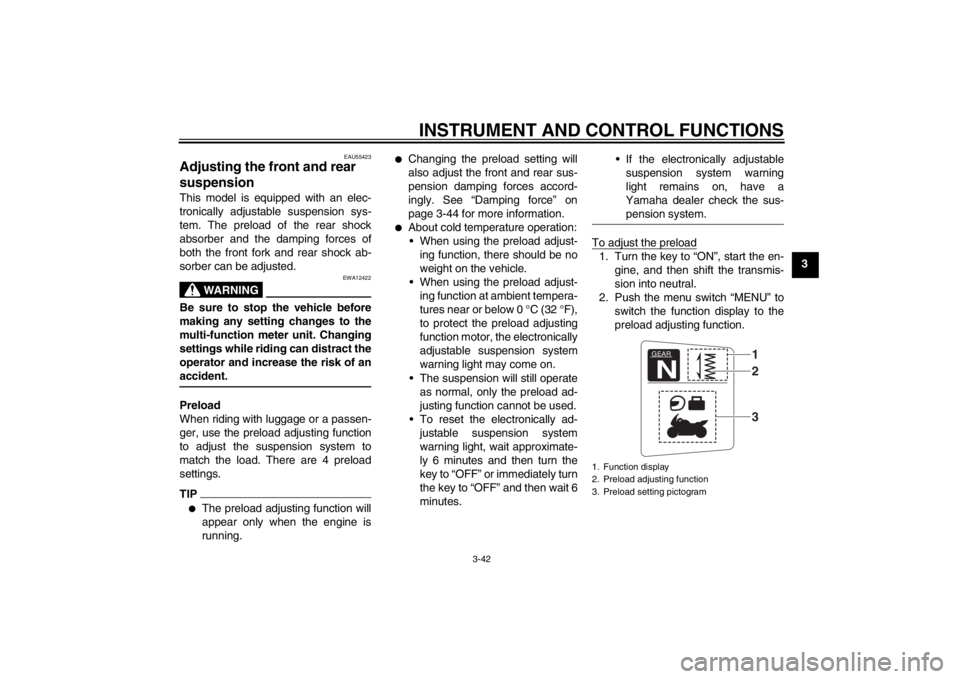
To adjust the preload1. Turn the key to “ON”, start the en- gine, and then shift the transmis-
sion into neutral.
2. Push the menu switch “MENU” to switch the function display to the
preload adjusting function.1. Function display
2. Preload adjusting function
3. Preload setting pictogram
GEARN
132
U1MDE0E0.book Page 42 Friday, February 15, 2013 1:26 PM
Page 60 of 122
INSTRUMENT AND CONTROL FUNCTIONS
3-45
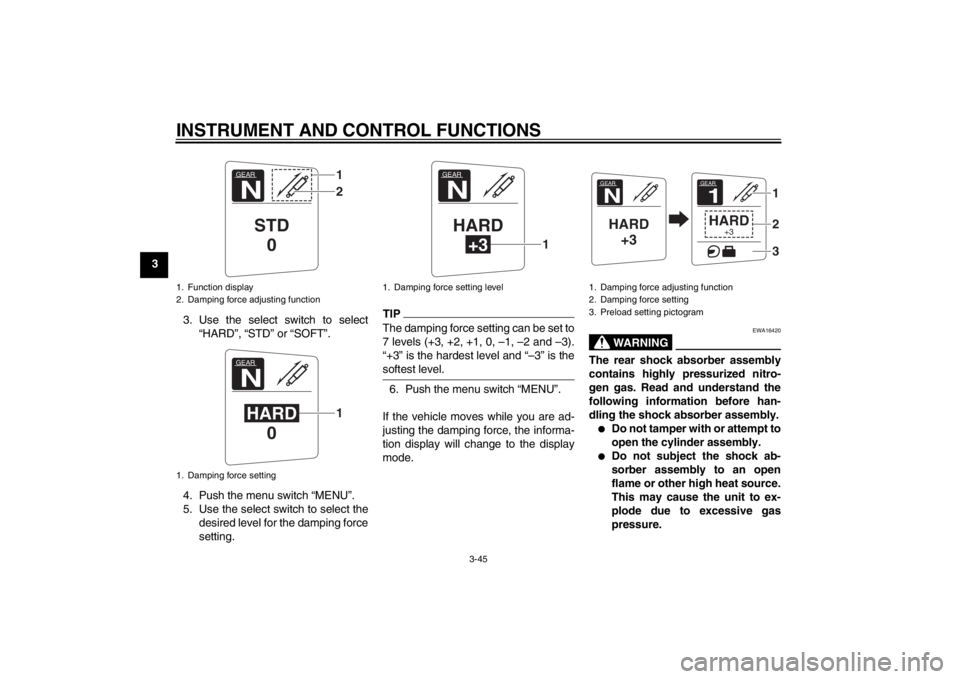
33. Use the select switch to select“HARD”, “STD” or “SOFT”.
4. Push the menu switch “MENU”.
5. Use the select switch to select the desired level for the damping force
setting.
TIPThe damping force setting can be set to
7 levels (+3, +2, +1, 0, –1, –2 and –3).
“+3” is the hardest level and “–3” is the
softest level.6. Push the menu switch “MENU”.
If the vehicle moves while you are ad-
justing the damping force, the informa-
tion display will change to the display
mode.
WARNING
EWA16420
The rear shock absorber assembly
contains highly pressurized nitro-
gen gas. Read and understand the
following information before han-
dling the shock absorber assembly.●
Do not tamper with or attempt to
open the cylinder assembly.
●
Do not subject the shock ab-
sorber assembly to an open
flame or other high heat source.
This may cause the unit to ex-
plode due to excessive gas
pressure.
1. Function display
2. Damping force adjusting function
1. Damping force setting
GEARN
STD 0
12
GEARNHARD 0
1
1. Damping force setting level
GEARNHARD
+3
1
1. Damping force adjusting function
2. Damping force setting
3. Preload setting pictogramGEARNHARD+3
GEAR1HARD
+3
123
U1MDE0E0.book Page 45 Friday, February 15, 2013 1:26 PM
Page 61 of 122
INSTRUMENT AND CONTROL FUNCTIONS
3-46
3
●
Do not deform or damage the
cylinder in any way. Cylinder
damage will result in poor
damping performance.
●
Do not dispose of a damaged or
worn-out shock absorber as-
sembly yourself. Take the shock
absorber assembly to a Yamaha
dealer for any service.
EAU55590
Sidestand The sidestand is located on the left side
of the frame. Raise the sidestand or
lower it with your foot while holding the
vehicle upright.TIP●
The built-in sidestand switch is
part of the ignition circuit cut-off
system, which cuts the ignition in
certain situations. (See the follow-
ing section for an explanation of
the ignition circuit cut-off system.)
●
The sidestand switch is also part of
the YCC-S system. Shifting out of
neutral is impossible when the
sidestand is down.WARNING
EWA10241
The vehicle must not be ridden with
the sidestand down, or if the side-
stand cannot be properly moved up
(or does not stay up), otherwise the
sidestand could contact the ground
and distract the operator, resulting
in a possible loss of control.
Yamaha’s ignition circuit cut-off
system has been designed to assistthe operator in fulfilling the respon-
sibility of raising the sidestand be-
fore starting off. Therefore, check
this system regularly and have a
Yamaha dealer repair it if it does not
function properly.
U1MDE0E0.book Page 46 Friday, February 15, 2013 1:26 PM
Page 69 of 122
OPERATION AND IMPORTANT RIDING POINTS
5-2
5
●
Oil level warning light
●
Engine trouble warning light
●
Traction control system indi-
cator/warning light
●
Cruise control indicator lights
●
Electronically adjustable sus-
pension system warning light
●
Shift down indicator light
●
YCC-S system warning light
●
Stop mode function indicator
light
●
Immobilizer system indicator
light
TIPIf the stop mode function was activated
when the key was turned to “OFF” then
the stop mode function is still activated
and the indicator light will remain on.NOTICE
ECA11833
If a warning or indicator light does
not come on initially when the key is
turned to “ON”, or if a warning or in-
dicator light remains on, see page
3-4 for the corresponding warning
and indicator light circuit check.
The ABS warning light should
come on when the key is turned to
“ON”, and then go off after travel-
ing at a speed of 10 km/h (6 mi/h)
or higher.
NOTICE
ECA17681
If the ABS warning light does not
come on and then go off as ex-
plained above, see page 3-4 for the
warning light circuit check.2. Shift the transmission into the neu-tral position. The neutral indicator
light should come on. If not, ask a
Yamaha dealer to check the elec- trical circuit.
3. Start the engine by pushing the “ ” side of the start/engine
stop switch with the front or rear
brake applied.
If the engine fails to start, release
the start/engine stop switch, wait a
few seconds, and then try again.
Each starting attempt should be as
short as possible to preserve the
battery. Do not crank the engine
more than 10 seconds on any one
attempt.
NOTICE
ECA11042
For maximum engine life, never ac-
celerate hard when the engine is
cold!
U1MDE0E0.book Page 2 Friday, February 15, 2013 1:26 PM