lock YAMAHA FJR1300AS 2013 Owners Manual
[x] Cancel search | Manufacturer: YAMAHA, Model Year: 2013, Model line: FJR1300AS, Model: YAMAHA FJR1300AS 2013Pages: 122, PDF Size: 3.34 MB
Page 6 of 122

TABLE OF CONTENTSSAFETY INFORMATION ..................1-1
DESCRIPTION ..................................2-1
Left view ..........................................2-1
Right view ........................................2-2
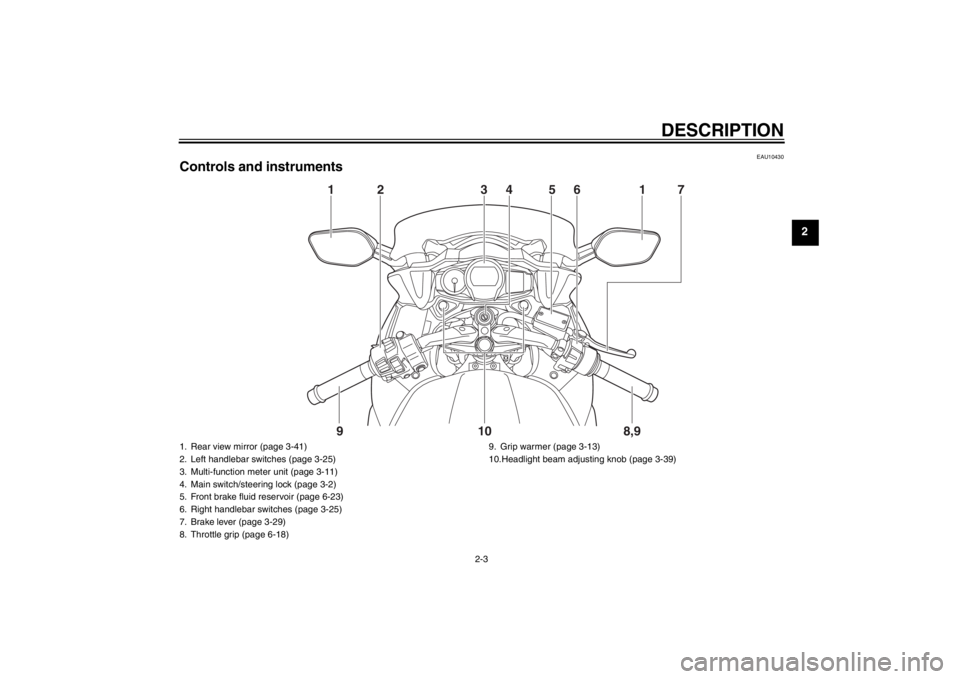
Controls and instruments.................2-3
INSTRUMENT AND CONTROL
FUNCTIONS .......................................3-1
Immobilizer system .........................3-1
Main switch/steering lock ................3-2
Indicator lights and warning lights ............................................3-4
Cruise control system .....................3-7
Multi-function meter unit ...............3-11
D-mode (drive mode) ....................3-24
Handlebar switches ......................3-25
YCC-S system ..............................3-27
Shift pedal .....................................3-28
Hand shift lever .............................3-28
Brake lever ...................................3-29
Brake pedal ..................................3-29
ABS ..............................................3-29
Traction control system ................3-30
Fuel tank cap ................................3-32
Fuel ...............................................3-33
Fuel tank breather/overflow
hose ..........................................3-34
Catalytic converters ......................3-34
Seats ............................................3-35
Adjusting the rider seat height ......3-36 Storage compartment ................... 3-38
Accessory box .............................. 3-39
Adjusting the headlight beams ..... 3-39
Handlebar position ....................... 3-40
Opening and closing the cowling
vents ......................................... 3-40
Rear view mirrors ......................... 3-41
Adjusting the front and rear suspension ................................ 3-42
Sidestand ..................................... 3-46
Ignition circuit cut-off system ........ 3-47
Auxiliary DC jack .......................... 3-49
FOR YOUR SAFETY –
PRE-OPERATION CHECKS ............. 4-1
OPERATION AND IMPORTANT
RIDING POINTS ................................. 5-1
Starting the engine ......................... 5-1
Shifting ........................................... 5-3
Tips for reducing fuel consumption ............................... 5-4
Engine break-in .............................. 5-4
Parking ........................................... 5-5
PERIODIC MAINTENANCE AND
ADJUSTMENT ................................... 6-1
Owner’s tool kit ............................... 6-2
Periodic maintenance chart for the emission control system ............. 6-3 General maintenance and
lubrication chart .......................... 6-4
Removing and installing panels ..... 6-8
Checking the spark plugs ............ 6-11
Engine oil and oil filter cartridge ... 6-12
Final gear oil ................................ 6-14
Coolant ........................................ 6-16
Air filter element ........................... 6-17
Checking the engine idling speed ........................................ 6-17
Checking the throttle grip free
play ........................................... 6-18
Valve clearance ........................... 6-18
Tires ............................................. 6-18
Cast wheels ................................. 6-21
YCC-S clutch ............................... 6-21
Checking the brake lever free play ........................................... 6-22
Brake light switches ..................... 6-22
Checking the front and rear brake pads .......................................... 6-23
Checking the brake and YCC-S clutch fluid levels ...................... 6-23
Changing the brake and YCC-S clutch fluids ............................... 6-25
Checking and lubricating the
cables ....................................... 6-25
Checking and lubricating the throttle grip and cable ............... 6-26
Checking and lubricating the brake and shift pedals ........................ 6-26U1MDE0E0.book Page 1 Friday, February 15, 2013 1:26 PM
Page 15 of 122
DESCRIPTION
2-3
2
EAU10430
Controls and instruments
12 34
56 1 78,9
10
9
1. Rear view mirror (page 3-41)
2. Left handlebar switches (page 3-25)
3. Multi-function meter unit (page 3-11)
4. Main switch/steering lock (page 3-2)
5. Front brake fluid reservoir (page 6-23)
6. Right handlebar switches (page 3-25)
7. Brake lever (page 3-29)
8. Throttle grip (page 6-18) 9. Grip warmer (page 3-13)
10.Headlight beam adjusting knob (page 3-39)
U1MDE0E0.book Page 3 Friday, February 15, 2013 1:26 PM
Page 17 of 122
INSTRUMENT AND CONTROL FUNCTIONS
3-2
3
●
Keep other immobilizer system
keys away from the main switch
as they may cause signal inter-
ference.
EAU10472
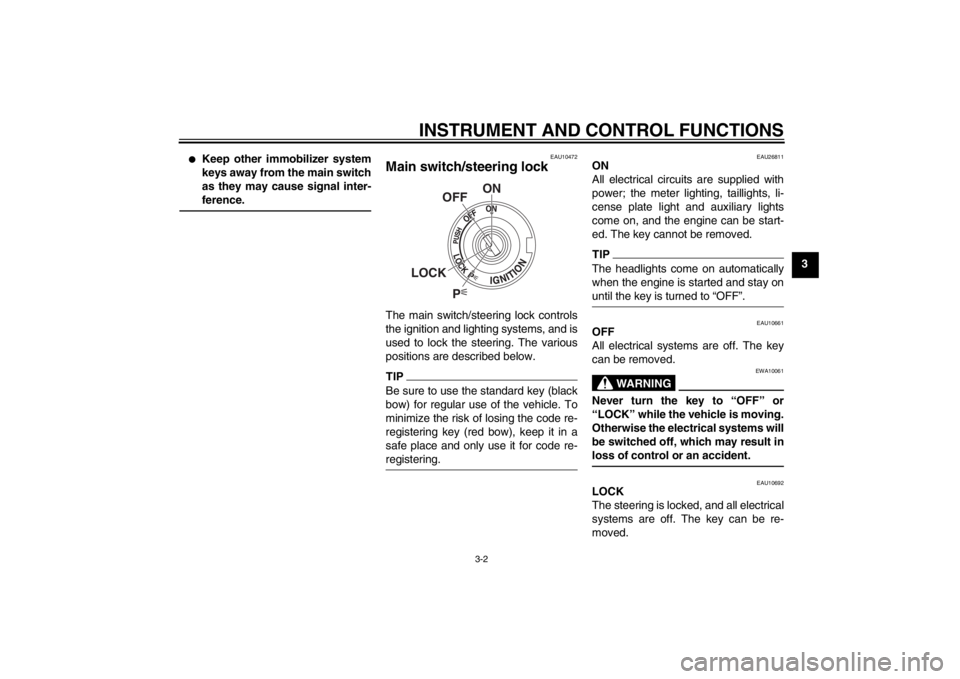
Main switch/steering lock The main switch/steering lock controls
the ignition and lighting systems, and is
used to lock the steering. The various
positions are described below.TIPBe sure to use the standard key (black
bow) for regular use of the vehicle. To
minimize the risk of losing the code re-
registering key (red bow), keep it in a
safe place and only use it for code re-
registering.
EAU26811
ON
All electrical circuits are supplied with
power; the meter lighting, taillights, li-
cense plate light and auxiliary lights
come on, and the engine can be start-
ed. The key cannot be removed.TIPThe headlights come on automatically
when the engine is started and stay on
until the key is turned to “OFF”.
EAU10661
OFF
All electrical systems are off. The key
can be removed.
WARNING
EWA10061
Never turn the key to “OFF” or
“LOCK” while the vehicle is moving.
Otherwise the electrical systems will
be switched off, which may result in
loss of control or an accident.
EAU10692
LOCK
The steering is locked, and all electrical
systems are off. The key can be re-
moved.
P
ON
OFF
LOCK
U1MDE0E0.book Page 2 Friday, February 15, 2013 1:26 PM
Page 18 of 122
INSTRUMENT AND CONTROL FUNCTIONS
3-3
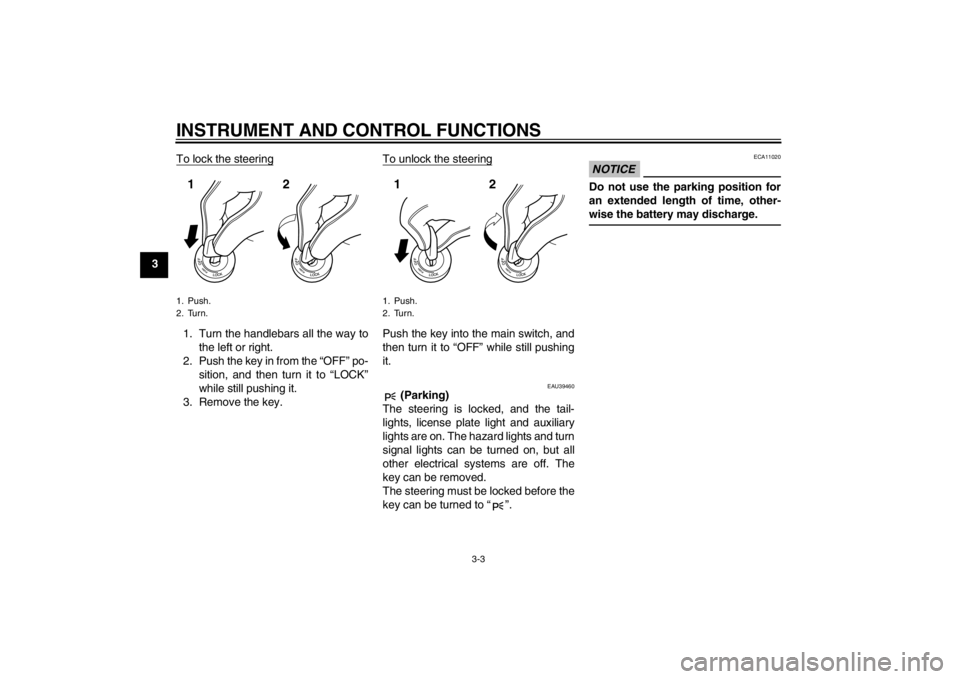
3To lock the steering
1. Turn the handlebars all the way to
the left or right.
2. Push the key in from the “OFF” po- sition, and then turn it to “LOCK”
while still pushing it.
3. Remove the key. To unlock the steering
Push the key into the main switch, and
then turn it to “OFF” while still pushing
it.
EAU39460
(Parking)
The steering is locked, and the tail-
lights, license plate light and auxiliary
lights are on. The hazard lights and turn
signal lights can be turned on, but all
other electrical systems are off. The
key can be removed.
The steering must be locked before the
key can be turned to “ ”.
NOTICE
ECA11020
Do not use the parking position for
an extended length of time, other-
wise the battery may discharge.
1. Push.
2. Turn.12
1. Push.
2. Turn.12
U1MDE0E0.book Page 3 Friday, February 15, 2013 1:26 PM
Page 19 of 122
INSTRUMENT AND CONTROL FUNCTIONS
3-4
3
EAU49393
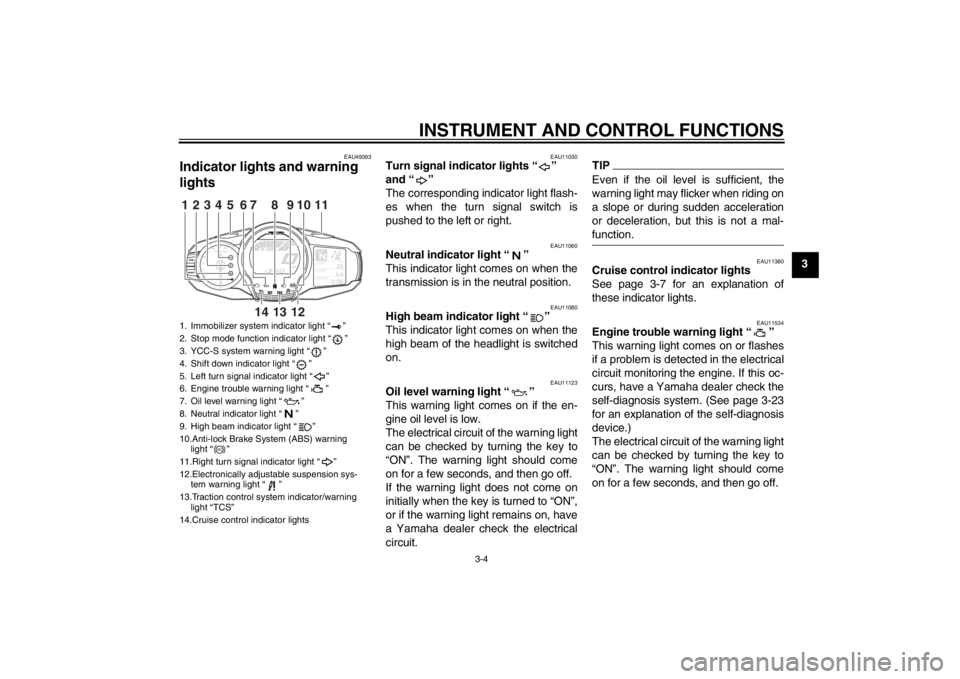
Indicator lights and warning
lights
EAU11030
Turn signal indicator lights “ ”
and “ ”
The corresponding indicator light flash-
es when the turn signal switch is
pushed to the left or right.
EAU11060
Neutral indicator light “ ”
This indicator light comes on when the
transmission is in the neutral position.
EAU11080
High beam indicator light “ ”
This indicator light comes on when the
high beam of the headlight is switched
on.
EAU11123
Oil level warning light “ ”
This warning light comes on if the en-
gine oil level is low.
The electrical circuit of the warning light
can be checked by turning the key to
“ON”. The warning light should come
on for a few seconds, and then go off.
If the warning light does not come on
initially when the key is turned to “ON”,
or if the warning light remains on, have
a Yamaha dealer check the electrical
circuit.
TIPEven if the oil level is sufficient, the
warning light may flicker when riding on
a slope or during sudden acceleration
or deceleration, but this is not a mal-
function.
EAU11380
Cruise control indicator lights
See page 3-7 for an explanation of
these indicator lights.
EAU11534
Engine trouble warning light “ ”
This warning light comes on or flashes
if a problem is detected in the electrical
circuit monitoring the engine. If this oc-
curs, have a Yamaha dealer check the
self-diagnosis system. (See page 3-23
for an explanation of the self-diagnosis
device.)
The electrical circuit of the warning light
can be checked by turning the key to
“ON”. The warning light should come
on for a few seconds, and then go off.
1. Immobilizer system indicator light “ ”
2. Stop mode function indicator light “ ”
3. YCC-S system warning light “ ”
4. Shift down indicator light “ ”
5. Left turn signal indicator light “ ”
6. Engine trouble warning light “ ”
7. Oil level warning light “ ”
8. Neutral indicator light “ ”
9. High beam indicator light “ ”
10.Anti-lock Brake System (ABS) warning light “ ”
11.Right turn signal indicator light “ ”
12.Electronically adjustable suspension sys- tem warning light “ ”
13.Traction control system indicator/warning light “TCS”
14.Cruise control indicator lights
GEARN
25
A.TEMP ˚C
Lo
C.TEMP˚C
0:06
TIME TRIP
1234
5
11
6
10
7
13
12
14
9
8
ABS
U1MDE0E0.book Page 4 Friday, February 15, 2013 1:26 PM
Page 20 of 122
INSTRUMENT AND CONTROL FUNCTIONS
3-5
3If the warning light does not come on
initially when the key is turned to “ON”,
or if the warning light remains on, have
a Yamaha dealer check the electrical
circuit.
EAU51661
ABS warning light “ ”
In normal operation, the ABS warning
light comes on when the key is turned
to “ON”, and goes off after traveling at a
speed of 10 km/h (6 mi/h) or higher.
If the ABS warning light:●
does not come on when the key is
turned to “ON”
●
comes on or flashes while riding
●
does not go off after traveling at a
speed of 10 km/h (6 mi/h) or higher
The ABS may not work correctly. If any
of the above occurs, have a Yamaha
dealer check the system as soon as
possible. (See page 3-29 for an expla-
nation of the ABS.)WARNING
EWA16040
If the ABS warning light does not go
off after traveling at a speed of 10
km/h (6 mi/h) or higher, or if the
warning light comes on or flashes while riding, the brake system re-
verts to conventional braking. If ei-
ther of the above occurs, or if the
warning light does not come on at
all, use extra caution to avoid possi-
ble wheel lock during emergency
braking. Have a Yamaha dealer
check the brake system and electri-
cal circuits as soon as possible.
TIPIf the start switch is pushed while the
engine is running, the ABS warning
light will come on, but this is not a mal-
function.
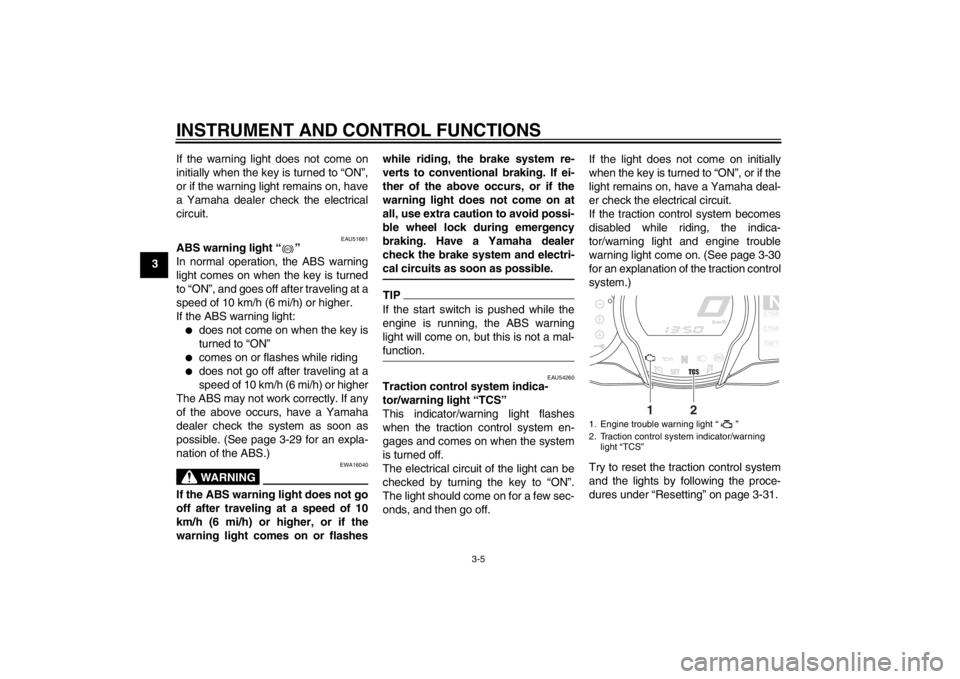
EAU54260
Traction control system indica-
tor/warning light “TCS”
This indicator/warning light flashes
when the traction control system en-
gages and comes on when the system
is turned off.
The electrical circuit of the light can be
checked by turning the key to “ON”.
The light should come on for a few sec-
onds, and then go off.
If the light does not come on initially
when the key is turned to “ON”, or if the
light remains on, have a Yamaha deal-
er check the electrical circuit.
If the traction control system becomes
disabled while riding, the indica-
tor/warning light and engine trouble
warning light come on. (See page 3-30
for an explanation of the traction control
system.)
Try to reset the traction control system
and the lights by following the proce-
dures under “Resetting” on page 3-31.
ABS
1. Engine trouble warning light “ ”
2. Traction control system indicator/warning
light “TCS”
NA.TEM
P
C.TEM
P
TIME T
R
2
1
U1MDE0E0.book Page 5 Friday, February 15, 2013 1:26 PM
Page 26 of 122
INSTRUMENT AND CONTROL FUNCTIONS
3-11
3
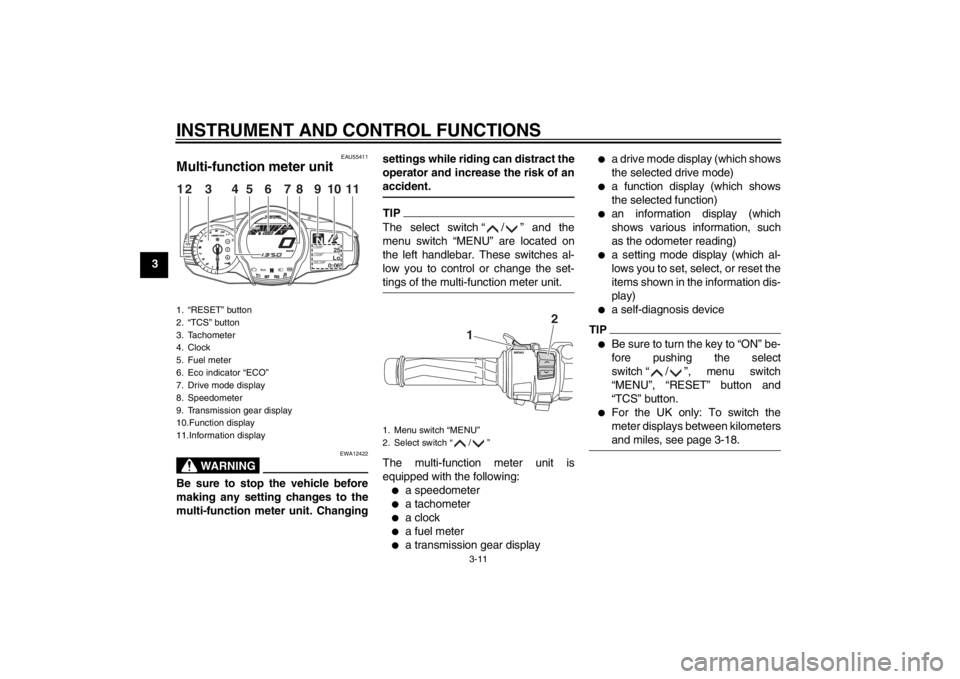
EAU55411
Multi-function meter unit
WARNING
EWA12422
Be sure to stop the vehicle before
making any setting changes to the
multi-function meter unit. Changingsettings while riding can distract the
operator and increase the risk of an
accident.
TIPThe select switch “ / ” and the
menu switch “MENU” are located on
the left handlebar. These switches al-
low you to control or change the set-
tings of the multi-function meter unit.The multi-function meter unit is
equipped with the following:●
a speedometer
●
a tachometer
●
a clock
●
a fuel meter
●
a transmission gear display
●
a drive mode display (which shows
the selected drive mode)
●
a function display (which shows
the selected function)
●
an information display (which
shows various information, such
as the odometer reading)
●
a setting mode display (which al-
lows you to set, select, or reset the
items shown in the information dis-
play)
●
a self-diagnosis device
TIP●
Be sure to turn the key to “ON” be-
fore pushing the select
switch “ / ”, menu switch
“MENU”, “RESET” button and
“TCS” button.
●
For the UK only: To switch the
meter displays between kilometers
and miles, see page 3-18.
1. “RESET” button
2. “TCS” button
3. Tachometer
4. Clock
5. Fuel meter
6. Eco indicator “ECO”
7. Drive mode display
8. Speedometer
9. Transmission gear display
10.Function display
11.Information display
GEARN
25
A.TEMP
˚C
Lo
C.TEMP˚C
0:06
TIME TRIP
12
3
11
4
5
8
7
6
9
10
1. Menu switch “MENU”
2. Select switch “ / ”
1
2
U1MDE0E0.book Page 11 Friday, February 15, 2013 1:26 PM
Page 33 of 122
INSTRUMENT AND CONTROL FUNCTIONS
3-18
3
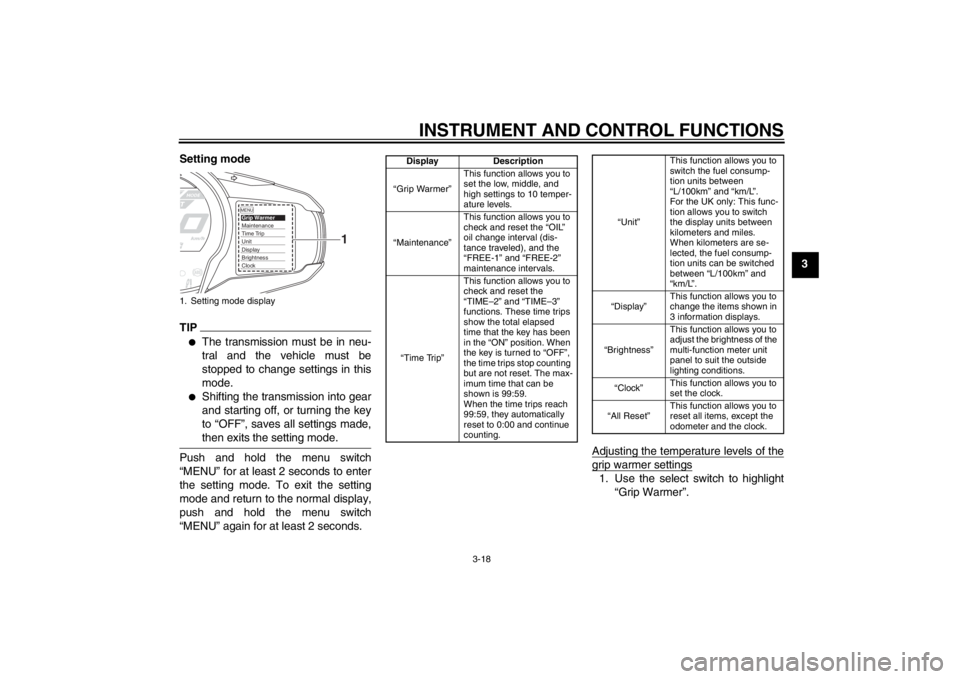
Setting mode
TIP●
The transmission must be in neu-
tral and the vehicle must be
stopped to change settings in this
mode.
●
Shifting the transmission into gear
and starting off, or turning the key
to “OFF”, saves all settings made,
then exits the setting mode.
Push and hold the menu switch
“MENU” for at least 2 seconds to enter
the setting mode. To exit the setting
mode and return to the normal display,
push and hold the menu switch
“MENU” again for at least 2 seconds.
Adjusting the temperature levels of the
grip warmer settings1. Use the select switch to highlight
“Grip Warmer”.
1. Setting mode display
MENUGrip WarmerMaintenanceTime TripUnitDisplayBrightnessClock
1
Display Description
“Grip Warmer” This function allows you to
set the low, middle, and
high settings to 10 temper-
ature levels.
“Maintenance” This function allows you to
check and reset the “OIL”
oil change interval (dis-
tance traveled), and the
“FREE-1” and “FREE-2”
maintenance intervals.
“Time Trip” This function allows you to
check and reset the
“TIME–2” and “TIME–3”
functions. These time trips
show the total elapsed
time that the key has been
in the “ON” position. When
the key is turned to “OFF”,
the time trips stop counting
but are not reset. The max-
imum time that can be
shown is 99:59.
When the time trips reach
99:59, they automatically
reset to 0:00 and continue
counting.
“Unit”
This function allows you to
switch the fuel consump-
tion units between
“L/100km” and “km/L”.
For the UK only: This func-
tion allows you to switch
the display units between
kilometers and miles.
When kilometers are se-
lected, the fuel consump-
tion units can be switched
between “L/100km” and
“km/L”.
“Display” This function allows you to
change the items shown in
3 information displays.
“Brightness” This function allows you to
adjust the brightness of the
multi-function meter unit
panel to suit the outside
lighting conditions.
“Clock” This function allows you to
set the clock.
“All Reset” This function allows you to
reset all items, except the
odometer and the clock.
U1MDE0E0.book Page 18 Friday, February 15, 2013 1:26 PM
Page 34 of 122
INSTRUMENT AND CONTROL FUNCTIONS
3-19
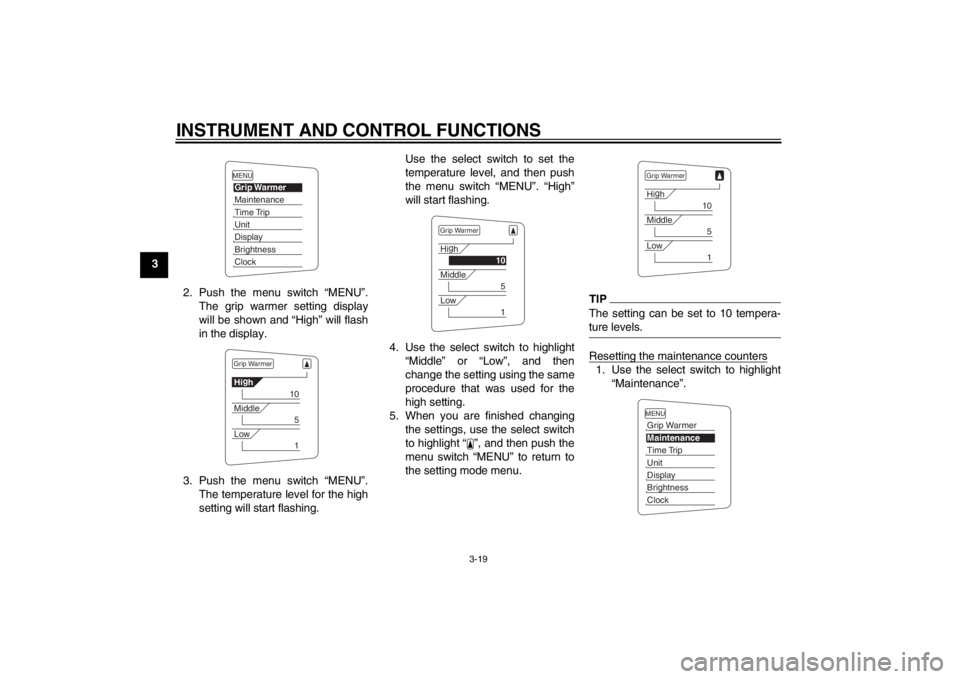
32. Push the menu switch “MENU”.The grip warmer setting display
will be shown and “High” will flash
in the display.
3. Push the menu switch “MENU”. The temperature level for the high
setting will start flashing. Use the select switch to set the
temperature level, and then push
the menu switch “MENU”. “High”
will start flashing.
4. Use the select switch to highlight “Middle” or “Low”, and then
change the setting using the same
procedure that was used for the
high setting.
5. When you are finished changing the settings, use the select switch
to highlight “ ”, and then push the
menu switch “MENU” to return to
the setting mode menu.
TIPThe setting can be set to 10 tempera-
ture levels.Resetting the maintenance counters1. Use the select switch to highlight“Maintenance”.
MENUGrip WarmerMaintenanceTime TripUnitDisplayBrightnessClockGrip WarmerHig
h
10
Middle
5
Low
1
Grip WarmerHi g
h
10
Middle
5
Low
1
Grip WarmerHi g
h
10
Middle
5
Low
1
MENUGrip WarmerMaintenanceTime TripUnitDisplayBrightnessClock
U1MDE0E0.book Page 19 Friday, February 15, 2013 1:26 PM
Page 35 of 122
INSTRUMENT AND CONTROL FUNCTIONS
3-20
3
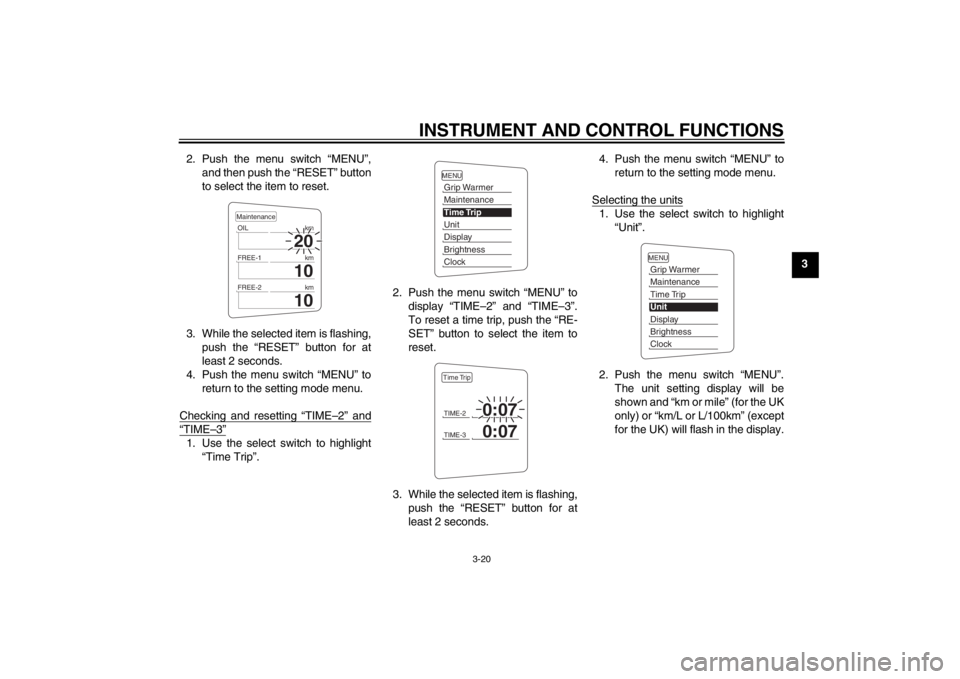
2. Push the menu switch “MENU”,
and then push the “RESET” button
to select the item to reset.
3. While the selected item is flashing, push the “RESET” button for at
least 2 seconds.
4. Push the menu switch “MENU” to return to the setting mode menu.
Checking and resetting “TIME–2” and
“TIME–3”1. Use the select switch to highlight “Time Trip”. 2. Push the menu switch “MENU” to
display “TIME–2” and “TIME–3”.
To reset a time trip, push the “RE-
SET” button to select the item to
reset.
3. While the selected item is flashing, push the “RESET” button for at
least 2 seconds. 4. Push the menu switch “MENU” to
return to the setting mode menu.
Selecting the units
1. Use the select switch to highlight “Unit”.
2. Push the menu switch “MENU”. The unit setting display will be
shown and “km or mile” (for the UK
only) or “km/L or L/100km” (except
for the UK) will flash in the display.
20
OIL km
10
FREE-1km
10
FREE-2kmMaintenance
MENUGrip WarmerMaintenanceTime TripUnitDisplayBrightnessClockTIME-2
0:07
TIME-3
0:07
Time Trip
MENUGrip WarmerMaintenanceTime TripUnitDisplayBrightnessClock
U1MDE0E0.book Page 20 Friday, February 15, 2013 1:26 PM