fuel YAMAHA FJR1300AS 2015 User Guide
[x] Cancel search | Manufacturer: YAMAHA, Model Year: 2015, Model line: FJR1300AS, Model: YAMAHA FJR1300AS 2015Pages: 124, PDF Size: 3.39 MB
Page 34 of 124

INSTRUMENT AND CONTROL FUNCTIONS
3-19
3
Adjusting the temperature levels of the
grip warmer settings1. Use the select switch to highlight
“Grip Warmer”.2. Push the menu switch “MENU”.
The grip warmer setting display
will be shown and “High” will flash
in the display.
3. Push the menu switch “MENU”.
The temperature level for the high
setting will start flashing.Use the select switch to set the
temperature level, and then push
the menu switch “MENU”. “High”
will start flashing.
4. Use the select switch to highlight
“Middle” or “Low”, and then
change the setting using the same
procedure that was used for the
high setting.
5. When you are finished changing
the settings, use the select switch
to highlight “ ”, and then push the
menu switch “MENU” to return to
the setting mode menu.
“Unit”This function allows you to
switch the fuel consump-
tion units between
“L/100km” and “km/L”.
For the UK only: This func-
tion allows you to switch
the display units between
kilometers and miles.
When kilometers are se-
lected, the fuel consump-
tion units can be switched
between “L/100km” and
“km/L”.
“Display”This function allows you to
change the items shown in
3 information displays.
“Brightness”This function allows you to
adjust the brightness of
the multi-function meter
unit panel to suit the out-
side lighting conditions.
“Clock”This function allows you to
set the clock.
“All Reset”This function allows you to
reset all items, except the
odometer and the clock.
MENUGrip WarmerMaintenanceTime TripUnitDisplayBrightnessClockGrip WarmerHig
h
10
Middle
5
Low
1
Grip WarmerHig
h
10
Middle
5
Low
1
U1MDE1E0.book Page 19 Monday, July 28, 2014 10:48 AM
Page 36 of 124

INSTRUMENT AND CONTROL FUNCTIONS
3-21
34. Push the menu switch “MENU” to
return to the setting mode menu.
Selecting the units
1. Use the select switch to highlight
“Unit”.
2. Push the menu switch “MENU”.
The unit setting display will be
shown and “km or mile” (for the
UK only) or “km/L or L/100km”
(except for the UK) will flash in the
display.
TIPFor the UK: Continue with the fol-
lowing steps.
Except for the UK: Skip steps 3–5.3. Push the menu switch “MENU”.
“km” or “mile” will flash in the dis-
play.4. Use the select switch to select
“km” or “mile”, and then push the
menu switch “MENU”.
TIP
sumption units. To set the fuel con-
sumption units, proceed as follows. If
6.5. Use the select switch to select
6.
use the select switch to select
again.
7. Use the select switch to
highlight Ž, and then push the
the setting mode menu.
MENUGrip WarmerMaintenanceTime TripUnitDisplayBrightnessClock
Unitkm or mile
km
km/L or L/100km
km/L
Unitkm or mile
km
km/L or L/100km
km/L
U1MDE1E0.book Page 21 Monday, July 28, 2014 10:48 AM
Page 47 of 124
INSTRUMENT AND CONTROL FUNCTIONS
3-32
3
Resetting
The traction control system will be dis-
abled in the following conditions:
The rear wheel is rotated with the
centerstand down and the key in
the “ON” position.
Either the front wheel or rear wheel
comes off the ground while riding.
Excessive rear wheel spinning.
If the traction control system has been
disabled, both the “TCS” indica-
tor/warning light and the engine trou-
ble warning light come on.To reset the traction control system
Turn the key to “OFF”. Wait at least 1
second, then turn the key back to
“ON”. The “TCS” indicator/warning
light should go off and the system will
be enabled. The engine trouble warn-
ing light should go off after the motor-
cycle reaches at least 20 km/h (12
mi/h). If the “TCS” indicator/warning
light and/or engine trouble warning
light still remain on after resetting, the
motorcycle may still be ridden; howev-
er, have a Yamaha dealer check the
motorcycle as soon as possible.
EAU13075
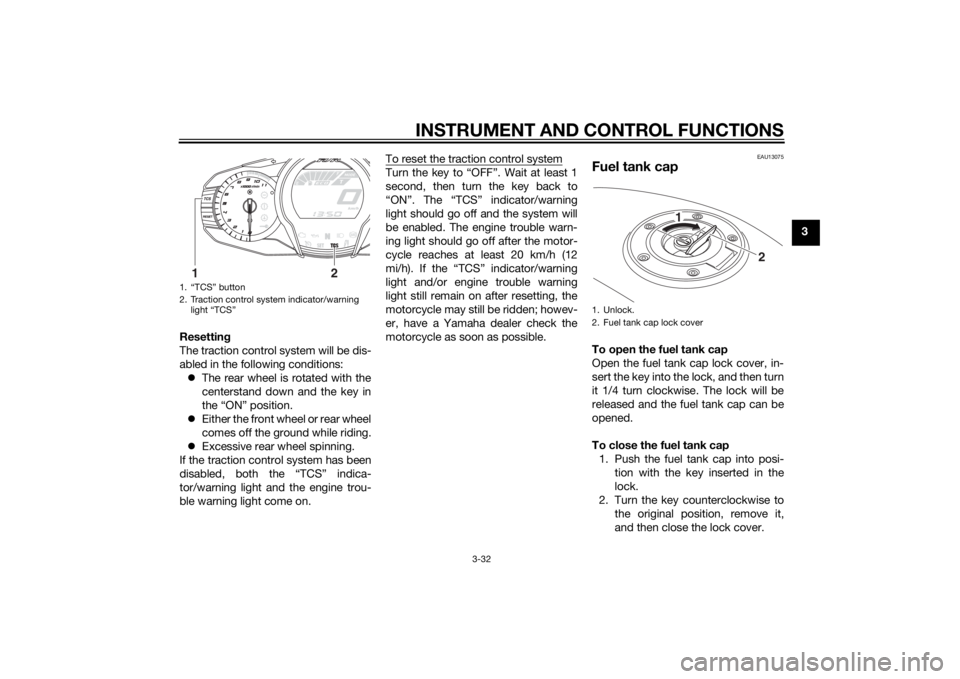
Fuel tank capTo open the fuel tank cap
Open the fuel tank cap lock cover, in-
sert the key into the lock, and then turn
it 1/4 turn clockwise. The lock will be
released and the fuel tank cap can be
opened.
To close the fuel tank cap
1. Push the fuel tank cap into posi-
tion with the key inserted in the
lock.
2. Turn the key counterclockwise to
the original position, remove it,
and then close the lock cover.
1. “TCS” button
2. Traction control system indicator/warning
light “TCS”
1
2
1. Unlock.
2. Fuel tank cap lock cover
2 1
U1MDE1E0.book Page 32 Monday, July 28, 2014 10:48 AM
Page 48 of 124
INSTRUMENT AND CONTROL FUNCTIONS
3-33
3
TIPThe fuel tank cap cannot be closed un-
less the key is in the lock. In addition,
the key cannot be removed if the cap is
not properly closed and locked.
WARNING
EWA11092
Make sure that the fuel tank cap is
properly closed after filling fuel.
Leaking fuel is a fire hazard.
EAU13222
FuelMake sure there is sufficient gasoline in
the tank.
WARNING
EWA10882
Gasoline and gasoline vapors are
extremely flammable. To avoid fires
and explosions and to reduce the
risk of injury when refueling, follow
these instructions.1. Before refueling, turn off the en-
gine and be sure that no one is sit-
ting on the vehicle. Never refuel
while smoking, or while in the vi-
cinity of sparks, open flames, or
other sources of ignition such as
the pilot lights of water heaters
and clothes dryers.
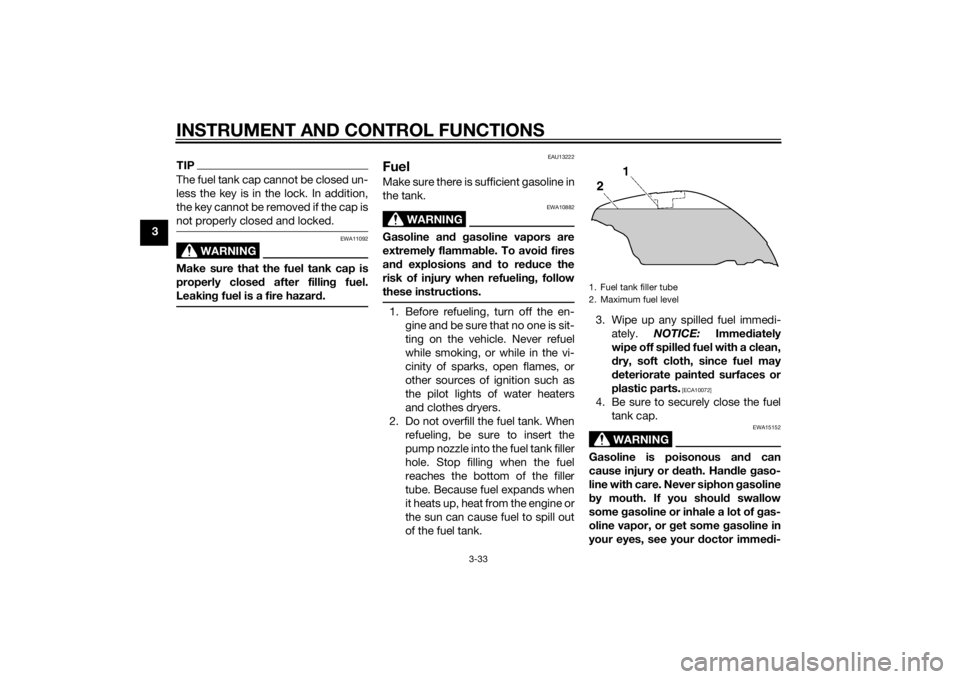
2. Do not overfill the fuel tank. When
refueling, be sure to insert the
pump nozzle into the fuel tank filler
hole. Stop filling when the fuel
reaches the bottom of the filler
tube. Because fuel expands when
it heats up, heat from the engine or
the sun can cause fuel to spill out
of the fuel tank.3. Wipe up any spilled fuel immedi-
ately. NOTICE: Immediately
wipe off spilled fuel with a clean,
dry, soft cloth, since fuel may
deteriorate painted surfaces or
plastic parts.
[ECA10072]
4. Be sure to securely close the fuel
tank cap.
WARNING
EWA15152
Gasoline is poisonous and can
cause injury or death. Handle gaso-
line with care. Never siphon gasoline
by mouth. If you should swallow
some gasoline or inhale a lot of gas-
oline vapor, or get some gasoline in
your eyes, see your doctor immedi-1. Fuel tank filler tube
2. Maximum fuel level
U1MDE1E0.book Page 33 Monday, July 28, 2014 10:48 AM
Page 49 of 124

INSTRUMENT AND CONTROL FUNCTIONS
3-34
3 ately. If gasoline spills on your skin,
wash with soap and water. If gaso-
line spills on your clothing, change
your clothes.
EAU13323
NOTICE
ECA11401
Use only unleaded gasoline. The use
of leaded gasoline will cause severe
damage to internal engine parts,
such as the valves and piston rings,
as well as to the exhaust system.Your Yamaha engine has been de-
signed to use regular unleaded gaso-
line with a research octane number of
95 or higher. If knocking (or pinging)
occurs, use a gasoline of a different
brand or premium unleaded fuel. Use
of unleaded fuel will extend spark plug
life and reduce maintenance costs.
EAUB1302
Fuel tank breather/overflow
hoseBefore operating the motorcycle:
Check the fuel tank breather/over-
flow hose connection.
Check the fuel tank breather/over-
flow hose for cracks or damage,
and replace it if necessary.
Make sure that the end of the fuel
tank breather/overflow hose is not
blocked, and clean it if necessary.
Make sure that the fuel tank
breather/overflow hose is routed
through the clamp.
EAU13446
Catalytic convertersThis vehicle is equipped with catalytic
converters in the exhaust system.
WARNING
EWA10863
The exhaust system is hot after op-
eration. To prevent a fire hazard or
burns:
Do not park the vehicle near
possible fire hazards such as
grass or other materials that
easily burn.
Park the vehicle in a place
where pedestrians or children
are not likely to touch the hot
exhaust system.
Make sure that the exhaust sys-
tem has cooled down before
doing any maintenance work.
Do not allow the engine to idle
more than a few minutes. Long
idling can cause a build-up of
heat.
Recommended fuel:
Regular unleaded gasoline only
Fuel tank capacity:
25.0 L (6.61 US gal, 5.50 Imp.gal)
Fuel reserve amount:
5.5 L (1.45 US gal, 1.21 Imp.gal)
1. Fuel tank breather/overflow hose
2. Clamp
2
1
U1MDE1E0.book Page 34 Monday, July 28, 2014 10:48 AM
Page 65 of 124

FOR YOUR SAFETY – PRE-OPERATION CHECKS
4-1
4
EAU15598
Inspect your vehicle each time you use it to make sure the vehicle is in safe operating condition. Always follow the inspection
and maintenance procedures and schedules described in the Owner’s Manual.
WARNING
EWA11152
Failure to inspect or maintain the vehicle properly increases the possibility of an accident or equipment damage.
Do not operate the vehicle if you find any problem. If a problem cannot be corrected by the procedures provided in
this manual, have the vehicle inspected by a Yamaha dealer.Before using this vehicle, check the following points:
ITEM CHECKS PAGE
Fuel• Check fuel level in fuel tank.
• Refuel if necessary.
• Check fuel line for leakage.
• Check fuel tank breather/overflow hose for obstructions, cracks or damage, and
check hose connection.3-33, 3-34
Engine oil• Check oil level in engine.
• If necessary, add recommended oil to specified level.
• Check vehicle for oil leakage.6-12
Final gear oil• Check vehicle for oil leakage. 6-14
Coolant• Check coolant level in reservoir.
• If necessary, add recommended coolant to specified level.
• Check cooling system for leakage.6-16
Front brake• Check operation.
• If soft or spongy, have Yamaha dealer bleed hydraulic system.
• Check brake pads for wear.
• Replace if necessary.
• Check fluid level in reservoir.
• If necessary, add specified brake fluid to specified level.
• Check hydraulic system for leakage.6-22, 6-23
U1MDE1E0.book Page 1 Monday, July 28, 2014 10:48 AM
Page 71 of 124

OPERATION AND IMPORTANT RIDING POINTS
5-4
5
EAU16811
Tips for reducing fuel con-
sumptionFuel consumption depends largely on
your riding style. Consider the follow-
ing tips to reduce fuel consumption:
Shift up swiftly, and avoid high en-
gine speeds during acceleration.
Do not rev the engine while shift-
ing down, and avoid high engine
speeds with no load on the en-
gine.
Turn the engine off instead of let-
ting it idle for an extended length
of time (e.g., in traffic jams, at traf-
fic lights or at railroad crossings).
EAU16842
Engine break-inThere is never a more important period
in the life of your engine than the period
between 0 and 1600 km (1000 mi). For
this reason, you should read the fol-
lowing material carefully.
Since the engine is brand new, do not
put an excessive load on it for the first
1600 km (1000 mi). The various parts in
the engine wear and polish themselves
to the correct operating clearances.
During this period, prolonged full-throt-
tle operation or any condition that
might result in engine overheating
must be avoided.
EAU17124
0–1000 km (0–600 mi)
Avoid prolonged operation above 4500
r/min. NOTICE: After 1000 km (600
mi) of operation, the engine oil and
final gear oil must be changed, and
the oil filter cartridge or element re-
placed.
[ECA10333]
1000–1600 km (600–1000 mi)
Avoid prolonged operation above 5400
r/min.
1600 km (1000 mi) and beyond
The vehicle can now be operated nor-
mally.NOTICE
ECA10311
Keep the engine speed out of
the tachometer red zone.
If any engine trouble should oc-
cur during the engine break-in
period, immediately have a
Yamaha dealer check the vehi-
cle.
U1MDE1E0.book Page 4 Monday, July 28, 2014 10:48 AM
Page 72 of 124

OPERATION AND IMPORTANT RIDING POINTS
5-5
5
EAU40583
ParkingWhen parking, stop the engine by turn-
ing the main switch to “OFF”, and then
remove the key.TIPWhen the main switch is turned to
the rear wheel cannot be moved.
WARNING
EWA14522
Always stop the engine using
the main switch. When the en-
gine stop switch has been used
in an emergency, be sure to ap-
ply the front or rear brake while
the main switch is still on, as the
clutch automatically disengag-
es a few seconds after the en-
gine is turned off, and the rear
wheel will move freely.
Since the engine and exhaust
system can become very hot,
park in a place where pedestri-
ans or children are not likely to
touch them and be burned.Do not park on a slope or on soft
ground, otherwise the vehicle
may overturn, increasing the
risk of a fuel leak and fire.
Do not park near grass or other
flammable materials which
might catch fire.
U1MDE1E0.book Page 5 Monday, July 28, 2014 10:48 AM
Page 75 of 124

PERIODIC MAINTENANCE AND ADJUSTMENT
6-3
6
EAU46862
TIPThe annual checks must be performed every year, except if a kilometer-based maintenance, or for the UK, a
mileage-based maintenance, is performed instead.
From 50000 km (30000 mi), repeat the maintenance intervals starting from 10000 km (6000 mi).
Items marked with an asterisk should be performed by a Yamaha dealer as they require special tools, data and tech-
nical skills.
EAU46911
Periodic maintenance chart for the emission control systemNO. ITEM CHECK OR MAINTENANCE JOBODOMETER READING
ANNUAL
CHECK 1000 km
(600 mi)10000 km
(6000 mi)20000 km
(12000 mi)30000 km
(18000 mi)40000 km
(24000 mi)
1*Fuel line• Check fuel hoses for cracks or
damage.√√√√√
2*Spark plugs• Check condition.
• Clean and regap.√√
•Replace.√√
3*Valves• Check valve clearance.
•Adjust.Every 40000 km (24000 mi)
4*Fuel injection sys-
tem• Adjust synchronization.√√√√√√
5*Mufflers and ex-
haust pipes• Check the screw clamps for
looseness.√√√√√
6*Air induction sys-
tem• Check the air cut-off valve, reed
valve, and hose for damage.
• Replace any damaged parts if
necessary.√√√√√
U1MDE1E0.book Page 3 Monday, July 28, 2014 10:48 AM
Page 90 of 124

PERIODIC MAINTENANCE AND ADJUSTMENT
6-18
6
EAU21385
Checking the throttle grip free
playThe throttle grip free play should mea-
sure 1.0–3.0 mm (0.04–0.12 in) at the
inner edge of the throttle grip. Periodi-
cally check the throttle grip free play
and, if necessary, have a Yamaha deal-
er adjust it.
EAU21402
Valve clearanceThe valve clearance changes with use,
resulting in improper air-fuel mixture
and/or engine noise. To prevent this
from occurring, the valve clearance
must be adjusted by a Yamaha dealer
at the intervals specified in the periodic
maintenance and lubrication chart.
EAU2177A
TiresTires are the only contact between the
vehicle and the road. Safety in all con-
ditions of riding depends on a relatively
small area of road contact. Therefore, it
is essential to maintain the tires in good
condition at all times and replace them
at the appropriate time with the speci-
fied tires.
Tire air pressure
The tire air pressure should be
checked and, if necessary, adjusted
before each ride.
WARNING
EWA10504
Operation of this vehicle with im-
proper tire pressure may cause se-
vere injury or death from loss of
control.
The tire air pressure must be
checked and adjusted on cold
tires (i.e., when the temperature
of the tires equals the ambient
temperature).
The tire air pressure must be
adjusted in accordance with the
riding speed and with the total
1. Throttle grip free play
1
U1MDE1E0.book Page 18 Monday, July 28, 2014 10:48 AM